


The capacity to transform rough lumber into thin, perfectly matched boards, to sculpt intricate curves with fluid grace, or to prepare precise stock for robust joinery often feels like the exclusive domain of master woodworkers. Yet, with a deep understanding of its capabilities and the right techniques, the band saw can unlock these advanced woodworking applications for any craftsman. This article, “Mastering the Band Saw: Essential Techniques for Resawing, Curve Cutting, and Joinery Preparation,” aims to demystify these powerful processes, elevating your woodworking projects in 2026.
Key Takeaways

- Blade Selection is Paramount: Choosing the correct blade for resawing, curve cutting, or joinery preparation dramatically impacts cut quality and efficiency.
- Precision Resawing: Proper fence setup, feed rate, and technique are crucial for achieving thin, consistent boards with minimal waste.
- Fluid Curve Cutting: Understanding blade width limitations and employing relief cuts allows for smooth, complex curves.
- Joinery Prep Accuracy: The band saw excels at roughing out joinery components, saving time and extending the life of hand tools.
- Safety First: Always prioritize personal protective equipment and maintain a clear, focused workspace.
Mastering the Band Saw: Essential Techniques for Resawing
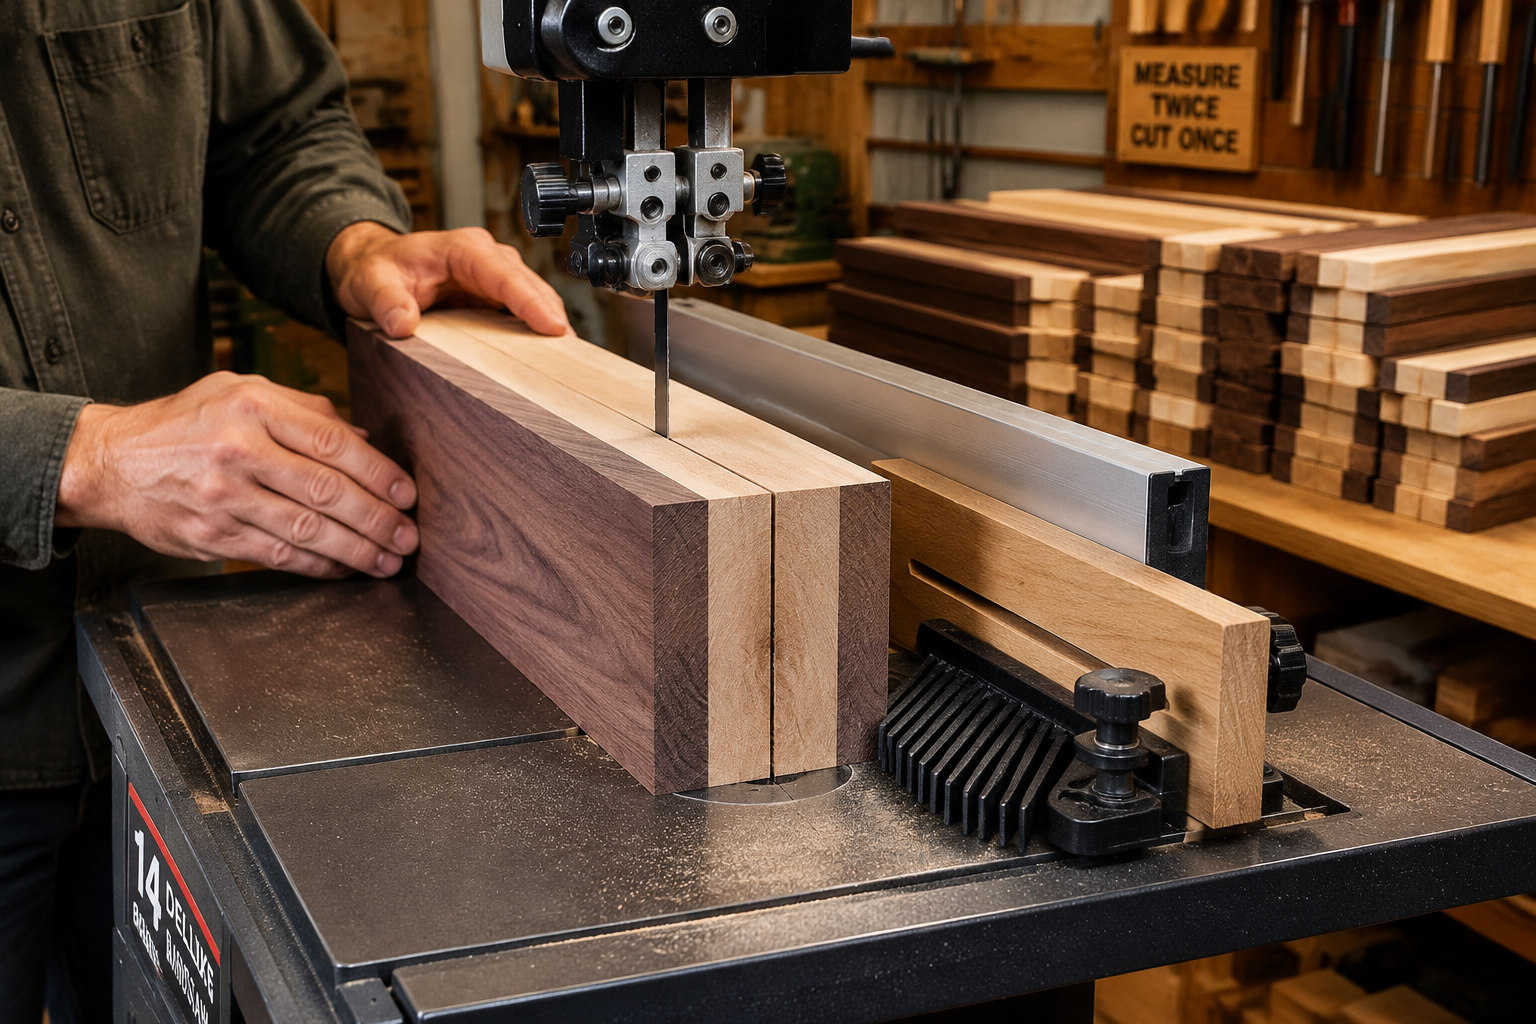
Resawing is arguably one of the band saw’s most impressive capabilities, allowing woodworkers to take thick lumber and slice it into thinner boards. This technique is invaluable for creating book-matched panels, veneer, or simply maximizing lumber yield. Achieving thin, consistent cuts requires a combination of the right setup, blade, and feeding technique.
Blade Selection for Resawing
The blade is the heart of effective resawing. For general resawing, a wide blade (3/4 inch to 1 inch, or even wider for larger machines) with a low tooth count (2-3 TPI, or Teeth Per Inch) is ideal. A skip-tooth or hook-tooth blade design helps clear sawdust efficiently, preventing blade wander and burning. A carbon steel blade is common, but bi-metal or carbide-tipped blades offer extended life and superior performance, especially in hardwoods.
| Blade Width (inches) | TPI (Teeth Per Inch) | Application | Benefits |
|---|---|---|---|
| 1/4 – 3/8 | 4-6 | Small stock, gentle curves | Good for tighter radii, less aggressive cut |
| 1/2 | 3-4 | General purpose, medium | Versatile for straighter cuts and wider curves |
| 3/4 – 1 | 2-3 | Resawing, straight cuts | Maximum stability, efficient stock removal |
Setting Up for Resawing Accuracy
- Blade Tension: Correct blade tension is critical. Too loose, and the blade will wander; too tight, and you risk blade breakage or premature wear on the saw’s components. Follow your band saw manufacturer’s recommendations. Many modern band saws feature tensioning gauges.
- Blade Guides: Position the upper blade guide assembly so it is just above the workpiece. The guides (bearings or blocks) should be set close to the blade, but not binding, providing maximum support.
- Resaw Fence: A tall, straight resaw fence is non-negotiable. Unlike a table saw fence, a resaw fence provides support across the entire height of the board, preventing twisting. Commercial resaw fences are available, or you can build one from a piece of plywood or MDF clamped to your existing fence. For optimal results, ensure the fence is perfectly parallel to the blade.
- Featherboards: Using a featherboard or two, positioned on the fence and/or the table, can help keep the workpiece pressed firmly against the fence and table throughout the cut, enhancing consistency.
“The secret to successful resawing lies not just in a powerful machine, but in the meticulous attention to blade selection, proper tension, and a truly effective resaw fence that guides your material with unwavering stability.”
The Resawing Technique
- Flatten One Face: Before resawing, ensure at least one face of your board is perfectly flat and one edge is straight and square to that face. This face will ride against the table, and the edge against the fence.
- Mark Your Cut: Mark the desired thickness on both ends of your workpiece. This provides a visual reference to monitor blade drift and cut consistency.
- Consistent Feed Rate: Feed the material into the blade at a steady, consistent pace. Let the blade do the work. Forcing the wood can cause the blade to wander, leading to uneven thickness and potential burning. A slower feed rate is generally better for hardwoods.
- Listen to Your Saw: The sound of the band saw can tell you a lot. A consistent hum indicates smooth cutting. A struggling or burning sound means you’re either feeding too fast or your blade is dull.
- Relieving Stress: As you resaw, the internal stresses in the wood can be released, sometimes causing the board to cup or bow slightly after the cut. Account for this by resawing slightly thicker than your final dimension, allowing for subsequent milling.
For projects requiring precise lumber dimensions, consider exploring techniques for building a custom wood workbench which can provide the stable foundation needed for accurate band saw operations.
Precision Curve Cutting and Intricate Shapes
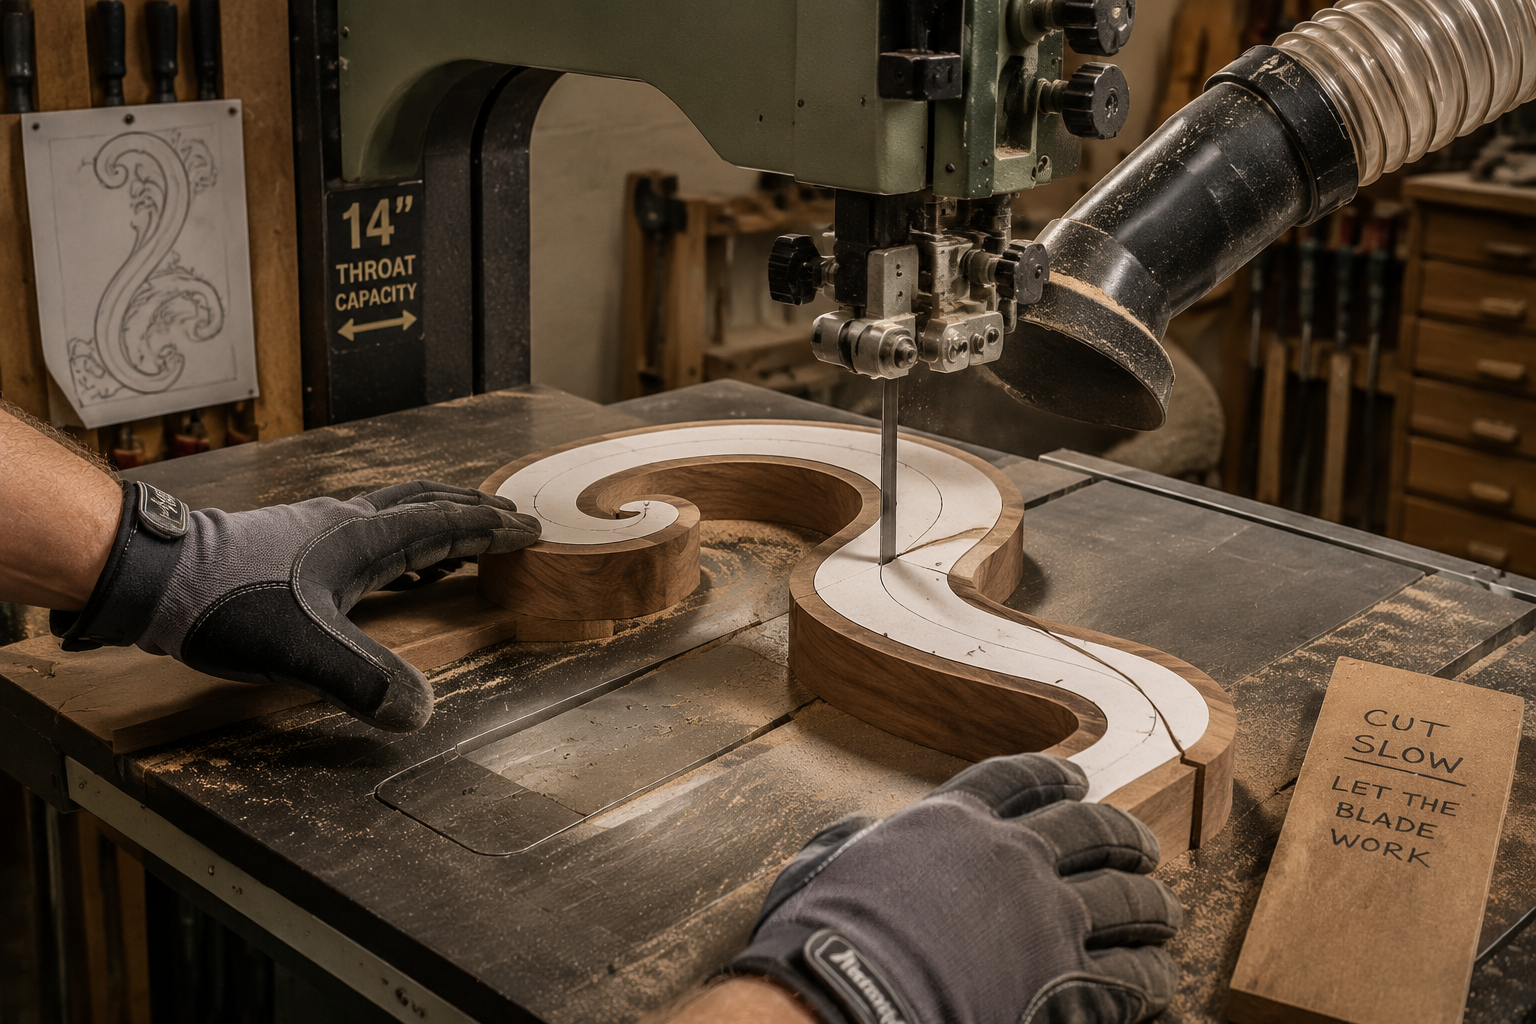
Beyond straight cuts, the band saw excels at creating curves, from gentle arcs to complex, flowing shapes. This versatility makes it indispensable for crafting furniture parts, decorative elements, and even DIY wooden toys and games.
Blade Selection for Curve Cutting
Curve cutting demands a different blade strategy than resawing. A narrower blade allows for tighter radii. The general rule of thumb is: the narrower the blade, the tighter the curve it can cut.
- 1/8-inch blade: For extremely tight curves (e.g., 1/2-inch radius).
- 1/4-inch blade: Good for moderate curves (e.g., 1-inch radius).
- 3/8-inch blade: Suitable for gentle curves (e.g., 2-inch radius and up).
A higher TPI (6-14 TPI) is often preferred for curve cutting as it reduces tear-out and leaves a smoother finish, especially in delicate work.
Techniques for Smooth Curves
- Layout is Key: Clearly mark your desired curve on the workpiece. Use templates if repeating the cut or if extreme accuracy is needed.
- Relief Cuts (Kerf Cuts): For tight inside curves, make a series of perpendicular relief cuts from the edge of the board up to the layout line. These cuts allow waste material to fall away, preventing the blade from binding and making it easier to maneuver the workpiece.
- Constant Contact: Keep the workpiece in constant contact with the table and feed it steadily into the blade. Avoid twisting the blade, as this can dull or break it.
- Turning the Workpiece: As you cut, gently rotate the workpiece, allowing the blade to follow the curve. Use both hands to control the material, keeping your fingers a safe distance from the blade.
- Backing Out: If you need to back out of a cut, turn off the saw first, then gently pull the workpiece back. Never back out with the blade running as it can pull the blade off the wheels or damage the teeth.
“The fluidity of a band saw’s curve cut is unmatched, but it’s the strategic use of blade width and relief cuts that truly unlocks complex shapes, transforming rigid lumber into artful forms.”
Using Jigs and Templates
For repeatable or highly precise curves, jigs and templates are invaluable.
- Circle Cutting Jigs: A simple pivot jig can be made to cut perfect circles.
- Pattern Following: Attach a template to your workpiece and guide it through the blade, or use a sanding jig to refine the band saw cut to the exact template shape.
- Push Sticks and Featherboards: Always use push sticks and featherboards to maintain control and safety, especially when cutting smaller pieces or near the end of a cut.
For further exploration of precision tools and techniques, including jigs, refer to our article on beginner’s guide to essential woodworking jigs.
Joinery Preparation and Stock Breakdown
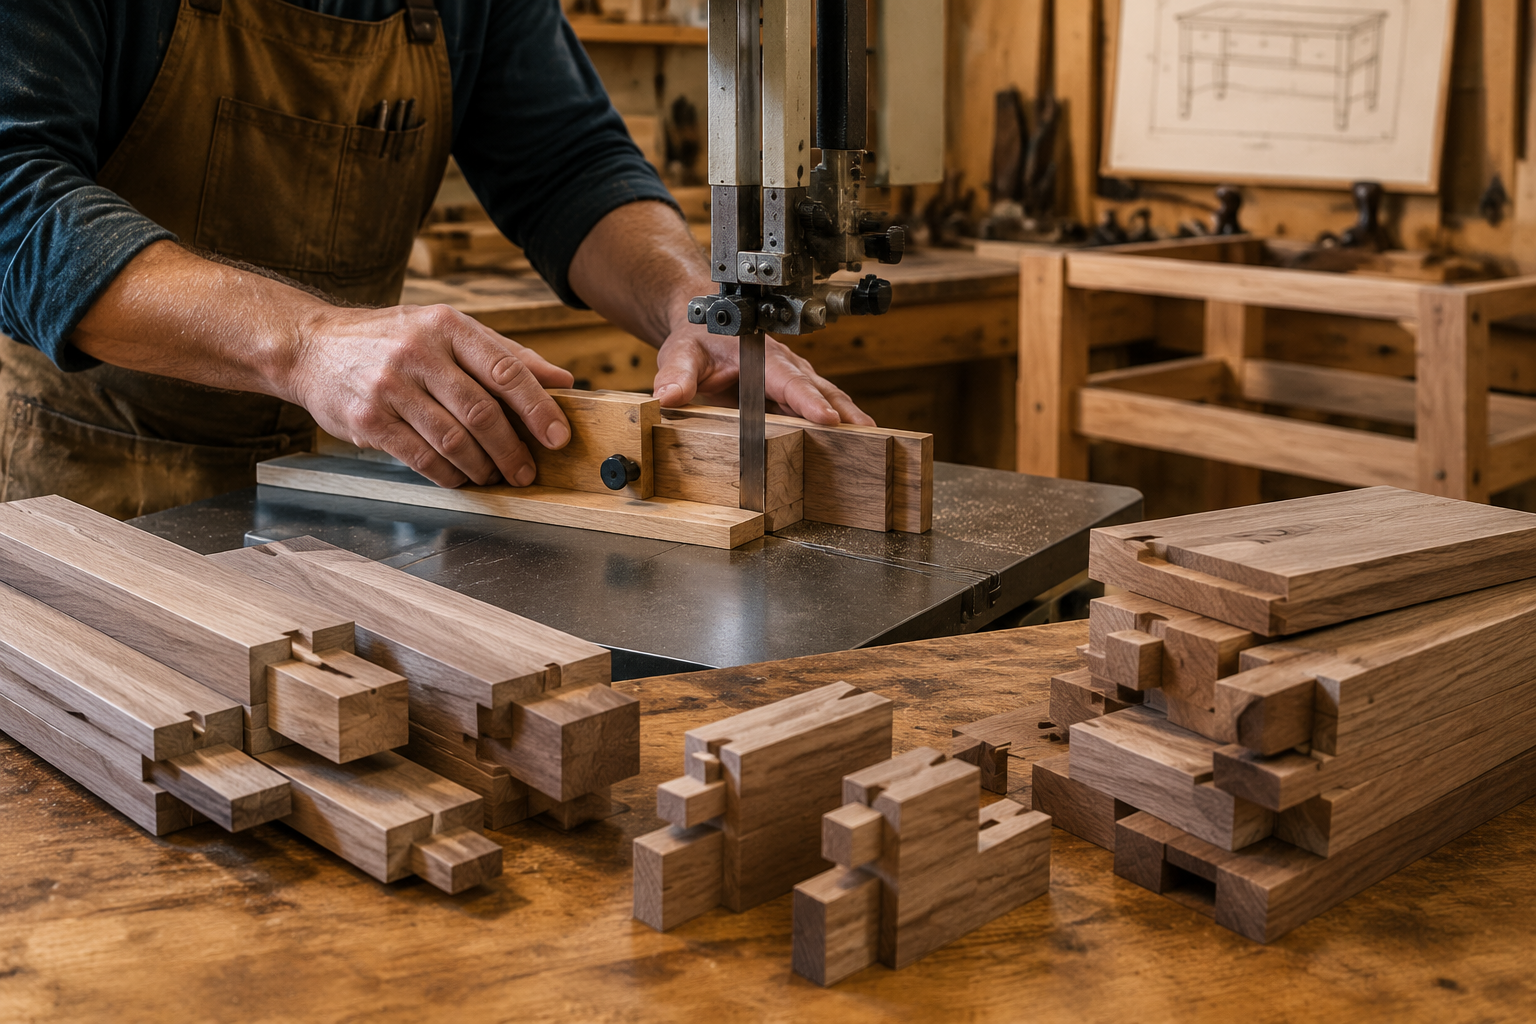
While table saws and routers are often the stars of joinery, the band saw plays a crucial supporting role, especially in roughing out complex joints, reducing material waste, and preparing stock efficiently. This foundational work is essential for achieving the precision detailed in guides like mastering dovetail joinery for drawers.
Blade Selection for Joinery Preparation
For general joinery preparation and stock breakdown, a 1/2-inch or 3/8-inch blade with 3-6 TPI is often a good compromise. It offers enough stability for relatively straight cuts but is still versatile enough for minor adjustments and roughing out. For very fine joinery work where precision is paramount, a smaller blade with a higher TPI (e.g., 1/4-inch, 10 TPI) can be used.
Roughing Out Tenons and Mortises
The band saw is excellent for quickly removing waste material when cutting tenons, saving wear and tear on your table saw blades or hand saws.
- Mark Clearly: Accurately lay out the shoulders and cheeks of your tenon on all four faces of the workpiece.
- Cut Cheeks: With the workpiece oriented on its edge, make a series of parallel cuts from the end of the board down to the shoulder line, staying just proud of the final cheek line.
- Remove Waste: Turn the workpiece and use the band saw to remove the waste material between the cheek cuts. Be careful not to cut past your shoulder line.
- Refine with Hand Tools/Router: The band saw gets you close; hand planes, chisels, or a router table (see mastering the router table) are then used to achieve the final, precise fit.
“The band saw’s ability to swiftly remove bulk material from joinery components is an often-underestimated time-saver, laying the groundwork for precise hand-tool or router finishing.”
Preparing Stock for Dovetails and Other Joints
While not ideal for the final, precise cuts of dovetails, the band saw can efficiently cut out the approximate shape of pins and tails.
- Paring Waste: For complex shapes, the band saw can quickly remove most of the waste, leaving a minimal amount for chisel work.
- Cutting Curves in Joint Components: If a joint has a curved element (e.g., a curved bridle joint), the band saw is the perfect tool for shaping those curves.
Advantages for Joinery Prep
- Safety: Compared to a table saw, the band saw blade is enclosed, and the teeth cut downwards, making it inherently safer for many off-cut operations.
- Material Economy: The thinner kerf of a band saw blade can mean less waste compared to a table saw, especially when making multiple cuts.
- Versatility: The ability to make both straight and curved cuts on a single machine is invaluable for diverse joinery tasks.
Ultimately, by embracing the band saw’s strengths for initial stock breakdown and roughing, woodworkers can optimize their workflow, preserve their more delicate tools, and achieve higher levels of precision in their final joinery. Consider integrating these techniques with advanced joinery projects like beyond the basic box: advanced joinery for unique wooden gift boxes.

Band Saw Maintenance and Safety for 2026
Regardless of the task, proper band saw maintenance and adherence to safety protocols are paramount. In 2026, many band saws incorporate improved safety features, but user vigilance remains the most important factor.
Essential Maintenance Tips
- Blade Condition: Regularly inspect your blade for dullness, missing teeth, or cracks. A dull blade is inefficient and unsafe.
- Tracking and Tension: Periodically check and adjust blade tracking and tension.
- Guide Blocks/Bearings: Inspect guide blocks for wear and bearings for smooth rotation. Replace as needed.
- Dust Collection: A good dust collection system is vital. Sawdust buildup not only obscures your view but can also be a fire hazard and negatively impact air quality.
- Cleanliness: Keep your band saw clean, especially the table and wheel interiors, to prevent sawdust buildup from affecting blade tracking.
Critical Safety Practices
- Personal Protective Equipment (PPE): Always wear safety glasses and hearing protection. Consider a dust mask, especially for prolonged cutting.
- Blade Guard: Ensure the blade guard is always lowered to just above the workpiece. This protects your hands and minimizes exposed blade length.
- Proper Stance and Control: Maintain a balanced stance, and always use push sticks or push blocks, especially when cutting small pieces or finishing a cut.
- Never Reach Over or Around the Blade: Plan your cuts to avoid placing your hands in dangerous positions.
- Clear Workspace: Keep your work area free of clutter to prevent trips or accidental contact with the blade.
- Unplug for Blade Changes/Maintenance: Always unplug the band saw before changing blades or performing any maintenance.
Conclusion
Mastering the band saw’s capabilities for resawing, curve cutting, and joinery preparation significantly expands a woodworker’s repertoire. From creating unique grain patterns with resawn lumber to shaping fluid lines and precisely preparing components for robust joints, the band saw stands as a cornerstone in any well-equipped workshop. By understanding blade characteristics, honing setup techniques, and consistently prioritizing safety, you can unlock the full potential of this versatile machine. In 2026, embracing these essential techniques will not only enhance the quality of your projects but also elevate your overall woodworking skill and efficiency, allowing you to tackle more ambitious and rewarding creations.
SEO Meta Title: Mastering Band Saw: Resawing, Curves & Joinery Prep in 2026 SEO Meta Description: Unlock your band saw’s full potential. Learn essential techniques for resawing, precise curve cutting, and efficient joinery preparation to elevate your woodworking projects in 2026.
