


The journey from a felled tree to a piece of stable, workable lumber in your shop is often underestimated. While the allure of freshly milled wood is undeniable, understanding the critical process of seasoning and drying your own lumber is paramount for any serious woodworker. Improperly dried wood is a primary culprit behind frustrating project failures – warping, cracking, and joint failure – costing time, materials, and immense effort. This comprehensive resource, The Complete Guide to Wood Seasoning and Drying: From Fresh Lumber to Workshop Ready Stock, will demystify the essential techniques, from basic air drying to the nuances of moisture content measurement, ensuring your lumber is perfectly prepared for any demanding project in 2026 and beyond.
Key Takeaways
- Moisture Content is Key: Understanding and controlling wood’s moisture content (MC) is the fundamental principle of successful seasoning and drying.
- Patience is a Virtue: Air drying is a slow, natural process that requires significant time, often a year per inch of thickness, but yields stable wood.
- Prevent Defects: Proper stacking, stickering, and protection are crucial to minimize warping, checking, and cracking during the drying period.
- Measure Accurately: A reliable moisture meter is an indispensable tool for assessing when wood is truly ready for use, preventing future project failures.
- Acclimation is Final Step: Even after drying, wood needs to acclimate to your workshop environment to achieve equilibrium moisture content before milling.
Understanding Wood Moisture and Why it Matters for Seasoning and Drying
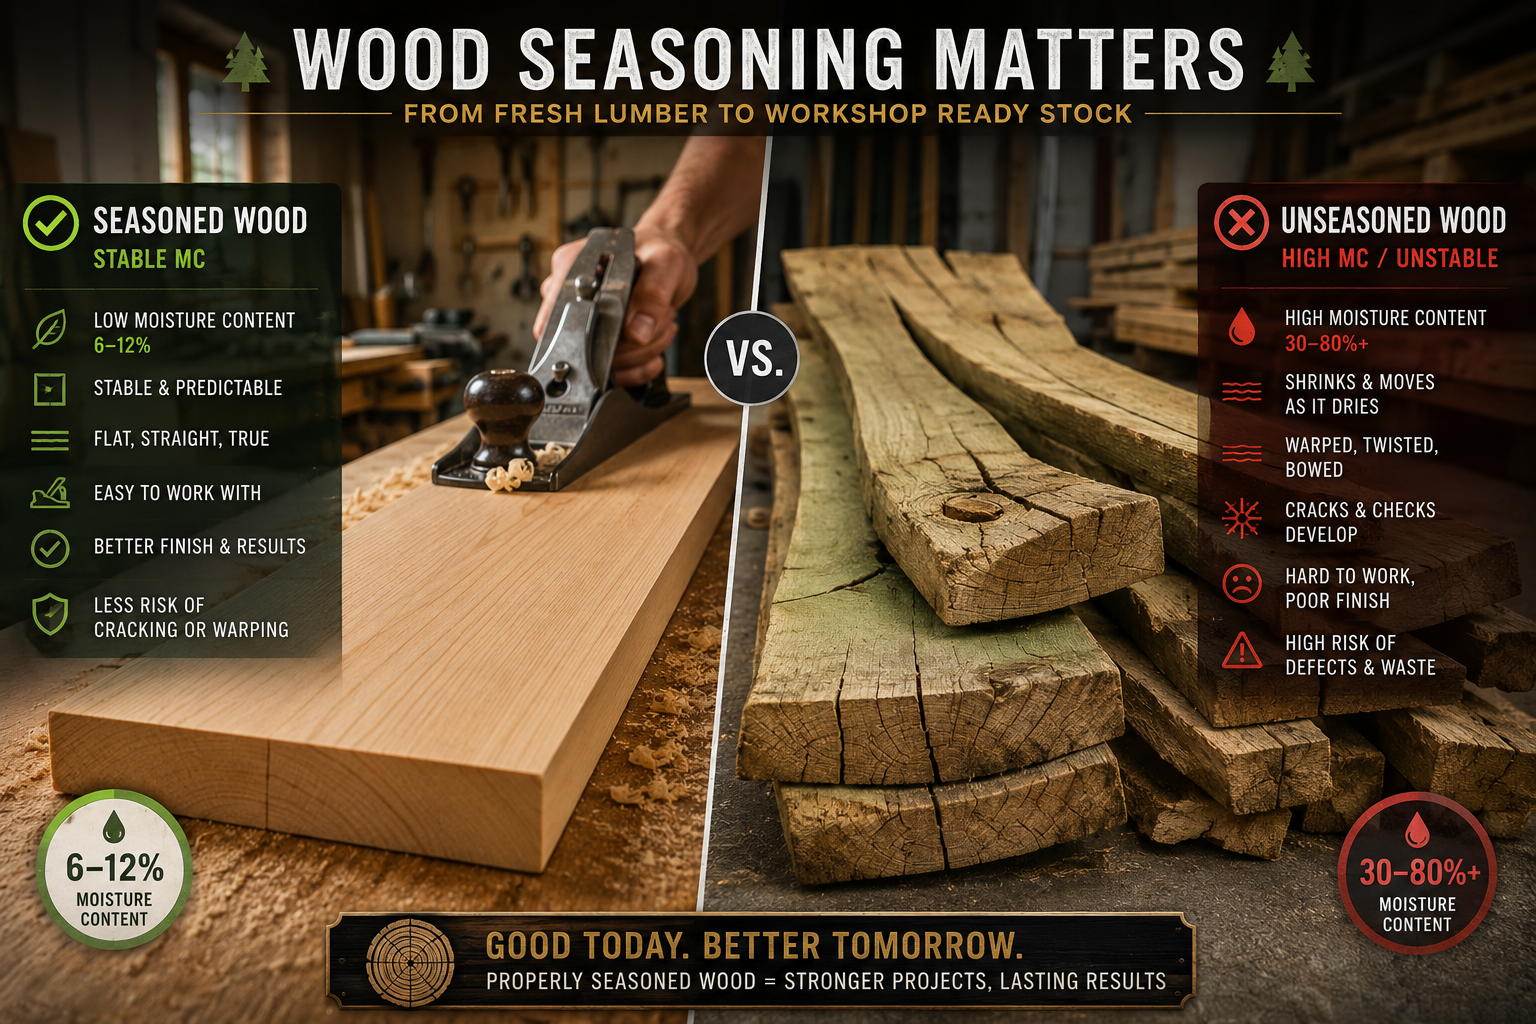
Wood, as a natural material, is hygroscopic, meaning it absorbs and releases moisture from its surrounding environment. When a tree is first cut, it is considered “green” lumber, containing a significant amount of water – often exceeding 100% moisture content (MC) relative to its dry weight. This high moisture content is the primary reason green lumber is unsuitable for most woodworking projects. As the wood dries, it sheds this water, leading to changes in its dimensions and stability. Ignoring this fundamental principle leads directly to bowed table tops, gapped joinery, and split panels.

The goal of seasoning and drying is to bring the wood’s moisture content down to an equilibrium that matches its intended end-use environment. For indoor furniture, this typically means an MC between 6-8%, while outdoor projects might tolerate 10-12%.
The Science Behind Wood Movement
As wood dries, it shrinks, primarily across the grain (tangentially and radially) rather than along its length. This differential shrinkage is what causes warping, twisting, cupping, and checking if not managed correctly. Different wood species also have varying shrinkage rates, making understanding your material vital. For a deeper dive into how wood behaves, consider exploring our guide on Understanding Wood Movement: How to Design and Build Furniture That Lasts Through Seasonal Changes. The internal structure of wood, with its cellular tubes, acts like a bundle of straws. Water is held both within these cell walls (bound water) and in the cell cavities (free water). Free water is removed first during drying, with minimal dimensional change. Once the free water is gone and the wood reaches the “fiber saturation point” (typically 25-30% MC), the bound water begins to evaporate, causing the wood cells to shrink. This is where the risk of significant dimensional change and defects arises.
Methods for Drying Wood: Air Drying and Kiln Drying
There are two primary methods for drying lumber: air drying and kiln drying. Each has its advantages and disadvantages, and the choice often depends on your resources, time, and the specific needs of your project.
Air Drying: Nature’s Approach to Seasoning
Air drying is the oldest and most accessible method for woodworkers. It involves stacking lumber in a way that allows natural airflow to gradually remove moisture. While slow, it is cost-effective and produces lumber with excellent working properties.
Key Principles of Successful Air Drying:
- Preparation:
- Seal End Grain: Freshly cut lumber loses moisture fastest from its ends, leading to severe checking (cracks). Apply a wax-based end sealer (e.g., Anchorseal) immediately after milling to slow this process significantly.
- Dimensioning: Mill your logs into manageable boards as soon as possible. Thinner boards dry faster.
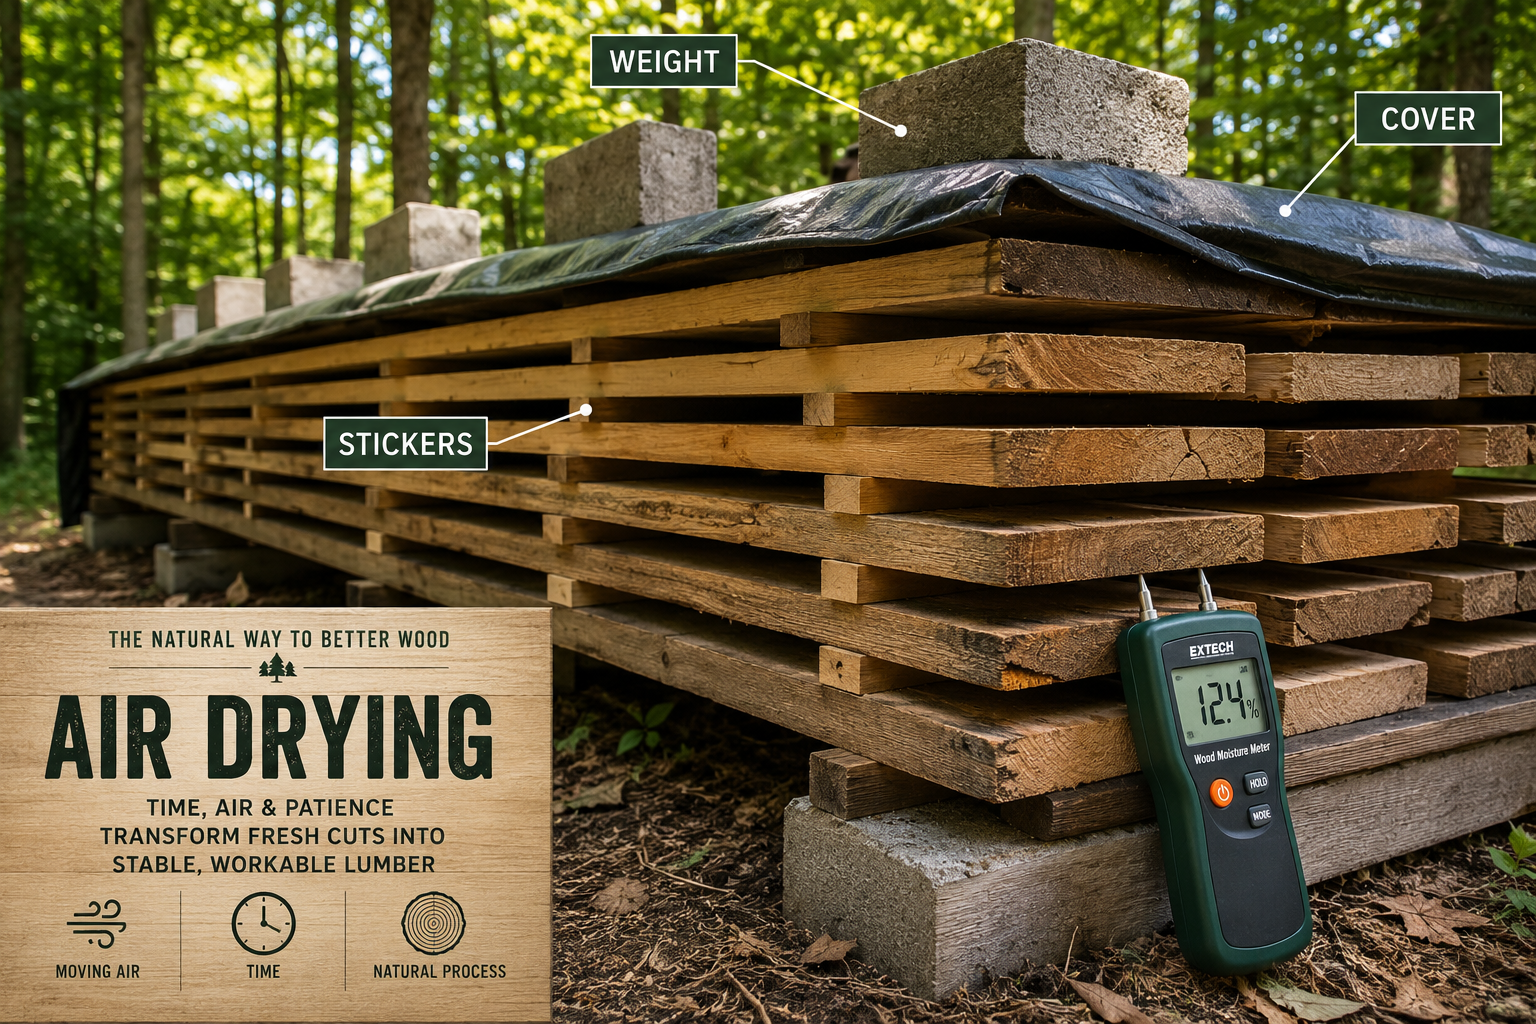
- Stacking:
- Foundation: Create a level, elevated foundation (at least 12-18 inches off the ground) to prevent moisture wicking from the soil and ensure good airflow. Use rot-resistant timbers or concrete blocks.
- Stickers: These are narrow, uniform strips of dry wood (typically 3/4″ to 1″ thick and wide) placed perpendicularly between each layer of lumber. Stickers create vital air channels.
- Placement: Align stickers vertically directly above each other from the bottom layer to the top. This prevents bowing and twisting in the drying wood.
- Spacing: Typically 12-18 inches apart for most hardwoods; closer spacing for thinner or prone-to-warp species.
- Weighting: Place heavy weights (concrete blocks, extra lumber, etc.) evenly across the top of the stack. This helps to prevent the upper layers from cupping or bowing as they dry.
- Location and Protection:
- Shelter: While open to air, the stack should be protected from direct rain and excessive sunlight. A simple roof or tarp (with airspace above the top layer) is essential.
- Airflow: Choose a location with good natural air circulation but avoid overly windy spots, which can cause surface checking. An open-sided shed or covered outdoor area is ideal.
- Pest Control: Keep the area clear of debris to deter insects and rodents.
Air Drying Times
A general rule of thumb for hardwoods is one year of drying time per inch of thickness, plus an additional year. So, a 1-inch thick board might take 2 years, and a 2-inch board 3 years. Softer woods like pine or poplar will dry faster. Environmental factors like humidity and temperature play a significant role.
Kiln Drying: Accelerated and Controlled Drying
Kiln drying uses controlled heat, humidity, and airflow to dry wood much faster than air drying. This method is common for commercially sold lumber and can achieve lower and more consistent moisture content.
Types of Kilns:
- Conventional Kilns: Use heated air to dry wood. They offer precise control over temperature and humidity cycles.
- Dehumidification Kilns: Use a refrigeration unit to condense moisture from the air, making them more energy-efficient for smaller operations.
- Vacuum Kilns: Dry wood in a vacuum, significantly speeding up the process and reducing drying defects. These are often used for specialty woods or large slabs.
While setting up a full-scale kiln is a significant investment, understanding the principles is useful, especially if you plan to buy kiln-dried lumber. Kiln-dried wood typically achieves a target MC of 6-8%, making it ideal for immediate use in indoor projects. For projects requiring precision and stability, such as crafting intricate Beyond the Basic Box: Advanced Joinery for Unique Wooden Gift Boxes or fine furniture, kiln-dried stock is often preferred.
Measuring Moisture Content and Preventing Defects in The Complete Guide to Wood Seasoning and Drying: From Fresh Lumber to Workshop Ready Stock
Accurately measuring moisture content is non-negotiable for determining when your lumber is truly workshop-ready. Relying on guesswork can lead to significant problems down the line.
Tools for Measuring Moisture Content
- Pin-Type Moisture Meters: These meters have two sharp pins that are driven into the wood to measure electrical resistance, which correlates to moisture content. They are generally affordable and effective for most applications. However, they leave small holes in the wood.
- Pinless Moisture Meters: These meters use electromagnetic waves to scan the wood’s surface without leaving marks. They are excellent for quick, non-destructive readings but are usually more expensive and can be affected by wood density and surface moisture.
- Oven-Dry Method: This is the most accurate method, used primarily for calibration or when extreme precision is required. It involves weighing a wood sample, drying it in an oven until all moisture is removed, and then reweighing it. The difference in weight determines the exact MC.
Important Note: Always check your moisture meter’s calibration and ensure it is set to the correct wood species for accurate readings. Readings should be taken from the core of the board, not just the surface.
Common Drying Defects and How to Prevent Them
Successfully seasoning wood means minimizing defects. Here are common issues and preventative measures:
| Defect | Description | Prevention Strategy |
|---|---|---|
| Checking | Splits or cracks, usually at the ends, caused by rapid end drying. | Apply end grain sealer immediately after milling. |
| Cupping | Boards developing a concave or convex shape across their width. | Use uniform sticker spacing, apply adequate top weight, ensure even drying conditions. |
| Warping | General distortion, twisting, or bowing of the board. | Proper stacking, straight stickers, heavy top weighting, protection from sun/rain. |
| Honeycomb | Internal cracks, often unseen until milling, caused by overly fast surface drying. | Slow down drying, especially in a kiln; ensure proper humidity control. Less common in air drying. |
| Casehardening | Surface layers become “set” in a dry, stressed state while the core remains wet, leading to internal stresses. | Manage drying rate, recondition in a kiln (steam treatment) to relieve stress, or allow slow, even air drying. |
| Stain/Decay | Discoloration or rot from fungal growth due to prolonged high moisture. | Ensure good airflow, elevate stacks, avoid contact with damp ground, dry as quickly as safely possible. |
By carefully following stacking protocols and regularly monitoring your lumber, you can significantly reduce the occurrence of these defects, ensuring you have quality Live Edge Slab Selection and Milling: From Raw Wood to Finished Surfaces for Tables and Islands or standard boards ready for any project.
From Dried Lumber to Workshop Ready Stock: The Final Steps
Even after your lumber reaches the target moisture content, the process isn’t quite finished. There are a few crucial final steps to ensure your wood is truly ready for the rigors of the workshop and years of use. This phase is critical to completing The Complete Guide to Wood Seasoning and Drying: From Fresh Lumber to Workshop Ready Stock.
Acclimation: The Essential Resting Period
Once dried (whether by air or kiln), wood needs to acclimate to its final environment – your workshop or the room where the finished piece will reside. Wood will always seek equilibrium with the ambient humidity. If you take wood dried to 6% MC and immediately mill it in a workshop that averages 10% humidity, the wood will absorb moisture and expand, potentially causing problems in your finished project.

- Process: Bring the dried lumber into your workshop space and let it sit, stickered and ideally weighted, for several weeks or even a month.
- Monitoring: Use your moisture meter to periodically check the MC. It should stabilize at a reading consistent with your shop’s average humidity. This equilibrium moisture content (EMC) is your target.
- Stability: This acclimation period allows the wood to relax, release any residual stresses from drying, and achieve its final, stable dimension before milling.
Final Preparation Before Milling
Once acclimated, your workshop-ready stock is almost ready for cutting.
- Rough Milling: Prior to fine dimensioning, many woodworkers “rough mill” their lumber. This involves surfacing one face and squaring one edge, then letting the wood rest for a few days to a week. This allows any hidden stresses to manifest as slight movement, which can then be corrected during final milling.
- Storage: Store your seasoned lumber neatly, ideally stickered, in a controlled environment to maintain its moisture content until you’re ready to use it. Proper storage ensures your efforts in seasoning are not wasted.
Mastering the complete cycle from fresh lumber to workshop-ready stock means your projects, whether they be crafting profitable wooden benches or intricate lathe-turned bowls, will start with a solid, stable foundation, drastically increasing your success rate and the longevity of your creations. For more on maximizing the use of various materials, including wood scraps, check out resources like Turning Shop Scraps into Design Features: Mixed Wood Techniques and Offcut Utilization for Zero-Waste Woodworking.
Conclusion
The meticulous process of wood seasoning and drying, as detailed in The Complete Guide to Wood Seasoning and Drying: From Fresh Lumber to Workshop Ready Stock, is not merely an optional step but a cornerstone of quality woodworking. By understanding the fundamentals of moisture content, patiently executing proper air drying techniques, or wisely selecting kiln-dried material, you lay the groundwork for stable, beautiful, and lasting projects. From preventing costly defects like warping and checking to ensuring your lumber is perfectly acclimated to your workshop, every stage contributes to superior craftsmanship. Embrace the patience and precision required in this crucial preparatory phase, and you will transform raw timber into a truly workshop-ready stock that will proudly stand the test of time in 2026 and beyond.
Actionable Next Steps
- Invest in a Quality Moisture Meter: This is your most important tool for assessing wood readiness.
- Plan Your Drying Space: Designate an area for air drying that offers protection, elevation, and good airflow.
- Source Green Lumber Wisely: Connect with local sawyers for fresh, affordable stock.
- Practice End Sealing: Make it a habit to seal all end grain on fresh lumber immediately.
- Be Patient: Remember the “year per inch plus one” rule for air drying. Good things come to those who wait.
References:
- Forest Products Laboratory. (2010). Wood Handbook: Wood as an Engineering Material. General Technical Report FPL-GTR-190. U.S. Department of Agriculture, Forest Service, Forest Products Laboratory.
- Hoadley, R. B. (2000). Understanding Wood: A Craftsman’s Guide to Wood Technology. Taunton Press.
- Wagner Meters. (2018). Wood Moisture Meter Guide.
