


The hum of a router, a tool capable of transforming raw lumber into exquisitely detailed furniture, often intimidates new woodworkers. This sophisticated machine, however, is only as versatile as the bits it holds. Understanding these small but mighty components is the key to unlocking a world of creative possibilities in your woodworking projects. This article, “The Essential Guide to Router Bits for Beginners: Understanding Profiles, Materials, and Safe Usage,” aims to demystify the vast world of router bits, explaining common types, their applications in furniture and trim, and crucial safety tips for new users to achieve professional results. By grasping these fundamentals, beginners can confidently select, use, and maintain router bits, ensuring both safety and success in their craft.
Key Takeaways
- Router bits are specialized cutting tools that shape wood, each designed for a unique profile.
- Understanding common bit profiles (straight, roundover, chamfer, rabbeting) is essential for various woodworking tasks.
- Bit materials (HSS, carbide-tipped, solid carbide) impact durability, sharpness, and suitability for different wood types.
- Proper router bit selection is crucial for achieving clean cuts and ensuring project success.
- Prioritizing safety with personal protective equipment (PPE) and correct routing techniques is paramount.
Demystifying Router Bit Profiles: Shaping Wood with Precision
Router bits come in an astonishing array of shapes, each designed to create a specific profile or cut in wood. For beginners, this can feel overwhelming. However, focusing on a few fundamental types will cover the majority of common woodworking tasks. Understanding these basic profiles is a core component of “The Essential Guide to Router Bits for Beginners: Understanding Profiles, Materials, and Safe Usage.”

Common Router Bit Profiles and Their Uses
Here are some of the most frequently used router bit profiles and their applications:
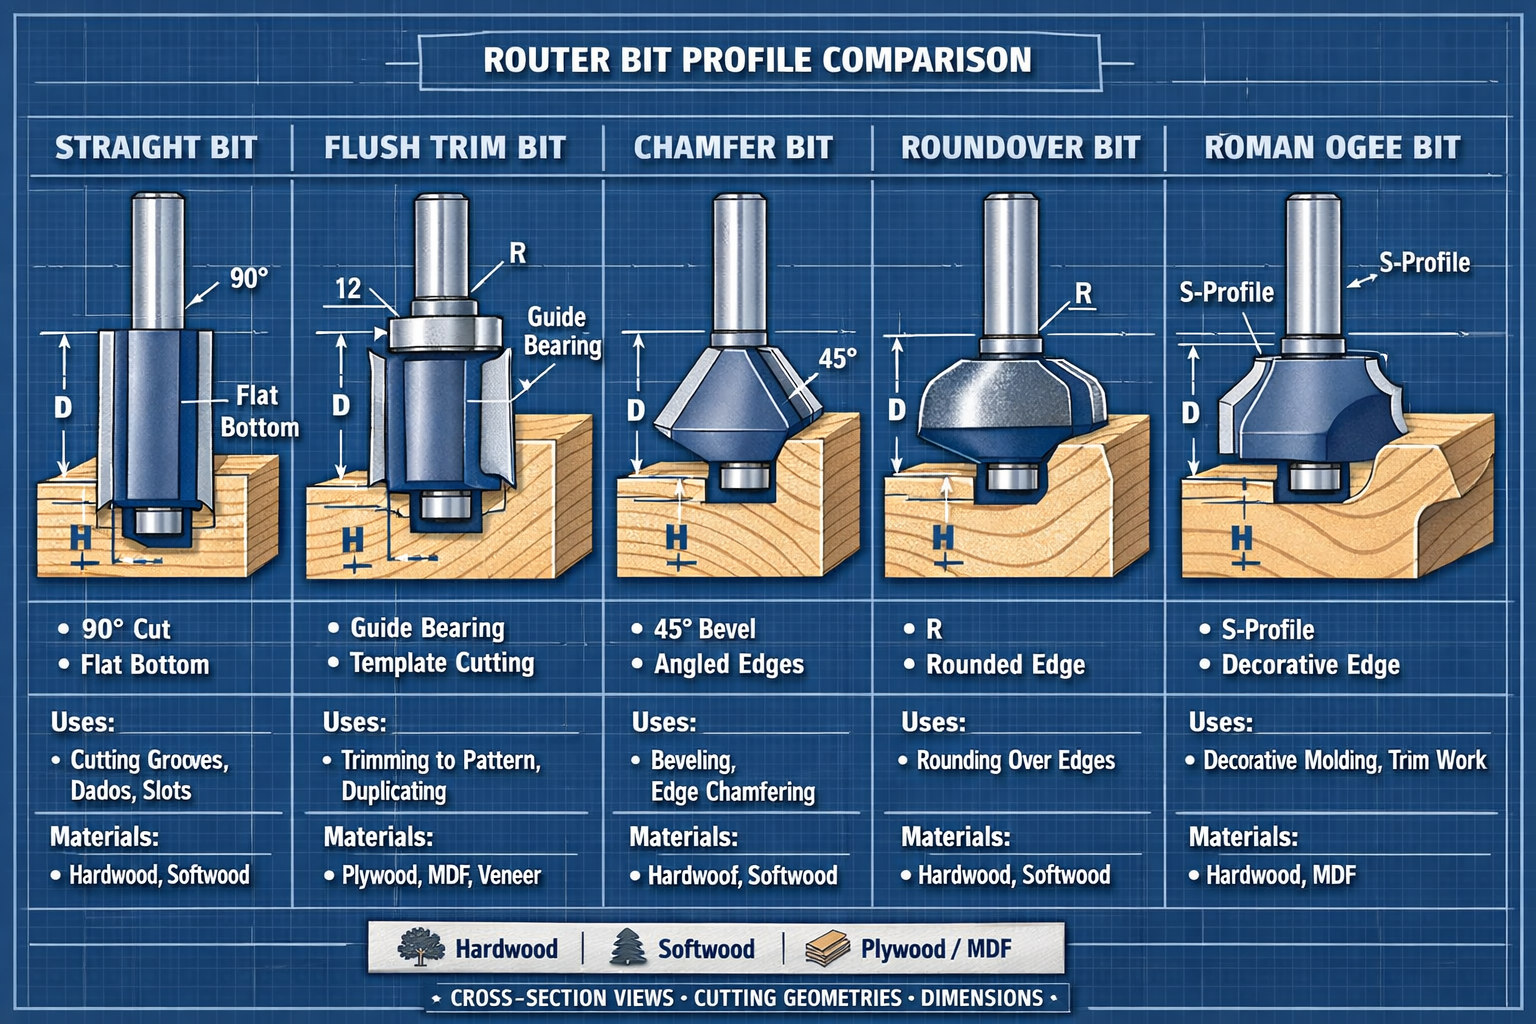
- Straight Bits: As the name suggests, these bits cut a straight, square-edged groove or dado. They are indispensable for tasks like cutting mortises, dados for shelving, or creating grooves for drawer bottoms.
- Applications: Joinery (dados, rabbets), shallow grooves, general material removal.
- Roundover Bits (or Rounding Over Bits): These bits create a smooth, rounded edge on your workpiece. They soften sharp corners, making furniture more comfortable and visually appealing. Available in various radii (e.g., 1/8″, 1/4″, 1/2″), they are often used for tabletops, shelves, and decorative trim.
- Applications: Softening edges, decorative profiling, ergonomic comfort.
- Chamfer Bits: Similar to roundover bits, chamfer bits create a beveled, angled edge rather than a rounded one. Common angles are 45 degrees, providing a clean, architectural look.
- Applications: Decorative edges, breaking sharp corners, adding visual interest.
- Rabbeting Bits: These bits cut a step or “rabbet” along the edge of a workpiece. Rabbets are crucial for various joinery techniques, such as creating recessed backs for cabinets or fitting panels. Many rabbeting bits come with interchangeable bearings to produce different rabbet depths.
- Applications: Joinery (cabinet backs, drawer bottoms), recessing panels.
- Cove Bits: Opposite of a roundover bit, a cove bit creates a concave, rounded profile. These are often used for decorative edges on molding, frames, or furniture legs.
- Applications: Decorative molding, architectural details.
- Roman Ogee Bits: A classic decorative profile, the Roman Ogee creates an S-shaped curve, adding elegance to edges on tables, shelves, and door frames.
- Applications: Elegant decorative edges, furniture trim.
| Router Bit Profile | Primary Use | Example Application |
|---|---|---|
| Straight | Cutting grooves, dados, and mortises | Shelf dados, box joints |
| Roundover | Creating rounded, soft edges | Tabletop edges, decorative molding |
| Chamfer | Cutting angled, beveled edges | Picture frames, cabinet doors |
| Rabbeting | Forming a step or recess along an edge | Cabinet backs, drawer bottoms |
| Cove | Creating a concave, rounded profile | Decorative molding, baseboards |
| Roman Ogee | Complex S-shaped decorative edge | Fine furniture edges, ornate trim |
Choosing the right profile is a creative decision that impacts the final look and functionality of your project. For more in-depth guidance on selection, refer to “The Essential Guide to Router Bits: Choosing the Right Profile.”
Router Bit Materials and Construction: Durability and Performance
Beyond their shape, router bits are distinguished by the materials they are made from, which directly influence their durability, sharpness, and suitability for different types of wood. A thorough understanding of these materials is crucial for any beginner following “The Essential Guide to Router Bits for Beginners: Understanding Profiles, Materials, and Safe Usage.”
High-Speed Steel (HSS)
HSS bits are the most economical option. They are generally suitable for cutting softwoods and some plastics. While less expensive, they dull faster than carbide bits, especially when cutting hardwoods or abrasive materials. They can be sharpened, but their edges are not as resilient.
- Pros: Inexpensive, easily sharpened.
- Cons: Dulls quickly, not ideal for hardwoods.
- Best For: Light-duty work, softwoods, occasional use.
Carbide-Tipped (CT)
Carbide-tipped bits are the most common type used by woodworkers. They feature a high-speed steel body with small pieces of tungsten carbide brazed onto the cutting edges. Tungsten carbide is significantly harder and more durable than HSS, allowing these bits to stay sharp much longer and handle hardwoods, plywood, and other challenging materials with ease.
- Pros: Good balance of cost and durability, excellent for hardwoods.
- Cons: More expensive than HSS, can chip if dropped or abused.
- Best For: General woodworking, hardwoods, plywood, daily use.
Solid Carbide (SC)
Solid carbide bits are made entirely from tungsten carbide. These bits offer the ultimate in durability and edge retention. They are often used for demanding applications, such as cutting abrasive laminates, plastics, or for intricate detail work where minimal deflection is critical. They are the most expensive option and are more brittle than HSS or carbide-tipped bits, meaning they can break if subjected to sudden impact or excessive force.
- Pros: Maximum durability, superior edge retention, ideal for abrasive materials.
- Cons: Most expensive, brittle (prone to breaking if mishandled).
- Best For: Commercial applications, abrasive materials, intricate routing, specialized tasks.
Shank Size: 1/4″ vs. 1/2″
Router bits typically come with shanks in two common sizes: 1/4 inch and 1/2 inch.
- 1/4-inch Shanks: Common in smaller, lighter-duty routers and some trim routers. They are suitable for smaller bits and lighter cuts.
- 1/2-inch Shanks: Found on larger, more powerful routers. The thicker shank offers greater stability, reduces vibration, and minimizes deflection, especially with larger diameter bits or when making deep cuts. This results in smoother cuts and less strain on the router. It is generally recommended to use 1/2-inch shank bits whenever your router can accommodate them.
Key takeaway: Always match the shank size of the bit to the collet size of your router. Never force a 1/2-inch shank into a 1/4-inch collet, and use a reducer bushing only when necessary for 1/4-inch bits in a 1/2-inch collet, ensuring it’s a high-quality, properly fitting bushing.

Understanding these material differences allows you to invest wisely in bits that will perform best for your specific woodworking needs in 2026.
Safe Usage of Router Bits: Protecting Yourself and Your Project
Safety is paramount in any woodworking endeavor, and using a router is no exception. Router bits, especially when spinning at tens of thousands of RPMs, can be extremely dangerous if not handled correctly. This section of “The Essential Guide to Router Bits for Beginners: Understanding Profiles, Materials, and Safe Usage” will cover critical safety practices.
Essential Safety Practices
Always Wear Personal Protective Equipment (PPE):
- Safety Glasses: Non-negotiable. Router bits create fine dust and can eject small chips or even broken bits.
- Hearing Protection: Routers are loud. Prolonged exposure can lead to hearing damage.
- Dust Mask/Respirator: Router operations generate significant sawdust, which can be harmful to your respiratory system.
- Gloves (Optional, with Caution): Some woodworkers use thin gloves for grip, but ensure they are snug-fitting and won’t get caught in the bit. Never use loose-fitting gloves.
Unplug the Router Before Changing Bits: This is perhaps the most critical safety rule. An accidental bump of the switch while changing a bit can cause severe injury.
Secure Your Workpiece: Never freehand route a piece of wood unless it’s a very specific, small detail cut with a trim router where the workpiece is held firmly against a stable surface. For most routing operations, the workpiece must be clamped firmly to a workbench or held securely in a router table with fences and featherboards. This prevents kickback and ensures a clean, controlled cut.
Proper Bit Insertion:
- Insert the bit at least 3/4 of the way into the collet, but avoid bottoming it out. Leave a small gap (about 1/16″) to allow for thermal expansion.
- Tighten the collet nut securely using the provided wrenches. Do not overtighten, as this can damage the collet or shank.
- Ensure the collet is clean and free of sawdust before inserting the bit.
Always Use the Correct Feed Direction: When using a handheld router, always feed the router against the rotation of the bit. For most standard bits, this means moving the router from left to right when routing an outside edge, or from right to left when routing an inside edge. Feeding with the rotation can cause the router to “climb” or “run away,” leading to loss of control and potential injury. On a router table, the workpiece is fed against the bit’s rotation (right to left for outside edges).
Make Shallow Cuts: Especially with larger bits or when working with hard materials, make multiple shallow passes instead of one deep pass. This reduces strain on the router, prevents burning the wood, prolongs bit life, and significantly reduces the risk of kickback.
Manage Dust: Connect your router to a dust collection system or shop vacuum whenever possible. This improves visibility, keeps the air clean, and reduces cleanup time. For more on workshop efficiency, consider exploring DIY Smart Workshop Upgrades: Integrating AI and IoT for Enhanced Precision and Safety.
Inspect Bits Before Use: Before each use, inspect your router bit for any signs of damage, dullness, or excessive buildup. A dull or damaged bit is more likely to burn the wood, cause kickback, or even break.
Clear the Work Area: Ensure your workspace is free of clutter, tripping hazards, and anything that could interfere with the routing operation.
Router Table Safety
When using a router table, additional considerations apply:
- Fences and Featherboards: Always use a fence to guide your workpiece for straight cuts. Featherboards are invaluable for holding the workpiece firmly against the fence and table, preventing chatter and kickback.
- Push Blocks/Sticks: Never use your bare hands to push a workpiece past the router bit. Always use push blocks or push sticks, especially for narrow pieces.
- Start and Stop Procedures: Turn the router on before feeding the workpiece into the bit. Once the cut is complete, slowly remove the workpiece before turning the router off.

By diligently following these safety guidelines, you can minimize risks and enjoy the rewarding experience of creating beautiful, precisely routed woodworking projects. Safety is not an option; it’s a fundamental requirement for anyone using this essential woodworking tool.
Conclusion
Mastering the router, like any powerful woodworking tool, begins with a solid understanding of its fundamental components. “The Essential Guide to Router Bits for Beginners: Understanding Profiles, Materials, and Safe Usage” provides the foundational knowledge necessary to confidently approach your routing projects. You’ve learned about the diverse world of router bit profiles, from basic straight cuts to elegant Roman Ogees, understanding how each shapes wood for specific aesthetic and functional purposes. We’ve also explored the critical differences in bit materials—HSS, carbide-tipped, and solid carbide—empowering you to choose the right bit for the right job, ensuring durability and clean cuts. Most importantly, we’ve emphasized the non-negotiable aspects of safe router usage, stressing the importance of PPE, proper bit handling, and controlled cutting techniques to protect yourself and achieve professional results.

With this guide, the router no longer needs to be an intimidating machine but rather a powerful extension of your creative vision. The next step is to put this knowledge into practice. Start with simple cuts on scrap wood, experiment with different profiles, and always prioritize safety. As you gain experience, you’ll discover the immense versatility a router adds to your workshop, enabling you to craft everything from intricate joinery to decorative edges on your furniture and home decor projects. Equip yourself with the right bits, adhere to safety protocols, and enjoy the journey of transforming wood into masterpieces in 2026. For further exploration of essential tools, consider our Essential Hand Tools for Every Woodworker: A Comprehensive Guide to.
