

The seemingly simple act of joining two pieces of wood can be the defining moment of a woodworking project. While precise joinery is paramount, the unsung hero that truly dictates the strength, durability, and longevity of your creations is the humble wood glue. An alarming number of otherwise well-crafted pieces fail not due to poor cuts, but due to an improper understanding or application of adhesives. This comprehensive exploration, The Ultimate Guide to Choosing and Using Wood Glues: Types, Strengths, and Best Practices for Lasting Joints, will demystify the world of wood adhesives, transforming your approach to joinery and ensuring your projects stand the test of time.
Key Takeaways
- Diverse Glue Types: Different wood glues (PVA, epoxy, polyurethane, hide) offer unique properties suited for specific applications, environments, and joint requirements.
- Strength Isn’t Everything: While strength is crucial, consider factors like open time, cure time, water resistance, gap-filling ability, and reversibility when selecting a glue.
- Surface Preparation is Paramount: Clean, accurately fitting surfaces are essential for any glue to achieve its maximum bond strength.
- Clamping is Critical: Proper clamping pressure and technique ensure intimate contact between glued surfaces during the curing process, preventing weak joints.
- Avoid Common Pitfalls: Understand and sidestep issues like glue starvation, excessive squeeze-out, insufficient open time, and improper environmental conditions.
Understanding Wood Glue Types and Their Strengths: The Ultimate Guide to Choosing and Using Wood Glues
Choosing the right wood glue is the first critical step towards achieving strong, lasting joints. With a variety of formulations available in 2026, each possessing distinct characteristics, understanding their strengths and weaknesses is essential. This section delves into the most common types of wood glues, helping you match the adhesive to your specific project needs.

Polyvinyl Acetate (PVA) Glues: The Everyday Workhorse
PVA glues are perhaps the most popular choice for general woodworking due to their ease of use, non-toxic nature when dry, and strong bond. They come in several variations:
- Aliphatic Resin Glues (Yellow Glue): This is your standard wood glue. It dries yellow, is sandable, and offers good initial tack. It’s ideal for interior projects like furniture building and cabinet making. However, it’s generally not waterproof and can soften with prolonged moisture exposure.
- Common Use: General assembly, furniture.
- Strength: Excellent tensile strength on porous wood.
- Drying Time: Typically 30-60 minutes clamp time, full cure in 24 hours.
- Cross-Linking PVA Glues (Water-Resistant PVA): Often labeled as “Titebond II” or similar, these glues contain additives that enhance their water resistance, making them suitable for outdoor projects or areas with moderate humidity. They are still not fully waterproof but offer significant improvement over standard yellow glue.
- Common Use: Outdoor furniture, cutting boards.
- Strength: Very strong, improved moisture resistance.
- Drying Time: Similar to yellow glue.
- Waterproof PVA Glues (Polyurethane-Reactive PVA or Type III): These advanced PVA glues, like “Titebond III,” offer superior water resistance, making them suitable for projects exposed to high moisture or occasional submersion. They boast a longer open time and are ideal for complex assemblies.
- Common Use: Exterior doors, boat building (above waterline), projects requiring maximum water resistance.
- Strength: Exceptional bond, high water resistance.
- Drying Time: Longer open time, full cure in 24 hours.
Key Consideration: PVA glues create a rigid glue line that can be brittle under shock. They also do not fill gaps well, requiring precisely fitting joints for optimal strength. For a deeper dive into creating strong connections, explore our Beginner’s Guide to Essential Woodworking Joints.
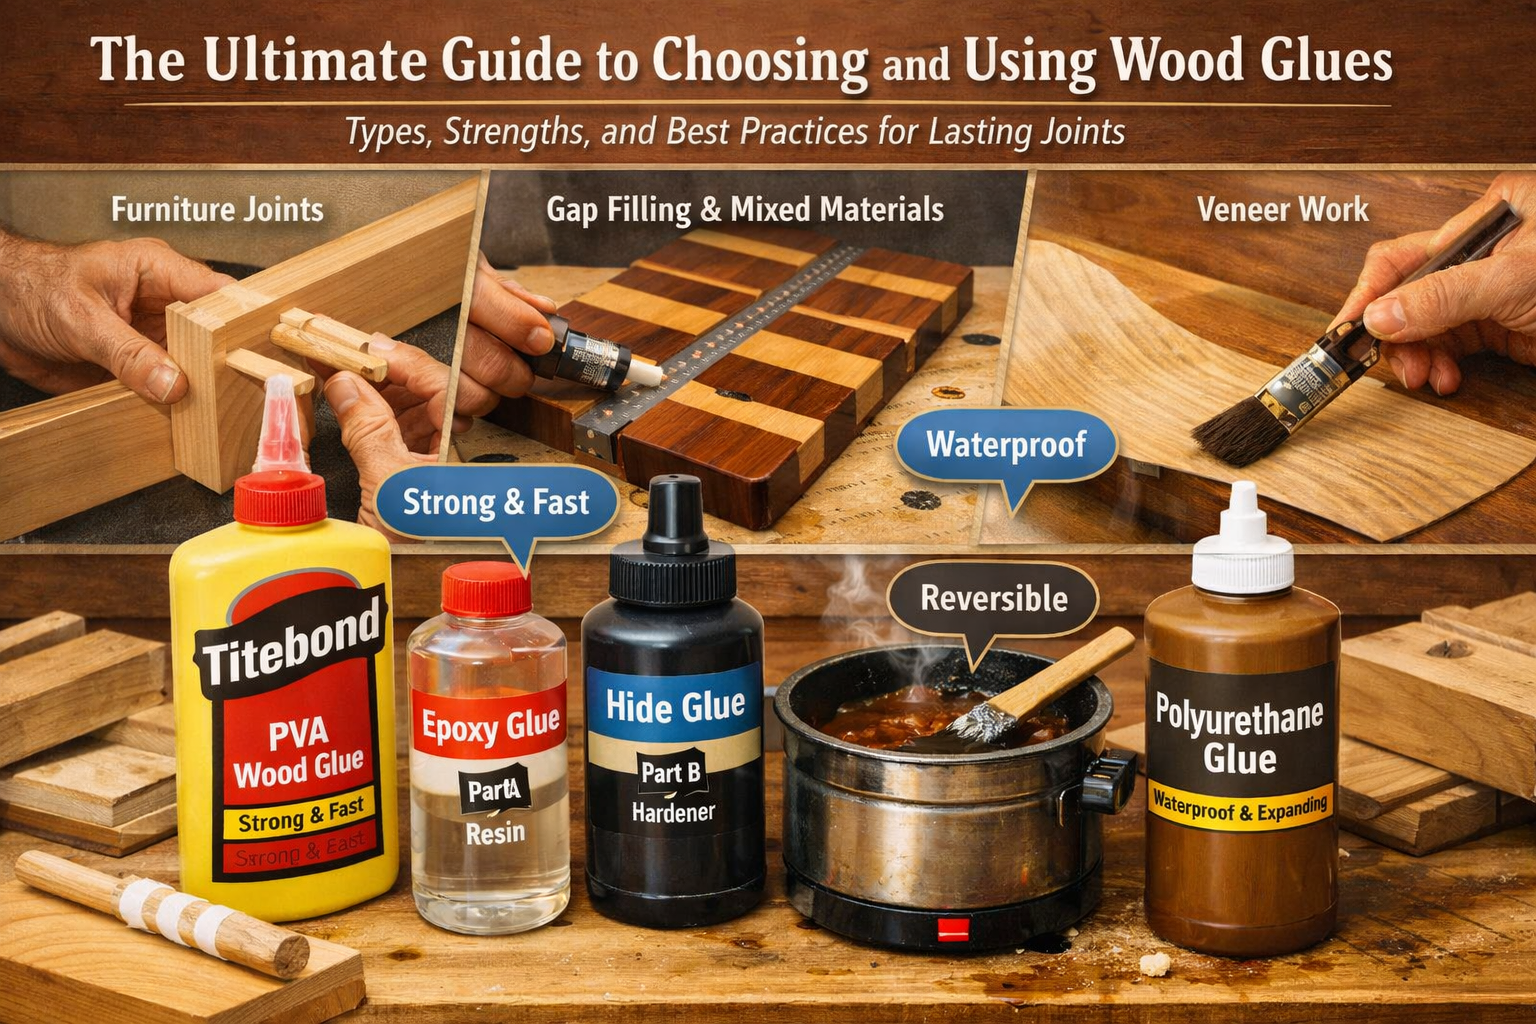
Epoxy Glues: The Gap-Filling Powerhouse
Epoxy is a two-part adhesive (resin and hardener) that, when mixed, creates an incredibly strong, waterproof, and gap-filling bond. Unlike PVA, epoxy forms a plastic-like substance that doesn’t rely on wood pores for adhesion, making it excellent for difficult joints, oily woods, or repairing voids.
- Common Use: Boat building, structural repairs, bonding dissimilar materials, filling voids in live edge slabs. For more on sourcing such materials, see our guide on Live Edge Slab Selection and Preparation.
- Strength: Extremely high, excellent shear strength, waterproof, fills gaps.
- Drying Time: Varies greatly by formulation, from minutes to hours. Full cure can take 24-72 hours.
- Considerations: Requires accurate mixing, can be messy, and is more expensive. It cures hard and can be difficult to sand flush with soft woods.
Polyurethane Glues: The Foaming Champion
Polyurethane glues react with moisture in the wood and air to cure, often expanding as they do. This expansion allows them to fill small gaps effectively and create a very strong, waterproof bond.
- Common Use: Exterior projects, bonding uneven surfaces, projects requiring strong water resistance.
- Strength: High, waterproof, good gap-filling.
- Drying Time: Initial clamp time 45-60 minutes, full cure 24 hours.
- Considerations: Foaming can be an issue if not controlled with clamping pressure, requires moisture to cure (sometimes needing to dampen one surface), and can stain skin and clothes.
Hide Glues: The Traditional and Reversible Choice
Historically significant, hide glue is derived from animal collagen. It’s unique in that it can be softened and reactivated with heat and moisture, making it reversible. This property is invaluable for repairs, instrument making, and veneering, as it allows for adjustments or disassembly without damaging the wood.
- Common Use: Fine furniture repair, instrument making, veneering, projects requiring reversibility.
- Strength: Strong, but less resistant to moisture than other types.
- Drying Time: Fast initial tack, full cure in 12-24 hours.
- Considerations: Available in liquid (ready-to-use) and granular (requires heating) forms. Liquid hide glue has a short shelf life once opened. Not water-resistant.
Cyanoacrylate (CA) Glues: The Instant Fix
Commonly known as “super glue,” CA glues offer incredibly fast setting times and high initial tack, making them useful for jigs, quick temporary bonds, or securing small parts before a stronger glue sets.
- Common Use: Temporary clamping, securing small parts, crack repair, jig construction.
- Strength: Very strong instant bond, but can be brittle.
- Drying Time: Seconds.
- Considerations: Not suitable for large structural joints, poor gap-filling, can be brittle.
Best Practices for Lasting Joints: The Ultimate Guide to Choosing and Using Wood Glues
Selecting the right glue is only half the battle; proper application and technique are equally vital. Mastering these best practices will ensure your joints achieve their maximum potential strength and durability.
1. Surface Preparation: The Foundation of a Strong Bond
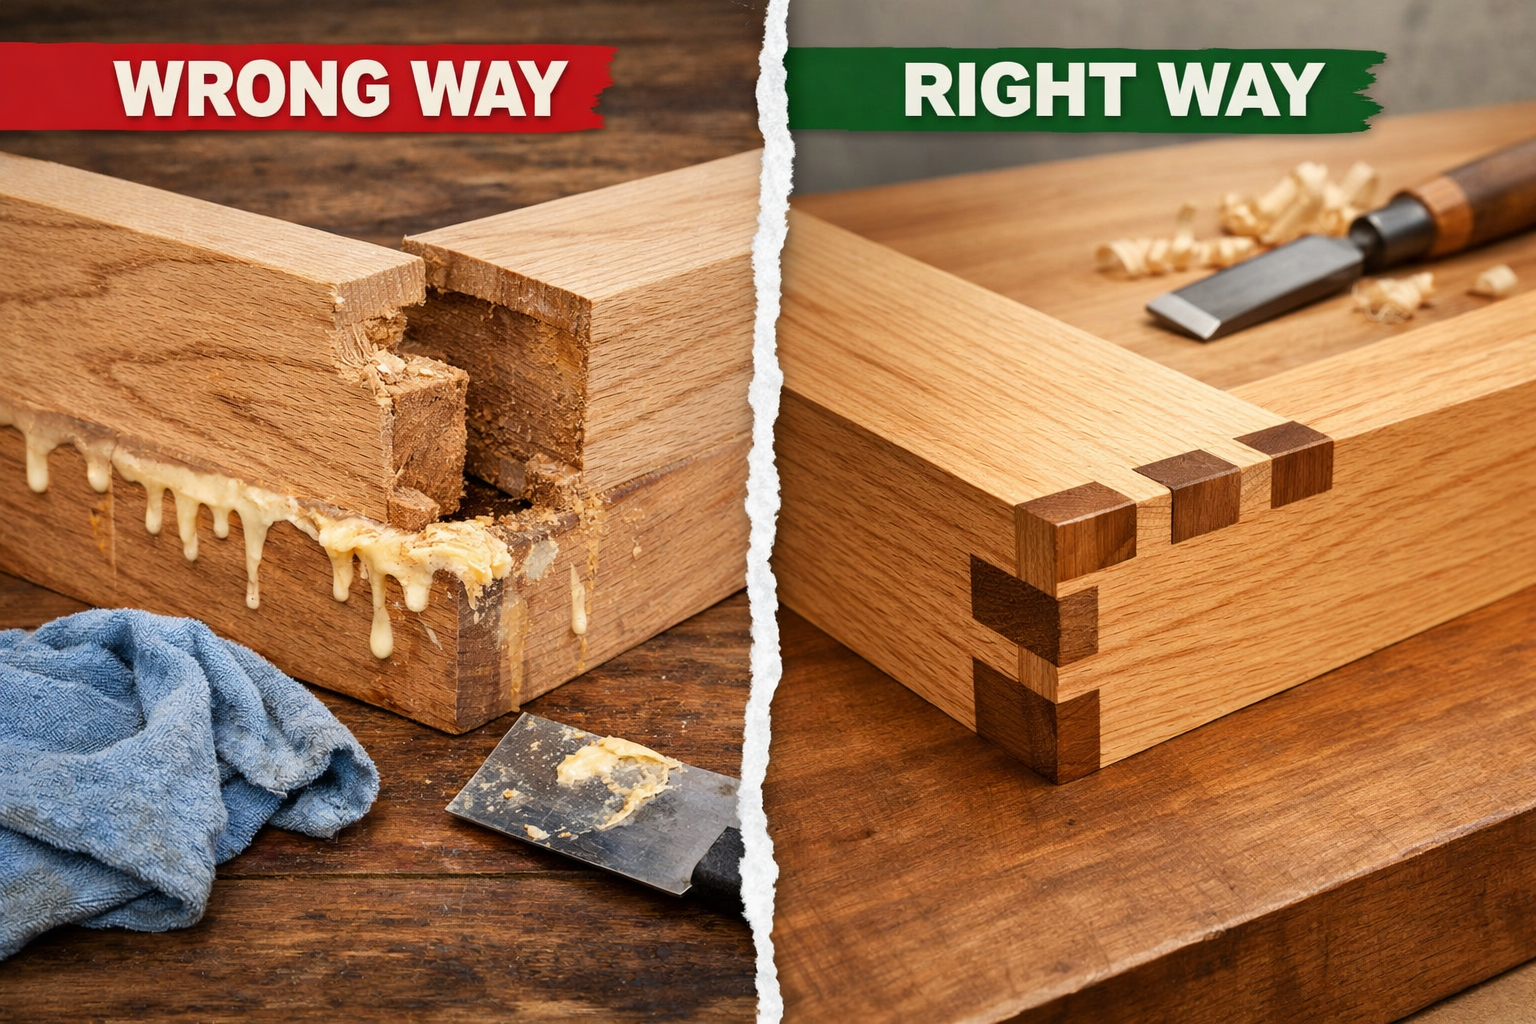
- Cleanliness: Always ensure wood surfaces are free from dust, sawdust, grease, oil, or previous finishes. These contaminants will prevent proper adhesion. A clean, fresh cut is ideal.
- Fit: Glue works by creating a bond between two surfaces, not by filling gaps. Joints should fit snugly together with no more than a hair’s breadth of gap. Poorly fitting joints will result in weak glue lines, regardless of the adhesive used. For insights on achieving precision, consult our guide on Hand Tool Joinery for Visible Wood Joints.
- Moisture Content: Wood’s moisture content impacts glue performance. Most glues work best on wood with a moisture content between 6% and 12%. Extremely dry wood can absorb too much moisture from water-based glues, leading to glue starvation.
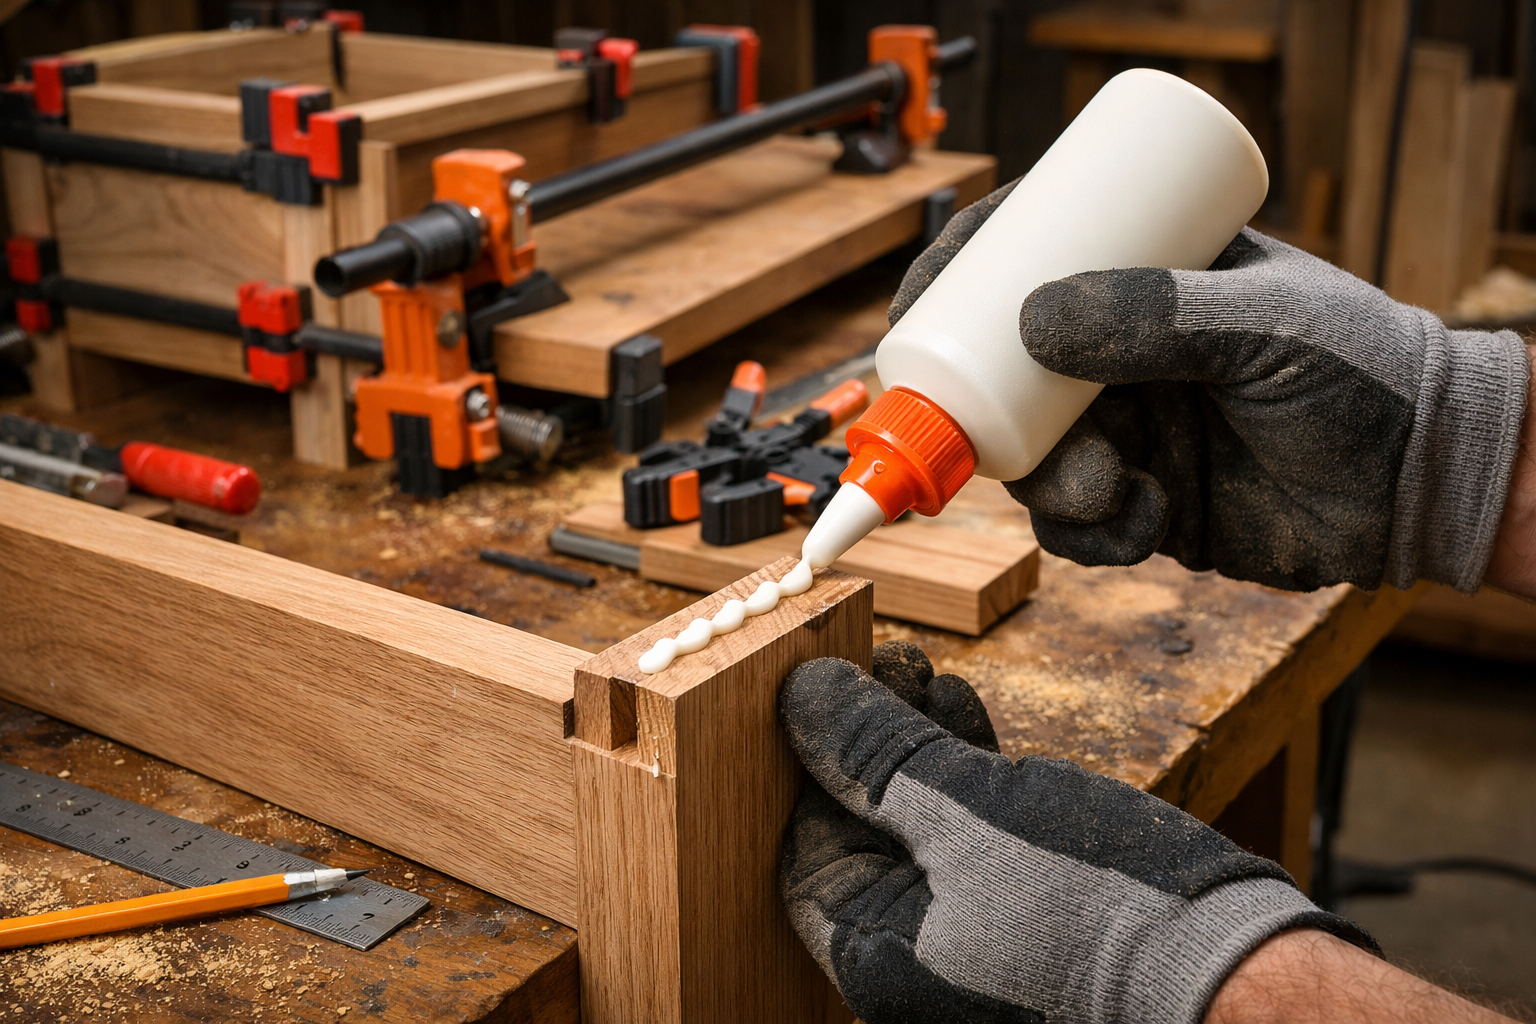
2. Glue Application: Just Right, Not Too Much, Not Too Little
- Even Coverage: Apply a continuous, even film of glue to one of the mating surfaces. For critical joints or very dry wood, apply to both surfaces (known as “sizing”).
- Avoid Starvation: “Glue starvation” occurs when too little glue is applied or too much clamping pressure squeezes out all the adhesive. This leaves voids in the joint and dramatically weakens the bond. Aim for a slight “squeeze-out” of glue when clamped, indicating full coverage.
- Open Time: This is the amount of time you have from applying the glue until you must bring the pieces together and apply clamping pressure. Different glues have different open times – be mindful of this, especially on complex assemblies. Work efficiently!
3. Clamping Techniques: The Invisible Strength
- Even Pressure: Apply firm, even pressure along the entire length of the joint. Use enough clamps to distribute the pressure, preventing bowing or gaps.
- Appropriate Pressure: Too little pressure won’t bring surfaces into intimate contact, leading to weak bonds. Too much pressure can squeeze out all the glue, causing starvation. A good rule of thumb is to apply enough pressure to see a slight, even bead of squeeze-out along the entire joint line.
- Cauls: Use cauls (sacrificial pieces of wood or clamping pads) between clamps and your workpiece to distribute pressure, protect the wood from marring, and prevent dents from clamp jaws.
- Squareness and Flatness: Always ensure your assembly is square and flat before the glue sets. Use winding sticks, squares, and measuring tapes. Once cured, correcting warps or out-of-square joints is extremely difficult.
- Drying Time: Respect the manufacturer’s recommended clamp time and full cure time. Removing clamps too early can compromise the bond. While most glues achieve significant strength in a few hours, full strength can take 24-72 hours.
4. Cleanup and Finishing
- Wet Wipe-up: The easiest time to remove excess glue is immediately after clamping. Use a damp cloth to wipe away squeeze-out. Be thorough, as dried glue can prevent stains and finishes from absorbing properly, creating visible light spots.
- Dried Glue Removal: If glue dries, it can be scraped, chiseled, or sanded off. For water-resistant glues, this can be challenging. For dried PVA, a cabinet scraper or a sharp chisel can work wonders.
Common Wood Glue Mistakes to Avoid for Lasting Joints
Even experienced woodworkers can fall prey to common glue-related errors. Recognizing and actively avoiding these pitfalls is crucial for ensuring the lasting integrity of your projects in 2026.
1. Ignoring Joint Fit
As mentioned, glue is not a gap filler (with epoxy being a partial exception). If your joints have significant gaps, the glue will form a thick, brittle layer that lacks the strength of a true wood-to-wood bond. Invest time in perfecting your joinery using precise tools. For instance, a well-tuned router table can greatly improve joint accuracy, as discussed in our article on Choosing and Using Router Tables.
2. Insufficient Clamping Pressure or Coverage
A single clamp on a long joint is a recipe for disaster. Uneven or insufficient pressure leaves parts of the joint loosely bonded or unbonded entirely. Always use enough clamps to ensure even pressure along the entire glue line. Remember the slight squeeze-out as your indicator.
3. Glue Starvation
This happens when too much clamping pressure or insufficient glue application leads to the adhesive being completely squeezed out of the joint. The result is a dry, weak joint where the wood fibers never properly interlocked with the glue. It’s better to have a little too much squeeze-out than not enough.
4. Rushing the Drying Process
Patience is a virtue in woodworking, especially with glue. Removing clamps too soon, or subjecting a freshly glued joint to stress before it’s fully cured, can permanently compromise its strength. Always follow the manufacturer’s recommendations for clamp time and full cure.
5. Neglecting Environmental Factors
- Temperature: Most glues perform best at room temperature (around 70°F or 20°C). Colder temperatures significantly slow down curing, while excessive heat can cause some glues to cure too quickly, reducing open time and potentially weakening the bond.
- Humidity: High humidity can extend drying times for water-based glues, while very low humidity might lead to premature drying of the glue surface before the joint is clamped.
- Dust and Dirt: A dusty shop environment can easily contaminate open glue bottles or freshly spread glue, weakening the bond. Keep your workspace clean, especially when gluing.
6. Improper Cleanup
Failing to thoroughly remove wet glue squeeze-out, particularly with water-resistant or waterproof glues, can lead to visible glue smears that prevent stains or finishes from absorbing. This creates frustrating light patches on your finished project that are almost impossible to fix later. Always have a damp rag handy.

By understanding these common mistakes and adopting the best practices outlined in The Ultimate Guide to Choosing and Using Wood Glues: Types, Strengths, and Best Practices for Lasting Joints, woodworkers can elevate the quality and longevity of their projects significantly.
Conclusion
Mastering the art of wood gluing is as crucial to successful woodworking as precise cutting and careful assembly. By understanding the unique properties of different glue types—from the versatile PVA to the gap-filling epoxy and the traditional hide glue—and by diligently applying best practices in surface preparation, application, and clamping, you empower yourself to create truly lasting and robust wooden joints.
Remember that the strongest joint isn’t just about the glue itself, but the entire process: a clean, well-fitting joint, proper application for full coverage without starvation, adequate clamping pressure for intimate contact, and sufficient time for the glue to fully cure. Incorporating these principles will elevate your woodworking craftsmanship, ensuring that your projects not only look fantastic but also possess the structural integrity to endure for generations.
Actionable Next Steps:
- Evaluate Your Project: Before starting, consider the environment (indoor/outdoor, wet/dry), stress on the joint, and desired finish to select the most appropriate glue.
- Practice on Scraps: If trying a new glue or technique, practice on scrap pieces of the same wood to get a feel for its open time and clamping requirements.
- Invest in Quality Clamps: A good assortment of clamps is an invaluable investment for any woodworker.
- Keep it Clean: Maintain a clean workspace and always clean up glue squeeze-out immediately.
SEO Meta Title: Wood Glue Guide: Types, Strengths & Best Practices for Joints SEO Meta Description: Master wood glue! Explore PVA, epoxy, hide glues, their strengths, and essential techniques for flawless, lasting wood joints in 2026.
