


Woodworking enthusiasts often spend countless hours perfecting joints, shaping profiles, and selecting the finest timber, only to fall short at the final, most visible hurdle: the finish. A remarkable 70% of a project’s perceived quality is attributed to its finish, yet many rush through the crucial preparation stage, unknowingly sabotaging their efforts. It’s this often-underestimated, yet profoundly impactful phase that differentiates amateur work from professional craftsmanship. Mastering Beyond Basic Sanding: Achieving a Flawless Finish with Progressive Grits and Finishing Techniques is not merely about removing imperfections; it’s about systematically refining the wood’s surface to unlock its inherent beauty, creating a canvas that elevates any applied finish from good to truly extraordinary.
Key Takeaways
- Progressive Grit System: Always move from coarser to progressively finer grits, ensuring each grit effectively removes the scratches left by the previous one.
- Dust Management is Crucial: Effective dust extraction and regular surface cleaning prevent old grit particles from re-scratching your work.
- Technique Over Speed: Consistent pressure, controlled movement, and diligent inspection at each stage are more important than how quickly you sand.
- Grain Raising: Understand and implement grain raising to prevent fuzzy finishes, especially with water-based products.
- Finishing Application: The best finishing techniques can only shine on a perfectly prepared surface; proper sanding is the foundation.
The Foundation of Flawlessness: Understanding Progressive Grits
The journey to a flawless finish begins not with a single swipe of sandpaper, but with a calculated progression. Think of sanding as a methodical erosion process, where each grit size plays a distinct role in refining the surface. Skipping grits or using them out of order is akin to painting a masterpiece on a crumpled canvas – the result will always be compromised.

What Are Sandpaper Grits and Why Do They Matter?
Sandpaper grits refer to the size of the abrasive particles embedded in the paper. The lower the number, the coarser the grit, meaning larger abrasive particles that remove material more aggressively. Conversely, higher numbers indicate finer grits with smaller particles, designed for subtle refinement and polishing.
Why is a progressive approach essential? Each grit leaves a unique scratch pattern. A coarse grit (e.g., 80-grit) creates deep, visible scratches. A medium grit (e.g., 150-grit) is used to remove those 80-grit scratches, replacing them with its own, finer pattern. A fine grit (e.g., 220-grit) then removes the 150-grit scratches, and so on. If you jump from 80-grit directly to 220-grit, the 220-grit paper will polish the peaks of the 80-grit scratches but won’t fully remove the deep valleys, leaving behind “pigtails” or visible scratch marks that will become glaringly obvious once a finish is applied.
Choosing the Right Starting Grit
The initial grit you select depends entirely on the condition of your wood.
- Rough-sawn or heavily damaged wood (40-80 grit): Use these coarse grits for heavy material removal, leveling uneven surfaces, or removing deep gouges. Be extremely careful, as these can quickly reshape your project.
- Milled or planed wood (100-120 grit): For wood fresh from a planer or jointer, or for general smoothing after assembly, this range is a good starting point. It’s aggressive enough to remove minor milling marks without being overly destructive.
- Lightly prepped wood or minor touch-ups (150-180 grit): If the wood is already relatively smooth, you can start here.
Pro Tip: For optimal results, consider how your wood was processed. If you’re working with live edge slab selection and milling, you’ll likely start with a much coarser grit than if you’re refinishing an antique piece.
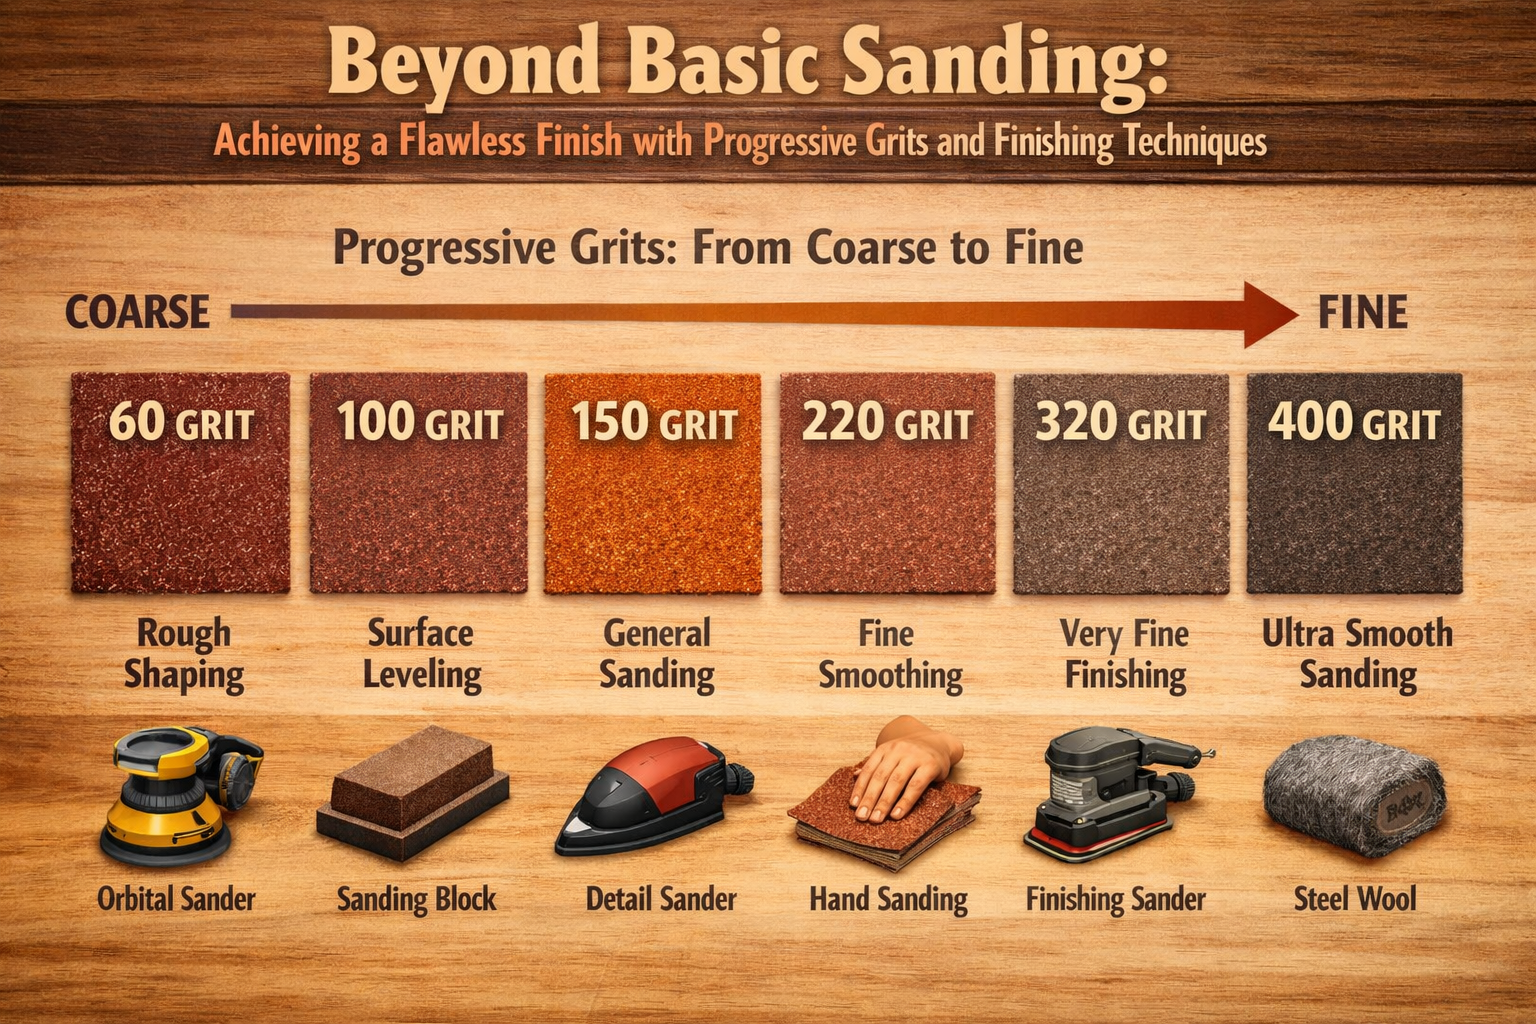
The Progressive Grit Sequence: A Step-by-Step Guide
The generally accepted rule is to never skip more than one grit size in your progression. For most projects, a common sequence might look like this:
| Grit Size | Primary Application | Visible Scratch? |
|---|---|---|
| 60-80 | Heavy stock removal, leveling, removing deep imperfections | Very obvious |
| 100-120 | Initial smoothing, removing marks from previous coarse grit | Clearly visible |
| 150 | Further refinement, preparing for staining (often a good stopping point for stains) | Faint |
| 180-220 | Final smoothing before clear finishes or light stains, removes 150-grit scratches | Barely visible |
| 320-400+ | Polishing, between-coat sanding, achieving ultra-smooth surfaces for high-gloss finishes | Invisible |
When you move to the next grit, it should be just aggressive enough to remove the scratches from the previous grit, nothing more. This efficiency saves time and preserves material. For instance, if you started with 100-grit, your next step should be 150-grit, then 220-grit. Only for exceptionally fine finishes, or for sanding between coats, would you go higher.
Mastering Sanding Techniques for a Superior Surface
Sanding isn’t just about the paper; it’s about the technique. Even with the perfect grit progression, poor technique can introduce new flaws or fail to remove existing ones.
Hand Sanding vs. Power Sanding
Both hand sanding and power sanding have their place in Beyond Basic Sanding: Achieving a Flawless Finish with Progressive Grits and Finishing Techniques.
- Power Sanding: Orbital sanders (random orbital, finish, belt sanders) are fantastic for speed and efficiency on flat, open surfaces. Random orbital sanders are generally preferred for final sanding as their random motion helps minimize visible scratch patterns. Belt sanders are for aggressive material removal.
- Hand Sanding: Essential for edges, corners, profiles, and detailed areas where a power sander cannot reach without risking damage. Always use a sanding block to ensure even pressure and a flat surface, preventing “dishing” or rounding of edges. For delicate work, mastering hand tool mastery for detail work can complement your sanding efforts, providing precision that machines often can’t match.
Essential Sanding Techniques
- Go with the Grain (Mostly): While random orbital sanders help minimize cross-grain scratches, it’s always best to primarily sand with the wood grain. Cross-grain scratches are particularly difficult to remove and become highly visible under finish. When hand sanding, always sand exclusively with the grain.
- Even Pressure: Apply consistent, moderate pressure. Too much pressure can clog the paper, generate excessive heat, and lead to uneven sanding. Let the abrasive do the work.
- Overlap: Ensure each pass overlaps the previous one by about 50% to prevent missed spots or uneven sanding.
- Dust Management: This is paramount. Dust from previous, coarser grits can embed itself into your finer sandpaper, causing deeper scratches.
- Use a dust extraction system with your power sander.
- Regularly wipe down your workpiece with a clean, dry cloth or a tack rag between grits.
- Vacuum your workspace frequently.
- Consider blowing off the surface with compressed air (wear appropriate PPE).
- Identify and Remove Scratches: Before moving to the next finer grit, rigorously inspect your work. Use a strong light source, raking it across the surface, to highlight scratches. You can also mark the surface lightly with a pencil between grits; when all the pencil lines are gone, you know you’ve effectively removed the previous grit’s scratches. This meticulous inspection is key to truly achieving Beyond Basic Sanding: Achieving a Flawless Finish with Progressive Grits and Finishing Techniques.
Grain Raising and Denibbing
- Grain Raising: Many finishes, especially water-based ones, can cause the wood fibers to swell and stand up, resulting in a fuzzy surface. To combat this, after your final sanding grit (e.g., 220-grit), dampen the wood surface evenly with a wet cloth or sponge. Let it dry completely. The raised grain will feel rough. Lightly sand it smooth again with your final grit (e.g., 220-grit). This process stabilizes the fibers, preventing them from raising once the actual finish is applied.
- Denibbing: After the first coat of finish dries, the wood grain may still feel slightly rough – these are tiny raised fibers or dust particles. Lightly “denib” the surface by hand-sanding with a very fine abrasive (320-400 grit or even finer, like 0000 steel wool for oil finishes). This creates a perfectly smooth base for subsequent coats. Always clean thoroughly after denibbing.
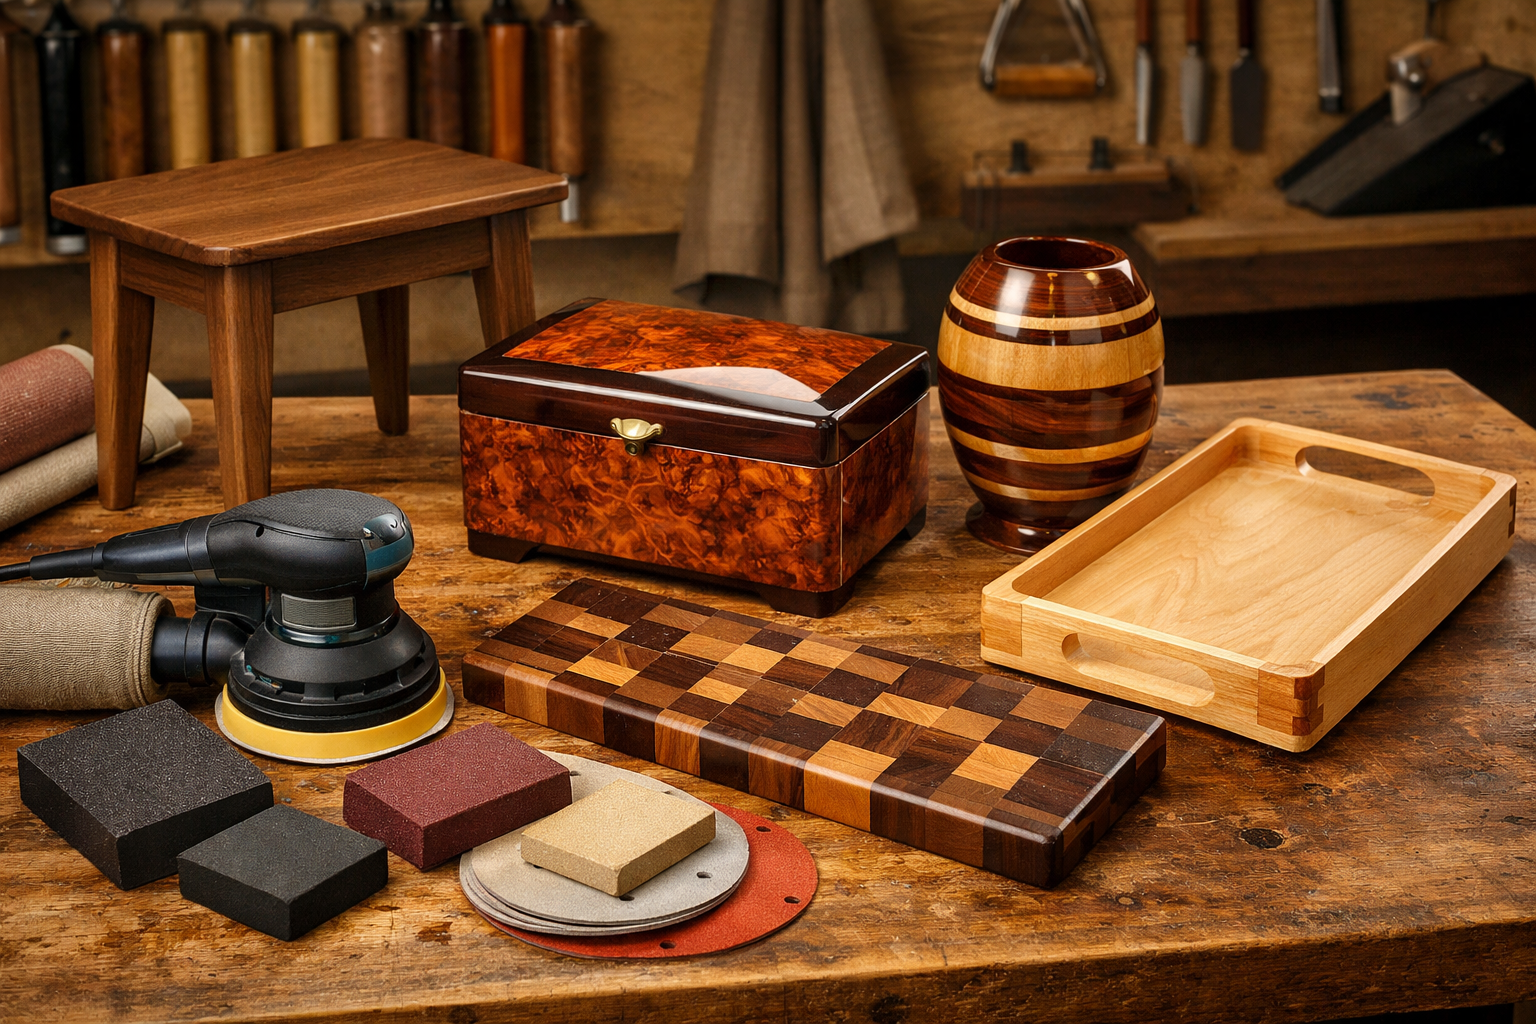
Advanced Finishing Techniques and Surface Preparation Synergy
The ultimate goal of superior sanding is to create an ideal substrate for your chosen finish. A perfectly sanded piece of wood will allow the finish to penetrate evenly, cure uniformly, and showcase the wood’s natural beauty without highlighting imperfections.
Matching Sanding to Finish Type
Not all finishes require the same level of sanding.
- Oil Finishes (e.g., Danish oil, tung oil): These finishes penetrate deeply into the wood. For a rich, lustrous look, sanding up to 220-grit is often sufficient. Going much finer can sometimes reduce penetration, as the wood pores become too closed. For certain natural wood finishing techniques, especially those emphasizing natural feel, a slightly less refined surface can even be desirable.
- Stains: Similar to oils, sanding to 150-180 grit is typically ideal before applying stain. Over-sanding (e.g., beyond 220-grit) can “burnish” the wood, closing the pores and preventing the stain from penetrating evenly, leading to blotchy results, especially with softwoods.
- Film-Building Finishes (e.g., polyurethane, lacquer, shellac): These finishes build a protective layer on the surface. For a truly glass-smooth, high-gloss finish, sanding to 220-grit, followed by grain raising and a final light pass with 220-grit, is usually the minimum. For mirror-like results, you might extend to 320-400 grit before the first coat. For specific materials like mahogany wood finishing techniques, achieving this level of smoothness is paramount to bring out the wood’s deep luster.
- Wax Finishes: Wax can be applied over many levels of sanding, but for the best sheen and smooth feel, sanding to 220-grit or higher is recommended.
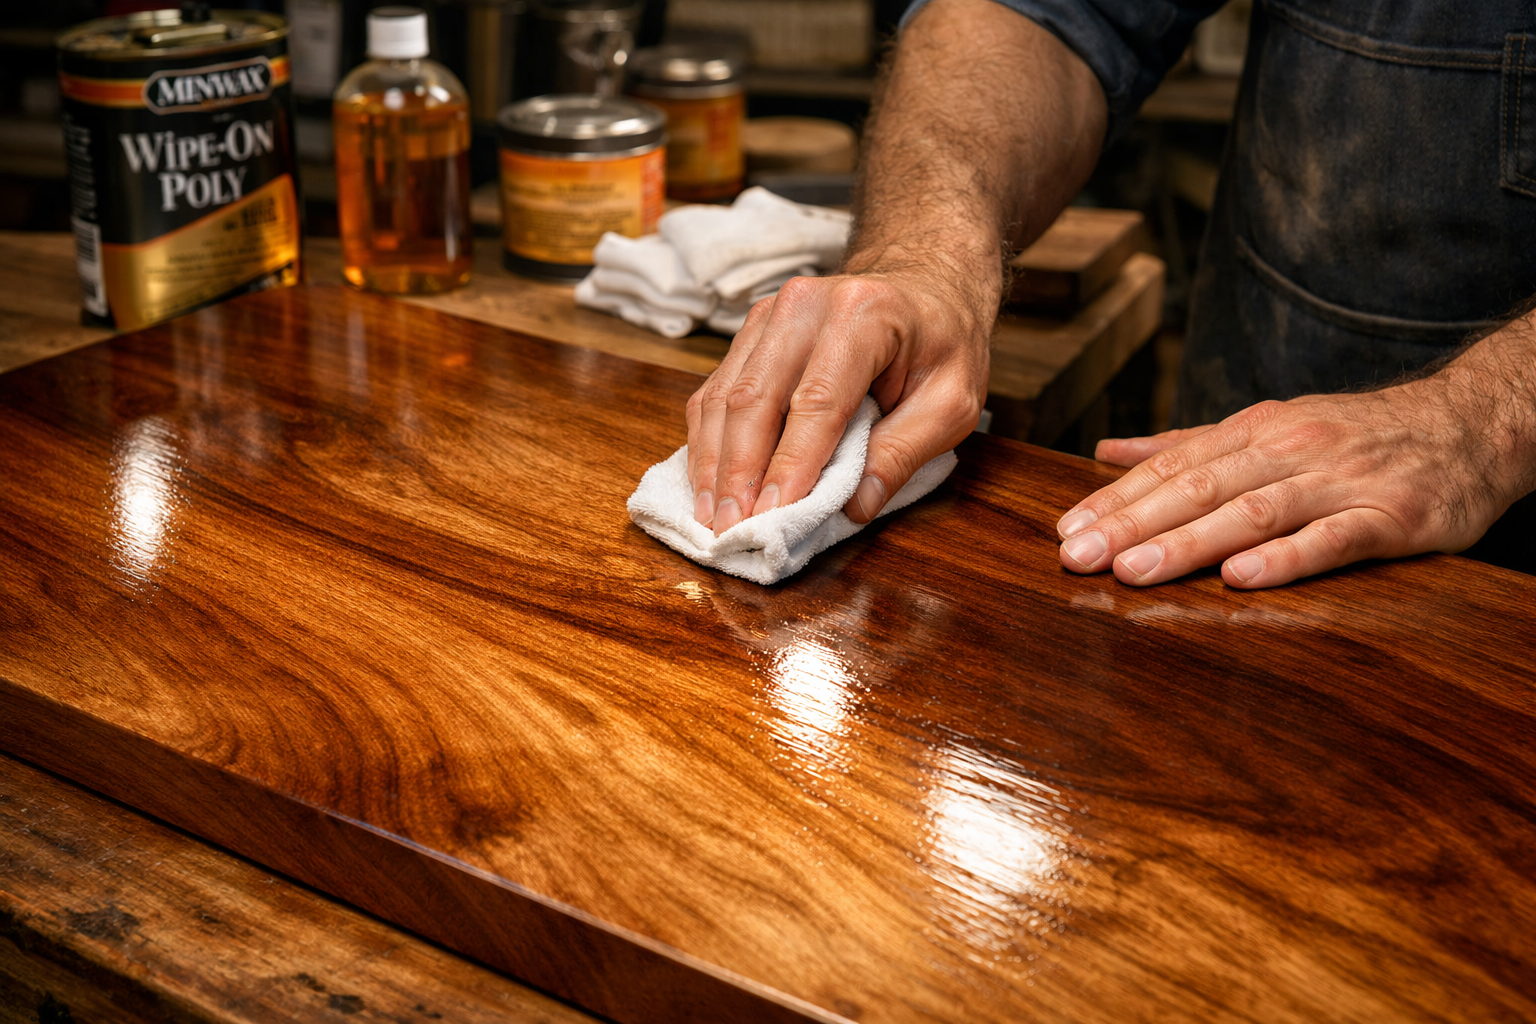
Applying Finishes for a Flawless Look
Once your sanding is complete and the surface is impeccably clean, the application of the finish itself becomes critical.
- Even Application: Whether brushing, wiping, or spraying, strive for thin, even coats. Multiple thin coats are always superior to a few thick ones.
- Dust-Free Environment: Dust is the enemy of a perfect finish. Work in as clean an environment as possible. Consider a dedicated finishing booth or at least ensure good ventilation and clean surfaces.
- Sanding Between Coats: For most film-building finishes, light sanding (denibbing) with 320-400 grit or 0000 steel wool between coats is essential. This smooths out any dust nibs or raised grain, providing better adhesion for subsequent layers and building a truly flat, smooth surface. Always clean thoroughly after sanding between coats.
- Final Buffing/Polishing: For the ultimate high-gloss finish, once the final coat has fully cured, you can wet-sand with ultra-fine grits (e.g., 1000, 2000, 3000 grit) and then machine-buff with polishing compounds. This is an advanced technique for achieving a mirror-like depth and clarity.
Remember, the finish you apply directly reflects the effort you put into surface preparation. A high-quality finish on a poorly sanded surface will always reveal the underlying flaws. Conversely, even a basic finish applied to a meticulously prepared surface will appear professional and beautiful. To explore further finishing options, consider diving into unique wood finishing techniques to see how different applications react to varied sanding preparations.
Conclusion
Mastering Beyond Basic Sanding: Achieving a Flawless Finish with Progressive Grits and Finishing Techniques is a transformative skill for any woodworker. It’s a deliberate, systematic process that demands patience, attention to detail, and an understanding of how each step influences the final outcome. By meticulously following a progressive grit sequence, employing correct sanding techniques, and managing dust effectively, you lay the groundwork for a finish that truly elevates your craftsmanship.

Don’t view sanding as a chore, but as an integral part of the artistic process. The hours invested in thoughtful preparation will pay dividends in the form of deep luster, silky smoothness, and a professional aesthetic that captures admiration. Start implementing these progressive grit strategies today, inspect your work rigorously, and watch your woodworking projects achieve a level of finish you never thought possible. Your projects deserve the flawless canvas that only meticulous sanding can provide.
