

The perception that a coffee table is merely a functional surface often overlooks its potential as a central decorative element, transforming any living space with its presence. In 2026, the demand for furniture that exudes warmth, character, and a sophisticated, understated elegance has surged, particularly for pieces like coffee tables. Achieving warm matte wood finishes for coffee tables, specifically mimicking rich walnut and oak tones, is not just a trend; it’s a testament to timeless craftsmanship and an appreciation for natural beauty. This guide provides a comprehensive, step-by-step approach to help DIY enthusiasts and seasoned woodworkers alike turn any coffee table into a modern showpiece, using precise product choices, sanding schedules, and finishing workflows optimized for indoor furniture.
Key Takeaways
- Proper wood preparation, including precise sanding schedules, is crucial for achieving an even, professional matte finish.
- Selecting the right stain or dye is essential for accurately mimicking rich walnut and oak tones on various wood species.
- Matte topcoats, such as water-based polyurethanes, hardwax oils, or natural oils, provide durability while preserving the desired low-sheen aesthetic.
- Testing your chosen finish system on scrap wood from your project is a non-negotiable step to ensure color accuracy and adhesion.
- Careful application techniques, including thin coats and proper drying times, prevent common finishing flaws like streaks or blotchiness.
Understanding Wood Types and Their Impact on Warm Matte Wood Finishes for Coffee Tables
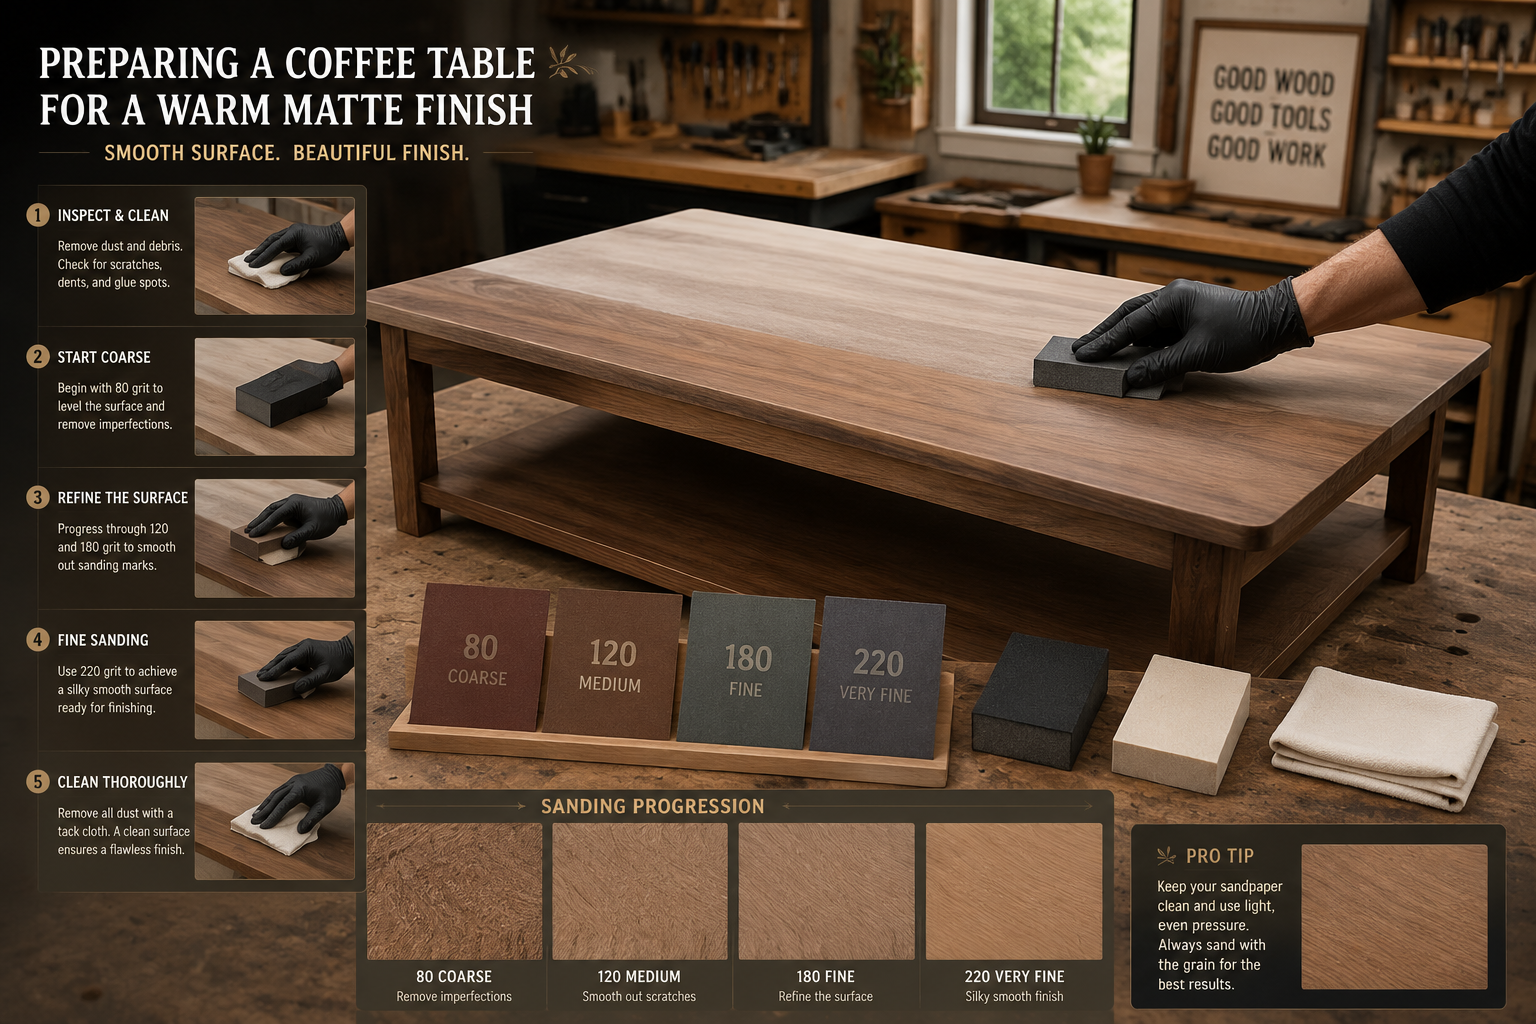
Before diving into the finishing process, it’s vital to understand the inherent characteristics of different wood species, as they significantly influence the final appearance of warm matte wood finishes for coffee tables. While the goal is to achieve rich walnut and oak tones, the underlying wood’s color, grain pattern, and porosity will dictate how stains and finishes react.
Wood Characteristics and Stain Absorption
Different woods absorb stains in unique ways due to their cellular structure.
- Porous Woods (e.g., Pine, Poplar, Birch): These woods tend to absorb stain unevenly, leading to blotchiness if not properly pre-treated. They often require a wood conditioner to achieve a more consistent color. While affordable, achieving deep, even walnut or oak tones on these can be challenging without careful preparation.
- Medium-Porous Woods (e.g., Maple, Cherry, Ash): These woods generally take stain more evenly than porous woods but can still benefit from a conditioner, especially for darker hues. Maple, for instance, has a tight grain that can resist stain penetration, making it appear lighter than expected.
- Dense Woods (e.g., Oak, Walnut, Mahogany): Oak and Walnut themselves are excellent choices for achieving their respective rich tones due to their natural color and open grain structure that readily accepts stain. When working with woods that already possess a similar natural hue, the finishing process often enhances rather than completely transforms. For example, enhancing the natural richness of oak or walnut can be done with a simple oil finish, achieving a beautiful natural wood finishing technique.
For DIY coffee tables, especially those built from readily available lumber, understanding these properties is the first step toward successful finishing. If you’re building a new piece, consider starting with a wood species that naturally aligns with your desired end tone. For instance, white oak is an excellent base for various oak tones, while woods like birch or even alder can be stained to mimic walnut with careful application. For those interested in incorporating unique materials, sourcing reclaimed and salvaged wood can also introduce distinct characteristics and challenges that must be accounted for in the finishing process.
The Foundation: Sanding and Preparation
The success of any wood finish, particularly a matte one, hinges on meticulous surface preparation. Imperfections left by inadequate sanding will be magnified by the finish, especially with a low-sheen application that doesn’t ‘fill in’ minor scratches.
Sanding Schedule for Optimal Matte Finishes
A precise sanding schedule is critical for achieving a smooth, even surface ready for staining and finishing.
- Start with Coarse Grit (80-100 grit): If the wood has significant imperfections, old finish, or mill marks, begin with 80 or 100 grit sandpaper. This step removes material quickly. Ensure all scratches from the previous grit are eliminated before moving on.
- Intermediate Grits (120-150 grit): Progress to 120-150 grit. This refines the surface and removes scratches left by the coarser grit. Always sand with the grain.
- Fine Grits (180-220 grit): For most coffee table applications and matte finishes, sanding up to 180 or 220 grit is sufficient. Going beyond 220 grit can sometimes ‘burnish’ the wood, closing off its pores and hindering stain absorption, particularly for oil-based stains. For specific woods or very light stains, 220 grit is often the maximum. For sustainable finishes for reclaimed wood, proper sanding also ensures maximum absorption and durability.
Important Considerations:
- Dust Removal: After each sanding stage, thoroughly remove all sanding dust using a shop vacuum, compressed air, and finally, a tack cloth. Residual dust can interfere with stain absorption and cause adhesion issues.
- Wood Conditioner: For porous or blotch-prone woods (like pine, maple, or birch), apply a pre-stain wood conditioner before staining. This helps equalize absorption and promotes a more uniform color. Apply according to manufacturer instructions, typically letting it penetrate for 5-15 minutes before wiping off the excess.
- Grain Raising: Water-based stains and finishes can raise the wood grain. To mitigate this, after sanding to your final grit, lightly dampen the wood surface with a clean, damp cloth. Allow it to dry completely, then lightly sand again with your final grit (e.g., 220) to knock down the raised fibers. This step creates a smoother finish.
Choosing Stains and Topcoats for Rich Walnut and Oak Tones
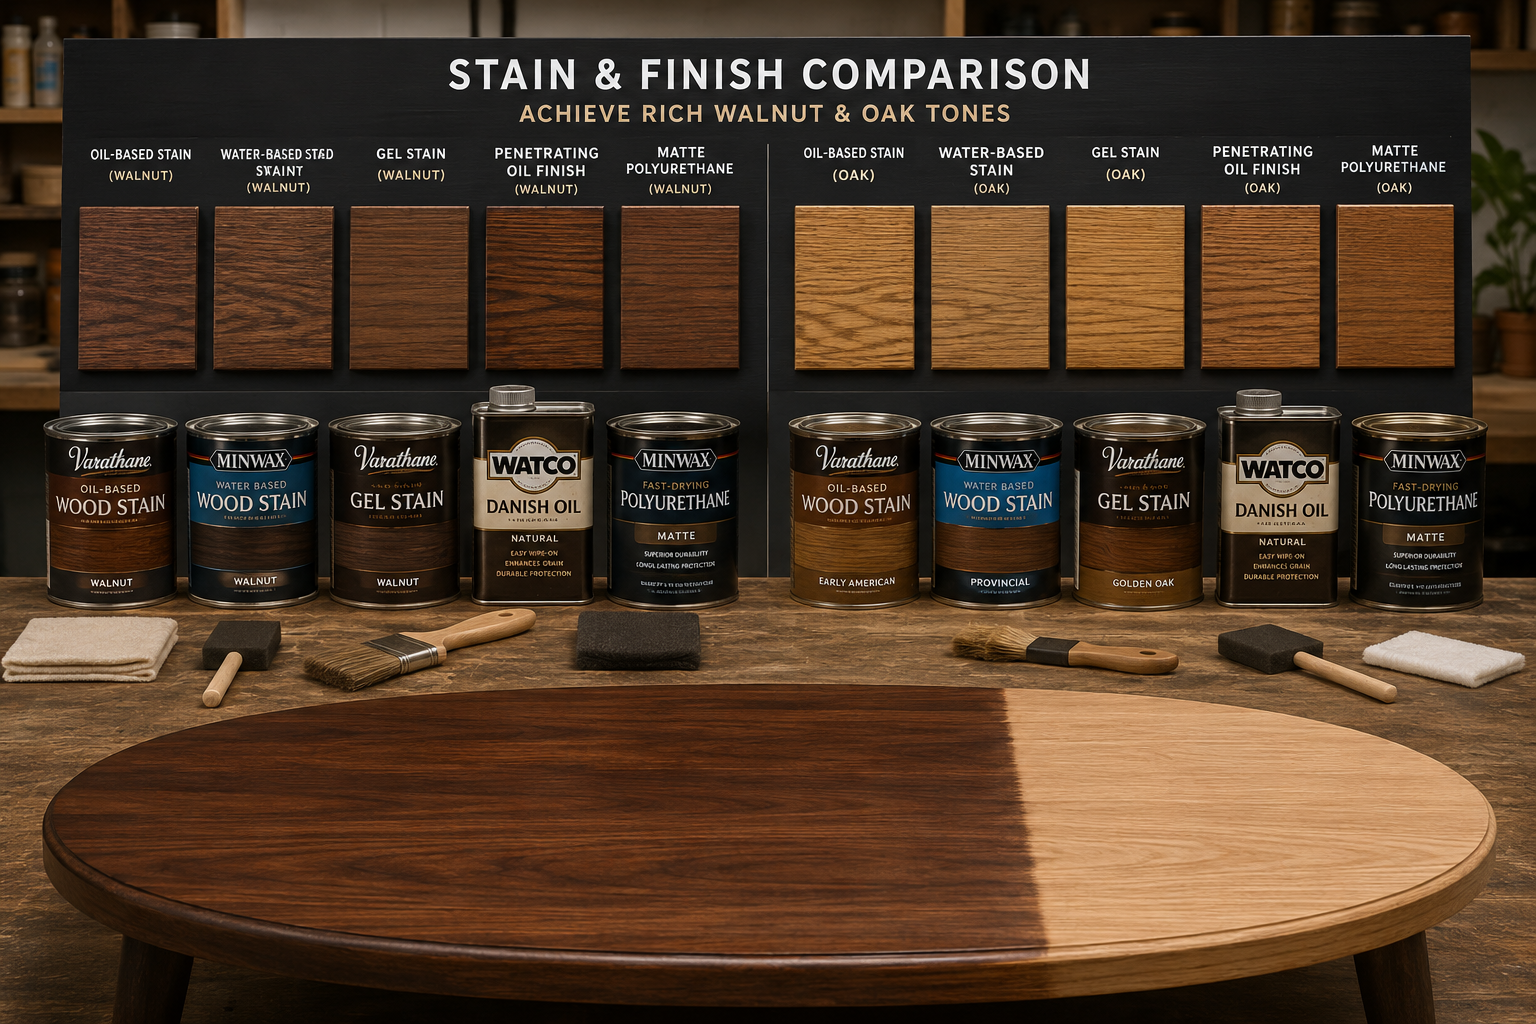
Selecting the right stain and topcoat is paramount to achieving the desired warm matte wood finishes for coffee tables. The choice impacts not only the color but also the durability and final aesthetic.
Stains and Dyes for Color Depth
To mimic rich walnut and oak tones, you’ll generally use stains or dyes. Stains contain pigments that sit in the wood’s pores, while dyes penetrate the wood fibers themselves.
Achieving Rich Walnut Tones
Walnut’s natural color ranges from light brown to a deep chocolate brown, sometimes with hints of purple or red. To replicate this:
- On Lighter Woods (e.g., Maple, Birch, Pine):
- Oil-Based Stains: Look for “Dark Walnut,” “Special Walnut,” or “True Black” (used sparingly to darken other browns) oil-based stains. Oil stains penetrate well and offer good color depth. Brands like Minwax, Varathane, and General Finishes offer reliable options.
- Gel Stains: Gel stains are excellent for blotch-prone woods as they sit more on the surface, offering more even color. “Walnut” or “Espresso” gel stains can provide deep, consistent color.
- Dyes: For very uniform color on tight-grained woods, alcohol or water-based dyes in a “Walnut” or “Dark Brown” can be effective, often used as a base coat before a pigmented stain.
- On Oak or Ash: These woods already have an open grain. A “Dark Walnut” oil stain will penetrate beautifully, enhancing the natural grain without completely obscuring it.
Achieving Rich Oak Tones
Oak’s characteristic is its prominent grain and often golden-brown to medium-brown color. To replicate this:
- On Lighter Woods (e.g., Pine, Poplar):
- Oil-Based Stains: “Golden Oak,” “Early American,” or “English Chestnut” can create warm, traditional oak tones. For a slightly darker, more contemporary look, consider “Special Walnut” which can bring out warm undertones similar to red oak.
- Water-Based Stains: These offer a wide range of natural wood tones and dry quickly. Look for “Warm Oak” or “Provincial” shades.
- On White Oak (to enhance its natural beauty):
- Clear Penetrating Oil Finishes: For a truly natural, warm oak look that enhances the grain without significantly altering the color, consider a clear or amber-toned penetrating oil finish like tung oil, linseed oil, or a hardwax oil. These bring out the wood’s natural depth.
- Light Stains: “Natural” or very light “Golden Oak” stains can simply enrich the existing color.
Application Tips for Stains:
- Test, Test, Test: Always test your stain on a hidden area of your coffee table or, ideally, on a scrap piece of the exact same wood that has been sanded identically. The same stain can look vastly different on various wood types.
- Wipe-On, Wipe-Off: Apply stain liberally with a brush or rag, allowing it to penetrate for a few minutes (check manufacturer’s recommendations), then thoroughly wipe off the excess with a clean rag. Leaving too much stain on the surface can result in a muddy, uneven finish and poor topcoat adhesion.
- Multiple Coats: For deeper color, apply thin multiple coats of stain, allowing each coat to dry completely before applying the next.
Matte Topcoats for Durability and Aesthetics
The topcoat protects the wood and stain while defining the final sheen. For a warm matte finish, avoid anything labeled “satin,” “semi-gloss,” or “gloss.”
Types of Matte Topcoats
- Matte Water-Based Polyurethane:
- Pros: Durable, low odor, dries quickly, non-yellowing, easy cleanup.
- Cons: Can sometimes feel a bit “plasticky” if applied too thickly.
- Application: Apply 2-3 thin coats with a foam brush or sprayer. Lightly sand with 320-400 grit sandpaper between coats (after drying) for optimal adhesion and smoothness.
- Hardwax Oils (e.g., Osmo Polyx-Oil, Rubio Monocoat):
- Pros: Highly durable, natural look and feel, repairable, penetrates rather than forms a film, often low-VOC. Creates a beautiful, tactile finish. Excellent choice for warm minimalism in woodworking.
- Cons: Can be more expensive, specific application instructions (often a single coat, sometimes a second very thin coat).
- Application: Follow manufacturer’s instructions precisely. Typically applied very thinly with a pad or cloth, allowed to penetrate, and then thoroughly buffed to remove excess.
- Oil Finishes (e.g., Tung Oil, Linseed Oil, Danish Oil):
- Pros: Deeply penetrates, enhances natural wood grain, easy to apply and repair, very natural feel.
- Cons: Less durable than polyurethane or hardwax oils for high-traffic surfaces like coffee tables, slower drying, can darken over time (especially tung and linseed).
- Application: Apply multiple thin coats, wiping off all excess after each coat. This builds protection within the wood.
- Matte Lacquer:
- Pros: Dries very fast, provides a smooth, durable finish.
- Cons: Requires spray application, strong fumes, less DIY-friendly for beginners.
- Application: Best left to experienced users with proper ventilation and spray equipment.
Important Topcoat Considerations:
- Compatibility: Ensure your topcoat is compatible with your chosen stain. Oil-based stains usually need more drying time before water-based topcoats. Always check product labels.
- Abrasion between coats: For film-forming finishes like polyurethane, a light scuff sanding between coats (with 320-400 grit) helps with adhesion and smooths any dust nibs. Always wipe clean with a tack cloth before the next coat.
- Even Application: Apply topcoats in thin, even layers. Thicker coats are prone to drips, uneven drying, and an unnatural, plasticky appearance, which is counter to the matte aesthetic.
- Cure Time: While finishes may be dry to the touch in hours, they need days or even weeks to fully cure and achieve maximum hardness. Treat the coffee table gently during this period.
The Finishing Workflow: Step-by-Step for Warm Matte Wood Finishes for Coffee Tables
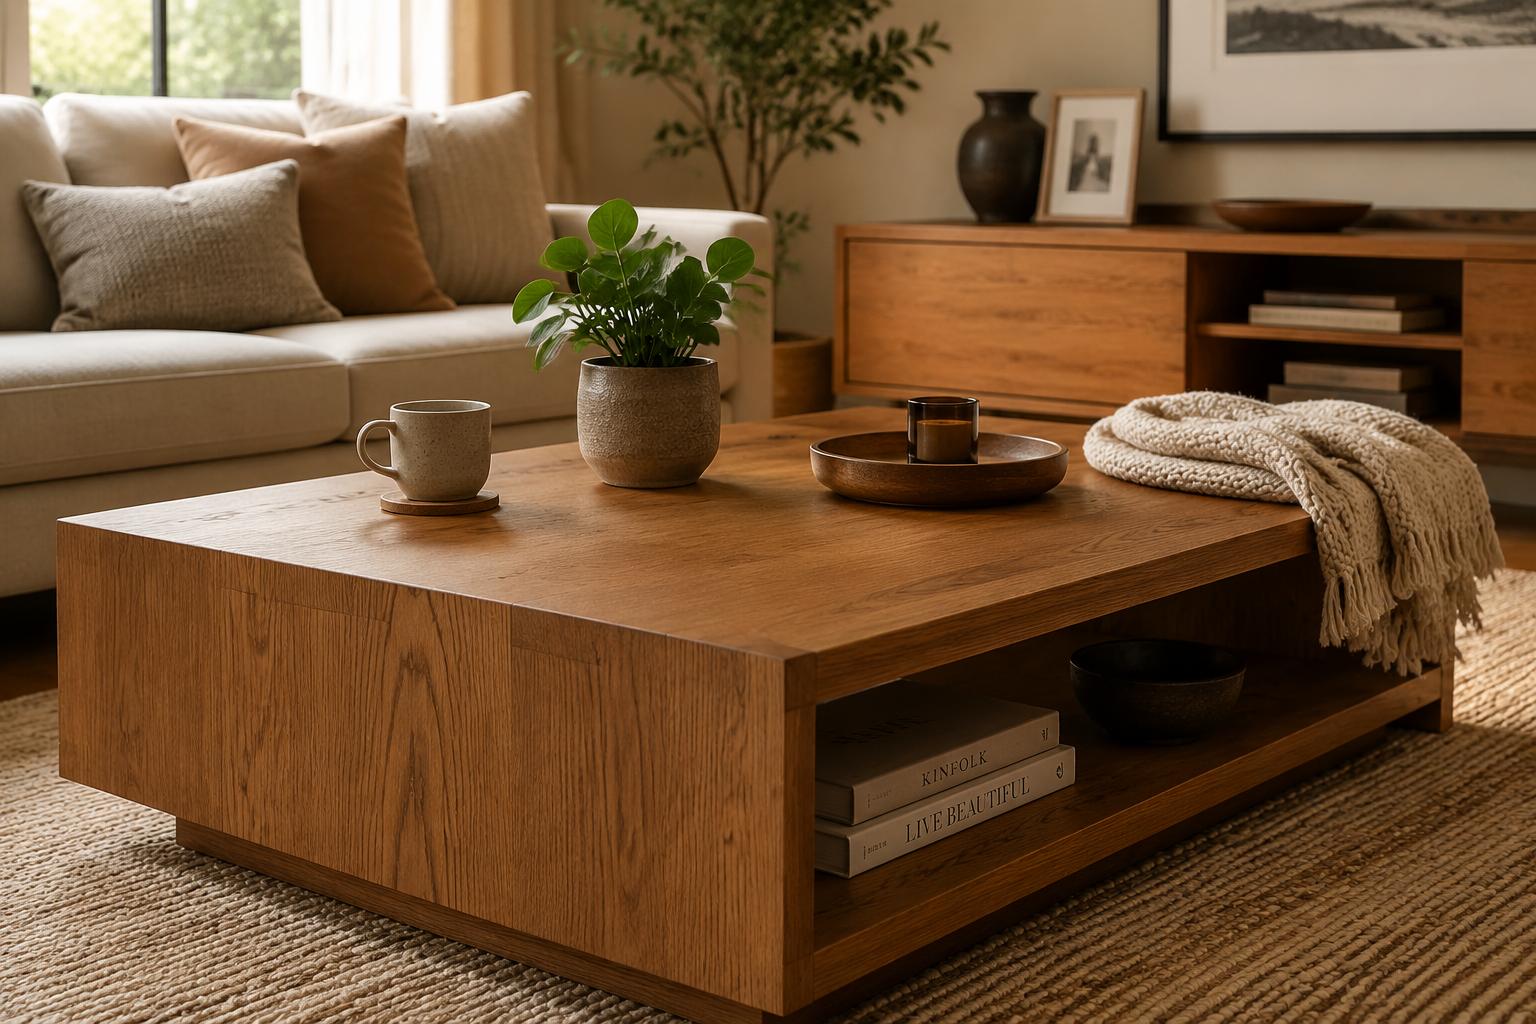
Achieving professional-grade warm matte wood finishes for coffee tables requires a methodical approach. This workflow combines preparation, staining, and topcoat application into a cohesive process.
Step-by-Step Finishing Process
- Initial Surface Preparation and Repairs:
- Inspect your coffee table for any dents, scratches, or imperfections. Fill small holes or cracks with wood filler that accepts stain, if necessary. Allow filler to dry completely.
- If there’s an existing finish, strip it completely using chemical strippers or extensive sanding. For guidance on working with salvaged materials, see our article on sourcing reclaimed and salvaged wood.
- Sanding to Final Grit:
- Follow the detailed sanding schedule: start with 80-100 grit (if needed), then 120-150 grit, finishing with 180-220 grit.
- Always sand with the grain, ensuring all scratches from previous grits are removed.
- Thoroughly clean the surface after each grit with a shop vacuum and tack cloth.
- Wood Conditioning (If Applicable):
- For blotch-prone woods (pine, maple, birch), apply a pre-stain wood conditioner. Allow it to penetrate for 5-15 minutes, then wipe off excess according to manufacturer instructions. Do not let it dry completely before staining.
- Grain Raising (Optional but Recommended):
- Lightly wipe the entire surface with a damp cloth (distilled water is ideal). Let it dry completely.
- Lightly sand with your final grit (220 grit) to knock down the raised grain fibers. Clean thoroughly with a tack cloth.
- Stain Application:
- Stir the stain thoroughly. Apply an even coat of your chosen stain (walnut or oak tone) with a brush or clean rag, working with the grain.
- Allow the stain to penetrate for the recommended time (typically 5-15 minutes), then thoroughly wipe off all excess with clean, lint-free rags.
- Allow the first coat to dry completely (check manufacturer’s recommendations, usually 8-24 hours). If a darker color is desired, apply a second thin coat, wiping off excess, and allowing it to dry.
- Always test on scrap wood first to ensure the desired color is achieved.
- First Topcoat Application (Seal Coat):
- Once the stain is completely dry, apply the first thin coat of your chosen matte topcoat (e.g., water-based polyurethane, hardwax oil).
- For film-building finishes, apply with a foam brush or sprayer. For penetrating oils, apply with a rag and buff off excess.
- Ensure even coverage. Allow to dry completely as per manufacturer instructions.
- Sanding Between Topcoats (for film-building finishes):
- Lightly scuff sand the first dried topcoat with 320-400 grit sandpaper or a fine sanding pad. This provides mechanical adhesion for the next coat and smooths any imperfections or dust nibs.
- Clean thoroughly with a tack cloth to remove all sanding dust. Do NOT sand hardwax oils or penetrating oils between coats unless specifically instructed by the manufacturer.
- Subsequent Topcoats:
- Apply 2-3 more thin coats of the matte topcoat, allowing each to dry and lightly scuff-sanding between each (for film-building finishes). The final coat should not be sanded.
- Ensure consistency in application to maintain an even matte sheen.
- Cure Time:
- Allow the finished coffee table to fully cure according to the product’s specifications (can be several days to weeks) before placing heavy objects or allowing extensive use. This ensures maximum durability.
By following this detailed workflow, you can achieve beautiful, durable warm matte wood finishes for coffee tables that mimic the rich, inviting tones of walnut and oak, elevating your DIY furniture project to a professional standard. For other furniture projects, similar finishing principles apply, such as when crafting custom wooden record player consoles. The journey from raw wood to a stunning finished piece is rewarding, demonstrating the power of careful technique and quality materials.
Conclusion
Achieving warm matte wood finishes for coffee tables in rich walnut and oak tones is a transformative process that blends meticulous preparation with informed product selection and precise application. As demonstrated, understanding the unique characteristics of different wood species, employing a rigorous sanding schedule, and carefully choosing compatible stains and matte topcoats are the cornerstones of success. Whether you opt for the deep, sophisticated allure of walnut or the classic, inviting warmth of oak, the matte finish ensures a contemporary yet timeless aesthetic that highlights the wood’s natural beauty without the distraction of glare.
The investment of time and effort in each step, from conditioning blotch-prone woods to meticulously wiping off excess stain and applying thin, even coats of topcoat, pays dividends in the form of a durable, beautiful, and tactile surface. Remember, testing your finish system on scrap wood is not merely a suggestion but a critical step to guarantee your desired outcome. With these techniques in hand, you are well-equipped to turn any coffee table into a central showpiece, imbuing your living space with the warmth and character that only expertly finished wood can provide.
Actionable Next Steps:
- Assess Your Wood: Identify the wood species of your coffee table and research its porosity and how it typically reacts to stains.
- Gather Supplies: Purchase high-quality sandpaper in varying grits, wood conditioner (if needed), your chosen stain (walnut or oak tone), and a compatible matte topcoat (water-based polyurethane, hardwax oil, or penetrating oil).
- Prepare a Test Piece: Obtain a scrap piece of the exact same wood as your coffee table and sand it identically to your main project. This is crucial for testing stains and topcoats.
- Execute the Workflow: Follow the step-by-step sanding, conditioning, staining, and topcoat application workflow detailed in this article, paying close attention to drying and cure times.
- Maintain Your Finish: Once cured, maintain your warm matte coffee table finish with appropriate cleaners and occasional reapplication or touch-ups as recommended by the finish manufacturer.
SEO Meta Title: Warm Matte Wood Finishes: Walnut & Oak Coffee Table Guide SEO Meta Description: Achieve stunning warm matte walnut & oak wood finishes for coffee tables in 2026. Step-by-step guide on sanding, staining, and topcoats for rich, durable results.