


The average household hosts entertaining events, from casual get-togethers to formal dinners, multiple times a year, often underestimating the impact presentation has on the overall guest experience. A well-designed serving piece, particularly a bespoke item like a wooden serving tray, can transform a simple arrangement of appetizers into a memorable display. Wooden serving trays, especially those with elevated designs, integrated handles, and intricate decorative inlays, stand as a testament to craftsmanship and thoughtful hospitality, making them perfect intermediate woodworking projects for gifting or sales in 2026. This article explores the art and utility of these functional art pieces, offering insights into their design, construction, and the specific considerations for creating truly exceptional items.
Key Takeaways
- Elevated Aesthetics: Wooden serving trays with handles and decorative inlays combine practicality with artistic flair, enhancing any entertaining setup.
- Design Versatility: Various wood species, handle styles, and inlay techniques allow for endless customization, suiting diverse interior design themes.
- Intermediate Woodworking Project: These trays offer a balanced challenge, blending flat panel work, precise joinery for handles, and decorative inlay techniques.
- Food Safety is Paramount: Choosing and applying food-safe finishes is critical for trays intended to serve consumables directly.
- Market Appeal: High-quality, handcrafted wooden serving trays make excellent gifts and marketable products due to their blend of utility and beauty.
The Allure of Wooden Serving Trays: Elevated Designs with Handles and Decorative Inlays for Entertaining
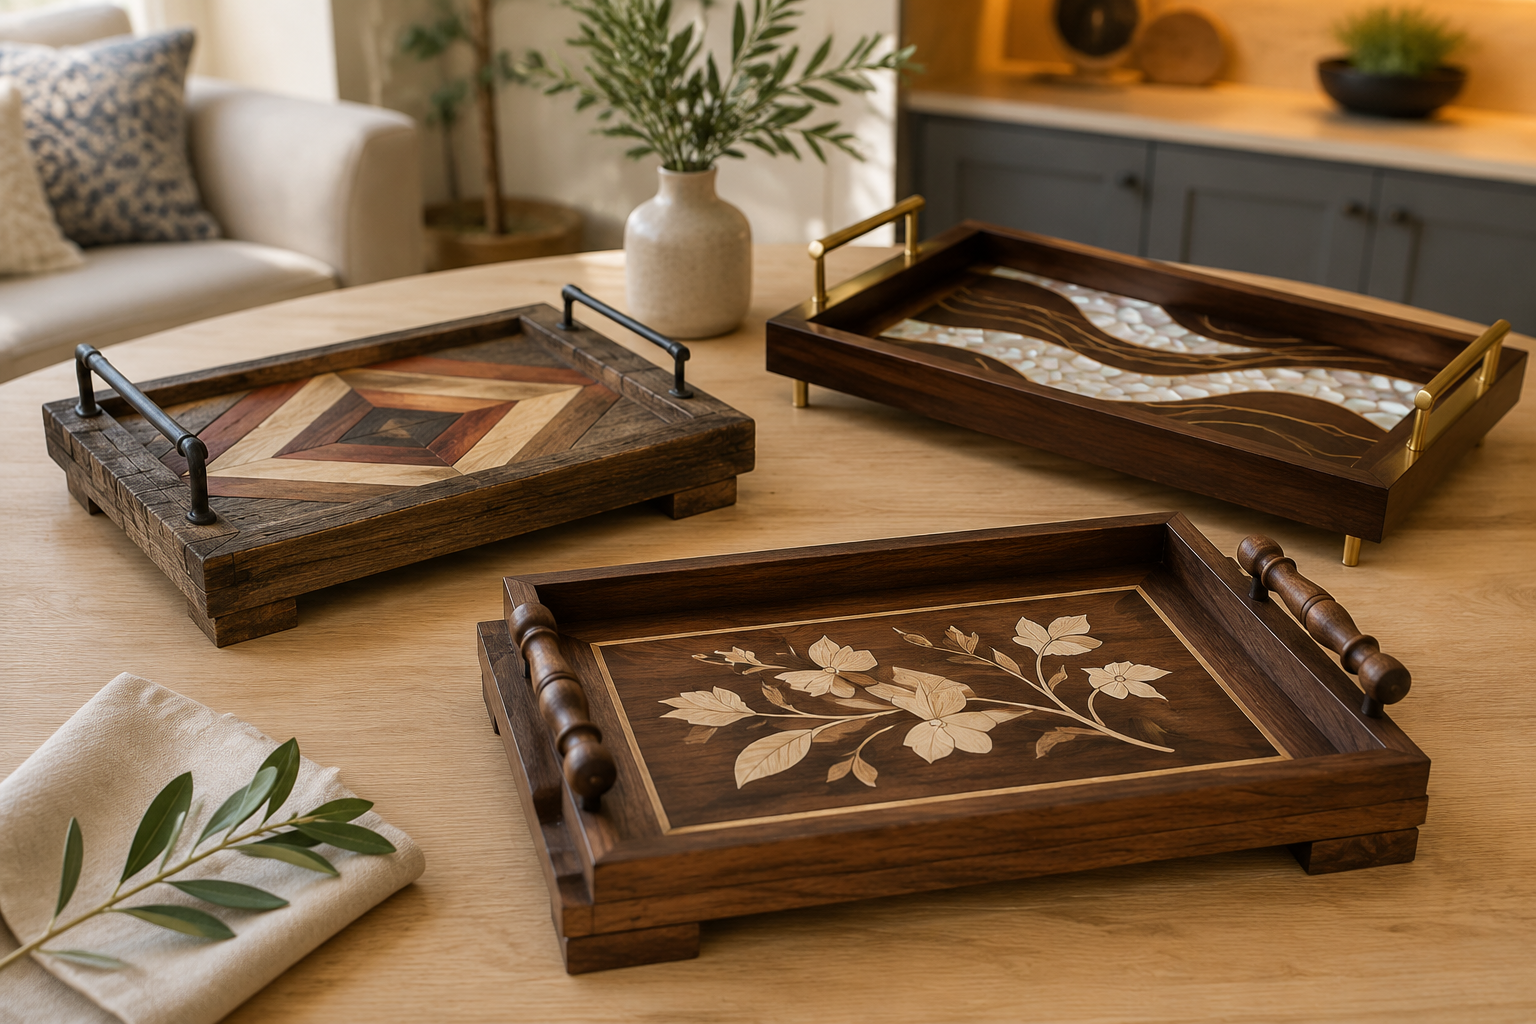
Wooden serving trays are more than just practical tools for transporting food and drinks; they are statement pieces that reflect a host’s attention to detail and appreciation for fine craftsmanship. In 2026, the demand for unique, handcrafted home goods continues to grow, making these trays particularly appealing to both makers and consumers. The combination of sturdy construction, ergonomic handles, and visually striking decorative inlays elevates a simple tray into a focal point, enriching the aesthetic of any gathering.

Designing a superior wooden serving tray involves thoughtful consideration of several elements: the choice of wood, the style and integration of handles, and the complexity and placement of decorative inlays. Each decision contributes to the tray’s functionality, durability, and visual appeal. For instance, hardwoods like walnut, maple, or cherry are favored for their durability and attractive grain patterns, offering a robust foundation for an elegant piece.
Selecting the Right Wood for Your Serving Tray
The foundation of any great wooden serving tray is the wood itself. Different species offer unique characteristics in terms of color, grain, hardness, and workability.
| Wood Species | Characteristics | Ideal Use |
|---|---|---|
| Walnut | Rich dark brown, beautiful grain, good stability, easy to work with. | Elegant, high-end trays. |
| Maple | Light, fine grain, very hard, durable, takes finishes well. | Modern, clean designs, often for contrasting inlays. |
| Cherry | Reddish-brown, darkens with age, smooth texture, good workability. | Classic, warm-toned trays. |
| Oak | Pronounced grain, very strong, good for rustic or sturdy designs. | Durable, rustic trays, complements industrial handles. |
| Sapele | Ribbon-like grain, reddish-brown, similar to mahogany, stable. | Exotic, elegant designs with a touch of warmth. |
When selecting wood, consider its density. Denser woods are more resistant to scratches and dents, which is crucial for an item that will see frequent use. Furthermore, stability is key to prevent warping, especially if the tray will be exposed to varying temperatures or moisture levels, common during entertaining.
Integrating Handles for Functionality and Style
Handles are integral to a serving tray’s functionality. They must be comfortable to grip, sturdy enough to bear weight, and aesthetically integrated into the overall design. Options range from simple routed finger holds to ornate metal or turned wooden handles.
- Routed Handles: These are cut directly into the tray’s side or top surface. They offer a seamless look but can limit the carrying capacity if not designed correctly. Careful routing, perhaps with a round-over bit for comfort, is essential. For those looking to master precision cuts, exploring resources on Mastering the Router Table: Essential Jigs, Safety, and Advanced Techniques can be beneficial.
- Attached Handles: These can be made from wood, metal (brass, wrought iron, stainless steel), or even leather.
- Wooden Handles: Can be carved, turned on a lathe (refer to Introduction to Wood Turning for Beginners: Mastering Basic Lathe Operations and Simple Bowl Projects for foundational skills), or simple dowels. They offer continuity with the tray’s material.
- Metal Handles: Provide a contrasting texture and often a modern or industrial aesthetic. Brass handles can complement warm wood tones beautifully.
- Leather Handles: Add a rustic or bohemian touch, often attached with decorative hardware.
When attaching handles, secure joinery is paramount. Through-tenons, mortise and tenon joints, or sturdy screws reinforced with plugs can ensure longevity. For advanced joinery techniques, articles such as Mastering Dovetail Joints with Hand Tools: A Step-by-Step Guide for Flawless Wood Joinery offer valuable insights into creating strong and visually appealing connections.
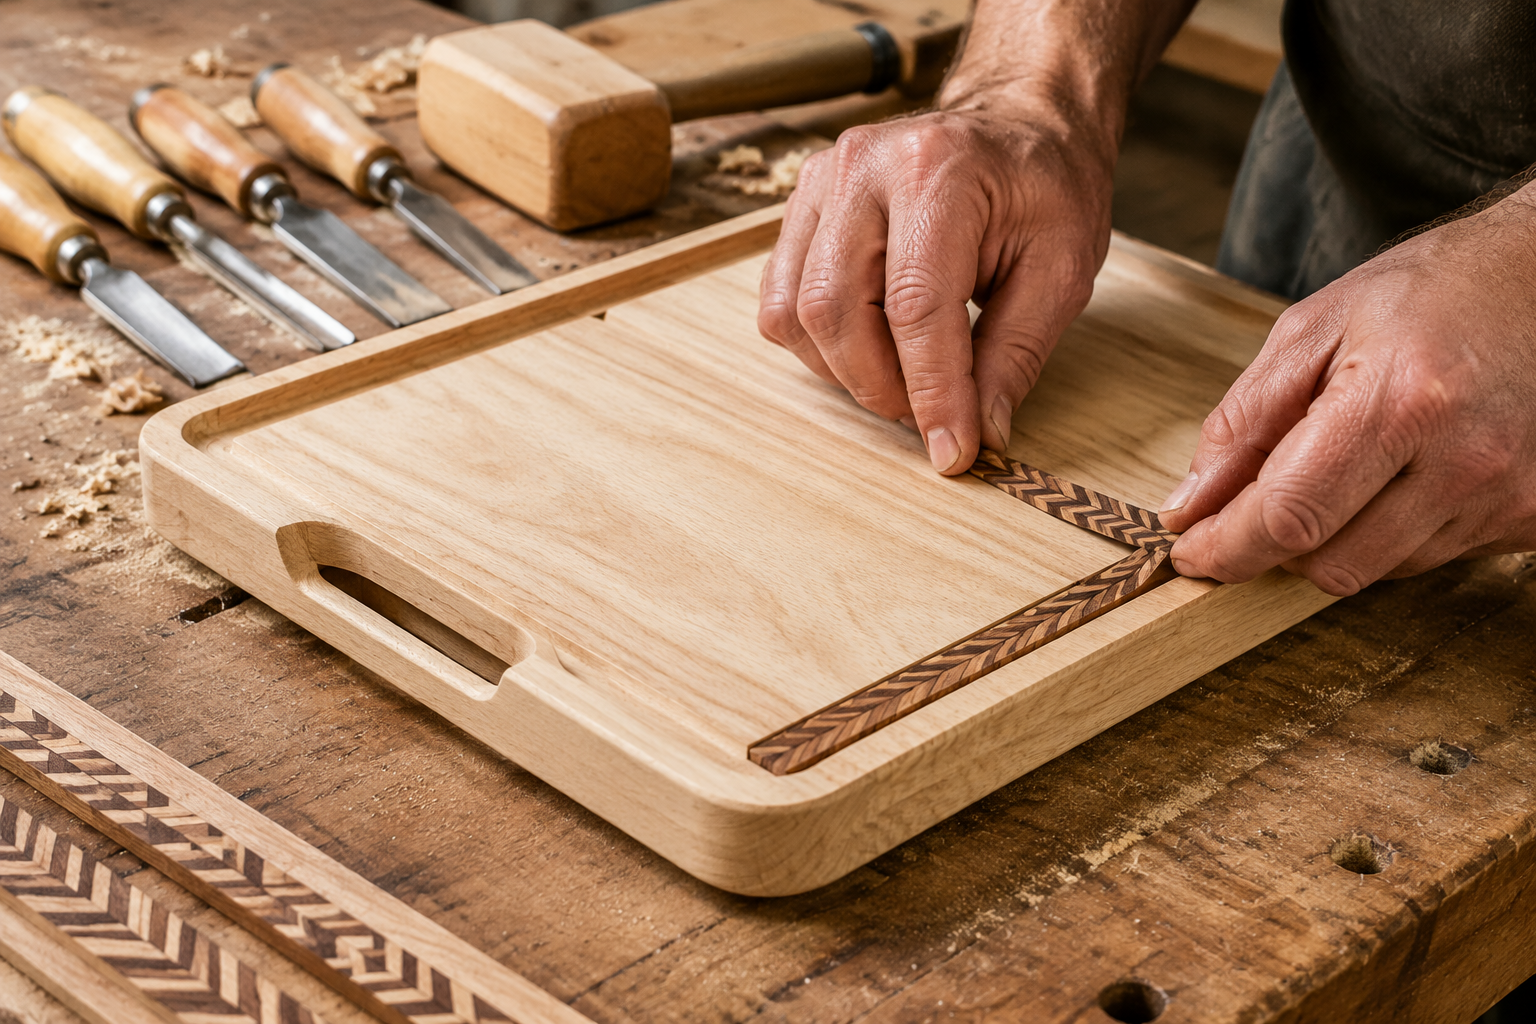
Crafting Decorative Inlays for Visual Impact
Decorative inlays transform a simple wooden panel into a work of art. Inlay involves embedding contrasting materials—often different wood species, mother-of-pearl, metal, or even stone—into the surface of the primary wood. This creates patterns, pictures, or borders that catch the eye and add a luxurious feel.
Popular Inlay Techniques:
- Marquetry: This technique uses veneers of different woods to form intricate pictures or patterns that are then inlaid into a larger wooden surface. The precision required makes this an intermediate to advanced skill.
- Parquetry: Similar to marquetry, but uses geometric patterns, often repeating, to create decorative effects.
- String Inlay: Thin strips of contrasting wood or material are used to create fine lines or borders. This is a good starting point for beginners in inlay work.
- Geometric Inlays: Simple shapes like squares, diamonds, or stripes cut from contrasting wood are embedded into routed recesses.
Achieving a seamless inlay requires precise cuts and careful fitting. Using a router with a fine bit or even hand chisels for delicate work is common. The inlay material should be chosen not only for its color and grain but also for its stability and compatibility with the primary wood. The goal is a flush surface where the inlay feels integral to the tray, not simply applied.
Constructing Wooden Serving Trays: Elevated Designs with Handles and Decorative Inlays
Building a wooden serving tray that combines elevated design, sturdy handles, and decorative inlays requires a methodical approach. From initial design to final finishing, each step demands precision and attention to detail, ensuring a durable and beautiful product ready for entertaining.
Design and Planning
Before any cutting begins, a detailed design plan is crucial. Sketch the tray, specifying dimensions, wood species for the main body and inlay, handle type, and inlay pattern. Consider the tray’s intended use—will it hold heavy dishes, delicate pastries, or drinks? This influences structural decisions.
Key Design Considerations:
- Size and Depth: A common serving tray might be 16×20 inches with a rim height of 1-2 inches. Deeper trays are better for items that might slide or spill.
- Base Construction: A solid wood panel or a plywood base with solid wood edging are popular choices. A solid wood base offers superior aesthetics but requires careful wood movement considerations.
- Rim/Sides: These define the tray’s boundaries and prevent items from falling off. They can be joined with simple butt joints, mitered corners, or more robust joinery like box joints for added strength and visual interest.
- Footing: Small feet can elevate the tray slightly, protecting surfaces and making it easier to pick up. These can be integrated into the base design or added as separate elements.
The Building Process: Step-by-Step
- Stock Preparation: Mill all wood to the required thickness, width, and length. Ensure all surfaces are flat and square. If using multiple pieces for the base, glue them up using strong, flat joints.
- Base and Side Fabrication:
- Cut the base panel to size.
- Cut the side pieces, ensuring precise angles for corners.
- Rout any desired grooves or recesses for the base panel into the side pieces.
- Assemble the sides around the base, using chosen joinery. Clamping pressure and proper glue application are vital for strong joints.
- Handle Integration:
- If using routed handles, carefully lay out their position and use a router with a template or fence to cut the recesses. Finish with sanding or a round-over bit for comfort.
- For attached handles, pre-drill holes for screws or prepare joinery. Ensure handles are level and securely fastened.
- Inlay Application:
- Layout: Mark the inlay pattern precisely on the tray’s surface.
- Routing/Carving: Use a router with a guide collar or a precision hand chisel to create the recess for the inlay material. The depth should match the inlay’s thickness for a flush fit.
- Inlay Cutting: Cut the inlay material to perfectly fit the routed recess. Precision is key here; a slight mismatch will be visible.
- Glue Up: Apply a thin, even layer of appropriate glue (e.g., wood glue for wood inlays, epoxy for non-wood materials) to the recess and press the inlay firmly into place.
- Clamping: Use cauls and clamps to apply even pressure across the inlay until the glue dries, ensuring a perfectly flush surface.
- Sanding: Once dry, carefully sand the entire surface, starting with coarser grits and progressively moving to finer ones, until the inlay is perfectly flush with the tray’s surface and the wood is smooth.
Finishing and Care for Your Wooden Serving Trays: Elevated Designs with Handles and Decorative Inlays
The finishing stage is where a wooden serving tray truly comes to life. It protects the wood, enhances its natural beauty, and makes it safe for use with food. Given that these trays are often used for entertaining, selecting a food-safe finish is non-negotiable.
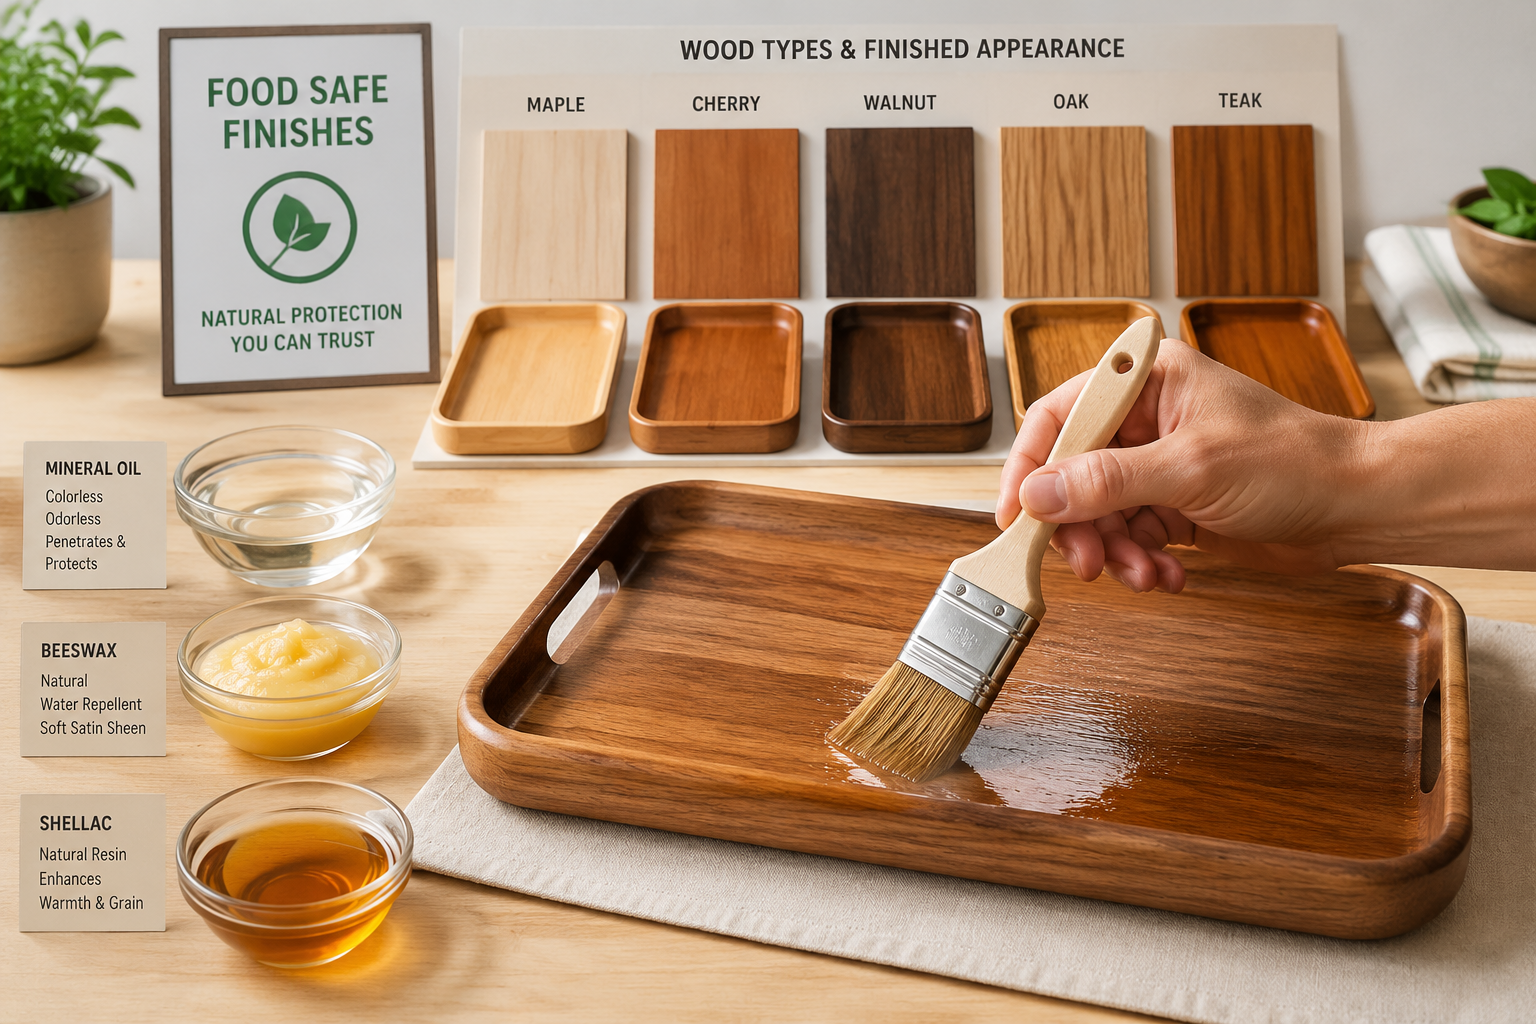
Choosing Food-Safe Finishes
For items that will come into direct contact with food, the finish must be non-toxic once cured. While many finishes are technically food-safe after full curing, some are better suited for direct food contact than others.

Common Food-Safe Finish Options:
- Mineral Oil: This is a popular choice, readily available, inexpensive, and easy to apply. It penetrates the wood, enhancing its color, but offers minimal protection against moisture and requires frequent reapplication.
- Beeswax/Carnuba Wax: Often combined with mineral oil to create a paste wax. This provides a slightly more durable and water-resistant finish than oil alone, offering a soft sheen.
- Walnut Oil/Tung Oil (Pure): These natural drying oils penetrate deeply and polymerize, offering better water resistance and durability than mineral oil. Ensure “pure” versions are used, as some products contain petroleum distillates or heavy metal dryers.
- Shellac: A natural resin that provides a beautiful, clear finish. It is food-safe once cured (made from beetle secretions, it’s even used as a confectionery glaze). However, it’s not very resistant to alcohol or hot liquids, which can be a concern for serving trays.
- Hardwax Oils: Products like Osmo Polyx-Oil or Rubio Monocoat are blends of natural oils and waxes that offer excellent durability, water resistance, and a beautiful matte or satin finish. Many are specifically formulated to be food-safe. For more on natural finishes, explore our guide on Natural Wood Finishing Techniques.
Finishes to Approach with Caution (or Avoid for Direct Food Contact):
- Polyurethane/Varnish: While generally considered food-safe once fully cured, their plastic-like film can be easily scratched, potentially exposing food to underlying layers or creating areas for bacteria to harbor. They are better suited for surfaces where food contact is indirect.
- Stains: Most stains are not food-safe. If staining is desired, ensure it’s fully sealed under a food-safe topcoat, but direct food contact is still generally discouraged.
Application Techniques for a Flawless Finish
Regardless of the finish chosen, proper application is crucial for durability and appearance.
- Surface Preparation: This is arguably the most important step. Sand the tray thoroughly, progressing through grits from 120-220, or even 320 for a silky smooth finish. Remove all dust between grits.
- First Coat: Apply the chosen finish according to the manufacturer’s instructions. For oils, apply generously, let it soak in, then wipe off excess. For hardwax oils, apply sparingly.
- Drying/Curing: Allow ample time for the finish to dry and cure. This can take days or even weeks, especially for oil-based finishes. A fully cured finish is less likely to transfer odors or chemicals to food.
- Subsequent Coats: Most finishes benefit from multiple thin coats. Lightly sand with very fine sandpaper (320-400 grit) or fine abrasive pads between coats to ensure good adhesion and a smooth surface.
- Buffing: For wax finishes, buffing with a soft cloth will bring out a gentle sheen.
Maintenance and Care
To ensure your wooden serving tray lasts for years of entertaining, proper care is essential.
- Cleaning: Wipe down the tray with a damp cloth immediately after use. Avoid soaking the tray in water or placing it in a dishwasher, as this can cause warping, cracking, or damage to the finish.
- Drying: Always dry the tray thoroughly with a clean cloth after wiping.
- Re-oiling: For oil or wax finishes, reapply periodically (every few months or as needed) to maintain protection and luster. Signs that re-oiling is needed include the wood looking dry or losing its sheen.
- Avoid Extreme Conditions: Do not expose the tray to prolonged direct sunlight or extreme temperature changes, which can lead to cracking or warping.
By focusing on food-safe finishes and diligent care, your handcrafted wooden serving trays with elevated designs, handles, and decorative inlays will remain beautiful and functional, serving as cherished pieces for entertaining for years to come. Such attention to detail also applies to other woodworking projects, such as ensuring is ebonized wood food safe when used for kitchen items, or selecting appropriate finishes for Ultimate Guide to Wooden Cutting Boards.
Conclusion
Wooden serving trays, particularly those featuring elevated designs, integrated handles, and intricate decorative inlays, are far more than mere utilitarian objects. They are artisanal creations that enhance the experience of entertaining, serving as a testament to the maker’s skill and an expression of refined taste. For the intermediate woodworker, crafting such a tray presents a rewarding challenge, blending precision flat panel work, thoughtful handle integration, and the delicate art of inlay.
By carefully selecting appropriate wood species, designing ergonomic and stylish handles, and executing decorative inlays with precision, woodworkers can create pieces that are not only durable and functional but also visually stunning. Crucially, the commitment to food-safe finishes ensures that these beautiful objects can safely interact with consumables, making them ideal for any occasion. In 2026, the market for unique, high-quality handcrafted items remains robust, offering a fantastic opportunity for both personal enjoyment and commercial success. Embarking on this project allows you to hone your skills, produce a meaningful gift, or create a valuable product for sale.
Actionable Next Steps:
- Sketch Your Design: Begin by detailing your ideal tray, including dimensions, handle style, and a simple inlay pattern.
- Source Materials: Select a hardwood known for stability and beauty, and choose contrasting materials for your inlay.
- Practice Techniques: Before working on your final piece, practice routing for handles and cutting simple inlay shapes on scrap wood.
- Invest in Quality Tools: Ensure you have sharp chisels, reliable routers, and effective clamping solutions for precise work.
- Prioritize Food Safety: Research and choose a genuinely food-safe finish that complements your chosen wood and will provide lasting protection.
SEO Meta Title: Wooden Serving Trays: Elevated Designs with Handles & Inlays SEO Meta Description: Explore elevated wooden serving trays with handles and decorative inlays. Learn design, construction, and food-safe finishing for entertaining in 2026.
