


For many woodworkers, the workshop is a sanctuary – a place of creativity and productivity. However, in small workshops, this sanctuary can quickly become a chaotic mess, hindering workflow and stifling inspiration. The solution lies in thoughtful design and efficient storage. This article will guide you through the process of Building Modular Wood Storage Systems for Small Workshops: Maximizing Space and Organization, transforming cramped areas into highly functional, adaptable workspaces in 2026. Learn to design and construct versatile, reconfigurable wooden storage modules for tools, materials, and project components, perfect for optimizing workflow and space in compact workshops.
The core principle behind modular storage is flexibility. Instead of fixed, rigid structures, you create independent units that can be rearranged, added to, or removed as your needs evolve. This dynamic approach is particularly beneficial for small spaces, allowing every inch to be utilized effectively.

Key Takeaways
- Design for Adaptability: Focus on creating independent, standardized modules that can be easily reconfigured to suit changing storage needs.
- Utilize Vertical Space: Small workshops benefit immensely from going vertical with shelves, wall-mounted units, and stacking modules.
- Material Selection Matters: Plywood and MDF offer excellent stability and workability for modular construction, providing a strong base for your system.
- Optimize Workflow: Position modules logically to create efficient work zones, minimizing movement and maximizing productivity.
- Label Everything: Clear labeling is crucial for maintaining organization within a modular system, saving time and reducing frustration.
Designing Your Modular Storage System for Maximum Efficiency
The first step in Building Modular Wood Storage Systems for Small Workshops: Maximizing Space and Organization is a comprehensive design phase. This isn’t just about sketching; it’s about understanding your workflow, inventory, and future needs. Think of your workshop as a puzzle, and each modular unit as a piece designed to fit perfectly.
Assessing Your Workshop and Inventory
Before cutting a single piece of wood, conduct a thorough assessment:
- Map Your Space: Measure your workshop dimensions precisely. Note permanent fixtures like windows, doors, electrical outlets, and existing machinery. Create a simple floor plan.
- Inventory Your Tools & Materials: Categorize everything. Group hand tools, power tools, fasteners, glues, abrasives, lumber, and project-specific components.
- Hand Tools: Chisels, planes, saws, screwdrivers, wrenches 🧰
- Power Tools: Drills, sanders, routers, jigsaws ⚡
- Consumables: Screws, nails, sandpaper, glues, finishes 📦
- Lumber: Sheet goods, dimensional lumber, offcuts
- Identify Bottlenecks: Where do you currently experience clutter or inefficiency? Is it finding the right drill bit, storing long pieces of lumber, or organizing small parts?
- Visualize Workflow: Consider how you move around your workshop. What tools do you use together? Where do you typically perform specific tasks (cutting, assembly, finishing)?
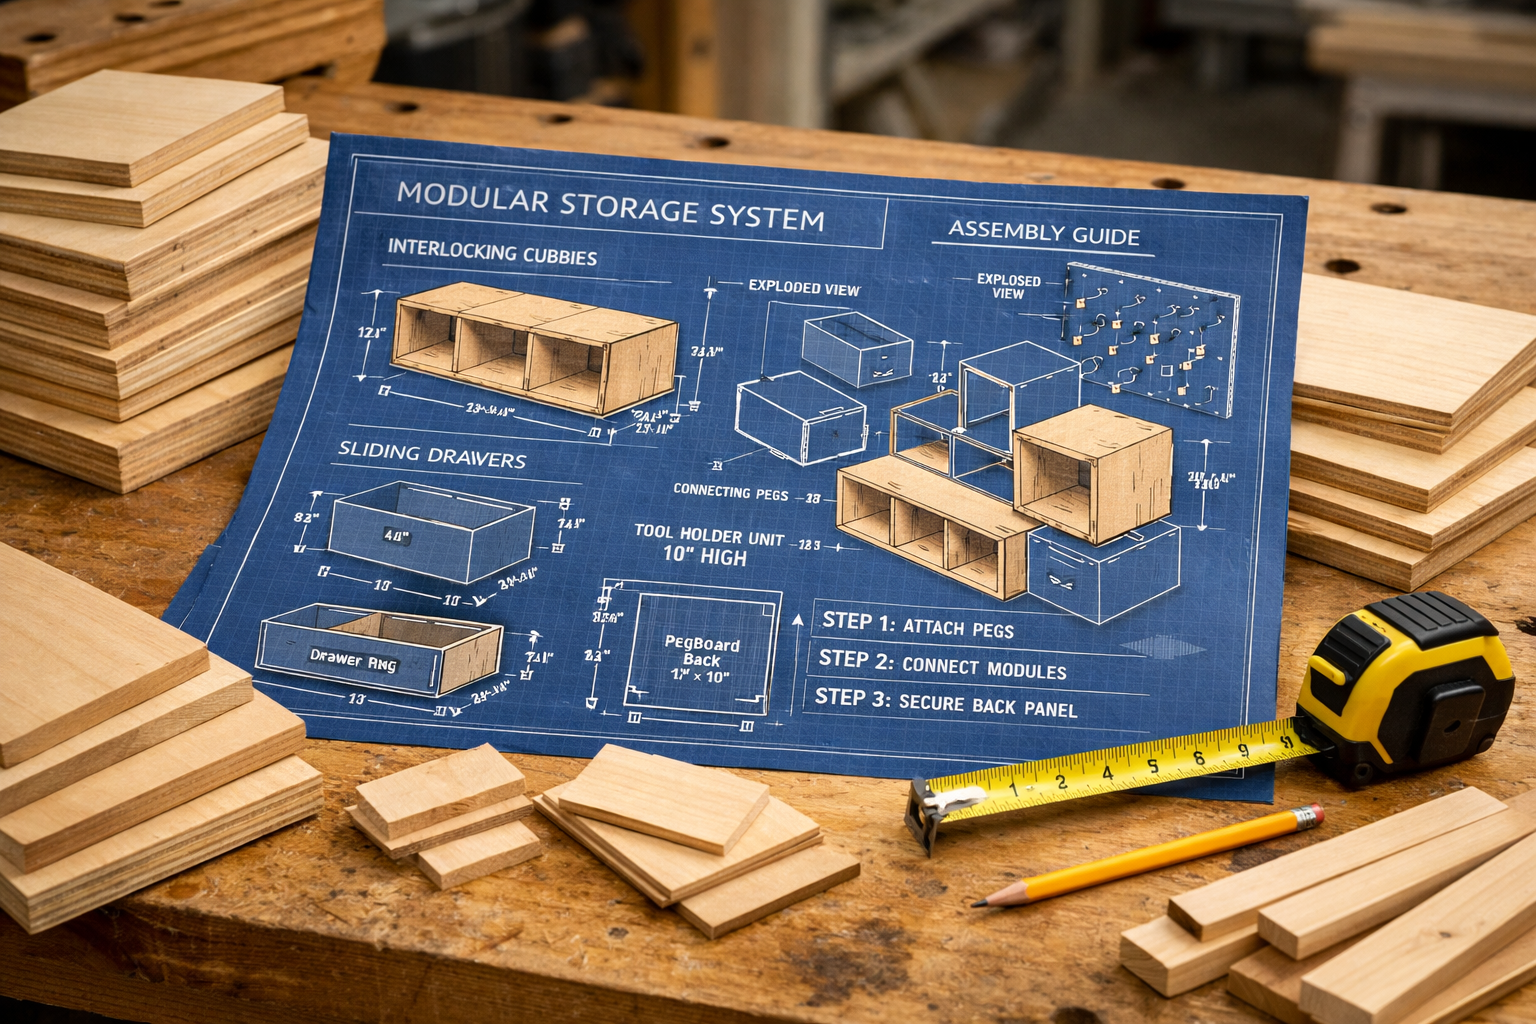
Principles of Modular Design
Modular design thrives on standardization and versatility. When designing your components, keep these principles in mind:
- Standardized Dimensions: Choose a base dimension for your modules. For example, a common depth of 12 or 16 inches and widths that are multiples of a smaller unit (e.g., 6, 12, 18 inches). This allows units to be stacked and reconfigured easily.
- Interchangeability: Design units so they can be swapped. An open shelf module should ideally be able to fit where a drawer unit currently sits, and vice-versa.
- Stackability & Wall-Mounting: Incorporate features that allow modules to be stacked securely or mounted to a wall. This is crucial for maximizing vertical space in a small workshop.
- Specific vs. General Storage: Design some modules for general storage (e.g., open shelving for lumber), and others for specific items (e.g., custom inserts for chisels, drill bit organizers).
Pull Quote: “A well-designed modular system transforms clutter into a canvas for creation, making every tool accessible and every space purposeful.”
Sketching and Prototyping
Start with rough sketches, then move to more detailed drawings or even 3D models using free software. Consider making simple cardboard prototypes of your modules. This low-cost approach allows you to test dimensions, placement, and accessibility before committing to wood. Think about how various modules, like those for specific tools or materials, will integrate. You might find inspiration in modular furniture design for woodworkers when planning your workshop setup.
| Module Type | Typical Use | Dimensions (Example) | Key Features |
|---|---|---|---|
| Open Shelf Unit | Lumber, large tools, project boxes | 12″D x 24″W x 18″H | Adjustable shelves, reinforced for heavy items |
| Drawer Unit | Fasteners, small tools, sandpaper | 12″D x 12″W x 9″H | Full-extension slides, clear labels |
| Tool Caddy | Frequently used hand tools | 6″D x 12″W x 12″H | Divided compartments, carry handle |
| Bin Storage | Scrap wood, rags, project offcuts | 16″D x 16″W x 16″H | Open top, stackable, integrated handles |
| Wall Cabinet | Measuring tools, delicate instruments | 8″D x 18″W x 24″H | Doors for dust protection, customizable interiors |
Construction Techniques and Material Selection
Once your design is finalized, the next phase is building. The choices you make here regarding materials and construction techniques will significantly impact the durability, cost, and ease of assembly of your modular system.
Choosing the Right Wood and Materials
For Building Modular Wood Storage Systems for Small Workshops: Maximizing Space and Organization, practicality often outweighs aesthetics. Cost-effective and stable sheet goods are usually the best choice.
- Plywood (Baltic Birch, Cabinet Grade): Excellent stability, strength-to-weight ratio, and holds fasteners well. Baltic Birch offers a clean, void-free core, while cabinet-grade plywood is a good all-around option. 1/2″ plywood for cabinets is a popular choice for carcasses and shelves.
- MDF (Medium Density Fiberboard): Very stable, smooth surface, excellent for painting. However, it’s heavy, doesn’t hold screws as well as plywood, and is susceptible to water damage. Best for cabinet backs or drawer bottoms in dry environments.
- Solid Wood (Pine, Poplar): Can be used for face frames, drawer fronts, or specific tool holders where durability and appearance are critical. More expensive and prone to seasonal movement. You could even utilize turning shop scraps into design features for smaller elements.
Hardware:
- Drawer Slides: Full-extension ball-bearing slides are highly recommended for smooth operation and full access to drawer contents.
- Casters: Locking casters allow mobile units to be moved for cleaning or reconfigured for different projects.
- Connectors: Shelf pins, threaded inserts, cam locks, or simple screws can be used to join modular units. Consider specialized connectors for easy disassembly and reassembly.
- Handles/Pulls: Choose durable and ergonomic options.
Essential Tools for Construction
A well-equipped workshop makes building easier and safer. For this project, you’ll need:
- Table Saw or Circular Saw with Guide: For accurate, straight cuts on sheet goods.
- Drill/Driver: For pilot holes and driving screws.
- Router (Optional, but Recommended): For cutting dados, rabbets, and other joinery.
- Measuring Tools: Tape measure, combination square, marking gauge.
- Clamps: Essential for holding pieces together during assembly.
- Safety Gear: Eye protection, hearing protection, dust mask.
Simple Joinery Techniques for Modular Units
The key to efficient modular construction is using strong, yet relatively simple joinery.
- Butt Joints with Screws: The simplest method. Reinforce with glue and pocket screws, or corner braces for added strength. Ideal for basic box construction.
- Dados and Rabbets: Create strong, self-aligning joints, especially for shelves and drawer boxes. A dado cut across the grain holds a shelf, while a rabbet cut along the edge is great for backs or drawer bottoms. You can learn more about techniques like these in articles about joining plywood edges.
- Pocket Hole Joinery: Fast, strong, and hidden. Excellent for attaching face frames or joining panels.
- Dovetail Joints (for drawers): While more advanced, dovetails offer superior strength and aesthetic appeal for drawer boxes, making them a worthwhile skill to develop, especially if you’re interested in mastering dovetail drawers for cabinets.
Pro Tip: Cut all similar pieces at the same time to ensure consistency across your modules. This saves time and improves accuracy.
Maximizing Space and Organization with Your New System
With your modular units built, the final stage is deployment and optimization. This is where your initial design comes to life, truly maximizing space and organization in your small workshop in 2026.
Strategic Placement and Layout
- Verticality is Key: Think upwards! Stack modules where possible, and use wall space for mounting frequently used tools or smaller storage units. Consider a French cleat system for ultimate flexibility in hanging modules.
- Work Zones: Arrange modules to create distinct work zones. For example, a cutting station with lumber storage nearby, an assembly area, and a finishing station. This minimizes wasted movement.
- Accessibility: Place frequently used tools and materials within easy reach. Less common items can go in higher or less accessible modules.
- Mobility: Incorporate casters on larger units, like a mobile workbench or a lumber cart, to allow for flexible floor plans and easy cleanup. This aligns with the idea of a wooden work table that can be moved or reconfigured.
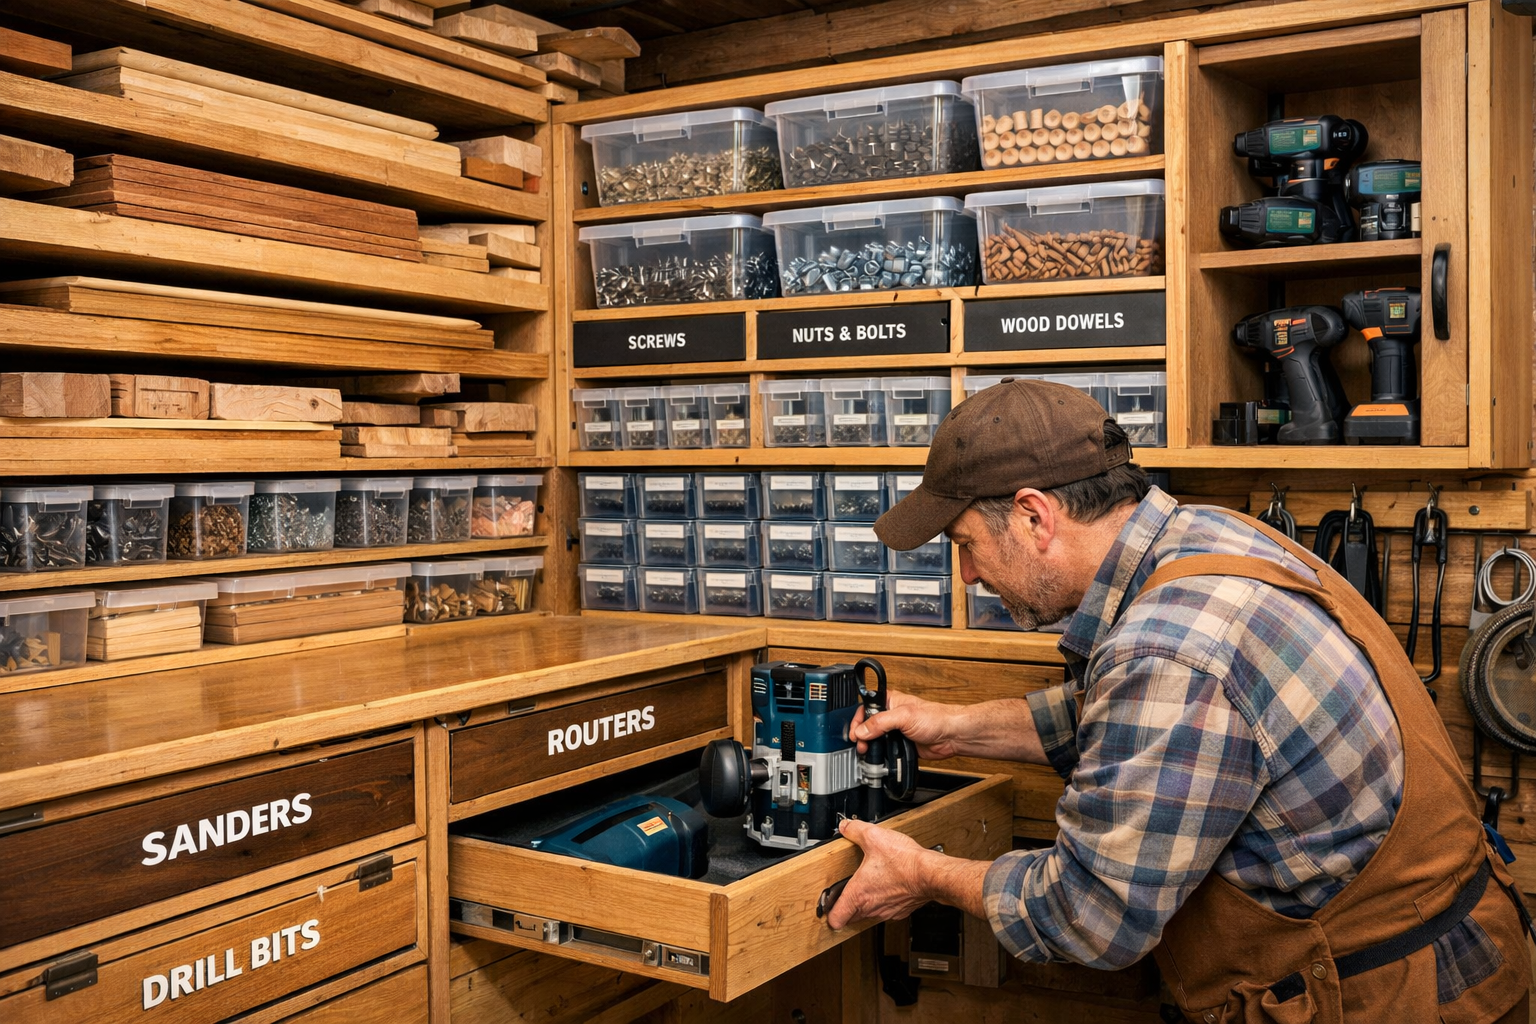
Effective Organization Techniques
- Categorize and Contain: Group similar items together. Use small bins, trays, and drawer dividers within your modular units to contain fasteners, fittings, and small parts.
- Label Everything: This cannot be stressed enough. Clear, consistent labels on drawers, bins, and shelves save immense amounts of time and frustration. Use a label maker or consistent hand-written labels.
- Tool-Specific Storage: Design custom inserts or holders for specific tools, such as chisels, router bits, or wrenches. This protects the tools and makes them instantly identifiable.
- Scrap Wood Management: Dedicate a specific module or bin for scrap wood. Organizing scrap wood by size or type can turn it from clutter into a valuable resource.
- Clear the Workbench: The primary workbench should remain as clear as possible. Design storage above or below it for frequently used items.
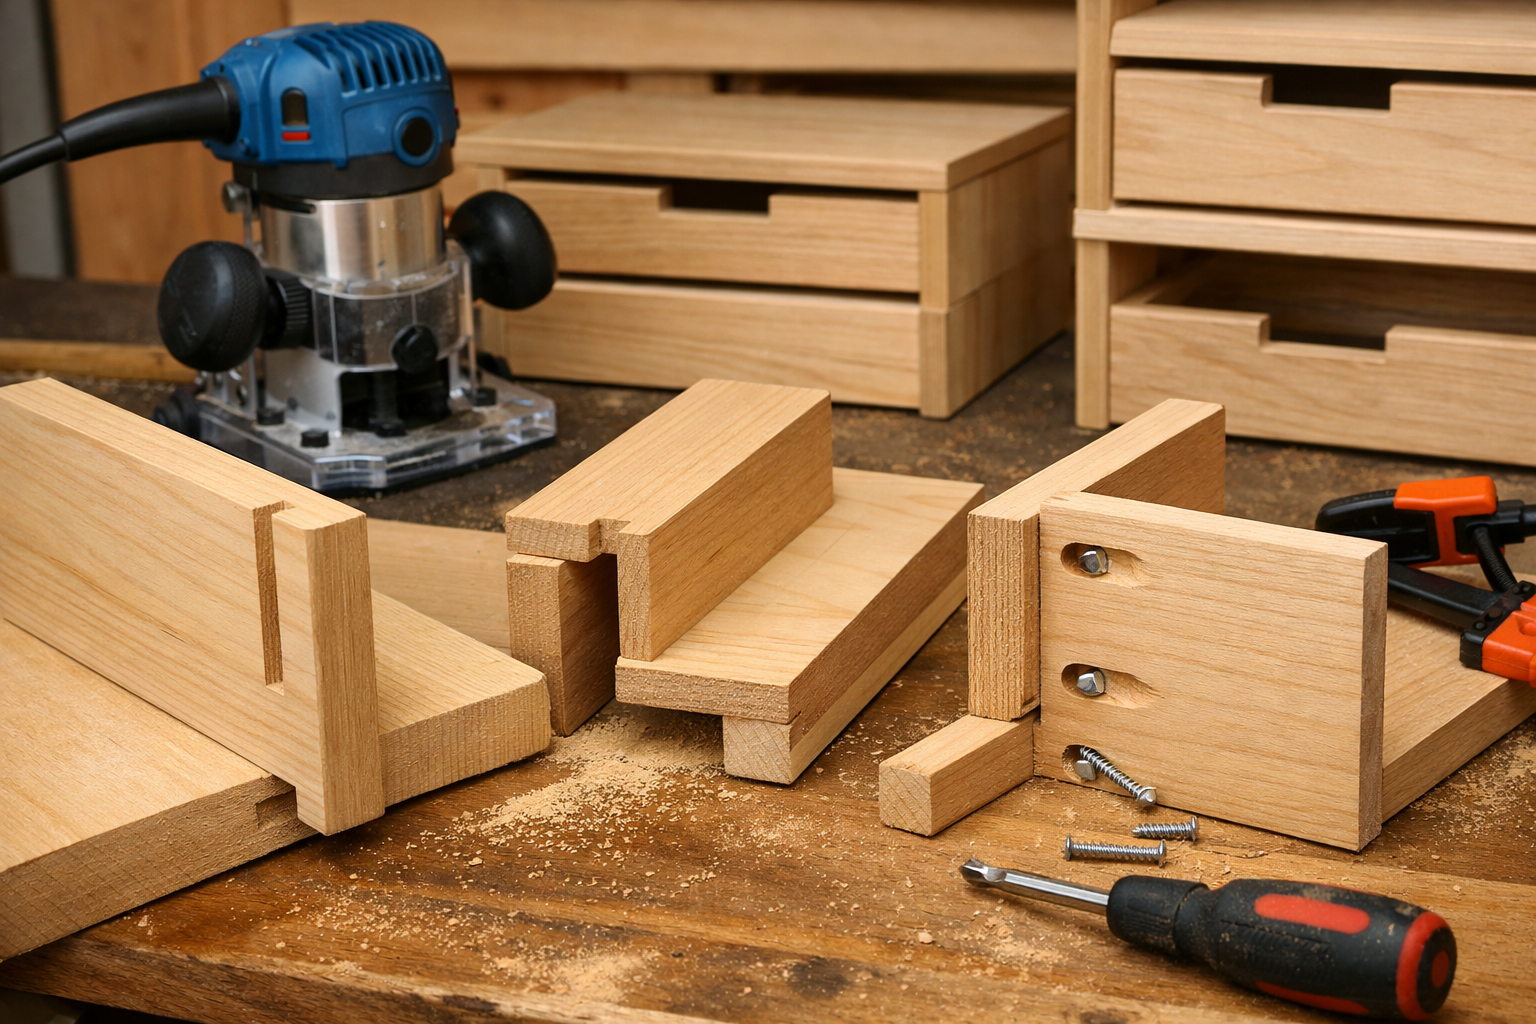
Table: Organization Best Practices

| Storage Challenge | Modular Solution | Benefit |
|---|---|---|
| Loose fasteners | Small drawer units with dividers | Quick identification, spill prevention |
| Scattered hand tools | Custom-fitted tool caddies, French cleat holders | Protects tools, easy access, visual order |
| Piled lumber | Vertical lumber rack module, open shelving | Saves floor space, prevents warping, safe |
| Untamed power cords | Cord wraps on module sides, dedicated drawer | Prevents tripping hazards, neatness |
| Dust/Debris accumulation | Closed cabinets, mobile units for easy cleaning | Cleaner air, protects delicate tools |
Maintenance and Evolution
A modular system is not a one-time build; it’s an evolving solution.
- Regular Purging: Periodically go through your tools and materials. Get rid of broken items, expired glues, or materials you no longer need.
- Adapt and Reconfigure: As your projects or tool collection changes, don’t hesitate to rearrange or build new modules to fit your current needs. That’s the beauty of a modular system!
- Cleaning Routine: Incorporate a cleaning routine. Mobile units make it easier to sweep and vacuum, maintaining a healthier workshop environment.
Conclusion
Building Modular Wood Storage Systems for Small Workshops: Maximizing Space and Organization is a transformative project for any woodworker. It moves beyond simple tidiness, creating an environment where efficiency, safety, and creativity can thrive. By meticulously designing versatile modules, selecting appropriate materials, and employing smart organization techniques, you can turn even the most confined space into a highly productive and enjoyable woodworking sanctuary.
Remember, the goal is not just to store things, but to store them in a way that supports your passion. Invest the time in planning and building your modular system in 2026, and you’ll reap the benefits of a well-organized, highly adaptable workshop for years to come. Start small, build a few core modules, and let your system evolve with your woodworking journey.
