


Unravel the timeless art of hand-cut mortise and tenon joints with this comprehensive guide for beginners, focusing on precision, strength, and traditional craftsmanship for lasting furniture pieces. For centuries, woodworkers have relied on the mortise and tenon joint as the bedrock of robust furniture construction. Its remarkable strength and enduring elegance make it indispensable for chairs, tables, cabinets, and countless other projects. While power tools offer speed, mastering the hand-cut method provides an unparalleled understanding of woodworking, sharpens your skills, and infuses your creations with a distinctive artisanal quality. This Beginner’s Guide to Hand-Cut Mortise and Tenon Joints: Mastering the Fundamentals for Strong Furniture will walk you through the essential steps, tools, and techniques needed to achieve strong, beautiful joints.
Key Takeaways
- The mortise and tenon joint is a cornerstone of strong, durable furniture construction.
- Hand-cutting these joints develops fundamental woodworking skills and provides a deeper understanding of wood.
- Precision in marking and cutting is paramount for a successful, tight-fitting joint.
- Essential tools include chisels, mallets, marking gauges, and accurate saws.
- Practice and patience are key to mastering this traditional joinery technique.
Understanding the Hand-Cut Mortise and Tenon Joint: Mastering the Fundamentals
The mortise and tenon joint is a classic interlocking connection composed of two primary parts: the mortise and the tenon. The mortise is a rectangular hole or cavity cut into one piece of wood, while the tenon is a projecting tongue or peg shaped on the end of another piece, designed to fit snugly into the mortise. When joined, often with the aid of wood glue, this mechanical lock creates an incredibly strong and stable bond, resistant to racking and twisting forces. This inherent strength is why it has been a staple in furniture making for generations.

Why Hand-Cut? The Advantages of Traditional Craftsmanship
While machines can produce these joints quickly, opting for the hand-cut method offers several distinct advantages, especially for beginners:
- Skill Development: Hand-cutting forces you to slow down, pay attention to detail, and develop a keen eye for precision. It hones your ability to read wood grain, use hand tools effectively, and understand how wood behaves.
- Control and Feel: There’s a tactile satisfaction and level of control unmatched by power tools. You feel the chisel bite into the wood, hear the sound of a sharp saw, and develop an intuitive sense for the material.
- Cost-Effective Entry: The initial investment in quality hand tools is often less than a comparable suite of power tools.
- Quiet and Clean: Hand tool woodworking is significantly quieter and produces less fine dust, making it ideal for smaller shops or shared spaces.
- Lasting Quality: A well-executed hand-cut joint often possesses a unique character and a level of finesse that speaks to true craftsmanship.
Essential Tools for Hand-Cut Mortise and Tenon Joints
Before diving into the cutting, gathering the right tools is crucial. Quality tools, kept sharp, will make the learning process far more enjoyable and successful.
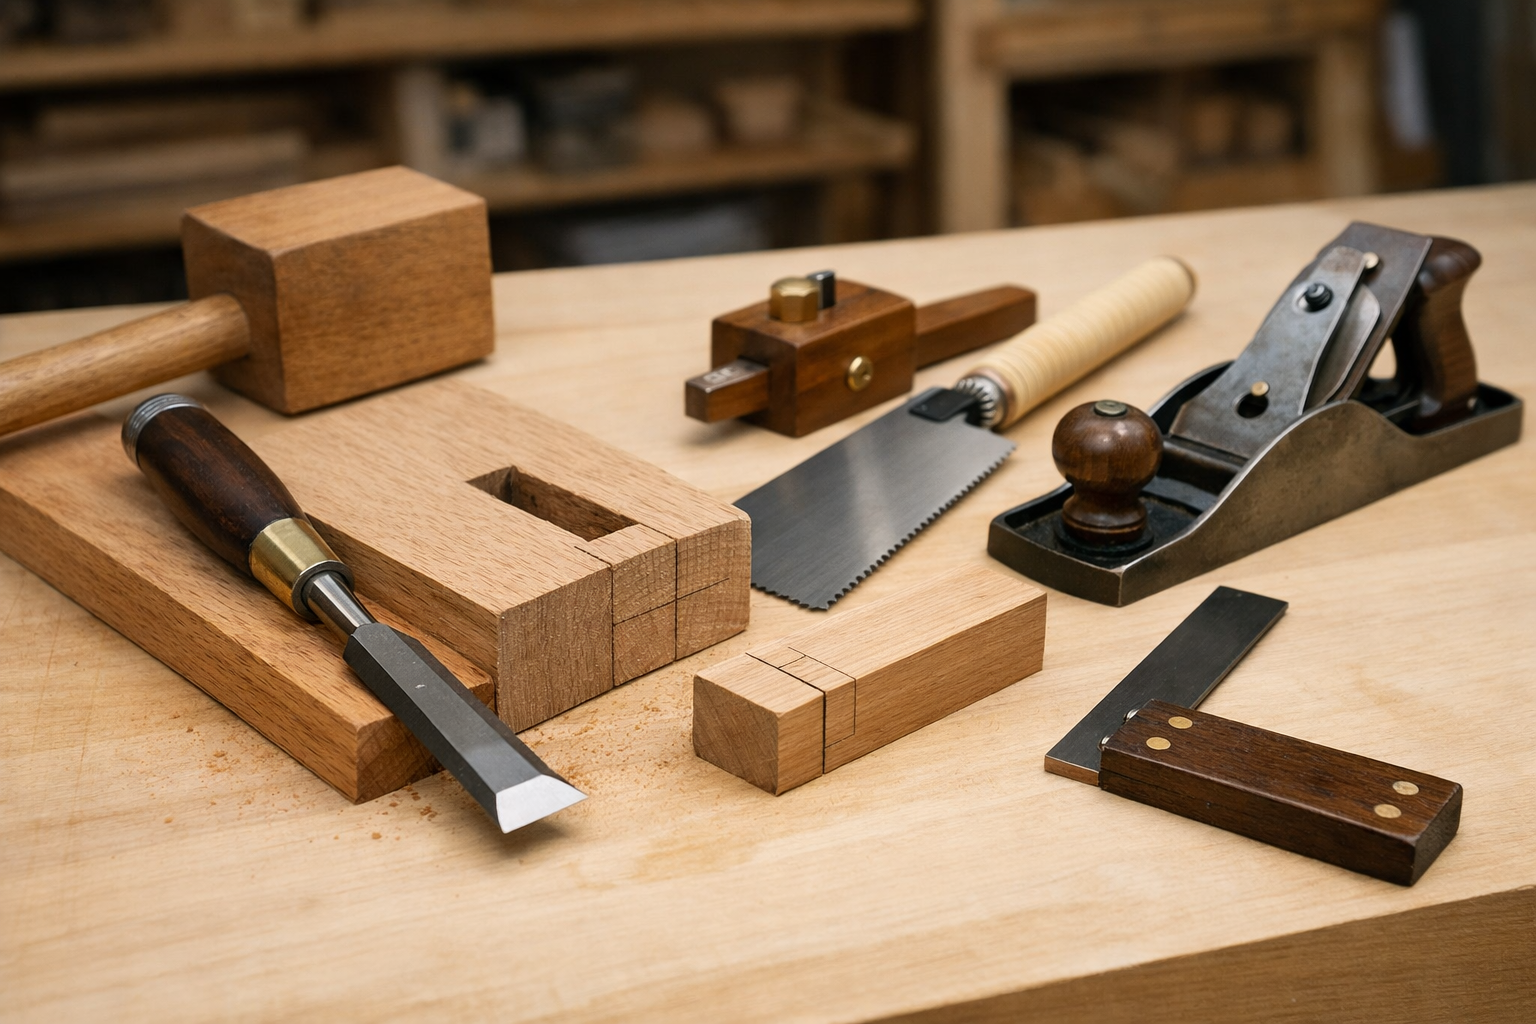
Here’s a list of what you’ll need:
- Mortise Chisels: These are thicker and stronger than regular bench chisels, designed to withstand the leverage needed for chopping out mortises. Sizes typically range from 1/4 inch to 1/2 inch (6mm to 12mm).
- Bench Chisels: For paring and cleaning up the mortise and tenon shoulders. A set of good quality bench chisels is invaluable.
- Mallet: A wooden or rawhide mallet is essential for striking chisels.
- Marking Gauge: Crucial for accurately marking the mortise and tenon dimensions. A mortise gauge, with two adjustable pins, is ideal for marking both sides of the mortise simultaneously.
- Panel Saw or Tenon Saw: A fine-toothed hand saw for accurately cutting the tenon cheeks and shoulders. A Japanese pull saw, with its thin kerf and easy cutting action, is an excellent choice for beginners.
- Try Square: For ensuring all lines are perfectly square to the edges.
- Marking Knife: Provides fine, accurate lines that help guide your chisels and saws, preventing tear-out.
- Sharpening Stones/System: Sharp tools are safe and effective tools. Invest in a good sharpening system.
- Clamps: To secure your workpiece firmly to the workbench.
- Workbench with Vise: A sturdy workbench with a reliable vise is fundamental.
For a broader understanding of various woodworking joints and their applications, refer to our guide on Beginner’s Guide to Essential Woodworking Joints: When to Use Which.
Step-by-Step Guide to Hand-Cut Mortise and Tenon Joints: Mastering the Fundamentals
The key to successful mortise and tenon joints lies in methodical, precise steps. Rushing any part of the process will lead to loose or ill-fitting joints.
1. Preparing and Marking the Stock
Preparation is paramount. Ensure your wood stock is perfectly milled, square, and flat. Any inaccuracies here will be magnified in the joint.
- Face and Edge Marks: Before you begin, mark the “reference face” and “reference edge” on both pieces of wood. These marks (often a pencil squiggle or triangle) will consistently orient your stock and marking tools, ensuring that your measurements are taken from the same datum surfaces every time.
- Layout the Mortise:
- Determine Location: Decide where the mortise will sit on your workpiece. Measure and lightly mark the length of the mortise on the reference face.
- Mark Width with Mortise Gauge: Set your mortise gauge to the desired thickness of your tenon (typically 1/3 the thickness of the mortise piece). With the fence against the reference face, slide the gauge along the edge to scribe two parallel lines, indicating the width of the mortise.
- Square Off Ends: Using a try square and a marking knife, extend the length marks across the width lines, creating sharp, precise boundaries for your mortise.
- Layout the Tenon:
- Determine Length: Measure and mark the length of the tenon on all four faces of the tenon piece. This length should be slightly less than the depth of your mortise to allow for glue squeeze-out and to prevent the tenon from bottoming out.
- Mark Thickness: Set your mortise gauge to the same setting as for the mortise. With the fence against the reference face, scribe lines on both sides of the tenon piece.
- Mark Width (Shoulders): Measure and mark the width of the tenon. This should match the width of the mortise. Use a marking knife and try square to scribe the shoulder lines on all four faces. These are crucial for a tight-fitting joint.
Pro Tip: Always mark with a marking knife for clean, crisp lines that your chisel and saw can register against. Pencil lines are too thick and imprecise.
2. Cutting the Mortise
This is often the most challenging part for beginners but also the most rewarding.
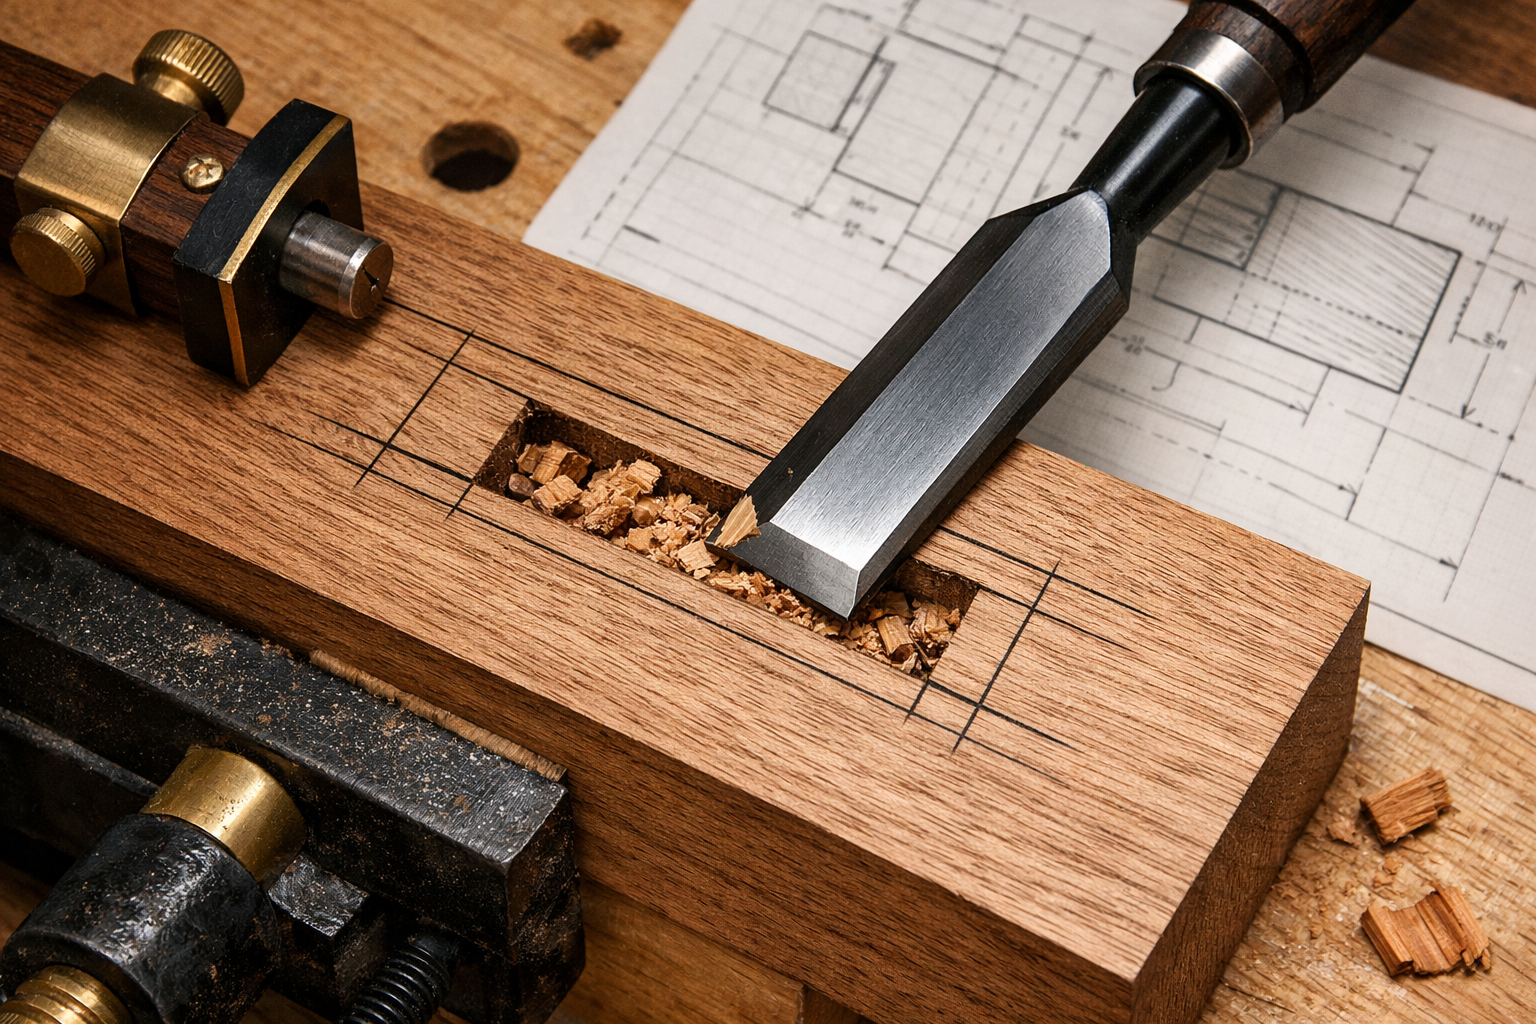
- Secure the Workpiece: Clamp your mortise piece firmly to your workbench. It must not move during chopping.
- Initial Waste Removal (Chopping):
- Start by positioning a mortise chisel (sized to the mortise width) slightly inside one of your end lines, bevel facing inwards. Use a mallet to drive the chisel straight down.
- Repeat this process, moving progressively inwards, taking small bites of wood. Angle the chisel slightly towards the center of the mortise with each strike.
- Once you’ve removed a good amount of waste from the center, return to the end lines. Position the chisel directly on the end line, bevel facing out. Drive the chisel straight down, ensuring you are cutting precisely to your marked line.
- Flip the workpiece and repeat the process from the other side. This helps prevent blowing out the far side of the mortise and ensures a clean exit.
- Paring and Cleaning:
- Once the bulk of the waste is removed, switch to a sharp bench chisel.
- Pare the sidewalls of the mortise to ensure they are perfectly straight and square to the face. Work slowly, taking thin shavings.
- Check frequently with a square or the tenon piece for fit.
3. Cutting the Tenon
Accuracy in cutting the tenon is just as critical as the mortise.
- Secure the Workpiece: Clamp the tenon piece securely.
- Cut the Shoulders First:
- Using a fine-toothed tenon saw, cut along your shoulder lines.
- For maximum accuracy, saw slightly to the waste side of the line. Cut carefully and ensure the saw is perfectly perpendicular to the face of the wood.
- Cut all four shoulders.
- Cut the Cheeks:
- Reposition the workpiece so the tenon is held vertically in the vise.
- Saw along the marked tenon thickness lines (the cheek lines). Again, saw just to the waste side of your line.
- Cut downwards until you meet your shoulder cuts.
- Refine the Tenon:
- Use a sharp bench chisel to pare down to your knife lines on the cheeks and shoulders if needed. The goal is a perfectly flat, smooth surface.
- Slightly chamfer the leading edges of the tenon (the very end) with a chisel. This helps guide it into the mortise and prevents damaging the mortise edges during assembly.
For guidance on other essential jigs that can improve accuracy and safety in your shop, explore the Beginner’s Guide to Essential Woodworking Jigs.
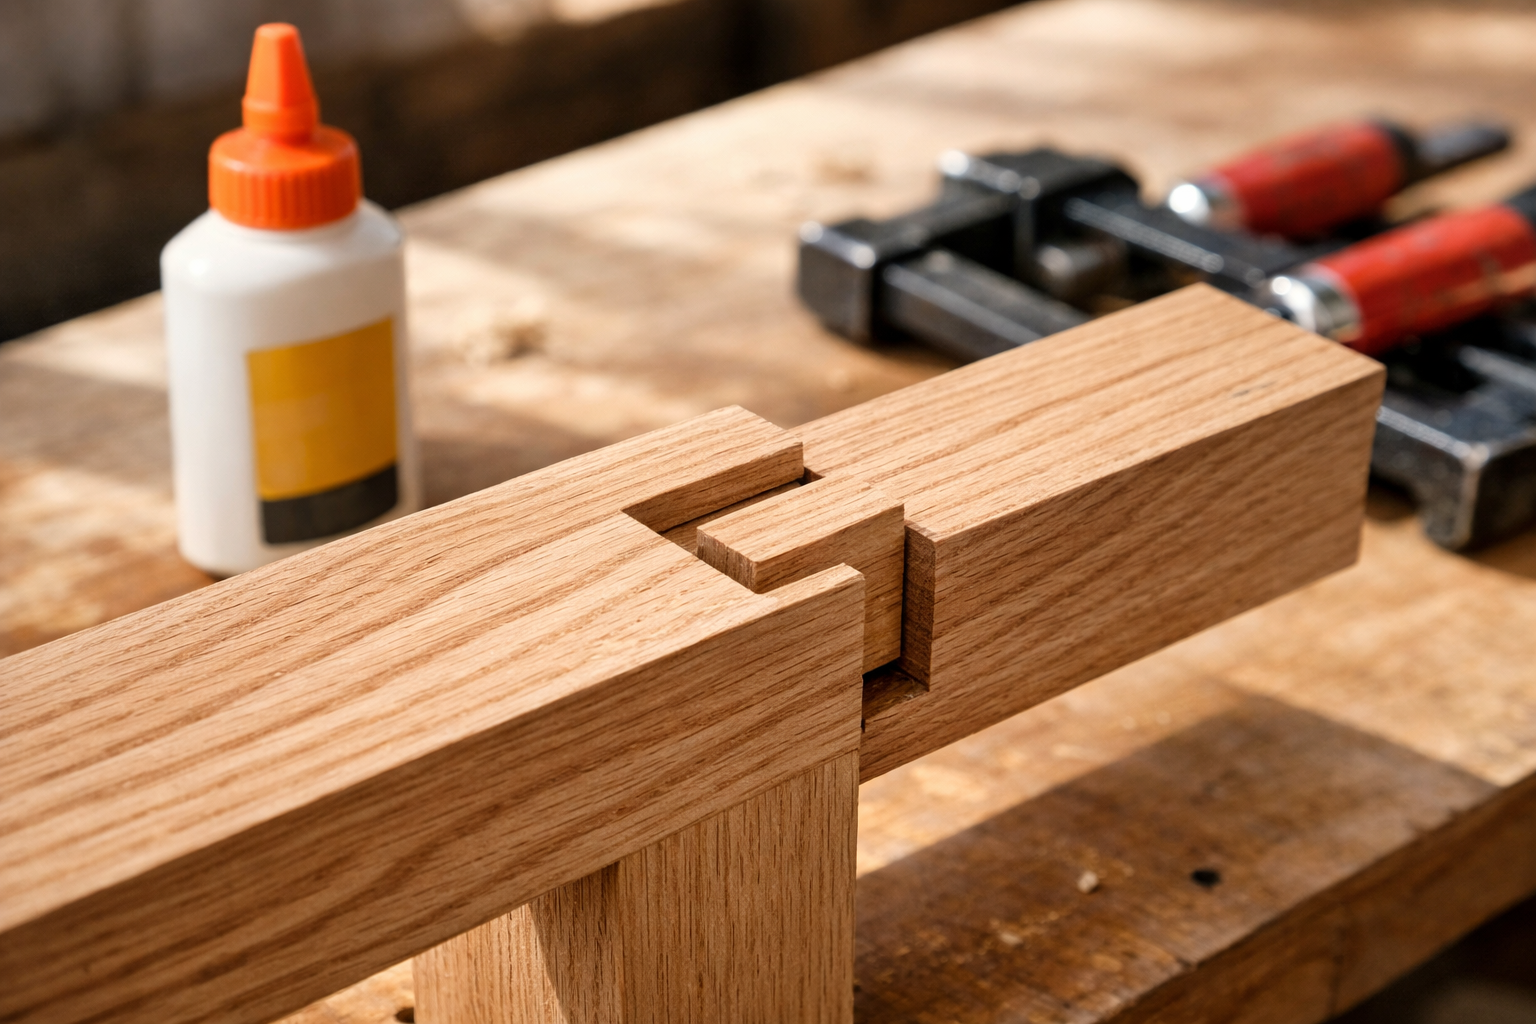
4. Test Fitting and Final Assembly
- Test Fit: Carefully try to join the mortise and tenon. It should be a snug fit that requires some gentle pressure (e.g., from a mallet) to fully seat. If it’s too tight, identify the high spots and pare them down with a chisel. If it’s too loose, you’ll need to consider shims or a new joint. A perfect fit is one where it goes together with firm hand pressure but won’t fall apart when inverted.
- Glue Up:
- Apply a quality wood glue (like PVA glue, see our guide on The Ultimate Guide to Wood Glue) evenly to both the mortise and tenon surfaces. Ensure good coverage without excessive squeeze-out.
- Bring the pieces together, using a mallet if necessary to fully seat the tenon into the mortise.
- Immediately wipe away any glue squeeze-out with a damp cloth.
- Clamp the joint securely, ensuring it is square. Leave it clamped for the glue manufacturer’s recommended time.
- Once dry, remove clamps and proceed with your project.
Tips for Success with Hand-Cut Mortise and Tenon Joints
Mastering the Beginner’s Guide to Hand-Cut Mortise and Tenon Joints: Mastering the Fundamentals for Strong Furniture takes practice. Here are some invaluable tips to help you along the way:
- Start with Practice Wood: Don’t use your best project wood for your first attempts. Use inexpensive softwood or scrap pieces to get a feel for the process.
- Sharpen, Sharpen, Sharpen: A sharp chisel cuts cleanly; a dull one tears and bruises the wood. Keep your tools razor-sharp.
- Work Methodically: Take your time. Double-check your measurements and lines. Rushing leads to mistakes.
- Utilize Your Reference Faces/Edges: Consistently using these datum surfaces will prevent many alignment issues.
- Pare, Don’t Hack: When refining your cuts, especially with chisels, take thin, controlled shavings.
- Good Lighting: Ensure your workspace is well-lit so you can clearly see your lines and the grain of the wood.
- Watch the Grain: Pay attention to the wood grain. When chopping the mortise, chopping across the grain is harder than chopping with it. Adjust your chisel angle and force accordingly.
- Be Patient with Yourself: Everyone makes mistakes. Learn from them, and don’t get discouraged.

Common Mistakes to Avoid
- Dull Tools: As mentioned, this is the number one culprit for frustration and poor results.
- Inaccurate Marking: Pencil lines, or lines not perfectly square, will throw off your entire joint. Use a marking knife and a reliable try square.
- Chopping Past the Lines: Always chop to your lines, not past them. It’s easier to remove more wood than to add it back.
- Not Securing Workpiece: A workpiece that shifts will result in inaccurate and potentially dangerous cuts.
- Forcing the Fit: If the joint is too tight, forcing it can split the wood. Find the tight spots and gently pare them down.
- Ignoring Wood Movement: Remember that wood expands and contracts with changes in humidity. Design your joints to account for this. Our article on Understanding Wood Movement offers further insights.
By following these guidelines and committing to practice, you’ll be well on your way to creating strong, beautiful, and lasting furniture pieces using the hand-cut mortise and tenon joint.
Conclusion
Mastering the Beginner’s Guide to Hand-Cut Mortise and Tenon Joints: Mastering the Fundamentals for Strong Furniture is a foundational skill that elevates your woodworking from simple assemblies to robust, heirloom-quality creations. While it demands patience, precision, and sharp tools, the satisfaction of cutting a perfect, tight-fitting joint by hand is unparalleled. It connects you to a rich tradition of craftsmanship and builds a deeper understanding of wood and its properties.

As you embark on this journey, remember that every successful joint is built upon careful preparation, accurate marking, and controlled cutting. Don’t be afraid to make mistakes; they are essential teachers. With each mortise you chop and every tenon you fit, your confidence and skill will grow. By consistently applying the techniques outlined in this guide, you will soon be crafting strong, beautiful furniture that will stand the test of time.
Next Steps:
- Gather Your Tools: Ensure you have the necessary sharp chisels, saws, and marking tools.
- Practice on Scraps: Dedicate time to practice the marking, chopping, and sawing techniques on inexpensive wood.
- Start a Simple Project: Apply your newfound skills to a small project, such as a stool, a simple frame, or a box. For ideas on profitable woodworking projects, check out Profitable Woodworking for Beginners.
- Continue Learning: Explore advanced joinery techniques like dovetails by reading our guide on Mastering Dovetail Joints with Hand Tools.
