


The bandsaw, often relegated to rough cuts and resawing, harbors a secret potential: it’s a precision joinery powerhouse capable of creating intricate, flowing, and incredibly strong connections that tablesaws and routers often struggle to replicate. In 2026, as woodworkers continue to push the boundaries of design, mastering bandsaw joinery, with its creative cuts and techniques beyond resawing, has become a cornerstone for crafting unique and robust pieces. This article delves into advanced methods, revealing how to unlock the full joinery capabilities of this versatile machine.
Key Takeaways

- The bandsaw excels at curves, acute angles, and complex profiles for joinery, offering unique design possibilities beyond linear cuts.
- Precision setup, sharp blades, and appropriate jigs are critical for accurate bandsaw joinery.
- Techniques like half-lap, bird’s mouth, and curved joinery can be executed with remarkable accuracy on a bandsaw.
- Advanced methods open doors to furniture designs with organic shapes and robust, visually appealing connections.
- With practice, the bandsaw can rival or even surpass other tools for specific, intricate joinery tasks.
Beyond the Basics: Precision Cuts for Creative Connections
Traditional woodworking often relies on the tablesaw and router for joinery like dados, rabbets, and mortise and tenons. While these tools are indispensable, the bandsaw offers a distinct advantage for cuts that defy straight lines or require extreme precision in specific scenarios. Its thin blade and continuous cutting action make it ideal for navigating curves, achieving precise angles, and forming complex profiles that would be difficult or impossible with other machines. Mastering bandsaw joinery in this context means understanding its unique strengths.
Consider the bandsaw’s ability to create perfectly fitting curved segments for bent laminations or shaped panels. A well-tuned bandsaw, equipped with a sharp, narrow blade, can cut two mating curves with astonishing accuracy, forming an invisible joint once glued. This opens up a world of possibilities for furniture with organic lines and flowing forms, from curved cabinet doors to elliptical table bases.
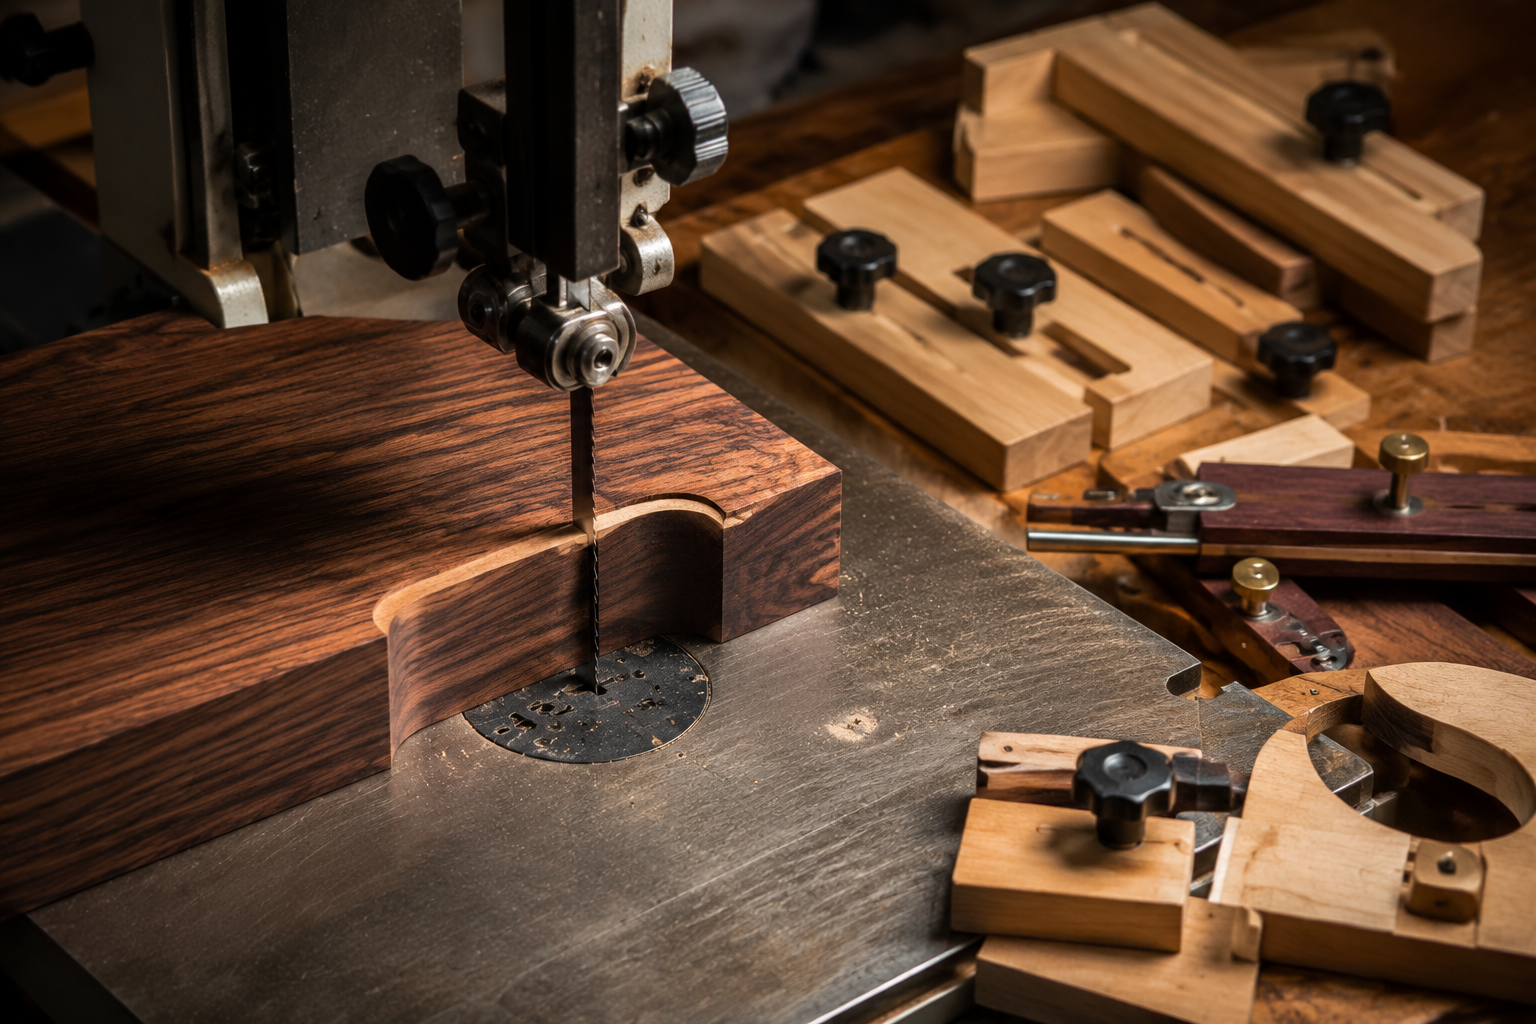
Essential Setup for Bandsaw Joinery Accuracy
Achieving precision joinery with a bandsaw begins long before the first cut. A meticulous setup is paramount.
- Blade Selection: For fine joinery, a narrow blade (1/8″ to 1/4″) with 10-14 teeth per inch (TPI) is generally preferred for its ability to navigate curves and leave a smooth finish. For thicker stock or straighter cuts, a slightly wider blade (3/8″ or 1/2″) with 6-10 TPI might be suitable.
- Blade Tension: Proper blade tension is crucial for straight, accurate cuts and to prevent blade wander. Consult your bandsaw’s manual for recommended settings. Too little tension leads to imprecise cuts, while too much can shorten blade life.
- Blade Guides: Adjust the blade guides – both side and rear – as close to the workpiece as possible without touching the blade when it’s not cutting. This minimizes blade deflection.
- Table Squareness: Ensure your bandsaw table is perfectly square to the blade for accurate 90-degree cuts. Use a reliable square and make test cuts on scrap wood to verify.
- Dust Collection: An efficient dust collection system is vital not only for shop cleanliness but also for clear visibility of your cut line.
For those looking to optimize their bandsaw performance, resources like “Reliant 14 Bandsaw: Overview, Setup, Techniques, Maintenance, or Expert Tips” can provide valuable insights into machine tuning and maintenance. Similarly, understanding your specific model, such as the G1019 Bandsaw: Overview, Performance Tips, and More, is key to maximizing its potential.
Advanced Techniques: Beyond Simple Resawing
While resawing is a common and valuable bandsaw operation, its true power for joinery lies in its ability to execute complex, multi-angle, and curved cuts with precision. This section explores several advanced bandsaw joinery techniques.
Bandsaw Half-Laps and Bridle Joints
The bandsaw can be surprisingly efficient for cutting half-lap and bridle joints, especially when working with wider stock or when a slightly curved profile is desired for aesthetic reasons.
Half-Lap Joint: This joint involves removing half the thickness from the end of two pieces of wood, allowing them to overlap and create a flush surface.
- Marking: Carefully mark the layout on both pieces, including the shoulders and the depth of the cut.
- Shoulder Cuts: Use a crosscut sled or a fence to make the shoulder cuts. A zero-clearance insert on your sled can help prevent tear-out.
- Cheek Cuts: With the workpiece oriented vertically against a fence or a specialized jig, carefully saw away the waste from the cheek. Multiple passes may be required.
Bridle Joint: Similar to a mortise and tenon but with an open-ended mortise, the bridle joint is strong and visually appealing.
- Marking: Lay out the mortise and tenon on the respective pieces.
- Tenon Cheeks: Use a fence to guide the bandsaw for the two cheek cuts of the tenon.
- Mortise: For the open mortise, make two parallel cuts to define its width, then make relief cuts within the waste area before removing the bulk with subsequent passes. A chisel can clean up any remaining material.
Compound Angle Cuts and Bird’s Mouth Joints
The bandsaw’s tilting table makes it a natural for compound angle cuts, crucial for projects like segmented turning, geodesic domes, or complex frame assemblies. When combined with a sled, it allows for incredible versatility.
The bird’s mouth joint, commonly used in roof framing, can also be adapted for woodworking, particularly for creating strong, self-aligning connections in decorative pieces or specialized frames. It involves a “V” shaped notch that receives a corresponding point on another piece.
- Jig Construction: A simple jig that holds the workpiece at the required angle (often 45 degrees or 60 degrees) and allows it to slide past the blade is essential.
- Precision Cutting: Make the two angled cuts, ensuring they meet perfectly at the apex of the “V”. This technique requires careful layout and precise jig work. For more on precision and complex joinery, consider exploring Beyond the Basic Box: Advanced Joinery for Unique Wooden Gift Boxes.
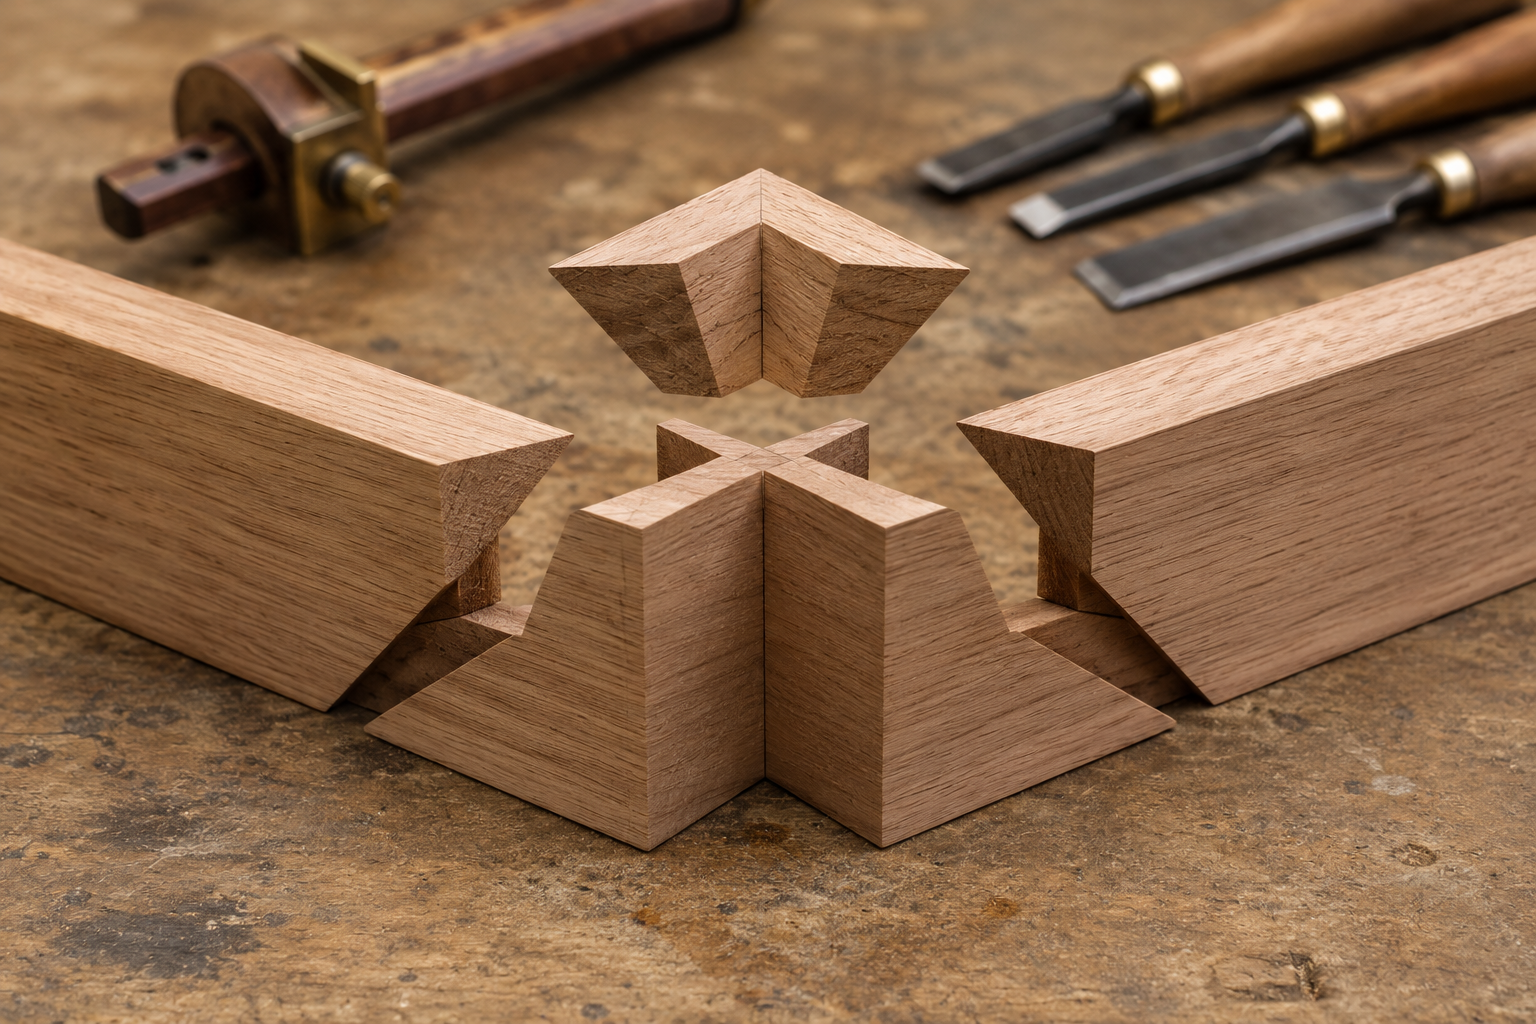
Curved Mortise and Tenon Joints
Perhaps one of the most compelling reasons to embrace bandsaw joinery is its unique ability to create curved mortise and tenon joints, perfect for furniture with flowing lines.
- Layout: Carefully draw the desired curve on both the mortise and tenon pieces.
- Tenon: Use a narrow blade to cut the shoulders of the curved tenon, then carefully pare away the waste from the cheeks, following the curve. This often requires multiple, slow, controlled passes.
- Mortise: For the curved mortise, drill relief holes at each end of the mortise to help guide the blade. Then, using a narrow blade, meticulously cut along the inside and outside curves, slowly removing the waste. A scroll saw or even hand chisels may be needed for final cleanup, but the bandsaw can do the bulk of the work.
This technique, while challenging, unlocks truly organic and strong connections that are aesthetically distinct.
Designing with Bandsaw Joinery in Mind
When you start thinking about the bandsaw as a joinery tool, your design possibilities expand dramatically. Instead of being constrained by straight lines and right angles, you can incorporate sweeping curves, intricate interlocking shapes, and visually striking connections directly into your projects.

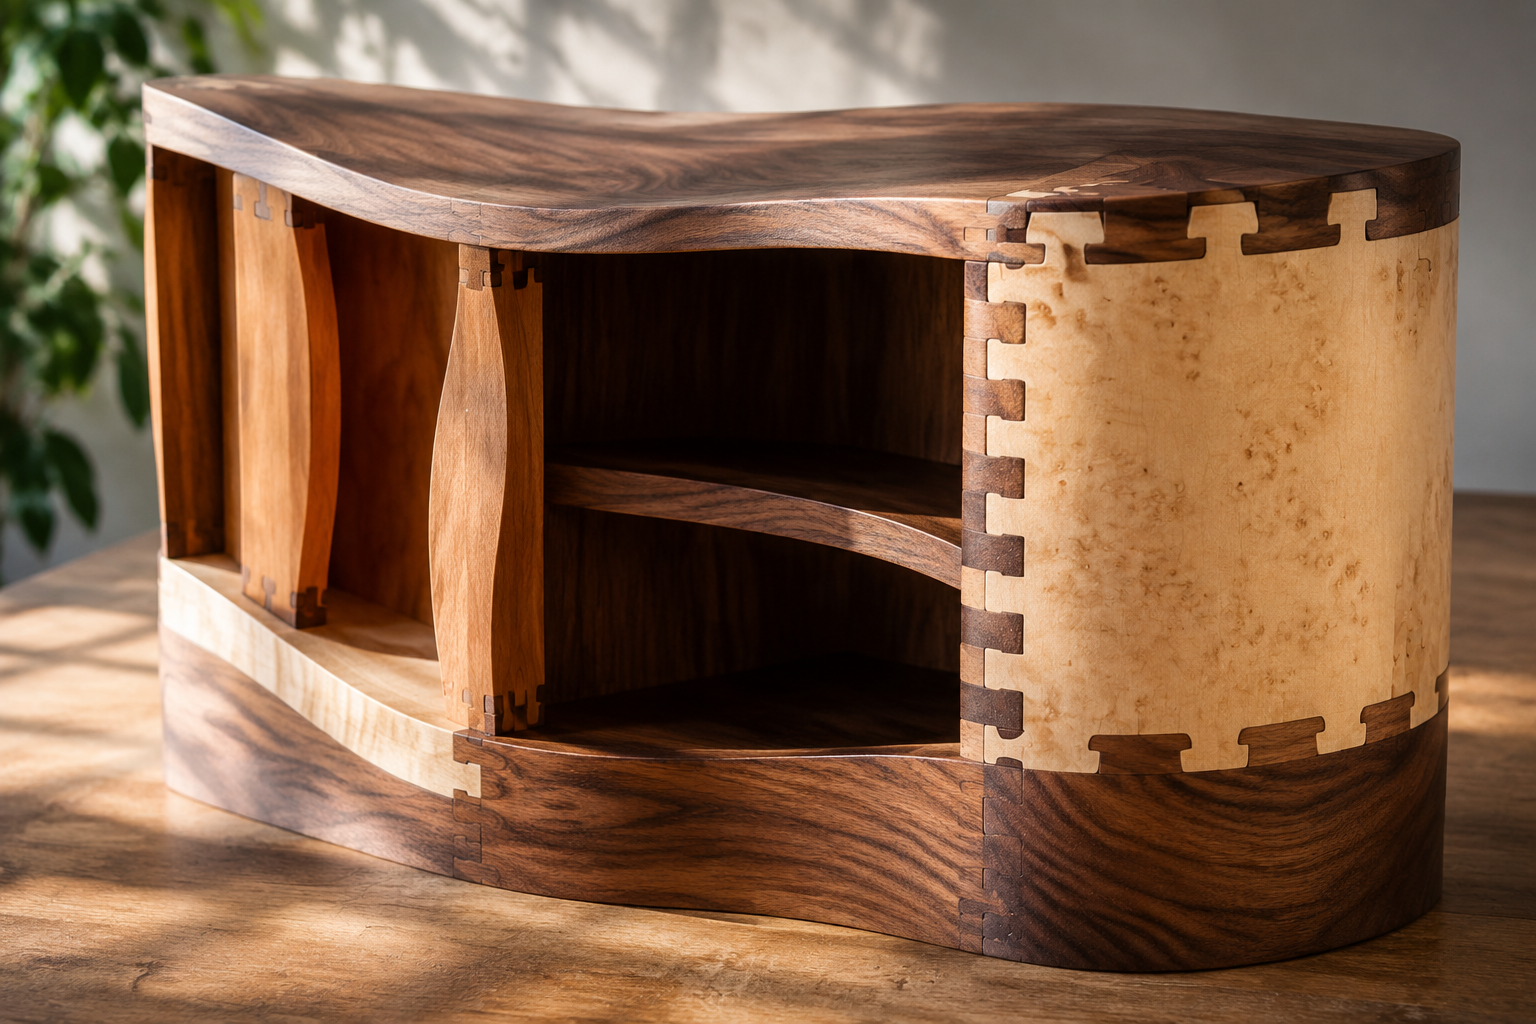
Creating Unique Aesthetic Features
Bandsaw joinery isn’t just about strength; it’s about aesthetics. Imagine a chair back with subtly curved through-tenons, or a table base where the legs join the apron with a flowing, integral curve. These features become central to the design, elevating the piece beyond mere functionality. Using contrasting wood species for interlocking bandsaw-cut joints can create striking visual interest, highlighting the craftsmanship.
- Sculptural Elements: The bandsaw is excellent for carving and shaping, making it possible to integrate sculptural elements directly into load-bearing joints. Think about the possibility of creating unique DIY Wooden Wall Clocks: Precision Joinery and Modern Designs with intricate, bandsaw-cut joinery.
- Interlocking Designs: Develop patterns where pieces interlock, almost like a puzzle, forming structural connections. This is particularly effective for small decorative boxes or frames. For those interested in advanced box designs, DIY Wooden Birdhouses: Advanced Designs with Precision Joinery offers inspiration for complex assemblies.
- Hidden Strength: Even when the joinery is not fully exposed, the precise fit achievable with the bandsaw ensures a strong glue-up, leading to durable and long-lasting furniture. This precision is also crucial when working with 1/2 Plywood for Cabinets: Strength, Durability, and Design Considerations.
Jigs and Fixtures for Repetitive Accuracy
For any advanced joinery, specialized jigs and fixtures are your best friends. They ensure repeatability, safety, and precision.
Common Jigs for Bandsaw Joinery:
| Jig Type | Purpose | Benefits |
|---|---|---|
| Crosscut Sled | Holds work square to the blade for accurate shoulder cuts | Prevents tear-out, ensures precise 90-degree cuts |
| Tenoning Jig | Holds work vertically for cutting tenon cheeks with repeatability | Consistent tenon thickness and squareness |
| Circle Cutting Jig | Pivots workpiece around a point to cut perfect circles and arcs | Essential for curved joinery and design elements |
| Angle-Setting Fixture | Allows for precise setting and repeatable cutting of specific angles | Critical for compound angles and segmented projects |
Building custom jigs can be a project in itself, but the investment in time pays dividends in accuracy and expanding your joinery capabilities. For inspiration on creating ergonomic and efficient workshop setups, “Creating Ergonomic Workshop Furniture: Building Custom Workbenches” is an excellent resource, ensuring your workspace supports advanced techniques.
Conclusion
The bandsaw is far more than just a tool for roughing out shapes or resawing lumber. By embracing creative cuts and techniques beyond resawing, woodworkers in 2026 can elevate their craft, producing joinery that is not only robust but also aesthetically captivating. From precise half-laps and intricate bird’s mouth joints to flowing curved mortise and tenons, the bandsaw offers a unique avenue for design and construction.
To truly master bandsaw joinery, focus on meticulous machine setup, invest in high-quality blades, and most importantly, practice. Experiment with different jigs and fixtures, and don’t be afraid to push the boundaries of traditional joinery. The payoff will be stronger, more beautiful, and truly unique woodworking projects that stand out. Unleash the full potential of your bandsaw, and you’ll discover a world of creative joinery possibilities that were previously out of reach.
Meta Title: Mastering Bandsaw Joinery: Creative Cuts Beyond Resawing for 2026 Meta Description: Unlock advanced bandsaw joinery in 2026! Explore creative cuts, precision techniques, and specialized jigs for unique, strong woodworking connections beyond resawing.
