


The hum of machinery, the scent of fresh-cut wood, the satisfaction of a project taking shape – these are the hallmarks of a vibrant woodworking workshop. However, this creative energy often comes with an unseen adversary: dust. Fine wood dust, generated by saws, sanders, and planers, isn’t just a nuisance; it’s a significant health hazard and a threat to your valuable tools. In 2026, with increasing awareness of occupational health and precision equipment maintenance, having an effective dust extraction system is no longer a luxury but a necessity, especially in smaller workshops where air circulation can be limited.
Designing and building an efficient, budget-friendly dust extraction system tailored for a small woodworking workshop can seem daunting, but it’s entirely achievable with a DIY approach. This comprehensive guide covers everything from the foundational principles of dust collection to integrating cyclone separators, optimizing shop vac performance, and implementing robust air filtration for a healthier environment. By taking control of your workshop’s air quality, you’re not just protecting your lungs; you’re also extending the life of your equipment and ensuring cleaner, more precise results.

Key Takeaways
- Prioritize Health & Tool Longevity: Effective dust extraction is crucial for preventing respiratory issues and prolonging the life of your woodworking machinery.
- Understand Dust Types: Differentiate between chip collection and fine dust filtration to design a system that tackles both effectively.
- DIY is Economical & Custom: Building your own system allows for tailored solutions to fit your specific workshop layout and budget, often outperforming commercial entry-level units.
- Cyclone Separators are Key: Incorporating a two-stage cyclone separator dramatically improves efficiency and protects your main filter from premature clogging.
- Air Filtration for Fine Dust: Even with source capture, ambient air filtration is essential for capturing airborne particles, ensuring maximum air quality.
Understanding Workshop Dust: The Invisible Threat
Wood dust is categorized primarily into two types: visible chips and shavings, and microscopic fine dust. While larger chips are relatively harmless and easy to clean, it’s the fine dust particles – often invisible to the naked eye – that pose the greatest risk. These particles can remain suspended in the air for hours, slowly settling on every surface.
Health Hazards of Fine Wood Dust
Exposure to fine wood dust can lead to a range of health problems, from immediate irritation to long-term chronic conditions:
- Respiratory Issues: Asthma, bronchitis, and allergic reactions are common. Prolonged exposure can lead to more serious conditions like chronic obstructive pulmonary disease (COPD) and even certain types of cancer, particularly nasal and sinus cancers (Nieuwenhuijsen et al., 2006).
- Skin and Eye Irritation: Dust can cause dermatitis, rashes, and eye irritation.
- Reduced Visibility: A dusty workshop reduces visibility, increasing the risk of accidents.
Impact on Tool Longevity
Beyond health, dust wreaks havoc on your expensive woodworking tools:
- Motor Damage: Fine dust can infiltrate motor housings, clogging cooling vents, causing motors to overheat, and accelerating wear on bearings and brushes.
- Moving Parts & Precision: Dust accumulates on moving parts, fences, and guides, leading to friction, inaccurate cuts, and compromised precision. This is particularly problematic for tools like table saws, planers, and jointers.
- Electrical Components: Dust can settle on electrical contacts and switches, leading to malfunctions and short circuits.
By investing time in Small Workshop Dust Extraction Systems: DIY Solutions for Maximum Air Quality and Tool Longevity, you’re making a wise decision for both your personal well-being and the lifespan of your equipment.
Essential Components of a DIY Dust Extraction System
A robust dust extraction system for a small workshop typically involves several key components working in concert:
- Source Capture: This is the first line of defense, involving connecting a hose directly to the dust port of each woodworking machine.
- Collection Unit: This can be a dedicated dust collector or a modified shop vacuum.
- Filtration: Essential for separating dust from the air stream.
- Ducting: The network of pipes and hoses that transport dust from tools to the collection unit.
- Air Filtration (Ambient): A supplementary system to clean airborne dust not captured at the source.
Building Your Own Small Workshop Dust Extraction Systems: DIY Solutions for Maximum Air Quality and Tool Longevity
The beauty of DIY is customization. You can design a system that perfectly fits your small workshop’s layout, budget, and specific tool requirements. The core principle for Small Workshop Dust Extraction Systems: DIY Solutions for Maximum Air Quality and Tool Longevity is two-stage separation.
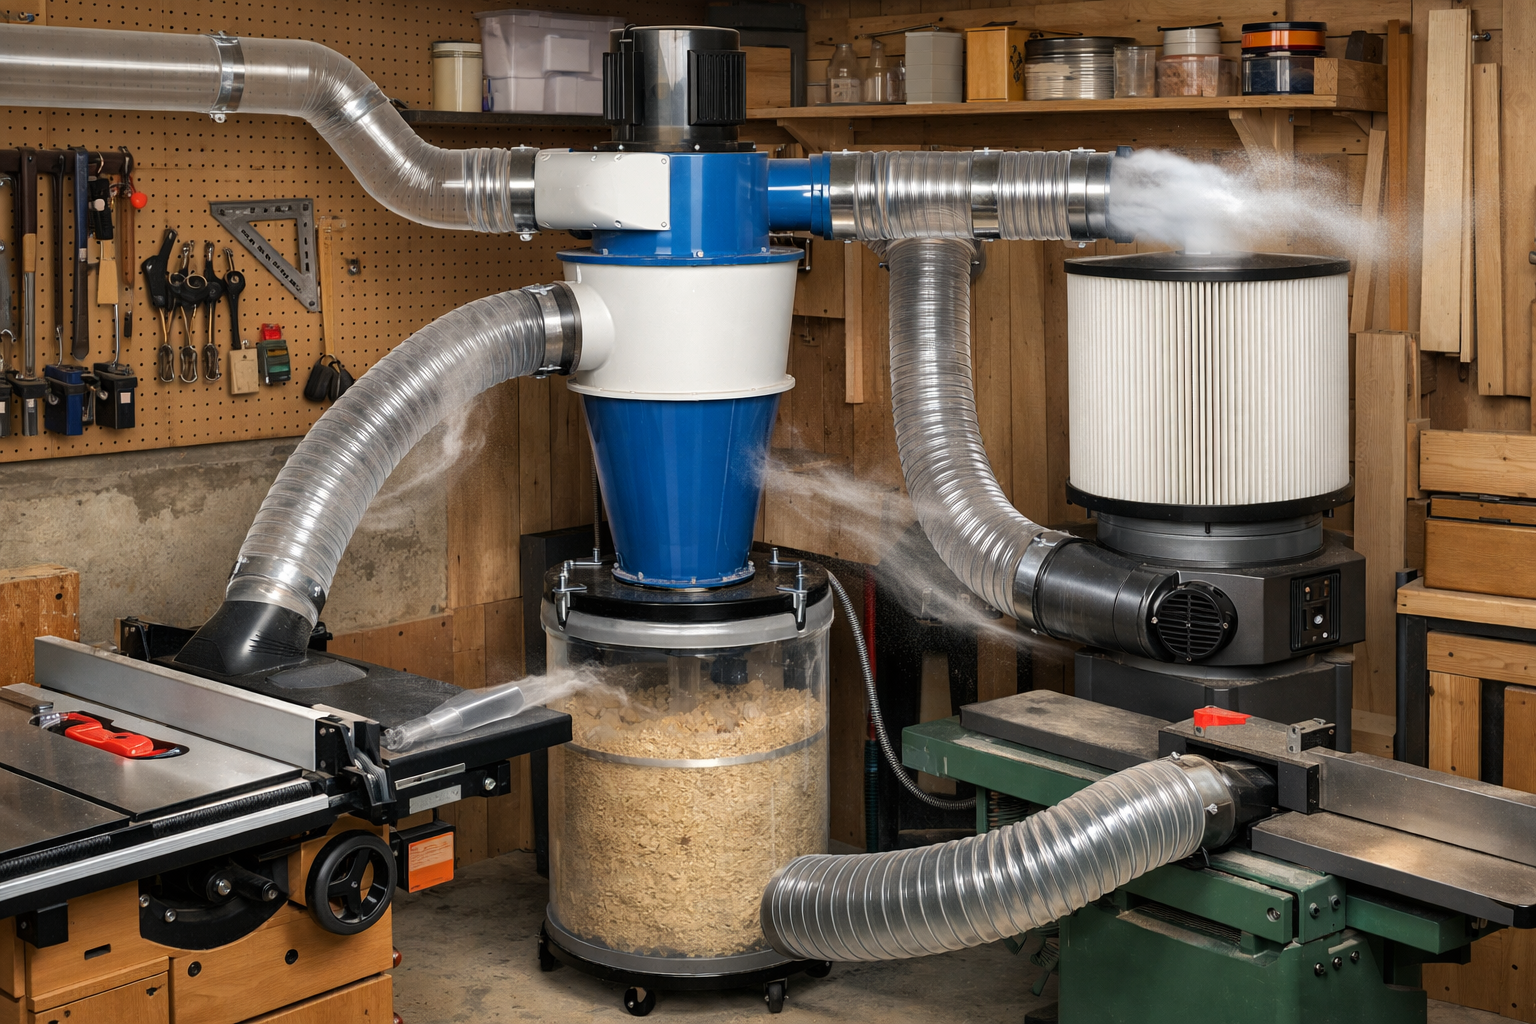
Stage 1: Cyclone Separators for Chip Collection
A cyclone separator is a game-changer for any dust extraction system. It uses centrifugal force to separate large chips and a significant amount of fine dust before the air reaches your main collection unit’s filter. This prevents your expensive filters from clogging quickly, maintaining suction power, and extending their lifespan.
How a Cyclone Separator Works:
Dust-laden air enters the top of a conical chamber tangentially. The air spins rapidly, creating a vortex. Heavier dust particles and chips are thrown against the walls by centrifugal force, lose momentum, and spiral down into a collection drum below. Cleaner air exits upwards through the center of the cone to the main collector or shop vac.
DIY Cyclone Construction:
You can purchase commercial cyclone lids or build one from scratch using materials like sheet metal or thick plastic. A common DIY approach uses a plastic bucket lid or a custom-built cone.
Materials for a Simple DIY Cyclone Lid:
- 5-gallon bucket (or larger drum for increased capacity)
- Plywood for lid and internal baffles
- PVC pipe fittings (2″ or 4″ depending on air volume)
- Sealant/caulk
- Screws and glue
Basic Steps for a DIY 5-Gallon Bucket Cyclone:
- Prepare the Lid: Cut two holes in a sturdy plywood lid for the bucket. One for the tangential inlet (where dusty air enters) and one for the central outlet (where cleaner air exits).
- Inlet Port: Securely attach a PVC elbow or a custom-fabricated tangential inlet into the lid. This is crucial for creating the spinning air motion.
- Outlet Port: Install a straight PVC pipe into the central hole, extending a few inches below the lid’s underside. This is the “vortex tube.”
- Seal Everything: Ensure all connections are airtight to prevent leaks and maximize efficiency.
- Connect: Attach the inlet from your tool, and the outlet to your shop vac or dust collector.
“A well-designed cyclone separator can capture over 90% of dust and chips before they ever reach your primary filter, making it the single most impactful DIY upgrade for small workshops.”
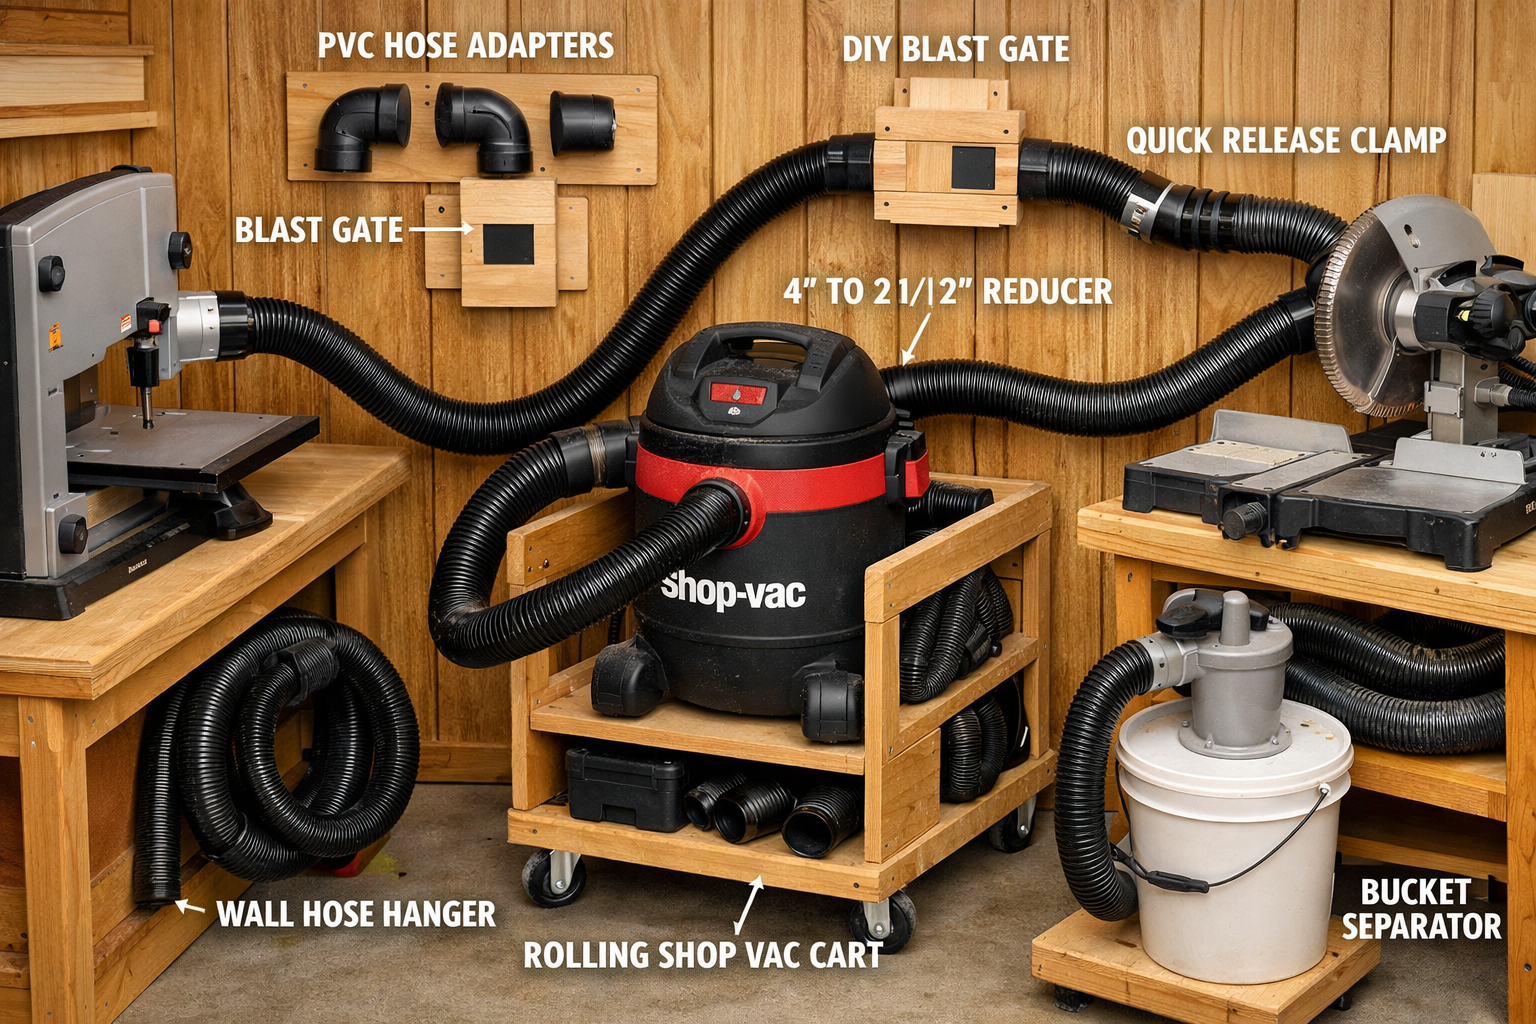
Ducting and Blast Gates: Optimizing Airflow
Efficient dust collection relies on proper ducting. For small workshops, 2.5-inch to 4-inch PVC or metal ducting is typically used.
Ducting Principles:
- Minimize Bends: Each bend creates turbulence and reduces airflow. Use gradual curves rather than sharp 90-degree elbows where possible.
- Shortest Runs: Keep duct runs as short as possible to maintain suction.
- Airtight Connections: Leaks drastically reduce efficiency. Use clamps, tape, and sealant on all connections.
- Grounding (Important!): Static electricity can build up in plastic ducts, posing a fire risk with fine dust. Ground your system by wrapping a bare copper wire around the outside of your PVC pipes, connected to earth ground.
Blast Gates: Essential for Efficiency
Blast gates are simple devices that open or close a section of ducting. They are critical for directing airflow to the specific tool you are using, preventing suction loss through unused ports. You can buy commercial blast gates or build your own from wood or plastic.

For ideas on organizing your workshop space to accommodate ducting, check out our article on smart workshop storage solutions.
Integrating a Shop Vac or Dedicated Collector
For small workshops, a robust shop vac often serves as the primary suction unit, especially when paired with a cyclone. For more intensive use, a dedicated dust collector offers higher airflow (CFM – cubic feet per minute).
Shop Vac Integration:
- High-Efficiency Filters: Upgrade your shop vac filter to a HEPA or fine dust cartridge filter.
- Pre-Separation: Always use a cyclone pre-separator with your shop vac to protect its filter.
- Automation: Consider integrating a smart switch or automated system that turns on your shop vac when a tool is activated. Our guide on building a DIY smart workshop dust collection system offers advanced solutions for this.
Dedicated Dust Collectors:
- CFM Rating: Choose a collector with sufficient CFM for your largest dust-producing tool (e.g., planers often require 600+ CFM).
- Filter Quality: Ensure it has a high-quality filter (e.g., 1-micron or better).
- Mobile Base: Put your collector on a mobile base for easy movement to different tools.
Advanced Filtration and Air Quality Control
Even with excellent source capture, some fine dust will escape into the ambient air. This is where an ambient air filtration system comes into play, acting as a final safeguard for Small Workshop Dust Extraction Systems: DIY Solutions for Maximum Air Quality and Tool Longevity.
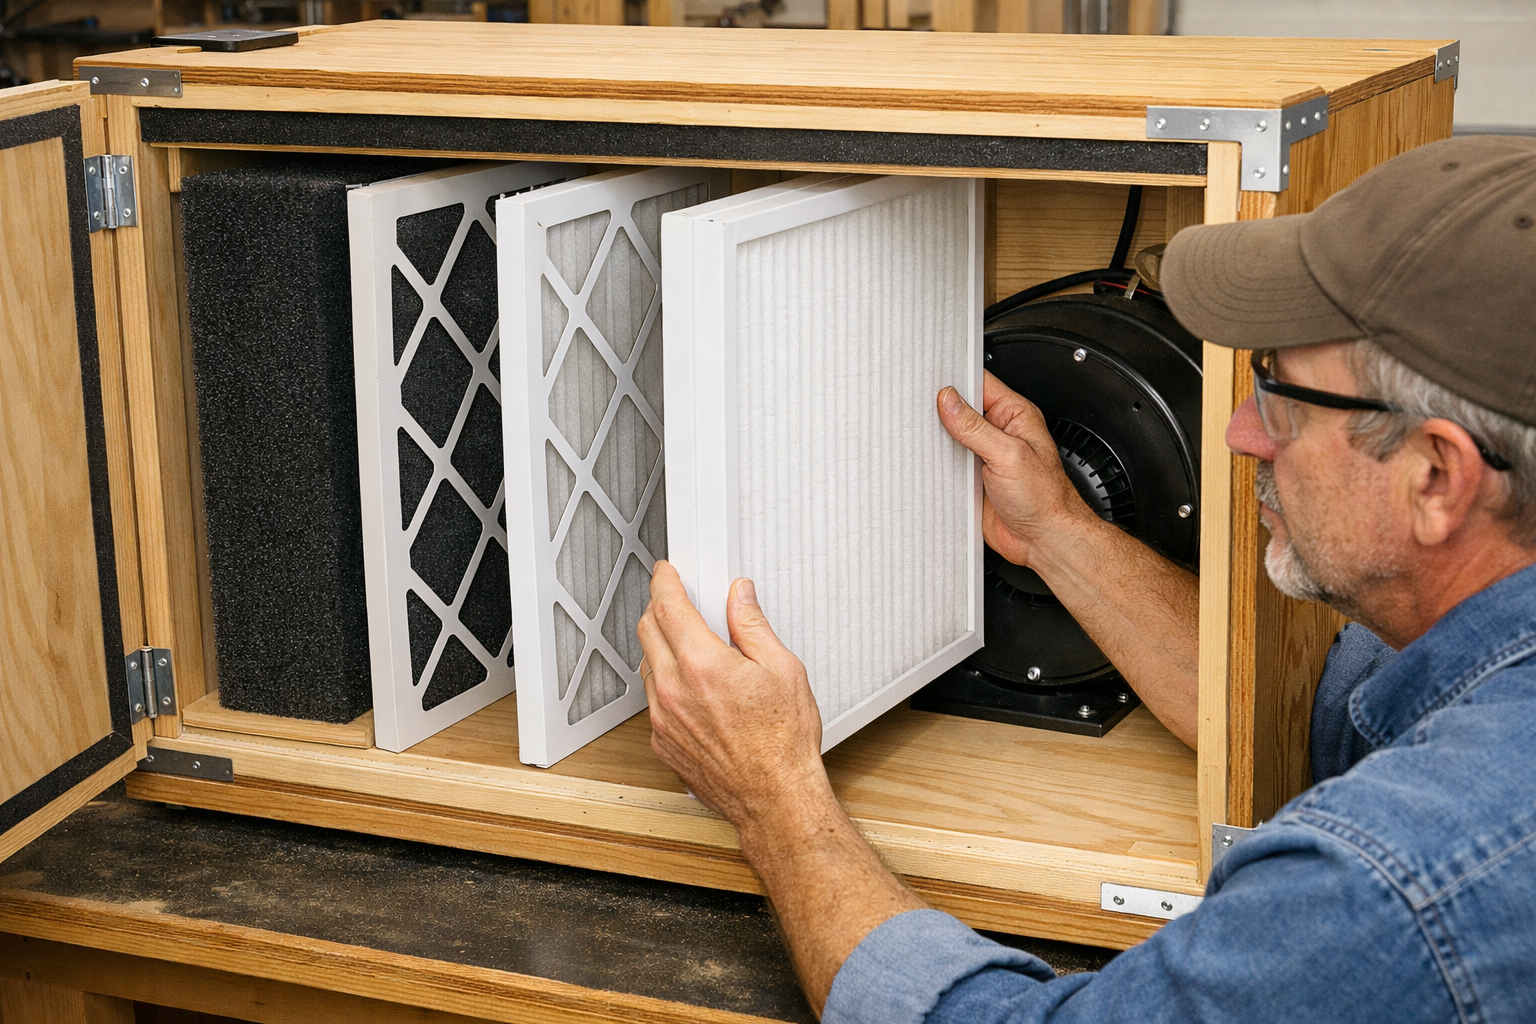
DIY Ambient Air Filtration Unit (Air Cleaner)
An ambient air cleaner continuously circulates and filters the air in your workshop, capturing particles that escape source capture.
Building a Simple DIY Air Cleaner:
Components:
- Box Fan: A standard 20×20 inch box fan.
- Filters: At least two, preferably three filters:
- Pre-filter: A coarser MERV 6-8 furnace filter to capture large particles.
- Main filter: A MERV 11-13 furnace filter for fine dust.
- (Optional) HEPA filter: For the highest level of filtration, placed after the main filter.
- Plywood/MDF: For constructing the enclosure.
- Toggle Clamps/Straps: To hold filters securely to the fan and allow for easy filter changes.
Construction Steps:
- Build a Box: Construct a simple box enclosure from plywood or MDF sized to hold your box fan and filters. The fan should be at one end, pulling air through the filters.
- Filter Slots: Create slots or a removable side for easy filter insertion and replacement.
- Stack Filters: Stack your filters in order, from coarsest to finest (e.g., MERV 8, then MERV 13, then HEPA if using).
- Seal It Up: Ensure the box is reasonably airtight so all air passes through the filters, not around them. Use caulk if necessary.
- Placement: Position the air cleaner strategically in your workshop, often hanging from the ceiling or on a shelf, to circulate air effectively. Aim for it to clean the entire workshop air volume 3-6 times per hour.
Tip: You can make your air cleaner smart by integrating a timer or even a dust sensor that activates it automatically when dust levels rise. Again, our article on building a DIY smart workshop dust collection system provides excellent guidance for this.
Maintaining Your System for Peak Performance
Regular maintenance is crucial for the efficiency and longevity of your DIY dust extraction system.
- Empty Collection Drums Regularly: Don’t let your cyclone drum or dust collector bag get too full. Reduced capacity means reduced efficiency.
- Clean/Replace Filters:
- Shop vac filters: Clean them frequently using a filter cleaning bag or by tapping them outdoors. Replace according to manufacturer guidelines or when suction noticeably drops.
- Dust collector filters: Periodically clean by tapping or using compressed air (outdoors!). Replace when airflow is consistently low.
- Air cleaner filters: Check and replace every 1-3 months depending on workshop use.
- Inspect Ducting: Check for blockages, leaks, or loose connections.
- Check Grounding: Ensure your anti-static grounding wire remains intact and connected.
Practical Considerations for Small Workshops
Space is always a premium in small workshops. Here are some tips to maximize your Small Workshop Dust Extraction Systems: DIY Solutions for Maximum Air Quality and Tool Longevity:
- Mobile Solutions: Mount your dust collector or shop vac + cyclone combo on a mobile base. This allows you to roll it to the tool being used, minimizing long duct runs.
- Overhead Ducting: Running ductwork along the ceiling or high on walls keeps the floor clear for tools and movement.
- Compact Designs: Look for compact cyclone designs or integrate components into existing fixtures. For instance, you might incorporate a cyclone into the base of a mobile workbench. For ideas on optimizing space, see our guide on building modular wood storage systems for small workshops.
- Flexible Hoses: Use flexible hoses for the final connection to tools, allowing for easy hook-up and disconnect. However, minimize the length of flexible hose as it creates more turbulence than rigid ducting.
Safety First!
- Eye and Respiratory Protection: Even with the best system, always wear eye protection and a respirator (N95 or better) when operating dust-producing tools.
- Fire Safety: Fine wood dust is combustible. Ensure your collection system is properly grounded, and empty collection drums regularly to prevent large accumulations. Never smoke near dust collection equipment.
- Electrical Safety: Ensure all electrical connections for your DIY system are safe, properly insulated, and grounded.
Conclusion
Building Small Workshop Dust Extraction Systems: DIY Solutions for Maximum Air Quality and Tool Longevity is a highly rewarding endeavor that directly impacts your health, the precision of your work, and the lifespan of your valuable tools. By understanding the principles of dust separation and filtration, you can create a customized, budget-friendly system that transforms your workshop into a safer, cleaner, and more enjoyable creative space in 2026 and beyond.
Start by identifying your workshop’s specific needs, then gradually build out your system, beginning with a cyclone separator and effective source capture. Prioritize airtight connections and appropriate filtration for both chip and fine dust. With a little ingenuity and elbow grease, you’ll be breathing easier and working more efficiently in no time.
References
- Nieuwenhuijsen, M. J., et al. (2006). Wood Dust Exposure and the Risk of Nasal and Nasopharyngeal Cancer: A Systematic Review. Occupational and Environmental Medicine, 63(1), 2-10.
