


The average piece of furniture often showcases wood grain as a mere background, an inherent characteristic rather than a deliberate design element. However, in the realm of high-end woodworking, the grain itself becomes the star, transforming mundane surfaces into captivating visual narratives. This transformation is epitomized by The Art of Book-Matched Panels: Techniques for Creating Stunning Grain Patterns in Furniture, a specialized approach that elevates a simple slab of wood into a symmetrical masterpiece, a testament to both nature’s artistry and human craftsmanship. This article delves into the meticulous process behind achieving these breathtaking patterns, from initial selection to final finishing, ensuring your furniture projects stand out with unparalleled elegance in 2026.
Key Takeaways
- Book-matching creates symmetrical, mirrored grain patterns by slicing a board and opening it like a book.
- Careful lumber selection is crucial, focusing on boards with prominent, interesting grain and minimal defects.
- Precise milling techniques are essential for achieving consistent thickness and perfectly square edges for a seamless glue-up.
- Proper glue-up strategies and strong clamping pressure are vital for an invisible and durable joint.
- Thoughtful finishing enhances the book-matched pattern, protecting the wood while allowing its natural beauty to shine.
Understanding Book-Matching: The Foundation of Mirrored Beauty
Book-matching is a technique where a single, thick piece of lumber is cut down its center, creating two thinner pieces. These two pieces are then opened up, or “booked,” so that their adjacent surfaces face outwards, creating a mirror image of each other. This process reveals a stunning, symmetrical grain pattern that is impossible to achieve through conventional lumber usage. The beauty lies in the continuity of the grain, creating a visually harmonious and often dramatic effect, frequently seen on tabletops, cabinet doors, and wall panels.

The magic of book-matching lies in nature’s inherent design. Each tree grows with unique patterns of growth rings, knots, and figure. When a log is milled, these patterns are exposed. By carefully slicing a thick board and mirroring the resultant pieces, woodworkers exploit this natural variation to create patterns that resemble Rorschach tests or the wings of a butterfly. This technique isn’t just about aesthetics; it’s about making a statement, showcasing the raw beauty of the wood, and highlighting the craftsmanship involved in the piece.
Why Choose Book-Matched Panels?
Book-matched panels offer several distinct advantages that make them a preferred choice for fine furniture:
- Aesthetic Appeal: The primary reason is the striking visual impact. Symmetrical grain patterns are inherently pleasing to the eye, creating a focal point in any room.
- Uniqueness: Every book-matched panel is unique, a one-of-a-kind piece of art dictated by the individual characteristics of the original wood slab.
- Value Enhancement: Furniture featuring book-matched panels often commands a higher value due to the skill, time, and quality of material required.
- Storytelling: The grain pattern can tell the story of the tree’s growth, revealing past conditions and adding character to the finished piece.
To truly master this technique, one must appreciate the importance of wood movement. Understanding how wood expands and contracts with changes in humidity is critical for designing and building furniture that lasts, especially with wide, book-matched panels where movement can be more pronounced. For deeper insights into this, consult our guide on Understanding Wood Movement: How to Design and Build Furniture That.
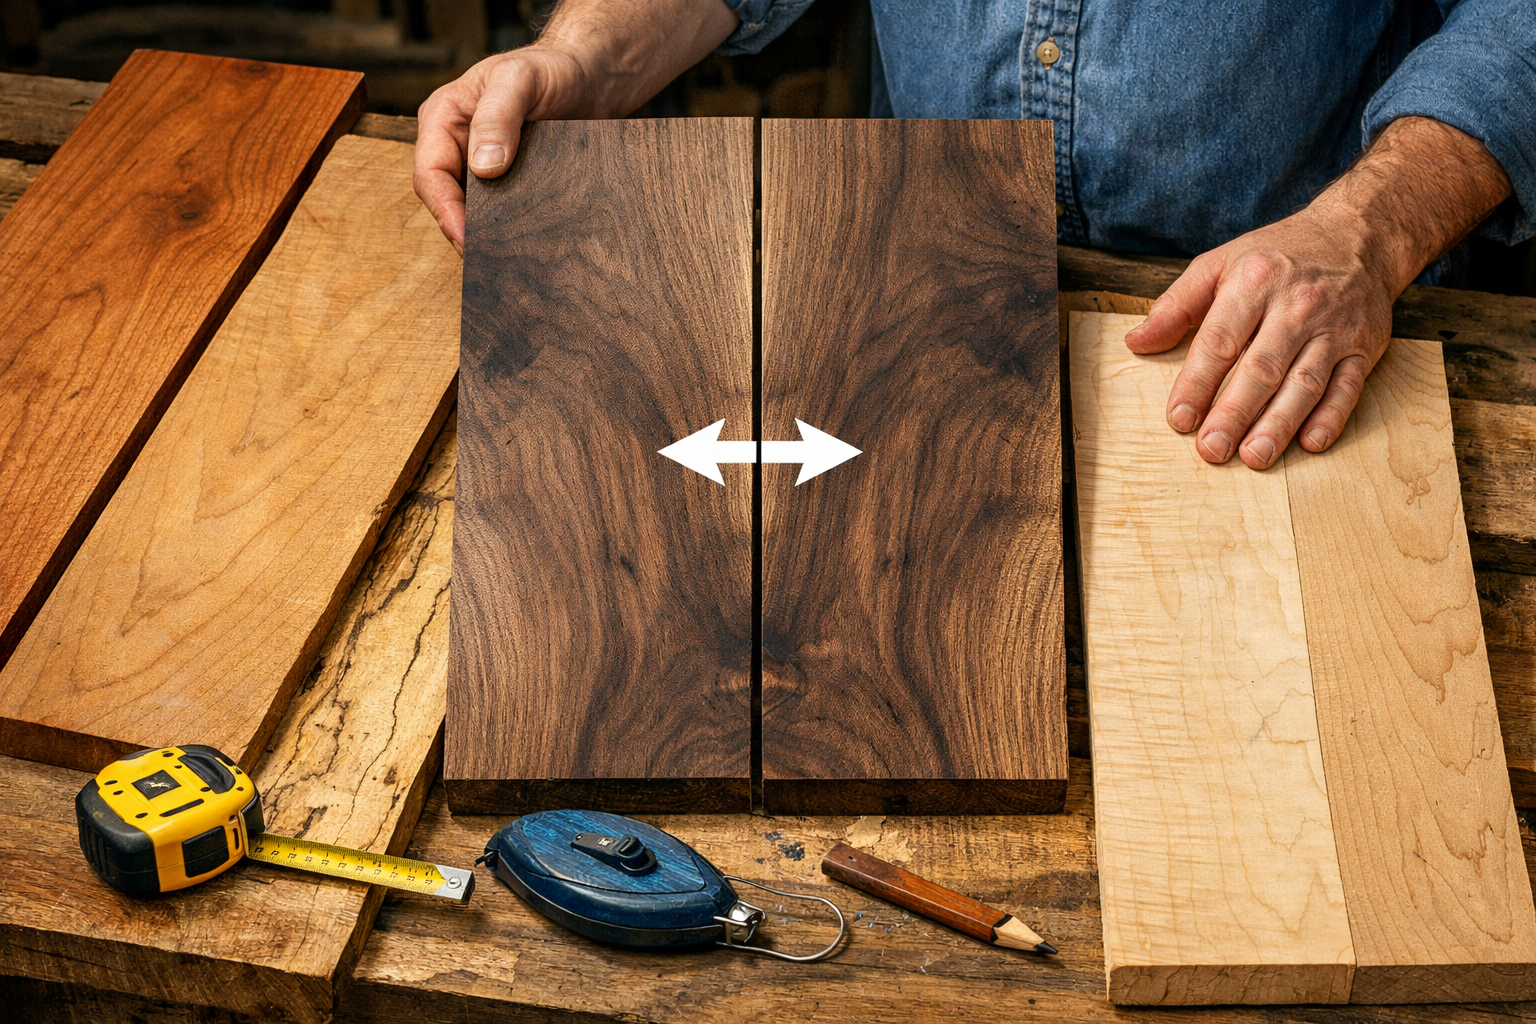
Selecting and Preparing Lumber for The Art of Book-Matched Panels: Techniques for Creating Stunning Grain Patterns in Furniture
The success of The Art of Book-Matched Panels: Techniques for Creating Stunning Grain Patterns in Furniture hinges significantly on the initial selection and meticulous preparation of the lumber. This stage is where potential masterpieces are identified, or projects are doomed to mediocrity.
Choosing the Right Wood Species
While many wood species can be book-matched, some lend themselves better to the technique due to their inherent grain characteristics.
- Walnut: Renowned for its rich color and often dramatic, flowing grain. It frequently displays figure like crotch grain or curly patterns that become spectacular when mirrored.
- Maple: Especially curly or figured maple, offers chatoyance and depth that is enhanced by book-matching.
- Cherry: Known for its subtle, graceful grain and ability to darken beautifully over time.
- Oak (Quartersawn): Quartersawn oak displays prominent ray fleck, which creates a distinct, almost architectural pattern when book-matched.
When selecting boards, look for lumber with interesting and continuous grain patterns. Avoid boards with excessive knots, sapwood (unless intentionally incorporated for design), or splits that might compromise the integrity of the panel. The thicker the original board, the more material you have to work with for resawing, which is crucial for achieving smooth, even surfaces.

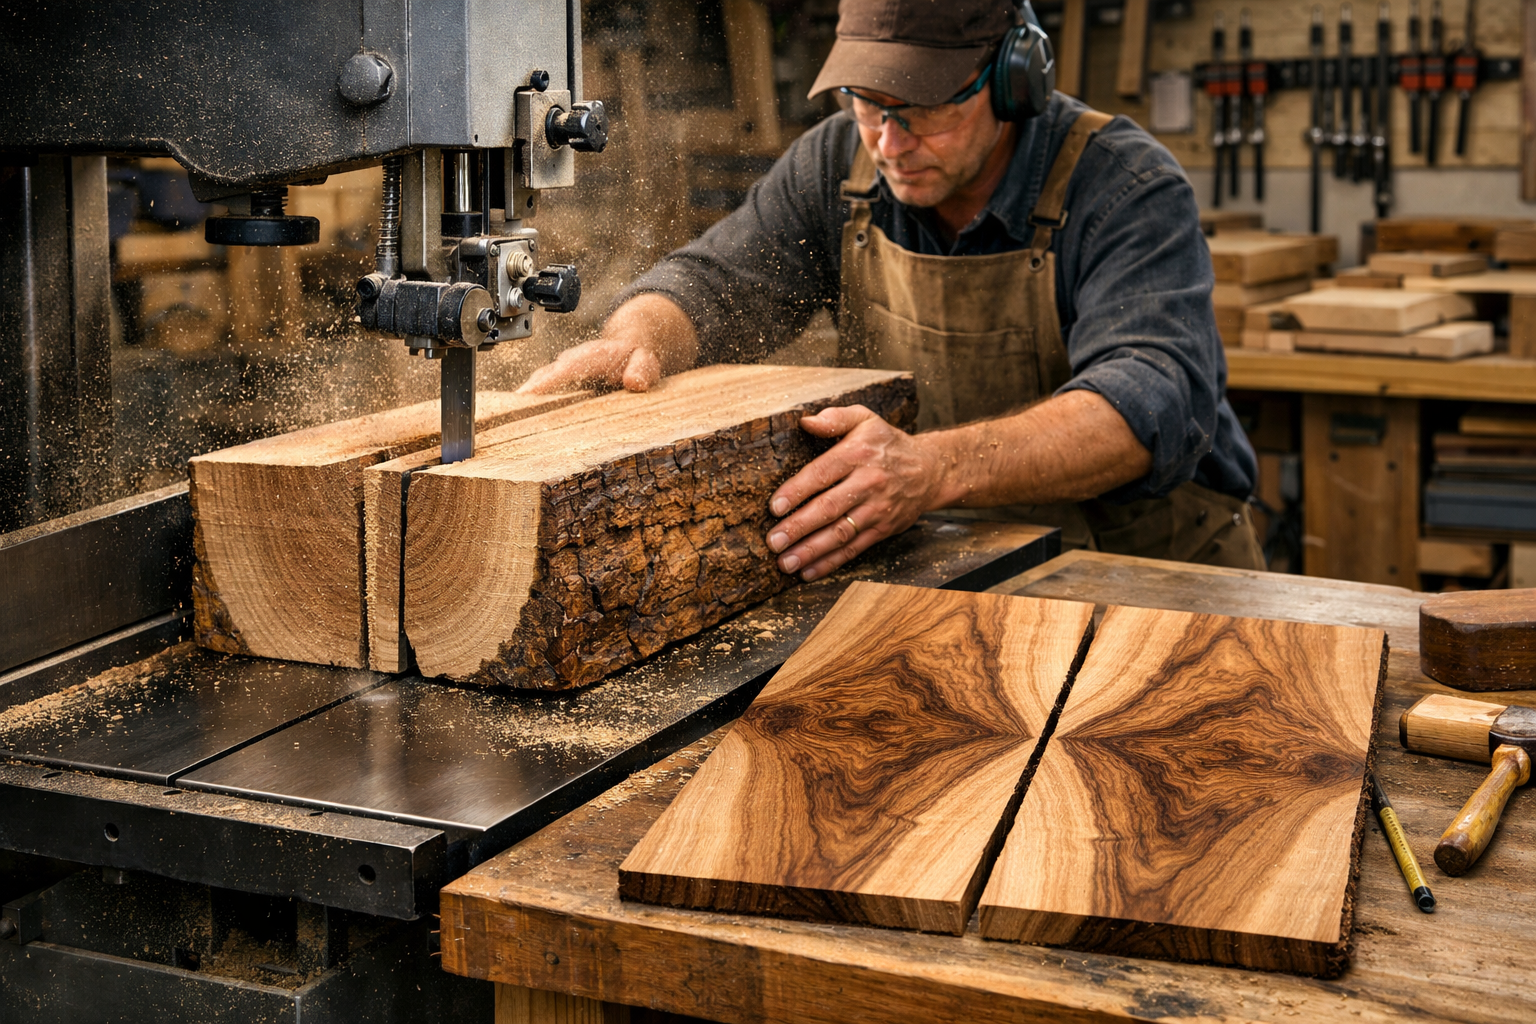
Resawing and Milling for Precision
Once the ideal board is chosen, the next critical step is resawing it into two thinner, mirror-image pieces. This is typically done on a bandsaw, as it allows for a thinner kerf (less wasted wood) and can handle thicker stock than a table saw.
Resawing Steps:
- Mark the Cut: Carefully mark a precise line down the center of the board’s thickness. This line will guide your bandsaw cut.
- Bandsaw Setup: Ensure your bandsaw is properly tuned with a sharp, wide blade (1/2″ to 3/4″) for straight cuts. Adjust the fence to support the board during the cut.
- Slow and Steady: Feed the board through the bandsaw slowly and consistently. The goal is to achieve two pieces of roughly equal thickness, though minor variations are expected. Safety is paramount here; always use push sticks and keep hands clear of the blade.
- Flattening and Jointing: After resawing, the two pieces will likely have rough, uneven surfaces. They must be flattened and dimensioned.
- Join one face: Use a jointer to create one perfectly flat reference face on each board.
- Plane to thickness: Use a thickness planer to bring both boards to their final, uniform thickness, ensuring the previously jointed face is against the planer bed. Aim for consistent thickness across both pieces to prevent problems during glue-up. Using a high-quality planer like the Hitachi P13F can significantly aid in achieving this precision. For more on optimizing your planer, check out our Hitachi P13F 13″ Thickness Planer: Overview, Advantages, Tips, and Techniques.
- Joint one edge: After planing, joint one edge of each board perfectly straight and square.
- Rip to width: Rip the boards to their final width on a table saw, using the jointed edge against the fence.
This precise milling ensures that when the two pieces are joined, the seam will be virtually invisible, allowing the book-matched grain to flow uninterrupted. This level of accuracy is also essential for intricate joinery often found in fine furniture. For those looking to refine their joinery skills, especially for visible wood joints, our article on Hand Tool Joinery for Visible Wood Joints: Dovetails, Mortis offers valuable guidance.
Gluing and Finishing: Bringing the Book-Match to Life
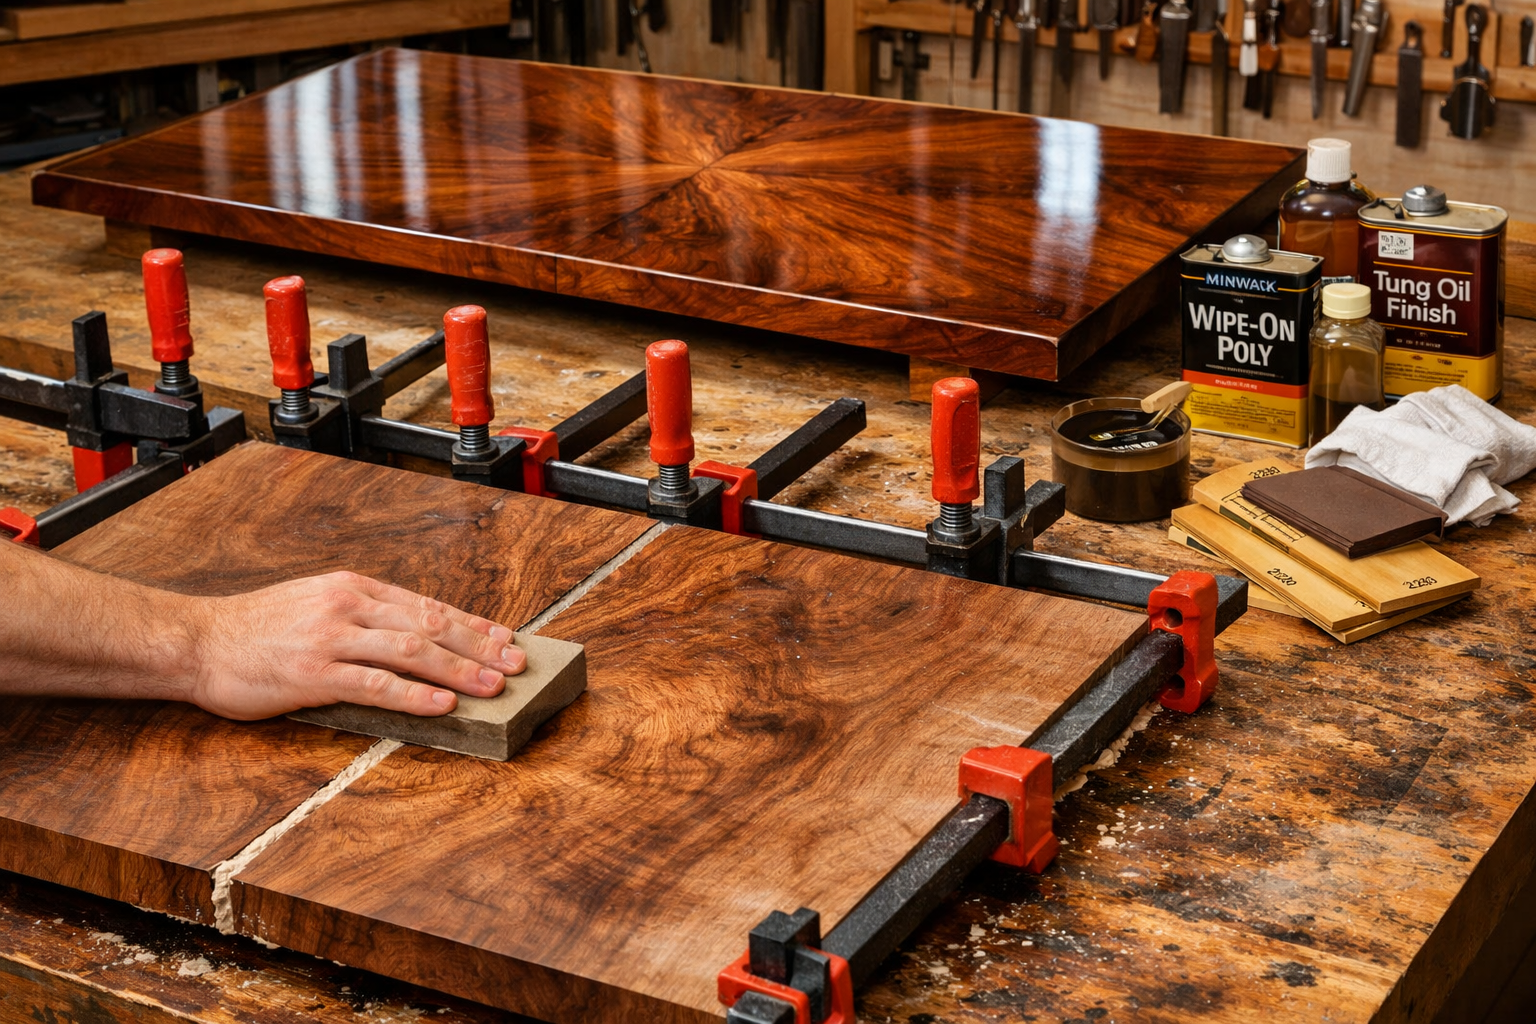
The final stages of The Art of Book-Matched Panels: Techniques for Creating Stunning Grain Patterns in Furniture involve the critical glue-up and careful finishing, which together transform the prepared lumber into a captivating piece. A flawless glue line is paramount for the book-match to truly shine.
The Perfect Glue-Up
Achieving an invisible seam is the hallmark of a successful book-matched panel. This requires careful preparation and execution.
- Dry Fit: Always perform a dry fit first. Clamp the two pieces together without glue to ensure the edges meet perfectly. Look for any gaps or irregularities. If adjustments are needed, use a hand plane or jointer to refine the edges until they are perfectly straight and square.
- Glue Application: Apply a thin, even layer of high-quality wood glue to both mating edges. Avoid excessive glue, which can create a mess and potentially hinder clamping pressure. For insights on selecting the right adhesive, refer to The Ultimate Guide to Wood Glue: Choosing the Right Adhesive for.
- Clamping Strategy:
- Cauls: Use cauls (straight pieces of wood, often waxed to prevent sticking) across the top and bottom of the panel, clamped firmly, to keep the panel flat and prevent bowing or cupping during glue-up.
- Bar Clamps: Apply even pressure with bar clamps across the joint, ensuring the pieces are pulled together tightly. Alternate clamps above and below the panel to distribute pressure evenly.
- Squaring: Before the glue sets, check the panel for squareness and adjust clamps as needed.
- Curing: Allow the glue to cure completely, typically 24 hours, before removing clamps and further working the panel. Rushing this step can compromise the joint’s strength.
Sanding and Finishing for Maximum Impact
After the glue has fully cured, the panel is ready for sanding and finishing. This is where the true depth and beauty of the book-matched grain will emerge.

Sanding:
Start with a coarse grit sandpaper (around 80-100 grit) to remove any dried glue squeeze-out and to flatten the panel surface. Gradually work your way through finer grits (120, 150, 180, 220, and even higher for very fine finishes). Always sand in the direction of the grain to avoid scratches. Proper sanding is key to preparing the wood for a finish that truly enhances the book-match.
Finishing Choices:
The choice of finish profoundly impacts the visual appeal of book-matched panels.

- Oils (e.g., Linseed Oil, Tung Oil): These finishes penetrate the wood, providing a natural, warm look that accentuates the grain. They offer moderate protection and are repairable.
- Varnishes (e.g., Polyurethane): These create a durable, protective film on the surface. They come in various sheens (matte to high gloss) and offer excellent resistance to moisture and wear. Polyurethane is a popular choice for high-traffic surfaces like tabletops. For tips on applying it, especially in challenging conditions, see Applying Polyurethane in High Humidity: Tips and Techniques.
- Shellac: A natural resin that provides a beautiful, traditional finish with a warm amber glow. It is often used as a sealer before other topcoats.
- Lacquers: Fast-drying and durable, lacquers provide a clear, hard finish that can be built up for depth.
When applying any finish, follow the manufacturer’s instructions for application, drying times, and recoating. Multiple thin coats are always better than one thick coat. Lightly sand between coats with very fine sandpaper (320-400 grit) to achieve a super-smooth surface. The final finish should highlight the symmetrical grain without obscuring it, making the book-matched pattern the undeniable star of the furniture piece.
Conclusion
Mastering The Art of Book-Matched Panels: Techniques for Creating Stunning Grain Patterns in Furniture is a journey that blends precision, patience, and a deep appreciation for the natural beauty of wood. From the initial meticulous selection of lumber with compelling grain to the exacting processes of resawing, milling, and glue-up, every step contributes to the creation of a truly unique and visually arresting piece of furniture. The final finish, chosen and applied with care, serves to protect the wood while enhancing the mirrored spectacle, bringing the book-match to vibrant life.
In 2026, where bespoke craftsmanship continues to be highly valued, incorporating book-matched panels elevates a piece from mere utility to a statement of artistry. It’s a technique that allows woodworkers to truly collaborate with nature, transforming raw material into a symmetrical masterpiece that tells a story of growth and skilled hands. Embrace this technique to create heirloom-quality furniture that not only serves its purpose but also captivates and inspires.
Actionable Next Steps:
- Source Quality Lumber: Begin by actively seeking out thick, interesting slabs of wood. Visit local sawmills or specialty lumberyards, keeping an eye out for boards with prominent, consistent grain.
- Practice Resawing: If new to resawing, practice on less expensive stock to dial in your bandsaw settings and technique before tackling your prized lumber.
- Refine Milling: Focus on achieving perfectly flat, square, and consistent dimensions for your boards. This precision is the foundation of a successful book-match.
- Experiment with Finishes: Test different finishes on scrap pieces of the same wood species to understand how each one affects the grain and color.
