
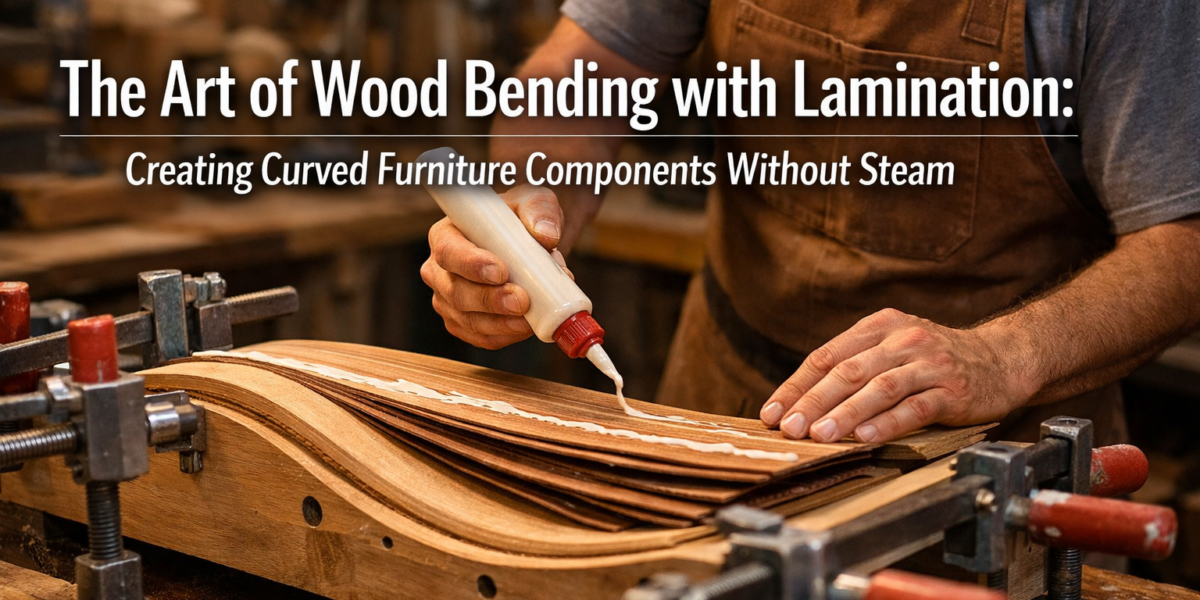

The persistent challenge of incorporating graceful curves into woodworking projects often leads artisans down the path of steam bending – a technique both effective and demanding. However, a less arduous, equally powerful method exists, offering superior control and often greater strength: The Art of Wood Bending with Lamination: Creating Curved Furniture Components Without Steam. This approach transforms stiff, straight lumber into fluid, organic forms by layering thin veneers with adhesive, then clamping them into a desired shape until the glue cures. It’s a technique that opens up a universe of design possibilities for furniture makers and woodworkers in 2026, allowing for custom curves and intricate designs previously thought difficult or impossible without specialized, large-scale steam facilities.
Key Takeaways
- Lamination Bending Offers Control: Unlike steam bending, which relies on wood’s inherent plasticity, lamination provides precise control over the final curve, preventing springback.
- Enhanced Strength and Stability: Layering thin veneers with opposing grain directions results in a component that is often stronger and more dimensionally stable than a solid piece bent through other methods.
- Accessibility for All Skill Levels: While requiring careful preparation, the technique doesn’t demand specialized steam equipment, making it accessible to hobbyists and professional woodworkers alike.
- Versatile Design Applications: From graceful chair backs to structural arches, laminated curves are ideal for furniture, cabinetry, architectural details, and decorative elements.
- Freedom from Steam: Eliminating the need for steam bending equipment simplifies the process, reducing setup time and the associated risks of high-pressure steam.
Understanding The Art of Wood Bending with Lamination: Creating Curved Furniture Components Without Steam
The principle behind wood bending with lamination is deceptively simple: instead of forcing a thick piece of wood to bend, you create the desired curve by stacking multiple thin layers of wood (veneers or thin strips), applying adhesive between each layer, and then pressing them into a form until the glue hardens. This method leverages the inherent flexibility of thin wood, allowing for much tighter radii and more consistent curves than traditional steam bending. The resulting laminated component is not only curved but often possesses superior strength due to the cross-grain reinforcement provided by the multiple glued layers.

Historically, wood bending techniques have been central to various crafts, from boat building to furniture making. Steam bending, while effective, requires specific wood species, controlled moisture content, specialized equipment like steam boxes, and a rapid clamping process to counteract springback. Lamination bending, however, bypasses these complexities, offering a predictable and repeatable process.
Consider the example of crafting a curved chair back. With steam bending, you might struggle with inconsistent bends, cracks, or a high degree of springback after clamping. With lamination, you precisely cut several thin strips, apply glue, and press them into a form. Each strip easily conforms to the mold, and once the glue dries, the multiple layers act as a single, incredibly strong, permanently curved unit. This makes The Art of Wood Bending with Lamination: Creating Curved Furniture Components Without Steam a highly attractive option for crafting elegant and durable pieces.
Key Advantages of Lamination Bending
The benefits of embracing this technique are numerous, making it a staple in modern woodworking shops.
- Precision and Repeatability: Molds ensure consistent curves every time, allowing for batch production of identical components.
- Reduced Springback: Unlike solid wood bending, laminated bends exhibit minimal to no springback, as the glue effectively “sets” the shape.
- Enhanced Strength: The layered structure, especially when grain directions are varied, creates an incredibly robust component. This technique is often used in structural applications where strength is paramount.
- Broader Wood Selection: Many wood species that are difficult or impossible to steam bend can be successfully laminated.
- No Steam Equipment Required: This is a significant advantage, eliminating the need for bulky, energy-intensive steam boxes and their associated setup.
- Design Freedom: Complex and tight curves become achievable, expanding creative possibilities for furniture design.
- Material Efficiency: Often, thinner, less expensive stock can be used and laminated together to achieve the desired thickness and curve.
This technique is particularly useful for projects requiring warm minimalism in woodworking, where clean lines and subtle curves enhance the aesthetic without overwhelming the design.
The Process of Wood Bending with Lamination: Step-by-Step
Mastering The Art of Wood Bending with Lamination: Creating Curved Furniture Components Without Steam involves several critical stages, each demanding precision and attention to detail.
1. Designing the Curve and Building the Mold
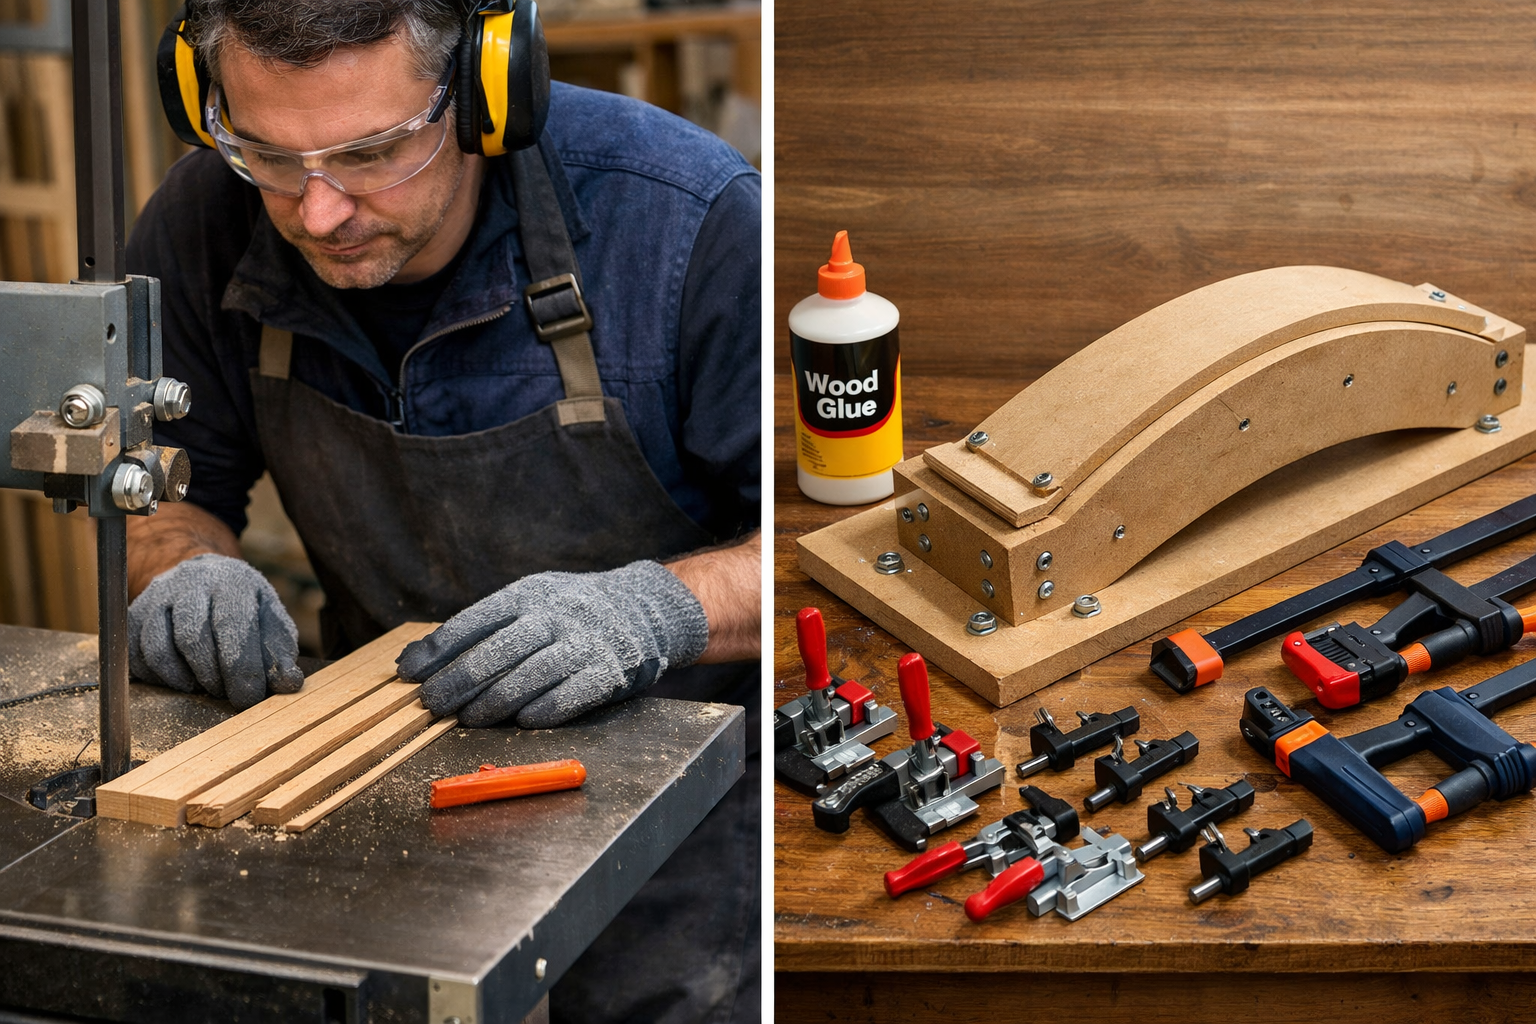
The journey begins with design. Accurately draw the desired curve, either on paper, with CAD software, or directly on a piece of material. This will be the blueprint for your mold. The mold is arguably the most crucial component, as it dictates the final shape.
- Materials for Molds: Common choices include MDF, plywood, or solid wood. MDF is often preferred for its stability and ease of shaping.
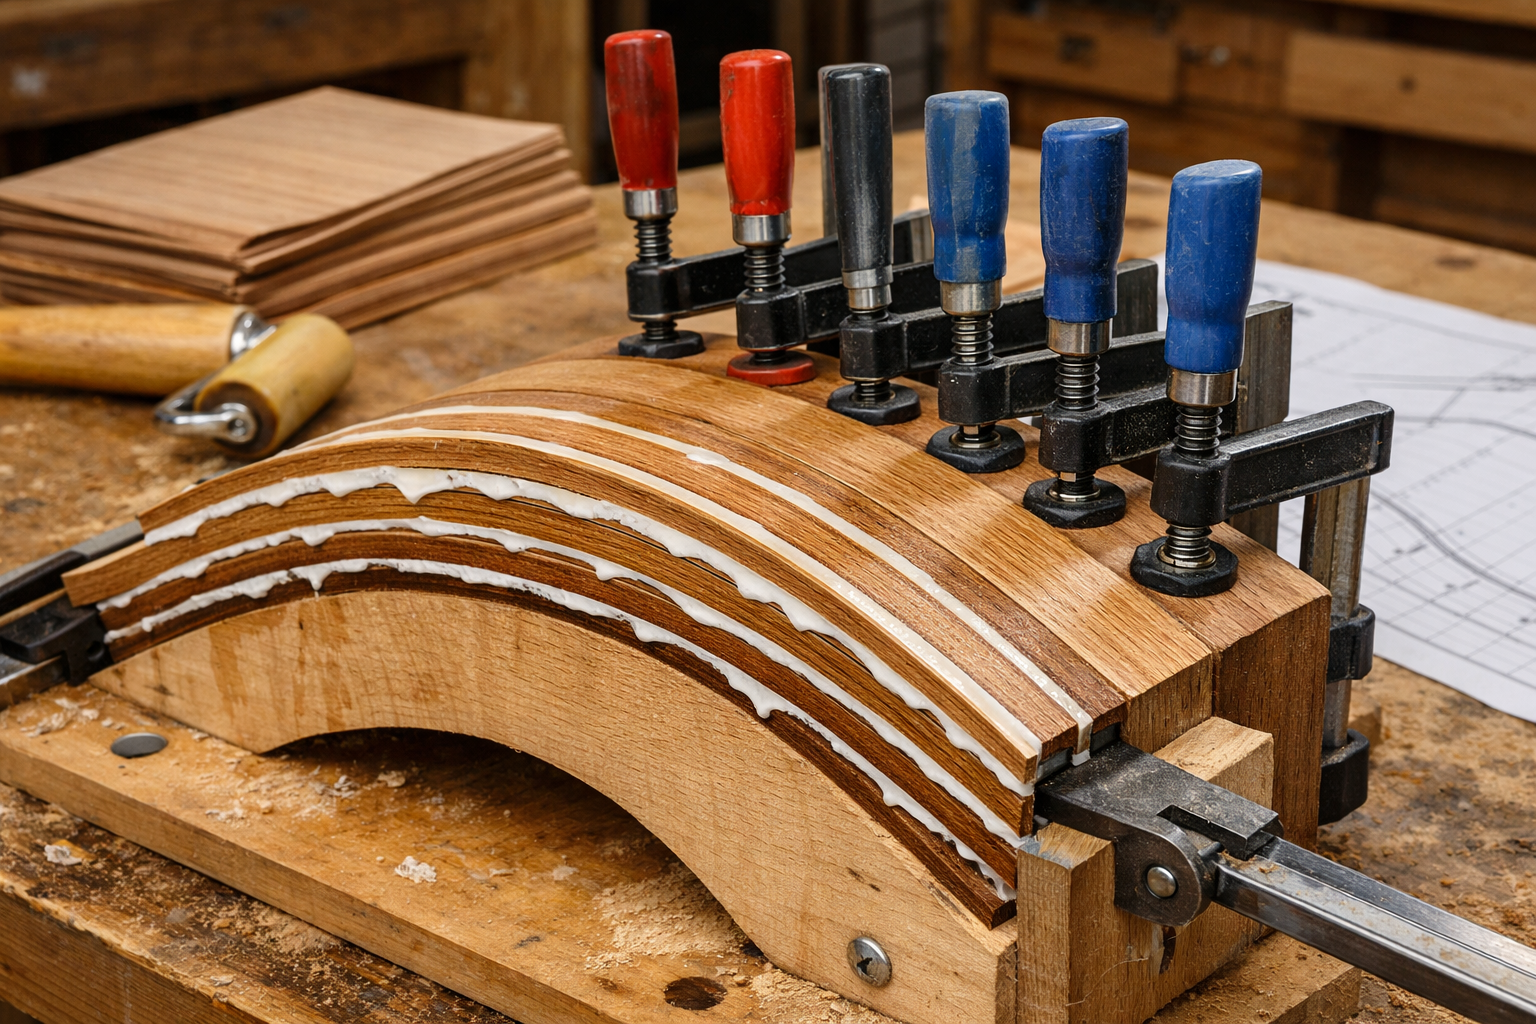
- Construction: Cut multiple identical pieces of the mold material, each with the exact negative curve of your desired component. Stack and glue these pieces together to create a solid, stable form. The mold should be wider than your finished laminated piece to allow for clamping pressure.
- Surface Preparation: Sand the mold smooth and apply a release agent (packing tape, wax paper, or paste wax) to prevent the glued veneers from sticking to it.
2. Selecting and Preparing Veneers
The choice and preparation of your wood veneers are critical for successful lamination bending.
- Wood Species: Hardwoods like maple, cherry, walnut, and oak are popular choices for their strength and aesthetic appeal. Softwoods can also be used for certain applications.
- Veneer Thickness: Thinner veneers bend more easily and allow for tighter radii. Typical thicknesses range from 1/16″ to 1/8″. The total thickness of your laminated stack will determine the strength and rigidity.
- Grain Direction: For maximum strength and stability, arrange veneers so that the grain direction of adjacent layers runs perpendicular to each other or at opposing angles. This helps counteract wood’s natural tendency to cup or warp.
- Cutting Veneers: Precision is key. Use a band saw with a sharp blade or a veneer saw to cut strips of consistent width and thickness. Ensure the edges are clean to allow for tight glue joints.
- Moisture Content: Ensure veneers have a consistent and appropriate moisture content (typically 6-8%) to minimize future movement.
3. Choosing the Right Adhesive
The glue forms the permanent bond between layers, so selecting the correct type is paramount.
- Type: Urea-formaldehyde glues (like Titebond III or epoxy) offer excellent strength and rigidity, making them ideal for structural components. PVA glues (Titebond Original, Titebond II) can work for less demanding projects but may have more creep under stress.
- Open Time: Ensure the glue has sufficient open time to allow you to spread it evenly and assemble all layers before it begins to set. For larger projects, a longer open time is crucial.
- Application: Apply glue evenly and generously to both surfaces of each veneer using a roller or brush. Avoid starved joints, which will weaken the bond.
4. The Lamination and Clamping Process
This is where the magic happens.
- Assembly: Working quickly, stack the glued veneers onto your prepared mold. Ensure each layer is aligned precisely.
- Clamping: Apply clamping pressure immediately and evenly across the entire surface. Use numerous clamps (bar clamps, C-clamps, vacuum press) to ensure uniform pressure. The goal is to squeeze out excess glue and bring the wood fibers into intimate contact.
- Cauls: Consider using cauls (wooden strips conforming to the mold’s curve) on the outside of the stack to help distribute clamping pressure more effectively.
- Curing: Allow the glue to cure fully, following the manufacturer’s recommendations for temperature and time. Rushing this step can lead to a weak bond and potential failure.
For projects such as crafting custom wooden record player consoles that feature elegant, sweeping curves, meticulous attention to the lamination process ensures both aesthetic appeal and structural integrity.
Advanced Techniques and Design Considerations for Laminated Bending
Once comfortable with the basics, advanced techniques allow for even greater versatility in The Art of Wood Bending with Lamination: Creating Curved Furniture Components Without Steam.

Complex Curves and Compound Bends
While simple curves are a great starting point, lamination bending can achieve more intricate shapes.
- Compound Curves: These involve bending in two directions simultaneously (e.g., a dish-shaped curve). This typically requires a more complex male and female mold system, often utilizing a vacuum press for even pressure distribution.
- Tapered Laminations: Varying the thickness of individual veneers or even the entire laminated stack can create components that are thicker or thinner at different points along the curve, adding dynamic visual interest and functional strength where needed.
- Segmented Lamination: For extremely tight or complex bends, laminating smaller segments of wood that are then joined can be an effective strategy. This integrates well with hand tool joinery for unique design elements.
Incorporating Laminated Bends into Furniture Design
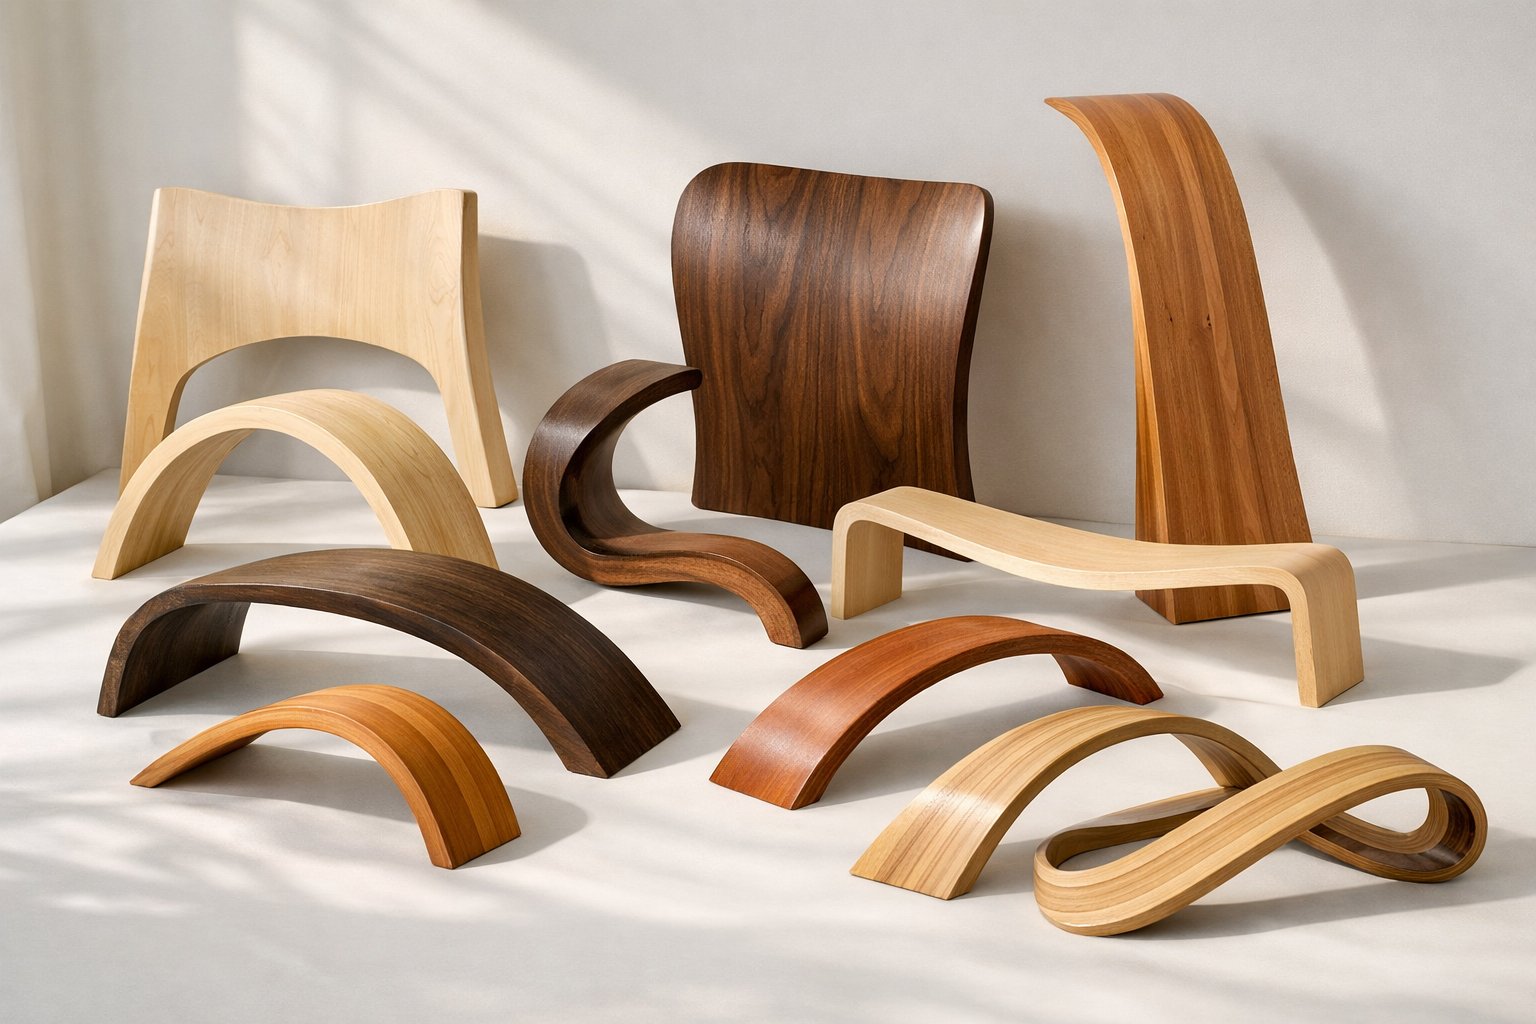
Laminated curved components can elevate nearly any woodworking project.
- Chair Design: Curved chair backs, arms, and even legs offer ergonomic comfort and a sophisticated aesthetic.
- Cabinetry: Curved doors, drawer fronts, or decorative trim pieces can soften the utilitarian look of cabinets, moving towards a warm minimalism in woodworking.
- Tables and Desks: Elegant curved aprons, legs, or edge details can transform a simple slab into a statement piece. See our article on building statement furniture pieces for inspiration.
- Architectural Elements: From curved handrails to decorative arches, lamination bending allows for custom architectural details that add character and flow to interior spaces.
Tools and Equipment for Efficient Lamination
While a basic setup can get you started, certain tools streamline the process and improve results.
- Vacuum Press: For complex curves or large components, a vacuum press provides uniform, consistent pressure across the entire surface, far superior to clamps alone.
- Veneer Slicer/Guillotine: Ensures perfectly straight, consistent veneer strips.
- Spreader Rollers: Essential for applying glue quickly and evenly across multiple veneer surfaces.
- Drying Racks: To store prepared veneers flat and allow glue to cure fully.
Remember to consider your workshop’s capabilities when planning projects. For instance, building a DIY smart workshop dust collection system can significantly improve the environment for fine veneer work by reducing airborne dust particles that could contaminate glue joints.
Troubleshooting Common Lamination Bending Challenges
Even with careful planning, challenges can arise when practicing The Art of Wood Bending with Lamination: Creating Curved Furniture Components Without Steam.
- Uneven Bends: Often due to inconsistent veneer thickness, insufficient clamping pressure in certain areas, or a poorly constructed mold. Double-check all measurements and ensure pressure is evenly distributed.
- Delamination (Layers Separating): This is a critical failure, usually caused by a starved glue joint (not enough glue), improper glue choice, inadequate clamping pressure, or insufficient curing time. Ensure thorough glue application and appropriate clamping force.
- Springback: While less common than with steam bending, some minor springback can occur, especially if the veneers are too thick for the radius or the glue hasn’t fully cured. Overbending the mold slightly can sometimes compensate.
- Cracks or Fractures in Veneers: Typically happens when veneers are too thick for the radius, are too dry, or when forced too quickly into a tight curve. Ensure proper veneer thickness for the desired bend and consider slightly wetting veneers (not soaking) to add flexibility before glue application if needed.
By understanding these potential issues and their remedies, woodworkers can achieve consistently high-quality results. The key is meticulous preparation and patience throughout the process.
Conclusion
The Art of Wood Bending with Lamination: Creating Curved Furniture Components Without Steam offers woodworkers a powerful, versatile, and highly accessible method for introducing elegant curves into their projects. By forsaking the complexities of steam bending, artisans can achieve precise, strong, and visually stunning components with greater control and repeatability. From simple arcs to complex compound curves, this technique empowers woodworkers to push the boundaries of design, creating furniture and architectural elements that blend timeless craftsmanship with contemporary aesthetics.
For those looking to elevate their craft in 2026, embracing wood lamination bending is an investment in skill and creative potential. Start with a simple project, focus on precise mold making, meticulous veneer preparation, and thorough clamping. As confidence grows, explore more intricate designs and discover the endless possibilities that this beautiful art form unlocks.
