


Workshop clutter is a notorious productivity killer, often reducing usable space by up to 30% and leading to countless hours spent searching for misplaced tools and materials. For enthusiasts and professionals alike working within the confines of a small workshop, effective organization isn’t just a convenience; it’s a necessity. This article explores innovative and cost-effective DIY Plywood Storage Solutions: Maximizing Space and Organization in Small Workshops, offering practical designs from rolling tool carts and lumber racks to custom cabinet inserts, all engineered to optimize every inch of your precious workspace in 2026.
Key Takeaways
- Plywood is an ideal material for workshop storage due to its strength, versatility, and cost-effectiveness.
- Modular and mobile storage solutions are critical for maximizing space and flexibility in small workshops.
- Vertical storage, such as wall-mounted shelves and lumber racks, significantly increases usable storage capacity.
- Custom-built inserts and drawer organizers streamline tool and supply accessibility, reducing clutter.
- Thoughtful design and careful construction ensure durability and long-term utility of plywood storage projects.
Innovative DIY Plywood Storage Solutions for Every Corner 🛠️

Maximizing space in a small workshop requires a strategic approach, and plywood stands out as the material of choice for its versatility, durability, and affordability. Unlike solid wood, plywood offers stable sheets that are less prone to warping and shrinking, making it perfect for constructing robust storage units. In 2026, DIY enthusiasts are continually seeking smart ways to leverage this material to transform chaotic spaces into highly functional environments. The key lies in creating solutions that are not only practical but also customizable to your specific needs and tools.

One of the most impactful DIY Plywood Storage Solutions: Maximizing Space and Organization in Small Workshops involves utilizing vertical real estate. Walls often go underutilized, yet they offer immense potential for storing tools, materials, and even larger equipment.
Rolling Tool Carts and Workstations
A rolling tool cart is arguably one of the most transformative additions to any small workshop. Made from plywood, these carts offer incredible mobility, allowing you to bring your tools directly to your project and then easily store them away when not in use.
- Design Considerations:
- Size and Footprint: Design the cart to fit snugly under a workbench or into an unused corner.
- Casters: Heavy-duty, locking casters are essential for stability and ease of movement.
- Integrated Storage: Incorporate drawers, shelves, and pegboard sides for diverse tool storage.
- Workbench Top: A sturdy plywood top can double as an additional small workspace.
Consider a multi-functional rolling workstation that includes a table saw or router table insert. This not only keeps specialized tools organized but also centralizes their use, minimizing setup time. For ideas on creating a stable work surface, refer to our guide on Building a Compact and Ergonomic Workbench for Small Workshops.
Wall-Mounted Lumber Racks
Lumber, especially long stock, can quickly consume floor space. A plywood lumber rack is a simple yet incredibly effective solution.
- Types of Racks:
- French Cleat System: Highly versatile, allowing you to easily reposition or add shelves and tool holders.
- Fixed Shelves: Strong and stable for heavier loads, ideal for storing sheet goods and longer dimensional lumber.
- Vertical Dividers: Create individual slots for smaller pieces of scrap wood, preventing a jumbled mess.
When designing your lumber rack, assess the types and quantities of wood you typically store. Ensure the plywood is thick enough (¾” or thicker for structural components) to support the weight. Utilizing a French cleat system can also be beneficial for other wall-mounted storage like cabinets and tool holders, offering incredible adaptability.
“Plywood’s structural integrity, combined with its ease of cutting and assembly, makes it the reigning champion for DIY workshop storage. It allows for custom solutions that perfectly fit your tools and workflow.”
Custom Cabinet Inserts and Drawer Organizers
Even existing cabinets and drawers can become more efficient with custom plywood inserts. These solutions tailor the storage space to the exact dimensions of your tools and supplies, eliminating wasted space and clutter.
- Drawer Dividers: Create compartments for wrenches, chisels, drill bits, and fasteners. These can be fixed or removable.
- Tool Trays: Custom-fitted trays for hand tools can sit inside drawers, preventing tools from sliding around and making them easier to find.
- Cabinet Shelving: Add extra adjustable shelves to existing cabinets to better utilize vertical space within. For insights into cabinet construction techniques, you might find our article on 12 Plywood Cabinets: Understanding Construction Techniques and Maintenance helpful.
Remember to consider the types of tools you own and how frequently you access them. Tools used daily should be the most accessible.
Planning and Construction: Bringing Your Ideas to Life 📐
The success of any DIY Plywood Storage Solutions: Maximizing Space and Organization in Small Workshops project hinges on careful planning and precise execution. Even experienced woodworkers will benefit from a structured approach, especially when dealing with the constraints of a small area. This section will guide you through the essential steps, from design to assembly, ensuring your plywood creations are both functional and durable.
Design Principles for Small Workspaces
Before cutting any plywood, take the time to measure your space thoroughly and sketch out your ideas.
- Analyze Your Needs: List every tool, material, and accessory that needs a home. Categorize them by frequency of use, size, and weight.
- Measure and Map: Accurately measure your workshop’s dimensions. Use masking tape on the floor or walls to visualize the footprint of proposed units.
- Think Vertical: Prioritize wall-mounted and stacked solutions. Overhead storage can free up valuable floor space.
- Embrace Mobility: Incorporate casters on any unit that could benefit from being moved, such as workbenches or tool chests. See our article on Building a Portable Workbench: Designs for Small Spaces and On-the-Go for inspiration.
- Modular Design: Design units that can be reconfigured or expanded later. French cleats are excellent for this.
- Accessibility: Ensure frequently used items are easily reachable without excessive bending or stretching.
Consider creating a 3D model using free software or even simple paper cutouts to test different layouts. This helps visualize the flow of your workspace and identify potential bottlenecks before you commit to construction.
Essential Tools and Materials
For most plywood storage projects, you won’t need an arsenal of specialized tools.
- Plywood: Opt for ¾” cabinet-grade plywood for structural components and ½” or ¼” for drawer bottoms, back panels, and dividers. Baltic Birch plywood is excellent for its strength and void-free core, though more expensive.
- Cutting Tools:
- Circular Saw with Guide: Essential for straight, accurate cuts on sheet goods.
- Jigsaw: For curves and intricate cuts.
- Table Saw (Optional but Recommended): For precise rips and crosscuts.
- Joining Methods:
- Pocket Hole Jig: Fast and strong joints for frames and panels.
- Wood Glue: For all permanent joints.
- Screws/Nails: Construction screws are often sufficient; brad nails can hold pieces while glue dries.
- Dado Blade or Router Bit: For strong dado and rabbet joints, ideal for shelves and cabinet construction. Mastering router table techniques can be very useful here: Mastering the Router Table: Essential Jigs, Safety, and Advanced Techniques for Precision Joinery and Edges.
- Measuring & Layout: Tape measure, speed square, combination square, pencil.
- Safety Gear: Safety glasses, hearing protection, dust mask.
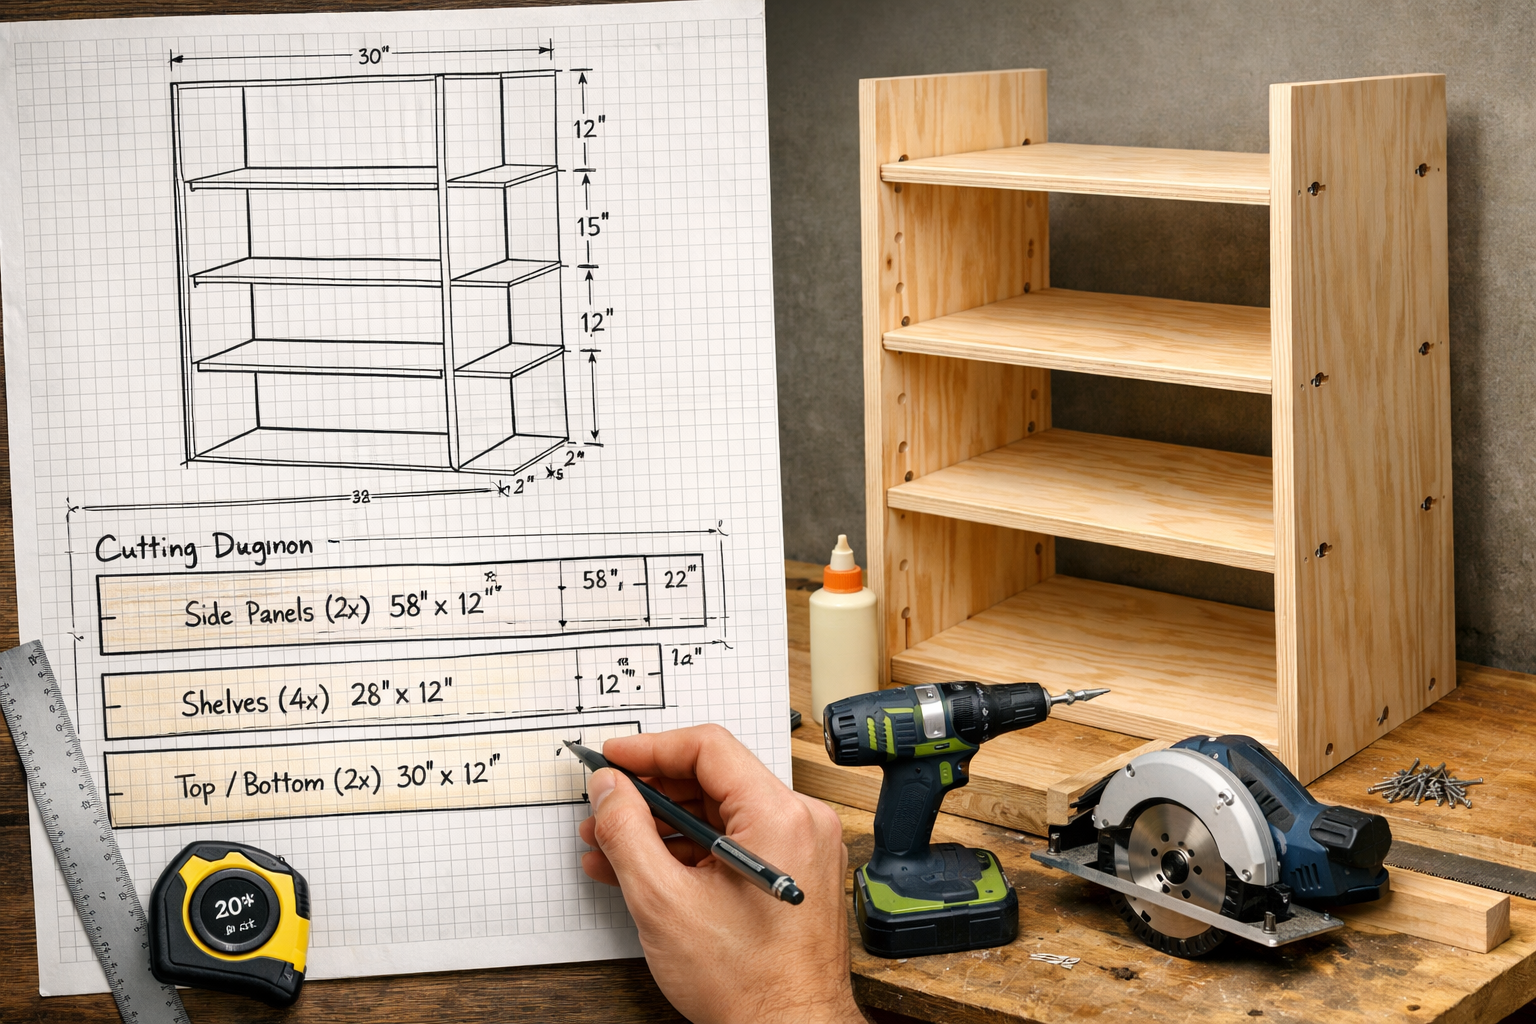
Step-by-Step Construction Guide (Example: Simple Wall-Mounted Shelf Unit)
Here’s a generalized approach applicable to many DIY Plywood Storage Solutions: Maximizing Space and Organization in Small Workshops:
- Cut List Creation: Based on your design, create a detailed cut list, including dimensions for all plywood pieces.
- Plywood Breakdown: Carefully cut your plywood sheets according to your cut list. Take your time to ensure square and accurate cuts.
- Edge Banding (Optional): If desired, apply iron-on or glue-on edge banding to exposed plywood edges for a cleaner look.
- Joinery Preparation: Drill pocket holes, cut dadoes, or prepare rabbets as per your design.
- Assembly:
- Apply wood glue to all mating surfaces.
- Secure joints with screws, nails, or clamps.
- Ensure everything remains square during assembly. Use clamps and corner squares.
- Finishing: Sand all surfaces smooth. Apply a protective finish (polyurethane, paint, etc.) to protect against moisture and wear.
- Installation: Secure wall-mounted units firmly to studs using appropriate fasteners.
“A well-planned cut list can save significant material and reduce waste. Take advantage of plywood’s dimensions to minimize offcuts and maximize efficiency.”
Remember that precision in cutting and assembly directly impacts the strength and appearance of your finished project. Don’t rush these steps.

Practical Organization and Maintenance Tips 🧹
Even the most ingeniously designed DIY Plywood Storage Solutions: Maximizing Space and Organization in Small Workshops will only be effective if they are properly utilized and maintained. A well-organized workshop fosters efficiency, reduces frustration, and can even improve safety by minimizing clutter and tripping hazards. This section focuses on practical strategies to keep your plywood storage solutions working optimally in 2026 and beyond.
Maximizing Efficiency with Strategic Placement
The layout of your tools and materials significantly impacts your workflow.
- Point-of-Use Storage: Store tools and supplies where they are most frequently used. For example, router bits near your router table, drill bits near your drill press, and sandpaper near your sanding station.
- Categorization: Group similar items together. All wrenches in one drawer, all fasteners in another. This makes finding specific items intuitive.
- Accessibility Hierarchy: Place frequently used tools at eye level or within easy reach. Less frequently used items can go on higher shelves or in deeper cabinets.
- Dedicated Zones: Establish specific zones for different activities: a cutting zone, an assembly zone, a finishing zone. This helps minimize cross-contamination and improves focus.
- Clearance: Ensure adequate clearance around workbenches and machinery for safe operation. Your Building a Custom Wood Workbench should also consider surrounding storage.
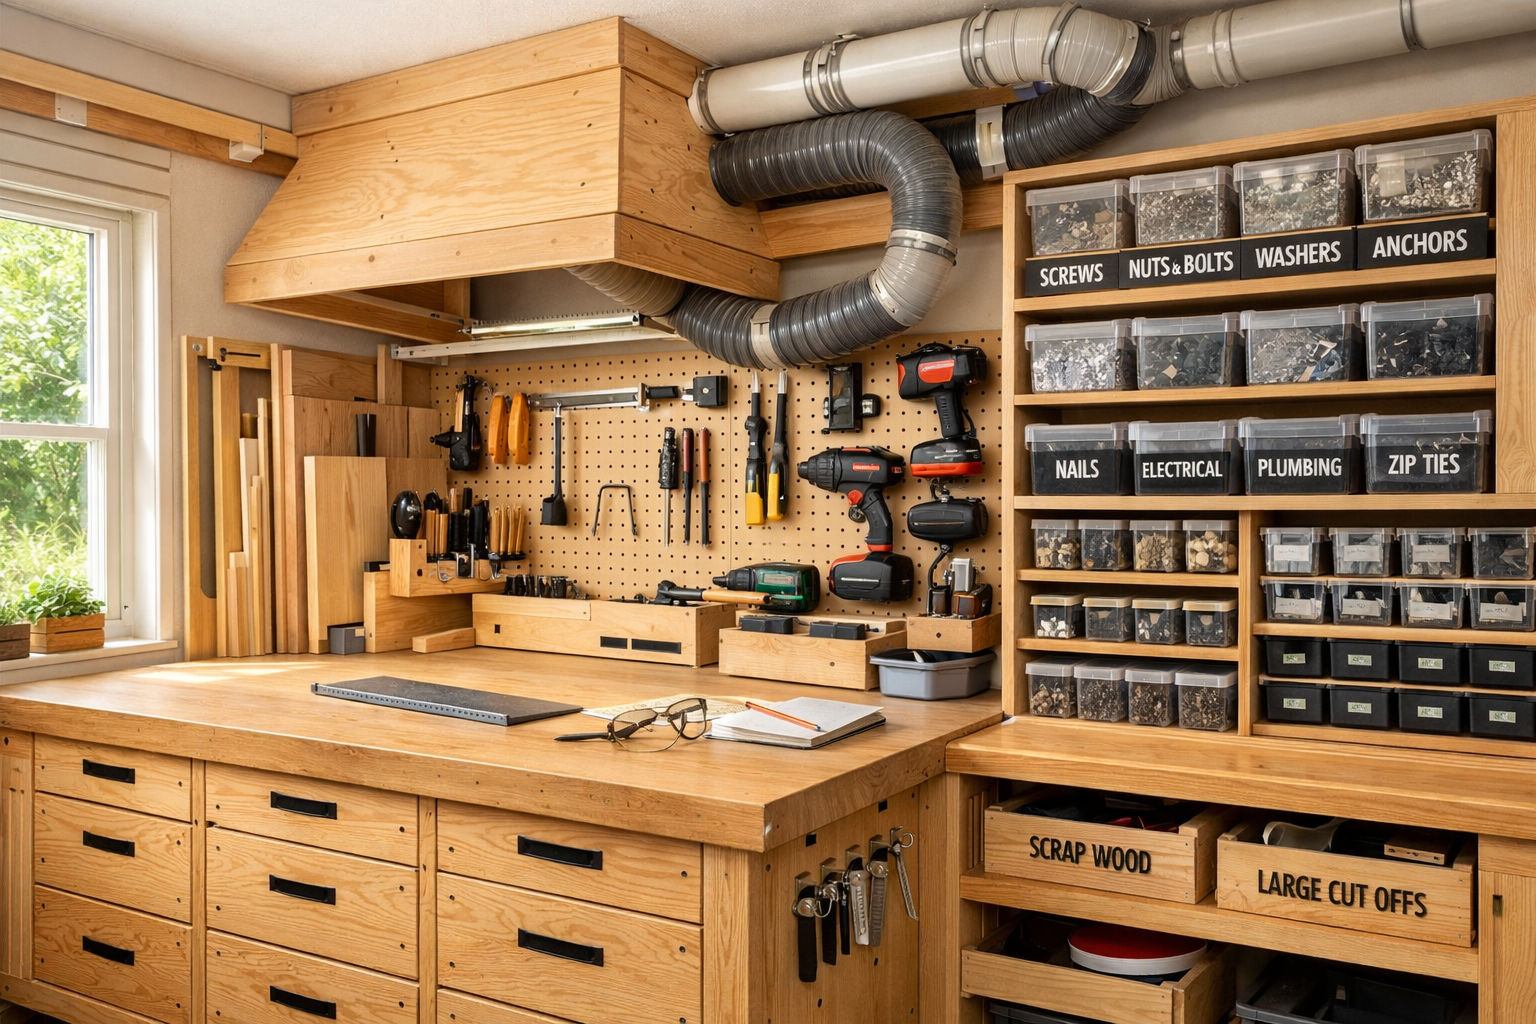
Labeling and Inventory Systems
A robust labeling system is crucial for long-term organization. Without it, even the best storage solutions can descend into chaos.
- Clear Labels: Use large, clear labels for drawers, bins, and shelves. Consider both text and visual cues (pictures) for quick identification.
- Color-Coding: Assign colors to different categories of items (e.g., red for fasteners, blue for electrical supplies).
- Inventory Lists: For specialized tools or bulk materials, consider maintaining a simple inventory list, either physical or digital, especially for items stored in less accessible locations.
- Magnetic Strips: Ideal for small metal tools like chisels, screwdrivers, and drill bits, keeping them visible and accessible. Our guide to Hand Tool Mastery for Detail Work: Chisels, Hand Planes, and Rasps emphasizes the importance of accessible tool storage.
“Good organization isn’t about having a place for everything; it’s about making everything easy to find, use, and put back.”
Maintaining Your Plywood Storage Solutions
Plywood is durable, but proper care will extend the life and appearance of your DIY storage projects.
- Regular Cleaning: Dust and sawdust can accumulate quickly. Wipe down shelves and cabinet interiors regularly. A shop vac with appropriate attachments is indispensable.
- Protective Finishes: If you didn’t apply a finish during construction, consider doing so. Polyurethane, paint, or shellac protect plywood from moisture, stains, and general wear and tear.
- Hardware Checks: Periodically check screws, casters, and drawer slides for looseness or wear. Tighten or replace as needed.
- Weight Limits: Be mindful of the weight capacity of your shelves and units. Overloading can lead to sagging or structural failure.
- Pest Control: In some environments, plywood can be susceptible to pests. Ensure your workshop is sealed and consider using non-toxic deterrents if necessary.
By implementing these organization and maintenance tips, your DIY Plywood Storage Solutions: Maximizing Space and Organization in Small Workshops will remain efficient, functional, and aesthetically pleasing for years to come. A well-maintained workshop not only enhances productivity but also makes woodworking a more enjoyable and safer experience.
Conclusion
Transforming a small, cluttered workshop into a beacon of efficiency is not just a dream in 2026; it’s an achievable reality with DIY Plywood Storage Solutions: Maximizing Space and Organization in Small Workshops. From robust rolling tool carts that bring your workstation to you, to innovative wall-mounted lumber racks that reclaim floor space, and custom cabinet inserts that optimize every drawer, plywood offers an unmatched combination of versatility, strength, and affordability. The investment of time in careful planning, precise construction, and diligent maintenance will pay dividends in improved workflow, reduced frustration, and ultimately, more enjoyable woodworking.
Start small, perhaps with a simple set of drawer dividers, and gradually expand your plywood storage empire. Each project not only enhances your workshop’s functionality but also hones your woodworking skills. Embrace the challenge of maximizing every square inch, and watch your small workshop become a powerful hub of creativity and productivity. Your tools, your projects, and your sanity will thank you.
