
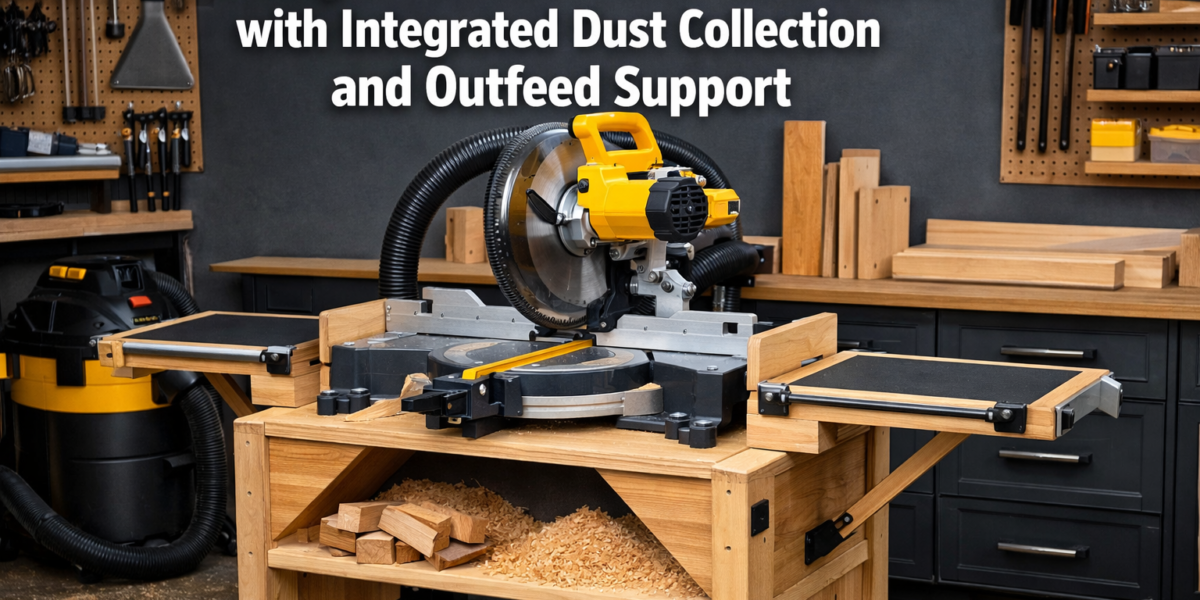

The persistent cloud of fine sawdust, the constant shuffling of makeshift supports, and the inevitable hunt for lost tools often transform a simple miter saw cut into a frustrating ordeal. In 2026, efficient woodworking demands more than just a powerful saw; it requires a streamlined workspace that integrates mobility, precise support, and robust dust management. This article delves into Building a Portable Miter Saw Stand with Integrated Dust Collection and Outfeed Support, a project designed to elevate your cutting experience from chaotic to controlled, whether you’re in a compact home workshop or tackling a job site.
Key Takeaways
- A custom portable miter saw stand significantly enhances accuracy, safety, and efficiency for crosscutting.
- Integrating dust collection directly into the stand design is crucial for a cleaner, healthier workspace.
- Adjustable outfeed supports are essential for handling long workpieces safely and precisely.
- Thoughtful design for portability, including locking casters and compact storage, maximizes workshop utility.
- Building your own stand allows for customization to your specific miter saw and workflow.
Designing Your Portable Miter Saw Stand for Optimal Performance
 The foundation of any successful woodworking project lies in its design. For Building a Portable Miter Saw Stand with Integrated Dust Collection and Outfeed Support, meticulous planning ensures functionality, durability, and user-friendliness. Consider your specific needs, the dimensions of your miter saw, and the space available in your workshop.

Core Design Principles
- Stability: The stand must be rock-solid to prevent wobble during cuts, which can compromise accuracy and safety. A wide base and sturdy construction materials are paramount.
- Portability: Since the goal is a portable stand, incorporating robust locking casters is vital. Consider collapsible or foldable designs for easier transport and storage if space is extremely limited.
- Integrated Dust Collection: This isn’t an afterthought; it’s a core design element. Plan for a dust shroud or funnel directly beneath the saw’s blade area, leading to a dedicated port for your shop vacuum or dust collector. This minimizes airborne dust, a significant health and cleanliness concern. For advanced users, consider how this might integrate with a DIY Smart Workshop Dust Collection System: Integrating IoT.
- Adjustable Outfeed Support: Crucial for accurately supporting long lumber and preventing snipe. These supports should be easily adjustable to match the height of your miter saw’s bed and capable of extending several feet.
- Material Storage: Dedicated compartments for tape measures, pencils, squares, and even a small lumber rack can significantly improve workflow. Think about integrating this with other Smart Workshop Storage Solutions: Maximizing Small Spaces with.
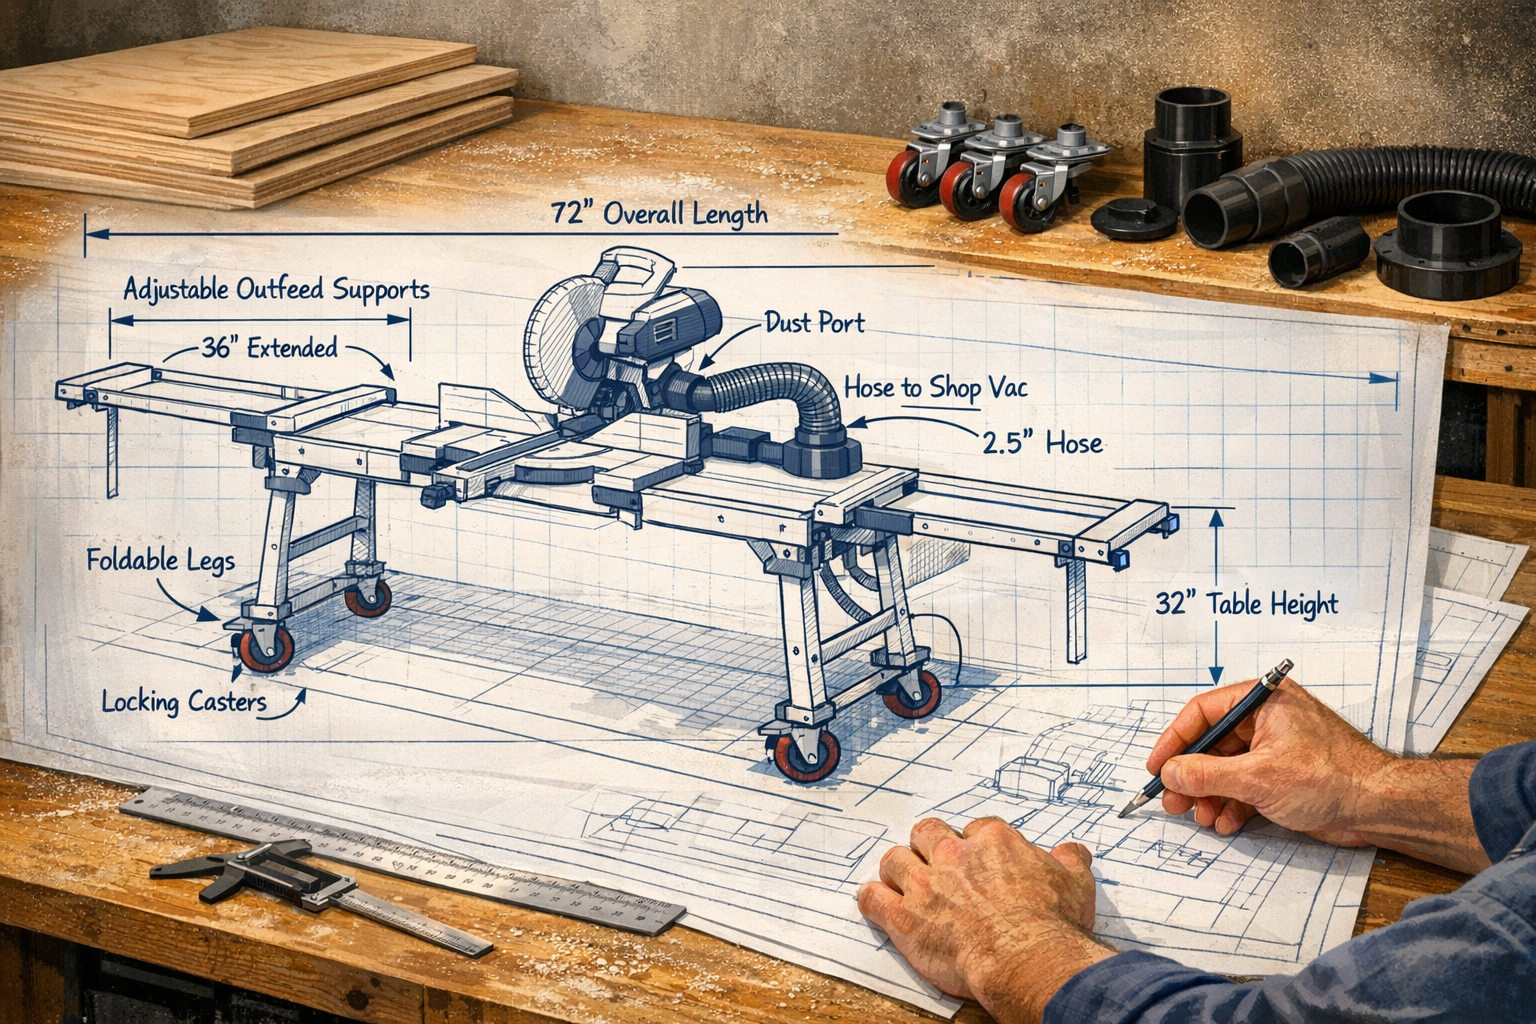
Key Dimensions and Layout
Begin by measuring your miter saw’s footprint and its bed height. The stand’s central platform should securely mount your saw, ideally recessing it so the saw’s bed is flush with the outfeed supports. This creates a continuous, flat surface for cutting.
| Component | Critical Measurement / Consideration |
|---|---|
| Miter Saw Platform | Match saw’s base dimensions; recess for flush outfeed. |
| Stand Height | Ergonomic working height (saw bed level with outfeed) – typically 34-38 inches. |
| Outfeed Supports | Extendable length (e.g., 2-4 feet per side); adjustable height mechanism. |
| Dust Collection Box | Size and shape to capture maximum dust; angled bottom for efficient flow. |
| Overall Footprint | Stable base when deployed; compact for storage/transport. |
| Casters | Heavy-duty, locking, non-marring; at least 3-4 inches in diameter. |
For materials, plywood (¾” birch or Baltic birch is excellent) offers strength and stability. Dimensional lumber (2x4s) can be used for the frame, but plywood panels create a more rigid and dust-proof structure. Given the precision required, using reliable fasteners and joinery techniques is important. Consider various Mastering Woodworking Screws: Your Ultimate Guide for 2026 and The Ultimate Guide to Wood Glue: Choosing the Right Adhesive for.
Building the Stand: Step-by-Step Construction
 With a solid design in hand, the construction phase focuses on precision and durability. This section outlines the general steps for Building a Portable Miter Saw Stand with Integrated Dust Collection and Outfeed Support.
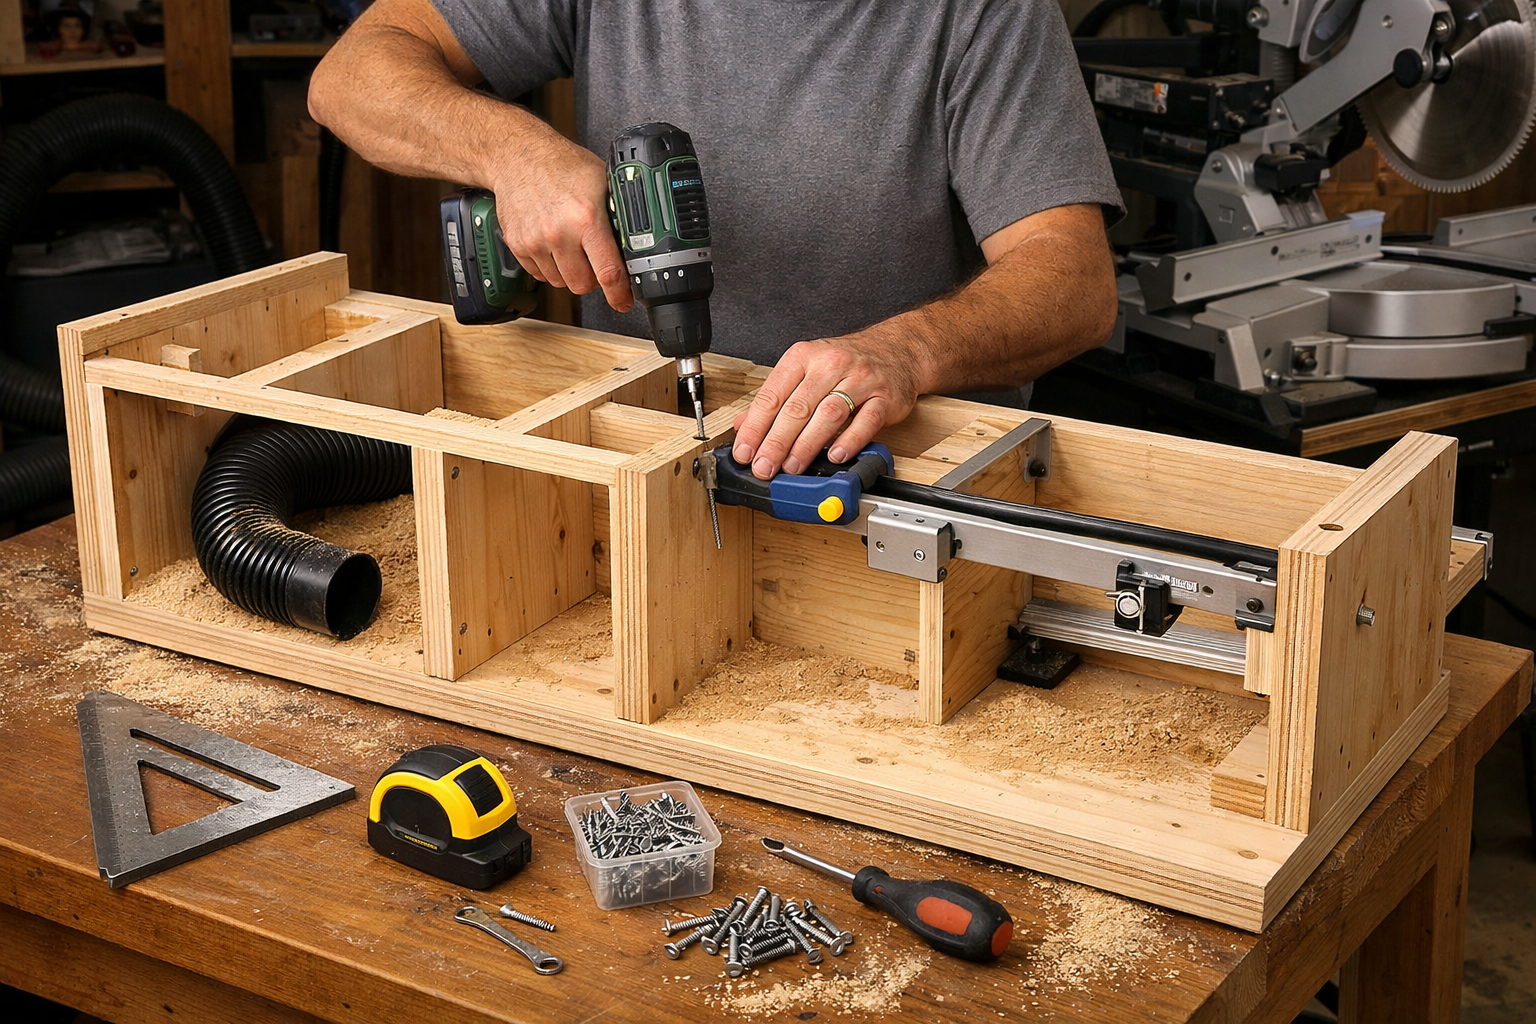
1. Frame Construction
Start by cutting the main plywood panels for the stand’s carcass (sides, bottom, top). Assemble these using dado joints, pocket screws, or traditional screws and glue for maximum strength. Ensure all corners are square. This central unit will house the miter saw and the primary dust collection components.
2. Miter Saw Platform Integration
Measure and cut the top panel to precisely fit your miter saw. Create a cutout or a recessed area for the saw, allowing its bed to sit flush with the intended outfeed surfaces. Secure the saw to this platform.
3. Dust Collection System Fabrication
This is where the “integrated” aspect truly shines.
- Dust Chute/Hood: Build a funnel or a small enclosure directly behind and below your miter saw’s blade. This component should be angled towards a single outlet port.
- Collection Box: Construct a sealed box beneath the saw’s platform, connected to the chute. The bottom of this box should also be angled towards a single port where your dust collector hose will attach. Use caulk or weatherstripping to seal any gaps, ensuring maximum suction efficiency. Consider a 4-inch dust port for optimal airflow.
4. Outfeed Support Mechanism
This is often the most intricate part.
- Support Arms: Construct two identical support arms from plywood or robust lumber. These should be long enough to provide ample support.
- Sliding Mechanism: There are several approaches:
- T-track and Adjustable Blocks: Install T-track channels along the top edges of the main stand, and create adjustable fences or blocks that slide in the T-track to support the outfeed arms.
- Drawer Slides: Heavy-duty drawer slides can be used to pull out support arms.
- Folding Legs: Simpler designs might use folding legs that deploy when needed, though these offer less precise height adjustment.
- Height Adjustment: Implement a mechanism to precisely match the height of the outfeed supports to the saw bed. This could be a threaded knob system, a series of pin holes, or a robust clamping mechanism. Remember, accuracy here is paramount for preventing snipe on long stock.
5. Adding Portability and Storage
- Casters: Attach four heavy-duty locking swivel casters to the bottom of the stand. Ensure they are rated for the combined weight of the stand, saw, and any lumber you’ll be cutting.
- Handles: Install sturdy handles on either end of the stand for easier maneuverability.
- Shelving/Drawers: Add internal shelves or small drawers within the stand’s carcass for tool storage, following concepts from Building Modular Wood Storage Systems for Small Workshops: Maximizing.
Optimizing Dust Collection and Outfeed Support
 A well-built stand is only as good as its integrated features. Maximizing the effectiveness of the dust collection and outfeed supports is key to a truly professional cutting station.
Enhancing Dust Collection Efficiency
The miter saw is notorious for generating a large amount of fine dust, often flung far and wide. Your integrated system must be robust.
- Vacuum Power: Connect your stand to a powerful shop vacuum or a dedicated dust collector. The more CFM (cubic feet per minute) your system pulls, the better the capture rate.
- Sealing: Ensure all connections in your dust collection path are sealed tightly. Use duct tape or silicone caulk where hoses connect to ports, and ensure the dust box itself is airtight except for its inlet and outlet.
- Airflow Management: Design the internal channels of your dust box to minimize turbulence and maximize airflow velocity towards the collection port. Smooth transitions and a lack of sharp corners will improve performance. A transparent dust shroud around the blade can further improve capture.
Perfecting Outfeed Support
Accurate outfeed support is not just about length; it’s about consistency and reliability.
- Leveling: Regularly check that your outfeed supports are perfectly level with your miter saw’s bed. Even a slight discrepancy can lead to inaccurate cuts or workpiece instability.
- Surface Material: Consider applying a low-friction surface, like laminate or even a layer of wax, to the top of your outfeed supports to allow lumber to slide smoothly without marring.
- Measurement Stops: Incorporate a flip-down or adjustable stop block system into your outfeed supports. This allows for repeatable cuts without constant re-measuring, significantly speeding up production. For inspiration, consider how such systems are integrated in dedicated workbenches, as detailed in Building a Portable Workbench: Designs for Small Spaces and On-the-Go.
- Edge Support: For wider boards, ensure the outfeed supports are wide enough to prevent the workpiece from tipping. Sometimes, a wider platform or multiple support points are necessary.
Maintenance and Longevity
Regular maintenance will ensure your portable miter saw stand remains a valuable asset for years.
- Cleanliness: Periodically clean out the dust collection system to prevent clogs and maintain optimal suction. Empty the shop vac frequently.
- Hardware Check: Tighten any loose screws or bolts, especially on the casters and outfeed support mechanisms.
- Lubrication: Lubricate sliding parts of the outfeed supports to ensure smooth operation.
- Damage Repair: Address any damage to the wood or hardware promptly to prevent further deterioration.
Conclusion
Building a Portable Miter Saw Stand with Integrated Dust Collection and Outfeed Support is a transformative project for any woodworker. It’s an investment in efficiency, accuracy, and a cleaner, safer workspace. By carefully designing and constructing a stand that integrates these crucial features, you move beyond the limitations of a standalone miter saw, creating a versatile and powerful cutting station. In 2026, a well-equipped workshop isn’t just about the tools you own, but how intelligently they are supported and optimized. Embark on this build, and experience the satisfaction of precise cuts, minimized cleanup, and enhanced productivity in all your woodworking endeavors.
Next Steps:

- Sketch Your Design: Draw out your stand, incorporating your specific miter saw’s dimensions and desired features.
- Gather Materials: Compile a cut list and procure high-quality plywood, dimensional lumber, casters, and dust collection components.
- Start Building: Follow the construction steps, prioritizing precision and safety.
- Test and Refine: Once built, test all features – especially the dust collection and outfeed support – and make any necessary adjustments.
Meta Title
Build a Portable Miter Saw Stand: Dust Collection & Outfeed
Meta Description
Learn to build a portable miter saw stand with integrated dust collection and adjustable outfeed support. Boost accuracy, efficiency, and cleanliness in your 2026 workshop.
