
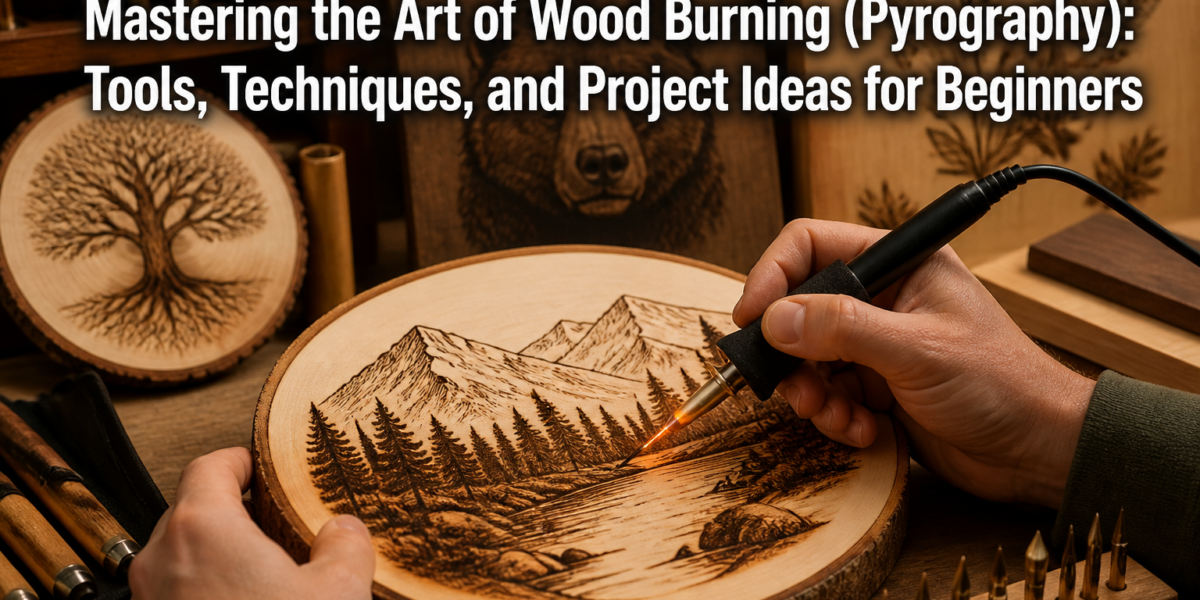

The subtle aroma of scorched wood, the gentle sizzle of a heated tip gliding across a surface, and the gradual emergence of intricate patterns from a blank canvas – these are the hallmarks of pyrography. Far from being a niche craft, wood burning is experiencing a significant resurgence in 2026, drawing enthusiasts with its meditative qualities and the unique ability to transform ordinary wood into captivating works of art. This article serves as your definitive guide to Mastering the Art of Wood Burning (Pyrography): Tools, Techniques, and Project Ideas for Beginners, providing essential knowledge to embark on this rewarding creative journey.
Key Takeaways
- Start with Quality Tools: Investing in a good pyrography pen with variable temperature control is crucial for consistent results and a smoother learning curve.
- Safety First: Always prioritize ventilation, wear appropriate protective gear, and work on a heat-resistant surface to prevent accidents.
- Practice Makes Perfect: Begin with simple lines, shapes, and shading exercises on scrap wood before tackling complex projects.
- Choose the Right Wood: Lighter, fine-grained woods like basswood and birch are ideal for beginners due to their even burn and minimal grain interference.
- Embrace Experimentation: Wood burning is an art form; experiment with different tips, pressures, and temperatures to develop your unique style.
Essential Tools for Mastering the Art of Wood Burning (Pyrography): Tools, Techniques, and Project Ideas for Beginners
To truly begin Mastering the Art of Wood Burning (Pyrography): Tools, Techniques, and Project Ideas for Beginners, understanding your equipment is paramount. The right tools not only make the process easier but also open up a wider range of artistic possibilities.

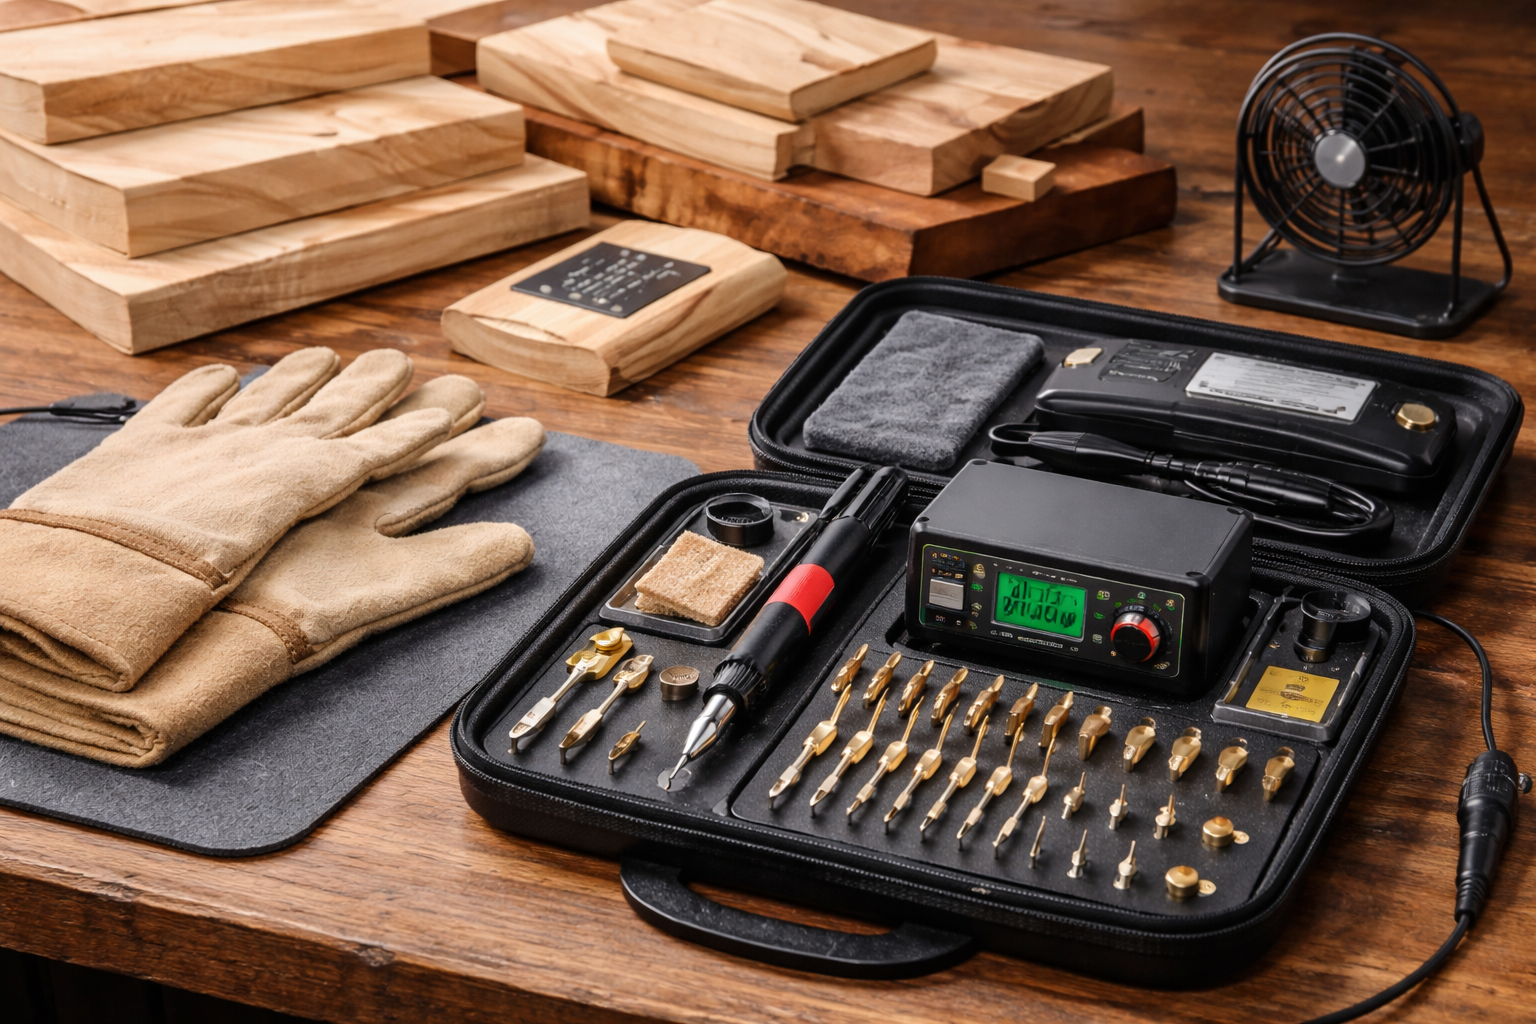
Choosing Your Pyrography Pen
There are two primary types of wood burning pens:
- Craft-style Burners (Solid-point burners): These are entry-level tools, resembling soldering irons. They have fixed tips or tips that screw into the heating element.
- Pros: Affordable, readily available.
- Cons: Slower heat-up/cool-down, limited temperature control, tips can be less versatile.
- Wire-nib Burners (Professional burners): These feature a control unit with a transformer that heats thin wire nibs.
- Pros: Precise temperature control, fast heat-up/cool-down, wide variety of interchangeable nibs for different effects, comfortable ergonomic handle.
- Cons: Higher initial cost.
For beginners serious about the craft, investing in a variable-temperature wire-nib burner is highly recommended. It offers much greater control and flexibility, leading to better results and a more enjoyable experience.
Essential Pyrography Nibs (Tips)
Each nib serves a specific purpose, allowing for diverse textures and effects:
- Universal/Shading Nib: Your workhorse for general burning, shading, and broad strokes.
- Writing/Detail Nib: Fine point for intricate details, lettering, and crisp lines.
- Rounded/Calligraphy Nib: Ideal for smooth curves, thicker lines, and varied stroke widths.
- Flow/Spoon Nib: Excellent for smooth, consistent shading and filling larger areas.
- Texturing Nibs (e.g., razor edge, spear point, skew): For creating specific textures like hair, fur, or cross-hatching.
Safety Equipment and Accessories
Safety is non-negotiable when working with heated tools. Always gather these items before you begin:
- Heat-Resistant Surface: A ceramic tile or specialized mat to protect your workspace.
- Pliers/Tweezers: For safely changing hot nibs.
- Ventilation: A fan to direct smoke away from your face or, ideally, a fume extractor. Always work in a well-ventilated area.
- Safety Glasses: To protect your eyes from stray sparks or wood dust.
- Leather Gloves (optional but recommended): To protect your non-dominant hand holding the wood.
- Sandpaper: Various grits (180, 220, 320) for preparing and finishing your wood.
- Pencil and Eraser: For sketching designs.
- Carbon Paper (optional): For transferring designs.
- Lint-Free Cloths: For cleaning your wood and applying finishes.
- Finishing Oil/Sealant: To protect your finished piece.
Fundamental Techniques for Mastering the Art of Wood Burning (Pyrography): Tools, Techniques, and Project Ideas for Beginners
Once you have your tools ready, it’s time to delve into the fundamental techniques that form the bedrock of pyrography. This section will guide you through preparing your wood, transferring designs, and mastering essential burning strokes.
Wood Selection and Preparation
The type of wood you choose significantly impacts your results. For beginners, select woods that are light-colored, fine-grained, and relatively soft.
| Wood Type | Characteristics | Ideal For | Notes |
|---|---|---|---|
| Basswood | Very light, fine, even grain, soft | Beginners, detailed work, smooth shading | Most popular for pyrography |
| Birch | Light, fine grain, slightly harder | Good for details, durable | Less prone to grain resistance |
| Maple | Light, very fine grain, hard | Fine lines, crisp details | Requires higher heat, slower burn |
| Pine | Light, distinct grain, soft | Rustic projects, bold lines | Inconsistent burn due to sap rings |
| Poplar | Light to greenish, soft, subtle grain | Practice, larger projects | Can be fuzzy, less ideal for fine detail |
Preparation Steps:
- Sand Smooth: Start with 180-grit sandpaper, then move to 220-grit, and finally 320-grit. Ensure the surface is perfectly smooth and free of any dust or debris. This helps the burner glide evenly and prevents inconsistent burns.
- Clean: Wipe the wood with a lint-free cloth or a tack cloth to remove all dust. Oils from your hands can also affect the burn, so handle the wood carefully.
Design Transfer
Before you burn, you need a design on your wood.
- Freehand Drawing: If you’re confident in your drawing skills, lightly sketch your design directly onto the wood with a pencil. Use a light touch so erase marks don’t show after burning.
- Carbon Paper Method: Print your design, place carbon paper face down on the wood, then lay your printed design on top. Trace over the lines of your design with a pencil, transferring the image onto the wood.
- Graphite Transfer: Shade the back of your printed design with a soft graphite pencil. Place the graphite side down on your wood and trace the design lines, transferring the graphite to the wood.
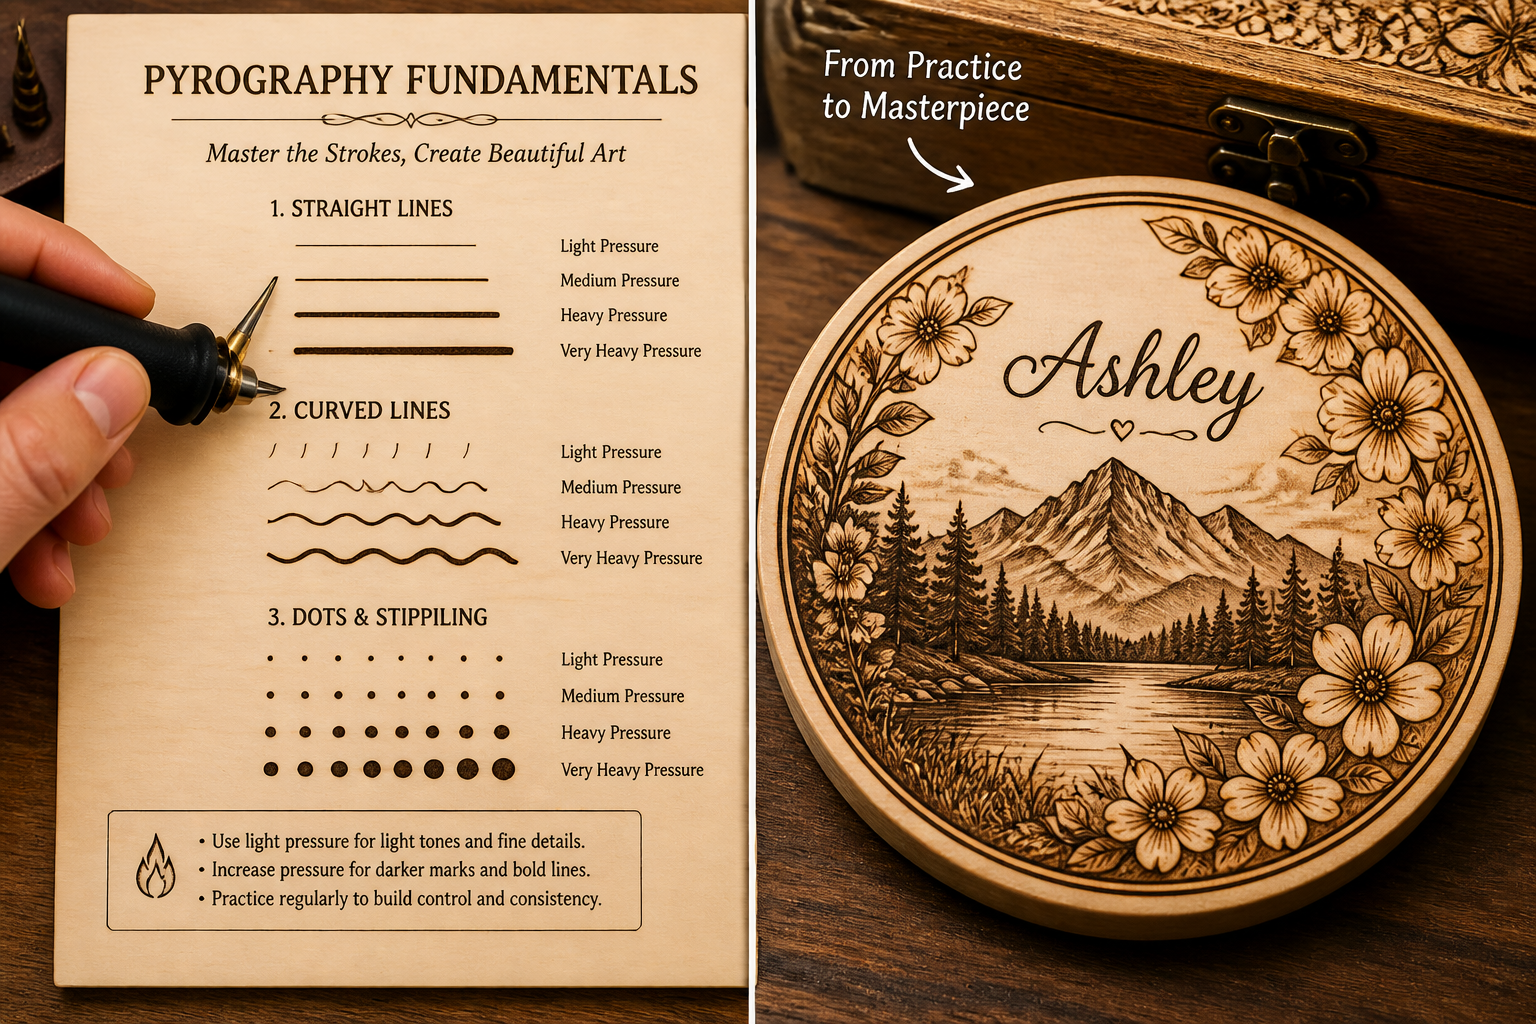
Basic Burning Strokes and Shading
This is where practice becomes crucial. Use scrap pieces of the same wood you plan for your project.
- Lines:
- Dot-and-Drag: Touch the nib to the wood, then drag it in the desired direction.
- Pressure: Varying pressure creates different line thicknesses and depths of burn. Light pressure for thin, pale lines; more pressure for darker, bolder lines.
- Speed: A slower speed results in a darker, deeper line. A faster speed creates a lighter, shallower line.
- Angle: The angle at which you hold the pen also affects the line.
- Shading:
- Circular Motion: For smooth, even shading, use a light hand and move the shading nib in small, overlapping circles.
- Feathering: Create gradual transitions by lifting the nib slightly as you move it, or by starting with light pressure and gradually increasing it.
- Cross-hatching: For textured shading, create intersecting lines.
- Stippling: Use the tip to create dots of varying density for a textured, shaded effect.
Pro Tip: Always test your heat setting and technique on a scrap piece of wood before applying it to your main project. This helps you understand how the wood reacts and ensures consistency. For detailed practice on precision cuts, consider exploring resources on Mastering Dovetail Joints with Hand Tools: A Step-by-Step Guide for which also emphasizes careful, controlled movements.
Inspiring Project Ideas for Beginners
Once you’ve familiarized yourself with the tools and basic techniques, it’s time to apply your newfound skills to exciting projects. Starting with simple, manageable projects builds confidence and provides tangible results as you continue Mastering the Art of Wood Burning (Pyrography): Tools, Techniques, and Project Ideas for Beginners.
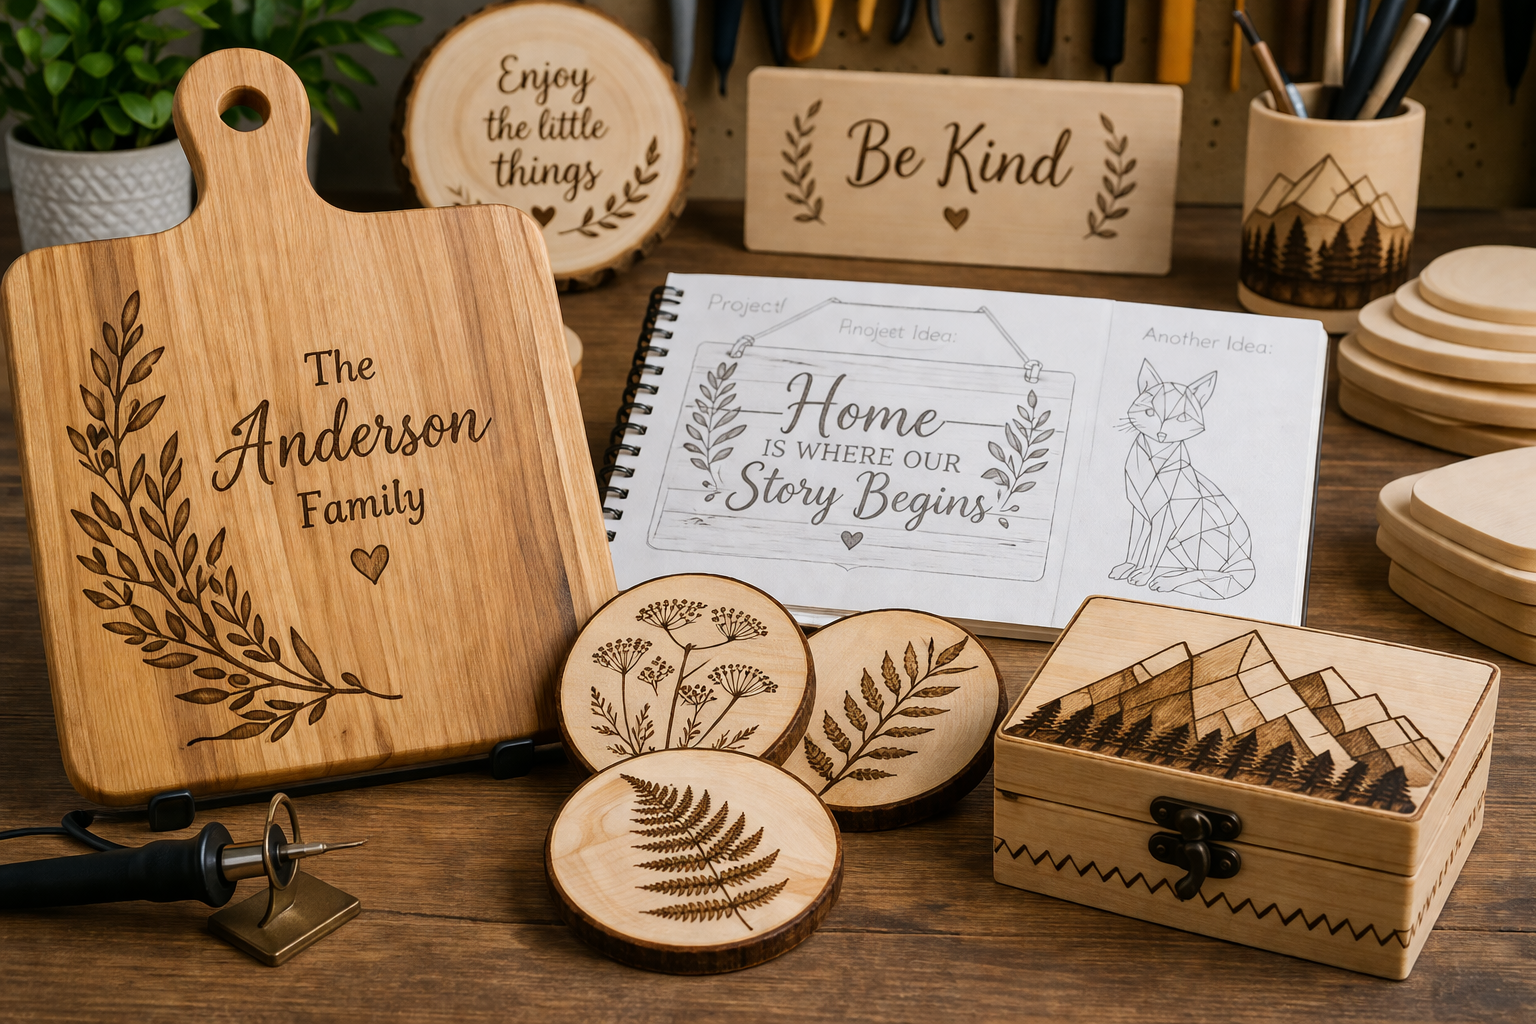
Simple & Functional Projects
These projects are excellent for honing your skills while creating useful items:
- Coasters: Start with simple geometric patterns, initials, or basic line art. This is a great way to practice consistent lines and shading on a small scale. Consider pairing them with Wooden Candle Holders for Ambient Decor: From Tealights to P for a cohesive home decor theme.
- Keychains: Small wooden blanks are perfect for practicing intricate details and lettering. Personalize them with names, dates, or small symbols. Explore designs that could also be adapted for Building Custom Wooden Key Holders: Wall-Mounted Designs wit for a matching set.
- Wooden Spoons/Utensils: Burn decorative patterns or personalized names onto the handles of wooden kitchen tools. Ensure you use food-safe wood and finishes.
- Small Plaques/Signs: Create custom door signs, desk plaques, or decorative wall art with inspiring quotes or simple nature scenes. These can also be great for exploring Profitable Beginner Woodworking: Picture Frames, Cutting Boa ideas if you’re looking to sell your creations.
Decorative & Giftable Projects
These projects allow for more artistic expression and make wonderful personalized gifts:

- Gift Tags: Instead of paper, create reusable wooden gift tags with custom designs for special occasions.
- Personalized Photo Frames: Add burned borders, names, or dates to plain wooden photo frames.
- Decorative Boxes: Small wooden boxes can be embellished with floral patterns, mandalas, or abstract designs.
- Bookmarks: Thin wooden blanks are perfect for delicate designs, quotes, or monograms.
- Small Ornaments: Seasonal designs on thin wooden slices make charming ornaments.
Finishing Your Wood Burned Art
Once your burning is complete, allow the wood to cool completely.
- Gentle Cleaning: Lightly brush away any residual ash. You can carefully use a very fine-grit sandpaper (400 or higher) to smooth rough spots, but be extremely gentle to avoid erasing your burn marks.
- Apply Finish: A protective finish enhances the wood’s natural beauty and protects your pyrography from wear and moisture.
- Mineral Oil (Food Safe): Ideal for cutting boards and kitchen utensils.
- Polyurethane/Varnish: Provides a durable, protective layer for decorative items. Apply thin coats, sanding lightly between each.
- Wax/Sealant: A softer finish, great for showing off the natural feel of the wood.
For larger, more ambitious projects after you’ve mastered the basics, consider how pyrography could enhance creations like High-Demand Woodworking Projects for 2026: Coffee Tables, Wi or even elements in DIY Smart Home Integration with Custom Woodwork: Hiding Tech with. The possibilities are truly endless once you gain confidence in your skills.
Conclusion
Mastering the Art of Wood Burning (Pyrography): Tools, Techniques, and Project Ideas for Beginners is a journey that combines patience, precision, and artistic vision. From selecting your first wood burning pen and understanding its various nibs to preparing your wood and executing fundamental strokes, each step builds towards creating stunning, personalized pieces. Remember to prioritize safety, practice diligently on scrap wood, and allow yourself the freedom to experiment.
The satisfaction of watching your designs come to life on wood is unparalleled, transforming a simple piece of timber into a unique expression of your creativity. Whether you aim to create heartfelt gifts, add a personal touch to your home decor, or even explore selling your handcrafted items, pyrography offers a deeply rewarding experience. Start small, be persistent, and soon you’ll be confidently burning intricate masterpieces.
SEO Meta Title: Master Wood Burning (Pyrography): Tools, Techniques & Beginner Projects SEO Meta Description: Dive into wood burning (pyrography) in 2026! Learn essential tools, core techniques, safety, and inspiring project ideas for beginners. Start your artistic journey today.
