

The average artisan, even with decades of experience, simply cannot achieve the consistent precision and intricate detail that modern CNC carving machines offer. For woodworkers seeking to elevate their craft beyond basic cuts to truly stunning artistic endeavors, embracing Computer Numerical Control (CNC) technology is not merely an option—it is a transformative imperative in 2026. This is The Ultimate Guide to CNC Carving for Artistic Wood Projects: Beyond Basic Cuts to Intricate 3D Designs and Inlays, a deep dive into leveraging this powerful technology for unparalleled creative expression.
Key Takeaways

- CNC carving opens doors to intricate 3D designs and precise inlays unattainable by hand.
- Mastering CAD/CAM software is crucial for translating artistic vision into machine instructions.
- Multi-toolpath strategies are essential for efficient and high-quality 3D carving, minimizing material waste and maximizing detail.
- Achieving perfect inlays requires precise design, material selection, and careful post-carving finishing.
- Safety protocols and continuous learning are paramount for successful and evolving CNC woodworking.
The Digital Canvas: Designing Complex 3D Forms and Textures
The journey into advanced CNC carving begins long before the router bit touches wood. It starts in the digital realm, where artistic vision is translated into machine-readable instructions. For The Ultimate Guide to CNC Carving for Artistic Wood Projects: Beyond Basic Cuts to Intricate 3D Designs and Inlays, understanding and utilizing sophisticated CAD (Computer-Aided Design) and CAM (Computer-Aided Manufacturing) software is the bedrock of success.
Choosing the Right Software Ecosystem
Several powerful software packages cater to artistic CNC woodworking, each with its strengths:
- VCarve Pro/Aspire (Vectric): These are perhaps the most popular choices for woodworkers due to their intuitive interfaces and robust capabilities for 2D, 2.5D, and full 3D carving. Aspire, in particular, excels at creating complex 3D relief models from scratch or importing existing models.
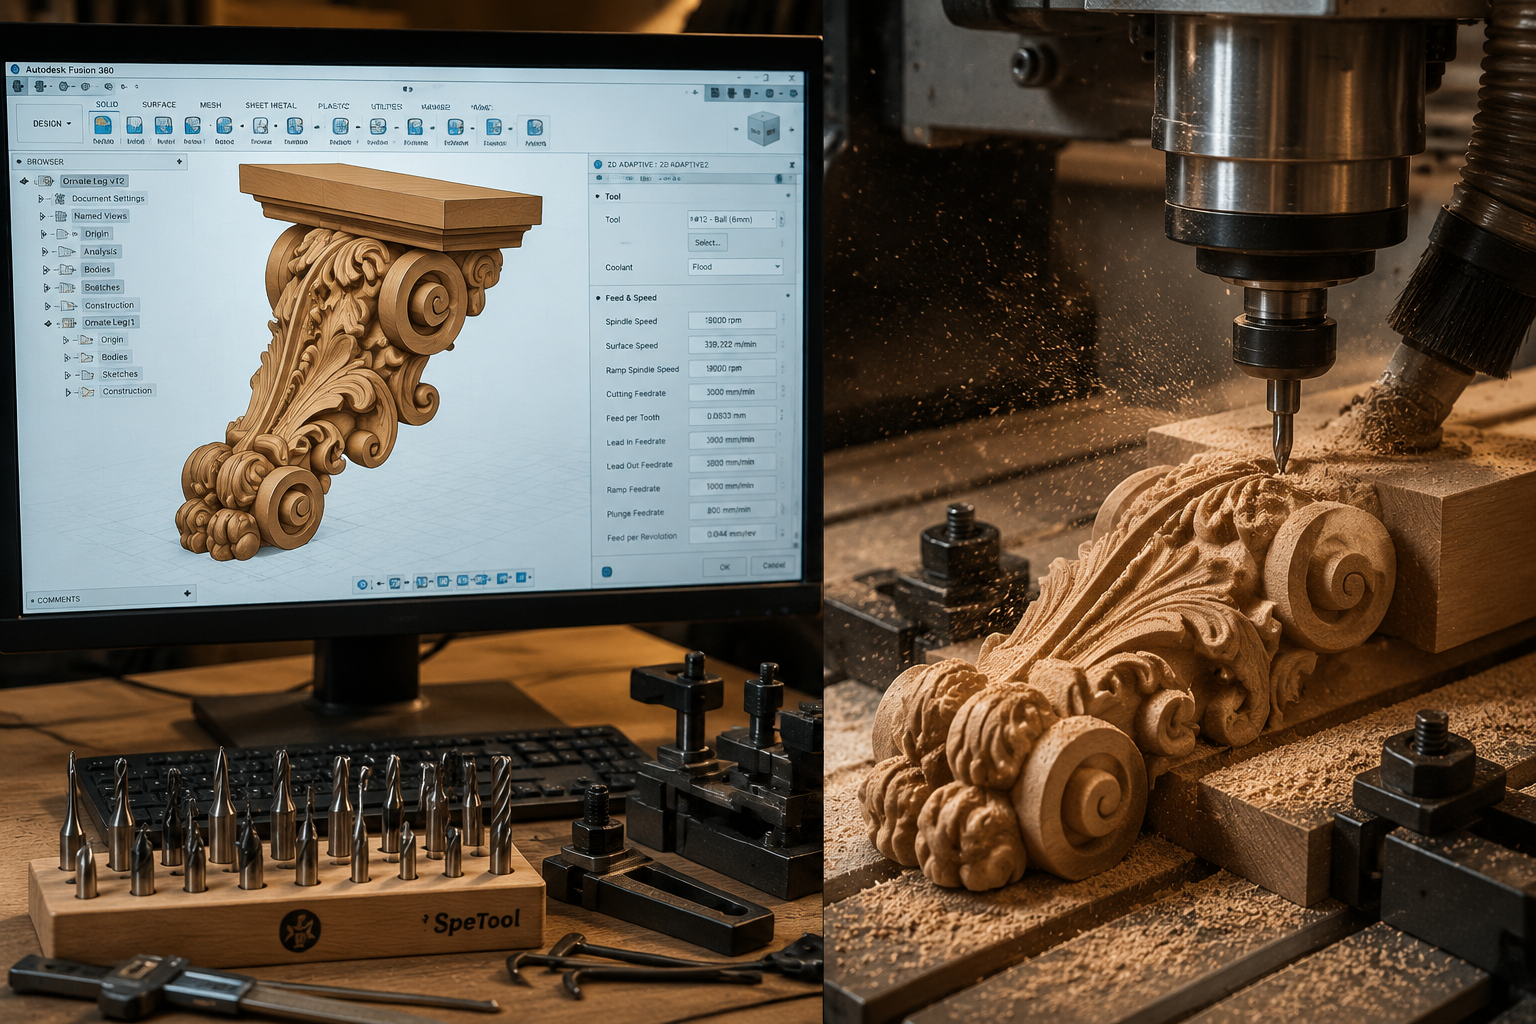
- Fusion 360 (Autodesk): A comprehensive solution that integrates CAD, CAM, and even simulation. While it has a steeper learning curve, its parametric modeling capabilities are unmatched for designing complex mechanical parts, and its sculpting tools allow for organic, artistic forms.
- Rhino 3D with Grasshopper: For highly sculptural and generative designs, Rhino offers powerful NURBS modeling, and its Grasshopper plugin enables algorithmic design for truly unique, intricate patterns and textures.
- ZBrushCoreMini/Blender: Excellent for organic sculpting, these tools allow artists to “digitally sculpt” shapes before exporting them as STL files for CAM software.
When selecting software, consider its ability to handle various file types (STL, DXF, SVG), generate different toolpath strategies, and provide realistic simulations to visualize the carving process. The goal is to move beyond simple vectors to truly three-dimensional forms.
From Concept to Code: Mastering 3D Modeling for CNC
Creating intricate 3D designs for CNC involves more than just drawing lines. It requires an understanding of how the machine interprets depth, angles, and curves.
- Relief Carving: This technique involves creating a raised or recessed image from a flat surface. Software like Aspire makes this accessible, allowing artists to blend shapes, sculpt surfaces, and add textures directly. Imagine carving a detailed landscape onto a cabinet door or a personalized coat of arms onto a wooden plaque.
- Full 3D Carving: For objects that are fully three-dimensional, like a sculpted bust or an ornate chess piece, the modeling process is more complex. This often involves creating a model in a dedicated 3D sculpting program and then bringing it into CAM software for toolpath generation.
- Texture Generation: CNC machines can create incredible surface textures, from faux distressed wood to intricate geometric patterns. Software can generate these procedurally or from imported texture maps, adding another layer of artistic detail to projects.
“The true magic of CNC carving for artistic wood projects lies in its ability to translate an artist’s most complex visions into tangible wooden forms with breathtaking accuracy.”
Advanced Toolpath Strategies for Intricate 3D Carving
Once a 3D model is perfected, the next critical step in The Ultimate Guide to CNC Carving for Artistic Wood Projects: Beyond Basic Cuts to Intricate 3D Designs and Inlays is developing sophisticated toolpaths. This isn’t just about telling the machine where to go; it’s about optimizing efficiency, achieving superior surface finish, and extracting every ounce of detail from your design.
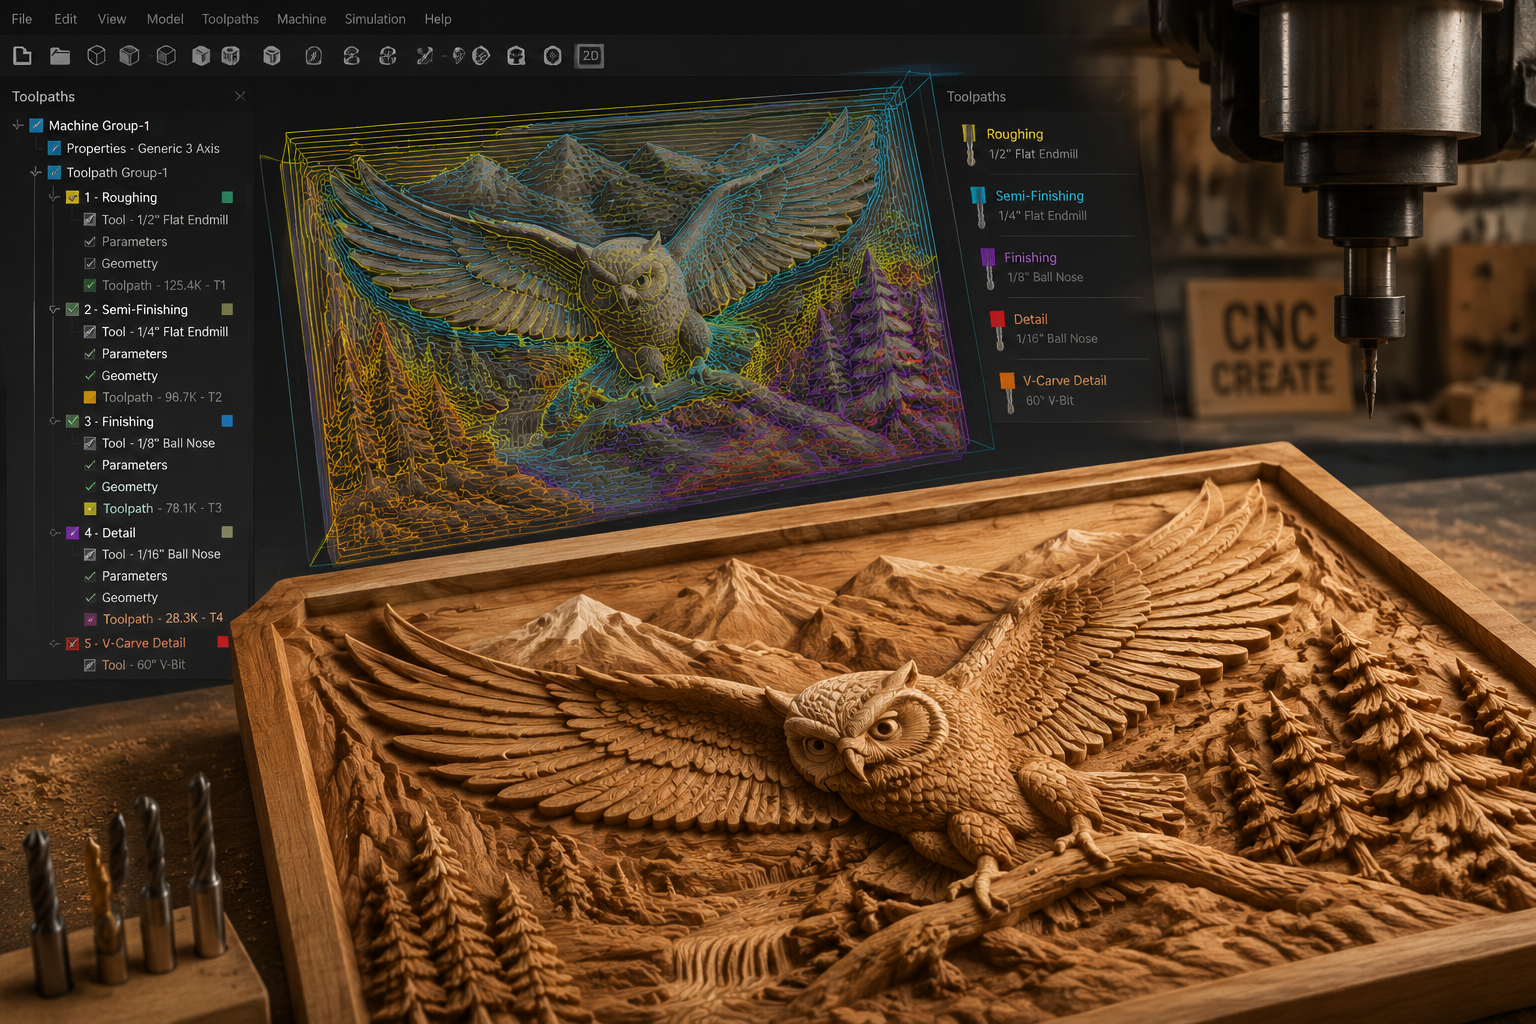
Multi-Toolpath Approach: Roughing, Finishing, and Detailing
For complex 3D carvings, a single toolpath is rarely sufficient. A multi-tool approach ensures material removal is efficient and the final details are crisp.
Roughing Pass:
- Purpose: Rapidly remove the bulk of the material to get close to the final shape.
- Tooling: Large diameter end mills or ball nose bits are typically used. These can take deep cuts, clearing away material quickly.
- Strategy: Often a “Z-level roughing” or “pocketing” strategy, where the tool cuts in layers, descending incrementally. This reduces stress on smaller finishing bits.
Finishing Pass:
- Purpose: Create the final surface contours and smooth transitions.
- Tooling: Smaller diameter ball nose bits (e.g., 1/4″ to 1/8″) are common. The size depends on the desired level of detail and the carving’s geometry.
- Strategy: Parallel line or raster toolpaths are frequently used, moving across the surface to create smooth, flowing lines. Stepover (the distance between passes) is crucial here; a smaller stepover results in a smoother finish but takes longer.
Detailing Pass:
- Purpose: Accentuate fine features, sharp edges, and small concave areas.
- Tooling: Very small diameter ball nose or tapered ball nose bits (e.g., 1/16″ or smaller) are employed. Tapered bits are excellent for reaching deep into narrow crevices.
- Strategy: Often a “rest machining” strategy, where the software calculates areas that the larger finishing bit couldn’t reach, and a smaller bit is then sent to clean those areas.
Proper selection of router bits is paramount. Explore different types beyond basic end mills, such as V-bits for crisp lines, down-cut spirals for clean top edges, and compression bits for optimal chip evacuation and clean cuts on sheet goods. For more on tool choices, consider our Beginner’s Guide to CNC Routers for Small Woodshops: From Setup to First Project.
Optimizing Feed Rates, Speeds, and Stepover
These parameters are not static; they must be fine-tuned for each wood species and bit size to achieve the best results and prevent tool breakage or burning.
- Feed Rate: How fast the router moves through the material. Too fast, and you risk poor surface finish or tool breakage. Too slow, and you might get burning or excess heat.
- Spindle Speed (RPM): How fast the router bit spins. Higher RPMs are generally better for smaller bits and finer detail.
- Stepover: The distance the tool moves sideways between passes. For finishing passes, a smaller stepover (e.g., 8-15% of the bit diameter) yields a smoother surface.
- Stepdown: The depth of cut per pass. For roughing, this can be significant, but for detailing, it will be very shallow.
Experimentation on scrap material is essential to find the optimal settings for your specific machine, wood, and bits. Always refer to manufacturer guidelines for starting points.
Crafting Perfection: Intricate 3D Inlays and Artistic Embellishments
Moving beyond just carving a surface, CNC machines excel at creating perfect pockets and corresponding parts for intricate inlays. This is where The Ultimate Guide to CNC Carving for Artistic Wood Projects: Beyond Basic Cuts to Intricate 3D Designs and Inlays truly shines, enabling decorative elements that add immense value and artistry.
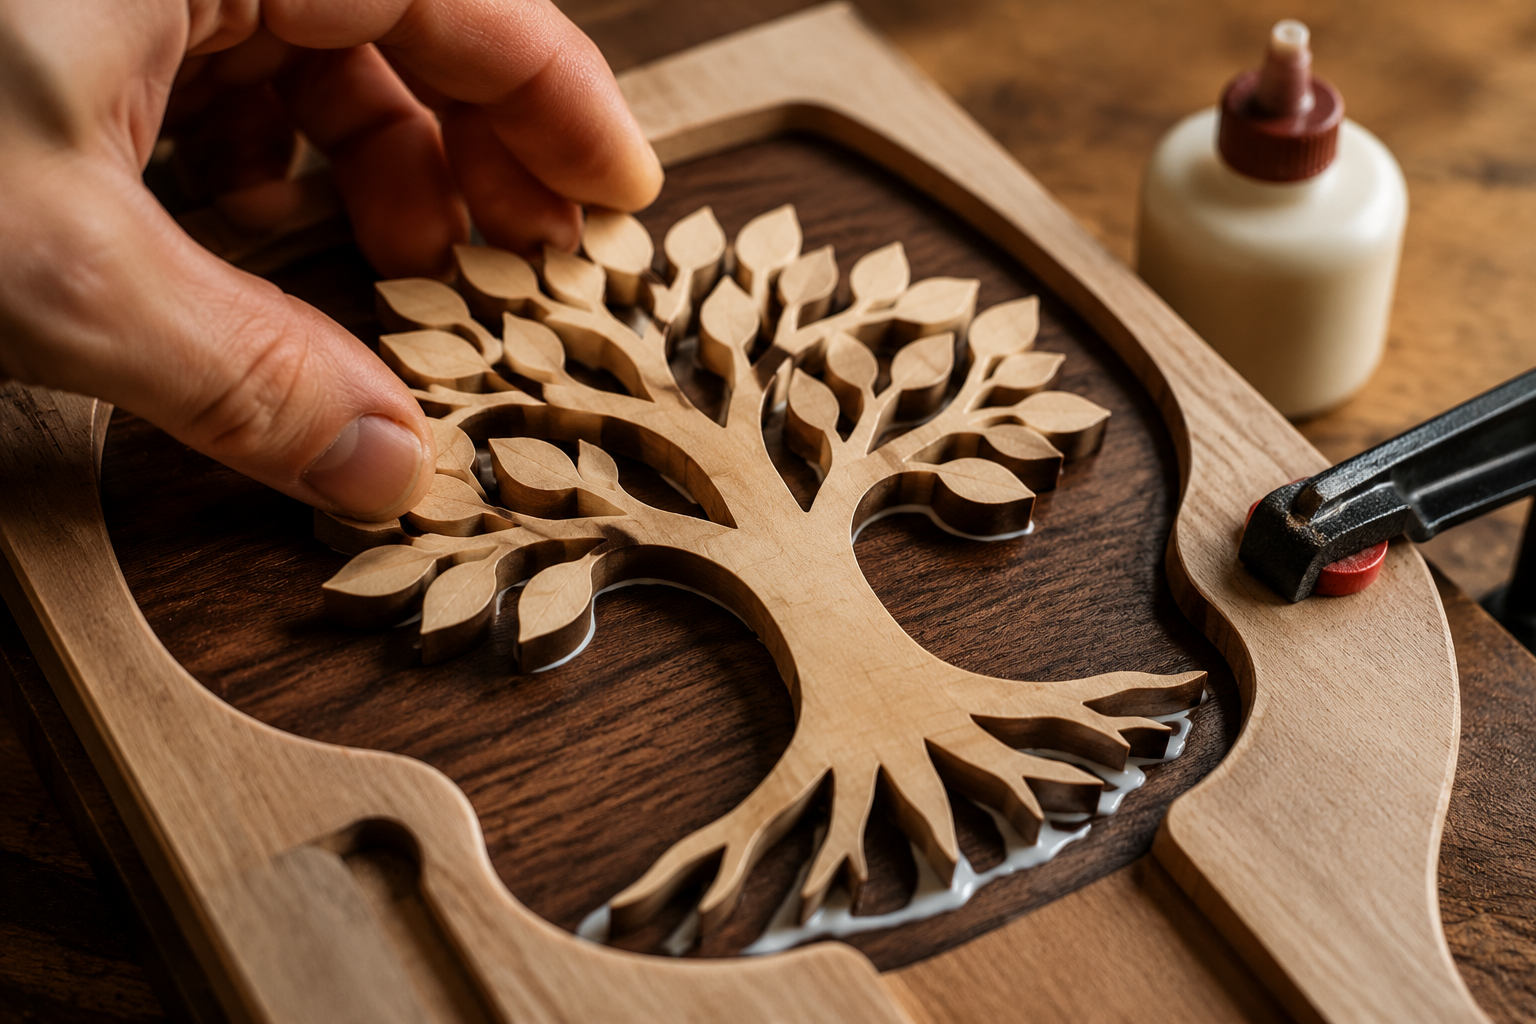
Precision Inlays with CNC
Traditional inlay work is a meticulous, time-consuming craft. CNC automates the precision, allowing for complex designs and perfect fits.
- Design the Inlay and Pocket:
- Create two separate vector files: one for the inlay piece (the positive) and one for the pocket it will fit into (the negative).
- Crucially, apply an offset to one of these files. This creates a minute gap (often 0.005-0.010 inches) to allow for glue and to ensure the inlay piece fits without binding. Some software offers specific “inlay toolpath” features that handle this automatically, often using a V-bit.
- Material Selection:
- Choose contrasting wood species for maximum visual impact. Think of light maple into dark walnut, or exotic veneers into domestic hardwoods. Consider the grain direction and stability of both woods.
- Carving the Pocket:
- Securely clamp the base material (e.g., a tabletop, box lid).
- Carve the pocket using a precisely sized end mill, ensuring a clean, flat bottom. For V-bit inlays, the V-bit carves the pocket.
- Carving the Inlay Piece:
- Securely clamp the inlay material.
- Carve the inlay piece. For V-bit inlays, the V-bit is used again, often with a slightly different depth setting to create a wedge shape that locks into the V-shaped pocket.
- Assembly and Finishing:
- Test the fit without glue first. It should be snug but not require excessive force.
- Apply a suitable wood glue, like Titebond III for its open time and strength, ensuring full coverage within the pocket. You can learn more about wood glues in our The Ultimate Guide to Wood Glue.
- Gently tap the inlay into place, ensuring it is fully seated. Clamp if necessary and allow ample drying time.
- Once dry, sand the surface flush. Start with a coarser grit and gradually move to finer grits for a perfectly smooth finish.
Combining Carving with Other Techniques
Artistic woodworking rarely relies on a single technique. CNC carving can be beautifully integrated with other methods:

- Layered Reliefs: Create multi-layered 3D art by carving different depths on separate pieces of wood and then assembling them. This adds incredible visual depth and dimension.
- Mixed Media: Combine carved wood with metal, acrylic, or resin elements. CNC can precisely cut recesses for these materials, opening up vast creative possibilities.
- Turned and Carved Pieces: Imagine a CNC-carved pattern on a turned bowl or a detailed handle for a custom tool. Our Ultimate Guide to Wood Lathe Turning offers great insights into turning techniques that can be paired with carving.
- Customization and Personalization: For projects like Ultimate Guide to Wooden Candle Holders or Mastering Wooden Beer Caddy Builds, CNC provides unmatched precision for adding names, dates, or complex logos. This enhances both aesthetic appeal and perceived value. For more on this, check out our article on Customization Strategies for Mass-Producing Small Woodcraft.
The precision of CNC also makes it ideal for creating jigs and fixtures to support other woodworking processes, further enhancing your workshop capabilities. Consider how CNC can improve projects discussed in Mastering Dovetail Joinery for Drawers: Hand and Router Meth, allowing for precisely cut templates.
Safety and Best Practices in Advanced CNC Carving
As with any powerful machinery, safety must always be the top priority. For The Ultimate Guide to CNC Carving for Artistic Wood Projects: Beyond Basic Cuts to Intricate 3D Designs and Inlays, this means understanding machine operation, material handling, and potential hazards.
Essential Safety Protocols
- Personal Protective Equipment (PPE): Always wear safety glasses to protect against flying debris, hearing protection to guard against noise, and a dust mask or respirator to prevent inhalation of fine wood dust.
- Workholding: Securely clamp your workpiece. Any movement during carving can lead to ruined projects, broken bits, or dangerous projectiles. Use appropriate clamps, double-sided tape, or vacuum tables.
- Clear Work Area: Keep the area around your CNC machine clean and free of obstructions.
- Emergency Stop: Know the location of your machine’s emergency stop button and be prepared to use it at any sign of trouble.
- Dust Collection: CNC machines generate a significant amount of dust. A robust dust collection system is vital for safety, air quality, and machine longevity.
Maintaining Your CNC Machine
Regular maintenance ensures accurate and reliable operation:
- Cleaning: Routinely clean the machine, especially the rails, lead screws, and gantry, to remove dust and debris that can impede movement.
- Lubrication: Follow manufacturer guidelines for lubricating moving parts to ensure smooth operation and prevent wear.
- Tool Inspection: Regularly inspect router bits for sharpness and damage. Dull bits lead to poor cuts, increased heat, and can be dangerous.
- Collet Care: Keep collets clean and free of debris to ensure bits are held securely.
Conclusion
The evolution of CNC technology has democratized precision woodworking, allowing artisans to push the boundaries of creativity like never before. The Ultimate Guide to CNC Carving for Artistic Wood Projects: Beyond Basic Cuts to Intricate 3D Designs and Inlays demonstrates that with the right software, advanced toolpath strategies, and a meticulous approach to inlays and artistic embellishments, the possibilities are truly limitless.
Embracing CNC is an investment in your artistic future, transforming complex visions into breathtaking realities. Start by mastering your chosen software, experiment with different toolpath combinations, and always prioritize safety. The journey from basic cuts to intricate 3D designs and exquisite inlays is a rewarding one, unlocking a new dimension of artistic expression in your woodworking projects in 2026 and beyond.
Actionable Next Steps:
- Invest in Software Training: Dedicate time to deeply learn one or two CAD/CAM software packages. Online tutorials, courses, and community forums are invaluable resources.
- Experiment with Scraps: Before committing to a large project, use scrap wood to test new toolpaths, bit combinations, and feed/speed settings.
- Join a Community: Engage with other CNC woodworkers online or locally. Sharing knowledge and experiences accelerates learning.
- Start Simple, Then Scale: Begin with 2.5D carvings or simple inlays to build confidence, then gradually tackle more complex 3D designs.
