


The average untreated room can degrade audio clarity by as much as 30% due to uncontrolled reflections and reverberation, profoundly impacting recordings and critical listening. For home studio enthusiasts and audiophiles in 2026, merely having good equipment isn’t enough; the acoustic environment itself dictates sound quality. This article delves into Crafting Acoustic Diffusers and Sound Panels for Home Studios: Blending Aesthetics with Audio Performance, providing comprehensive guidance on transforming ordinary spaces into acoustically optimized sanctuaries that also enhance visual appeal.
Key Takeaways
- Acoustic Treatment Fundamentals: Understand the difference between sound absorption and diffusion and their crucial roles in managing room acoustics.
- DIY Benefits: Learn how crafting your own acoustic treatments offers significant cost savings and unparalleled customization for both sound and style.
- Diffuser Construction: Explore popular diffuser designs like QRDs and PRDs, focusing on material selection, precise cuts, and assembly techniques.
- Sound Panel Craftsmanship: Master the creation of broadband absorption panels, including frame construction, insulation choices, and fabric application.
- Aesthetic Integration: Discover strategies to seamlessly blend your acoustic treatments with your studio’s decor, ensuring they are both functional and visually pleasing.
Understanding the Science of Sound in Your Studio
Before diving into Crafting Acoustic Diffusers and Sound Panels for Home Studios: Blending Aesthetics with Audio Performance, it’s vital to grasp the basic principles of room acoustics. Sound waves behave predictably within an enclosed space, reflecting off hard surfaces and absorbing into soft ones. These interactions create phenomena like reverberation, echo, and standing waves, which can severely color your audio, making mixing difficult and listening fatiguing.

The Acoustic Challenge: A typical untreated room, especially one with parallel walls and hard surfaces (like drywall, glass, and wood floors), suffers from:
- Flutter Echo: Rapid, repetitive reflections between parallel surfaces.
- Reverberation: The persistence of sound after its source has stopped, causing muddiness.
- Standing Waves: Areas of exaggerated or canceled frequencies at specific points in the room, leading to an uneven frequency response.
Absorption vs. Diffusion: The Core Principles
Effective acoustic treatment employs a combination of absorption and diffusion to manage these issues.
- Sound Absorption Panels: These panels are designed to reduce reflections by converting sound energy into heat. They are typically made from porous materials like mineral wool, fiberglass, or specific foam. Absorption is crucial for taming excessive reverberation and controlling early reflections, particularly at first reflection points.
- Acoustic Diffusers: Unlike absorbers, diffusers scatter sound waves in multiple directions, rather than absorbing them. This preserves the room’s liveness while eliminating flutter echoes and comb filtering. Diffusers create a more natural, spacious sound field, preventing the room from sounding “dead” or overly damped. They are especially useful on rear walls or behind listening positions.
By strategically deploying both, you create a balanced acoustic environment where sound is clear, defined, and accurate. This balance is key to Crafting Acoustic Diffusers and Sound Panels for Home Studios: Blending Aesthetics with Audio Performance, ensuring your effort translates into superior sound quality.
Crafting Wooden Acoustic Diffusers: Precision and Artistry
Wooden acoustic diffusers are not just functional; they can be stunning pieces of art, adding warmth and sophistication to any studio. Crafting Acoustic Diffusers and Sound Panels for Home Studios: Blending Aesthetics with Audio Performance through diffusers involves precision woodworking. The most common DIY diffuser types are Quadratic Residue Diffusers (QRDs) and Primitive Root Diffusers (PRDs).
Quadratic Residue Diffusers (QRDs)
QRDs are highly effective at scattering sound waves across a wide frequency range. Their design is based on a mathematical sequence that dictates the depths of a series of wells or blocks.
Key Design Considerations:
- Frequency Range: The effective frequency range depends on the deepest well (low frequency limit) and the width of the wells (high frequency limit).
- Material: Solid wood (pine, cedar, plywood offcuts) is ideal due to its density and workability.
- Construction: QRDs typically consist of a base panel and numerous wooden blocks (fins or wells) cut to varying, precise depths.
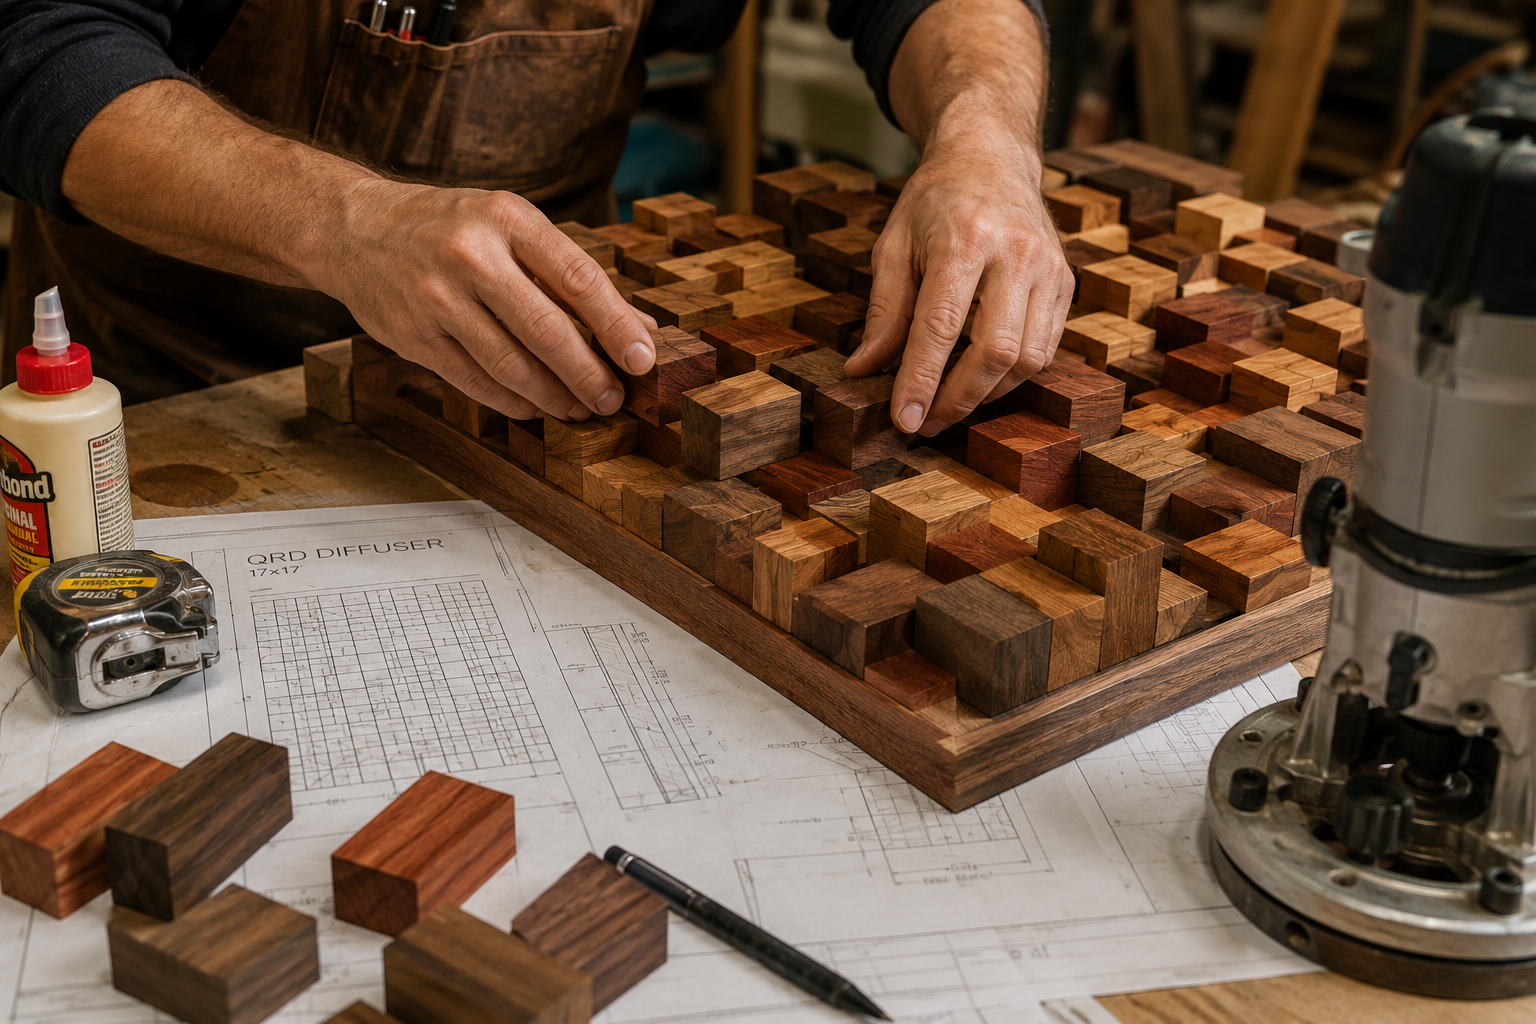
Step-by-Step QRD Construction:
- Calculate Dimensions: Use online QRD calculators to determine the required well depths based on your target frequency range and desired diffuser size.
- Prepare Base Panel: Cut a stable plywood or MDF panel to your chosen dimensions.
- Cut Well Blocks: Cut numerous wooden strips to the width of your wells. Then, carefully cut these strips into varying lengths according to your calculated depths. Precision is paramount here. A mastering the band saw or table saw is essential for accuracy.
- Assembly: Glue the well blocks onto the base panel in the calculated sequence. Ensure they are perfectly perpendicular and tightly aligned. Clamps are invaluable during this stage.
- Finishing: Once the glue is dry, sand the diffuser smooth. You can apply a clear coat, stain, or paint to match your studio’s aesthetic. Remember that thick finishes might slightly alter acoustic properties. For more on wood finishing, explore dark wood finishing techniques or high-gloss wood finishing techniques.
“The beauty of a well-crafted diffuser lies in its ability to sculpt sound while simultaneously serving as a visual focal point, proving that acoustic treatment doesn’t have to be an eyesore.”
Primitive Root Diffusers (PRDs)
PRDs offer another mathematically derived scattering pattern. While QRDs use prime numbers for their well depths, PRDs use prime numbers for the quadratic residue sequence, resulting in a more uniform scattering angle. They often have a less ‘boxy’ appearance than QRDs, sometimes featuring curved or angled elements, making them particularly appealing for those aiming for a unique aesthetic.
Advantages:
- Broader Scattering Angle: Can scatter sound over a wider angle than QRDs.
- Design Flexibility: Their design can sometimes lend itself to more organic or modern forms, contributing creatively to the overall design of your studio. Consider integrating them into other custom furniture pieces, like a modular home office desk system.
Construction Tips for PRDs:
- Similar to QRDs, precision cutting of wood blocks or fins is critical.
- Some PRD designs might involve routing channels into a solid block of wood, requiring a mastery of router bits.
- Careful planning and layout before cutting are essential to achieve the desired pattern and acoustic effect.
Building Effective Sound Absorption Panels: Function Meets Form
While diffusers scatter sound, absorption panels soak it up, reducing unwanted reflections and reverberation. For Crafting Acoustic Diffusers and Sound Panels for Home Studios: Blending Aesthetics with Audio Performance, absorption panels are often easier to build and can be just as visually striking.
Components of a High-Performance Absorption Panel
- Frame: Typically made from wood (pine, poplar) to create a sturdy box for the absorbent material.
- Absorbent Material: The core of the panel. Rigid mineral wool (e.g., Rockwool Safe’n’Sound, Owens Corning 703) or rigid fiberglass are excellent choices. Avoid soft batts meant for thermal insulation, as they are less effective acoustically.
- Fabric Covering: An acoustically transparent fabric is essential. Burlap, linen, or specific acoustic fabrics allow sound to pass through to the absorbent core while protecting the material and providing a finished look.
Step-by-Step Absorption Panel Construction
- Cut Frame Pieces: Cut four pieces of wood to form your frame. Common sizes for panels are 2’x4′ or 2’x2′. For a 2’x4′ panel, you might cut two 48″ pieces and two 21″ pieces (to account for the thickness of the other frame pieces).
- Assemble Frame: Join the frame pieces using screws and wood glue. Butt joints with screws are simplest, but for a more refined look, consider using pocket screws or even simple half-lap joints. Strong joints are important here, much like building custom wooden planters.
- Insert Absorbent Material: Place the rigid mineral wool or fiberglass inside the frame. Ensure it fits snugly without significant gaps. For material safety, it’s wise to wear gloves, a mask, and eye protection.
- Wrap with Fabric:
- Lay your chosen fabric face down on a clean surface, ensuring it’s large enough to wrap around the frame with plenty of overlap.
- Center the frame (with insulation inside) on the fabric.
- Starting with one long side, pull the fabric taut over the frame edge and staple it to the back.
- Repeat for the opposite long side, pulling firmly to avoid wrinkles.
- Do the short sides, folding the corners neatly like a present. Ensure the fabric is stretched evenly.
- Trim any excess fabric.
- Add Mounting Hardware: Attach sawtooth hangers, D-rings, or French cleats to the back of the frame for easy wall mounting.

Aesthetic Customization for Absorption Panels:
- Fabric Choices: Experiment with different colors, textures, and patterns of acoustically transparent fabric to match or accent your studio’s decor.
- Frame Finishes: Stain, paint, or distress the wooden frame to complement your existing furniture. You could even integrate custom panel designs into larger wooden elements, similar to handcrafted wooden wall art.
- Grill Cloth: For a more professional look, consider adding an additional layer of grill cloth over the main fabric, which can also protect the underlying material.
Blending Aesthetics with Audio Performance
The ultimate goal of Crafting Acoustic Diffusers and Sound Panels for Home Studios: Blending Aesthetics with Audio Performance is to create a space that sounds exceptional without looking like a padded cell. The visual integration of these treatments is just as important as their acoustic function.

Strategic Placement and Visual Harmony
- Diffuser Placement: Typically, diffusers are placed on the rear wall of the studio, behind the listening position, to scatter reflections and prevent slap-back echo. They can also be effective on side walls further from the listening position. Their often intricate designs make them perfect candidates for focal points.
- Absorption Panel Placement: These are usually placed at first reflection points on side walls, the ceiling, and sometimes the front wall behind monitors. Visually, these panels can be treated as artwork.
- Consider creating a “feature wall” by arranging several panels in a geometric pattern.
- Use contrasting or complementary fabric colors to break up monotony.
- Build frames from attractive wood species or use specialized joinery techniques, much like those used in building statement furniture pieces.
Innovative Design Ideas
- Integrated Solutions: Instead of standalone panels, consider building acoustic treatments directly into custom cabinetry, shelving, or even a building a modular home office desk system that incorporates absorption.
- Hidden Panels: For a minimalist aesthetic, some absorption panels can be concealed behind perforated wooden screens or stretched fabric art.
- Lighting Integration: Incorporate LED strips or subtle backlighting around or within your diffusers and panels to create ambiance and highlight their textures.
- Material Variety: Don’t be afraid to mix different types of wood, stains, and fabric textures. A combination of smooth, dark wood for diffuser fins and light, textured fabric for absorbers can create a sophisticated, layered look.
- Artistic Carvings: For those with advanced woodworking skills, diffusers can be carved with intricate patterns, making them truly unique works of art. Explore introduction to wood carving for beginners for inspiration.

By thoughtfully designing and placing your acoustic treatments, you can achieve a studio that not only performs flawlessly but also inspires creativity through its beautiful and functional design. This synergy between form and function is at the heart of successfully Crafting Acoustic Diffusers and Sound Panels for Home Studios: Blending Aesthetics with Audio Performance.
Conclusion
The journey of Crafting Acoustic Diffusers and Sound Panels for Home Studios: Blending Aesthetics with Audio Performance is a rewarding endeavor that significantly impacts your sound quality and studio environment. By understanding the principles of sound, meticulously building your diffusers and absorption panels, and thoughtfully integrating them into your space, you can achieve professional-grade acoustics without compromising on aesthetics. In 2026, home studios are more sophisticated than ever, and a truly optimized space reflects both technical understanding and artistic vision.
Start by assessing your room’s specific acoustic challenges, then choose the appropriate mix of absorption and diffusion. Don’t be afraid to experiment with materials, finishes, and arrangements. The beauty of DIY is the freedom to customize every aspect, creating a unique, high-performing studio that is truly yours.
Actionable Next Steps:
- Analyze Your Space: Use a sound meter app or perform simple clap tests to identify problematic reflections and reverberation in your studio.
- Plan Your Design: Sketch out where diffusers and absorption panels will go, considering both acoustic effectiveness and visual appeal.
- Gather Materials: Source high-quality wood, acoustically dense insulation, and aesthetically pleasing, acoustically transparent fabric.
- Start Small: Begin with a few absorption panels to address first reflection points, then consider adding diffusers for more advanced sound scattering.
- Iterate and Refine: Room acoustics can be complex. Be prepared to adjust panel placements and add more treatments as needed until you achieve your desired sound.
SEO Meta Title: Crafting Acoustic Diffusers & Sound Panels for Home Studios
SEO Meta Description: Learn to craft acoustic diffusers & sound panels for home studios in 2026. Blend aesthetics with audio performance using DIY wood designs & expert tips.
