
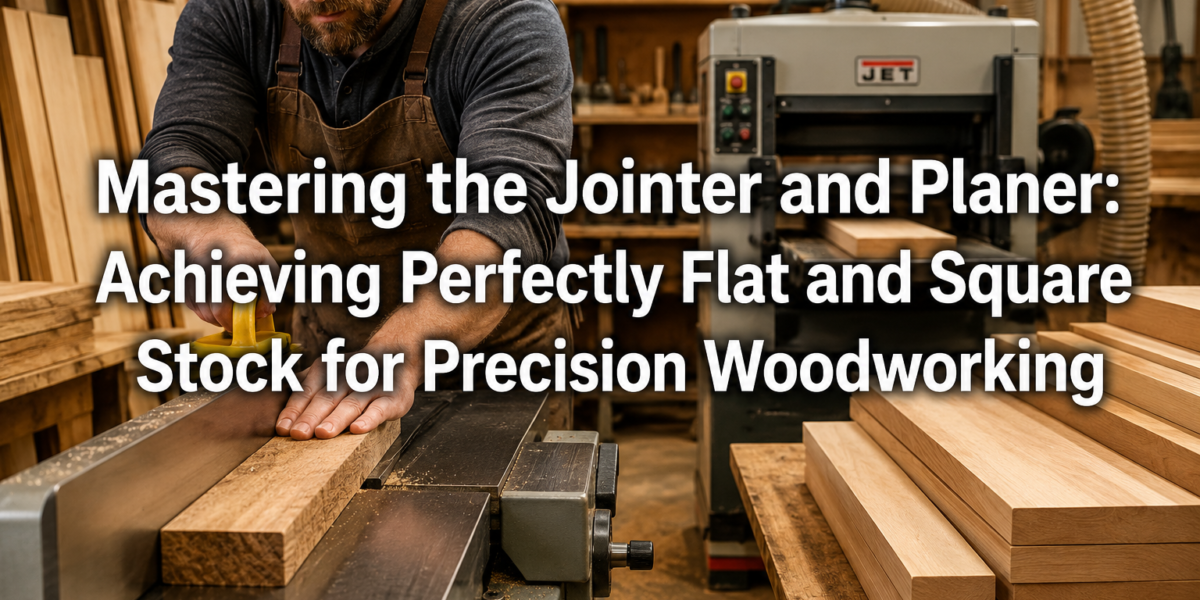

The difference between a passable woodworking project and a masterpiece often hinges on a single, fundamental principle: the flatness and squareness of your stock. Imperfections as subtle as a sixteenth of an inch can lead to unsightly gaps, weak joints, and frustrating assembly problems. For woodworkers aiming for professional-grade results in 2026, mastering the jointer and planer is not merely a desirable skill but a critical foundation. These two machines, working in tandem, transform roughsawn lumber into perfectly dimensioned material, ensuring every joint fits precisely and every surface aligns flawlessly. This guide will walk you through the essential techniques, safety protocols, and operational nuances required for Mastering the Jointer and Planer: Achieving Perfectly Flat and Square Stock for Precision Woodworking.
Key Takeaways
- The jointer creates one flat face and one square edge on rough lumber.
- The planer then brings the opposing face parallel to the first, achieving uniform thickness.
- Proper machine setup and blade sharpness are crucial for accurate and safe operation.
- Always prioritize safety, including personal protective equipment and correct feeding techniques.
- Mastering these tools is essential for strong joinery and high-quality finished projects.
Understanding the Jointer: Flattening and Squaring Stock
The jointer is the first step in milling rough lumber. Its primary function is to create a perfectly flat reference face and a perfectly square reference edge on a board. Without these foundational flat and square surfaces, it is impossible to achieve true dimensions with subsequent operations like planing or table saw cuts.

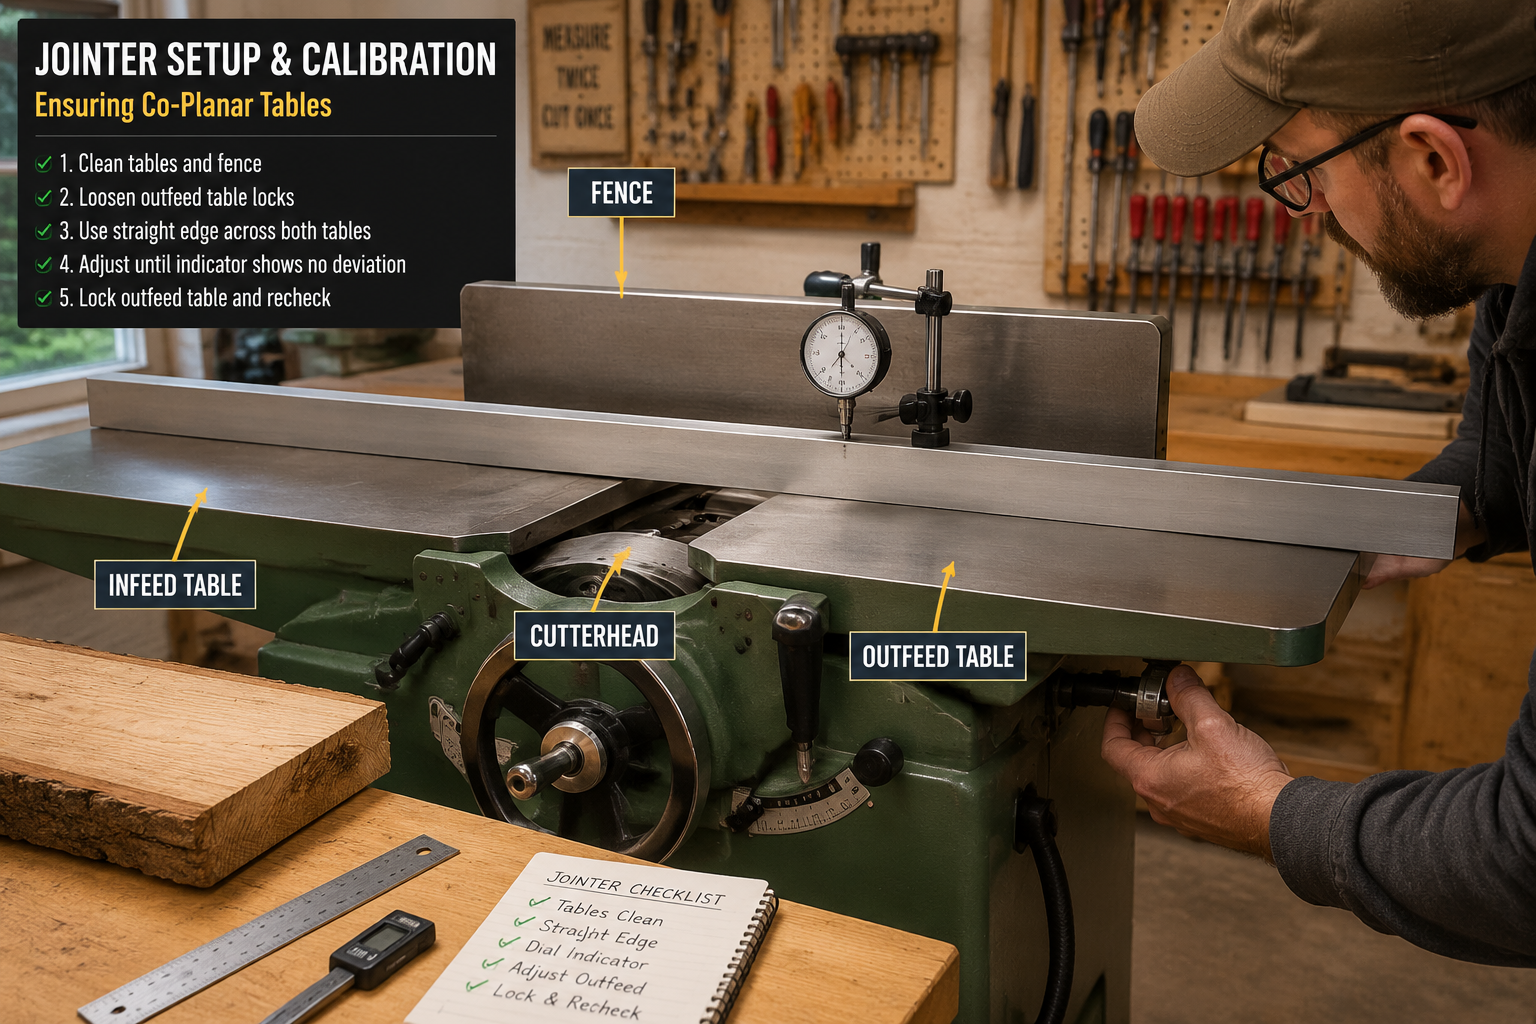
Anatomy of a Jointer
A jointer consists of several key components:
- Infeed Table: This table holds the board before it contacts the cutterhead. Its height is adjustable to control the depth of cut.
- Outfeed Table: This table supports the board after it passes over the cutterhead. It must be perfectly coplanar with the top of the cutterhead knives at their highest point.
- Cutterhead: This rotating cylinder houses the knives that remove material from the wood.
- Fence: The fence provides a straight, adjustable surface against which the edge of the board rides, ensuring a square cut.
- Guard: A spring-loaded guard covers the cutterhead when not in use, a critical safety feature.
Essential Jointer Setup and Calibration
Before making any cuts, proper jointer setup is paramount for both accuracy and safety.
- Check for Coplanarity: The outfeed table is the fixed reference point. The knives must be set precisely so their highest point is exactly level with the outfeed table. This is the most critical adjustment. If the outfeed table is too low, the board will “dive” at the end of the cut, resulting in a tapered edge. If it’s too high, the board will “climb” and create a snipe. Use a straight edge spanning both tables, rotating the cutterhead manually to find the high point of the knives.
- Fence Squareness: Ensure the fence is perfectly square (90 degrees) to the tables using a reliable machinist’s square. While some projects may require angled edges, a 90-degree reference is standard for initial milling.
- Depth of Cut: For most operations, especially on rough lumber, a shallow depth of cut (1/32 to 1/16 inch) is ideal. This reduces tear-out and motor strain. The infeed table controls this depth.
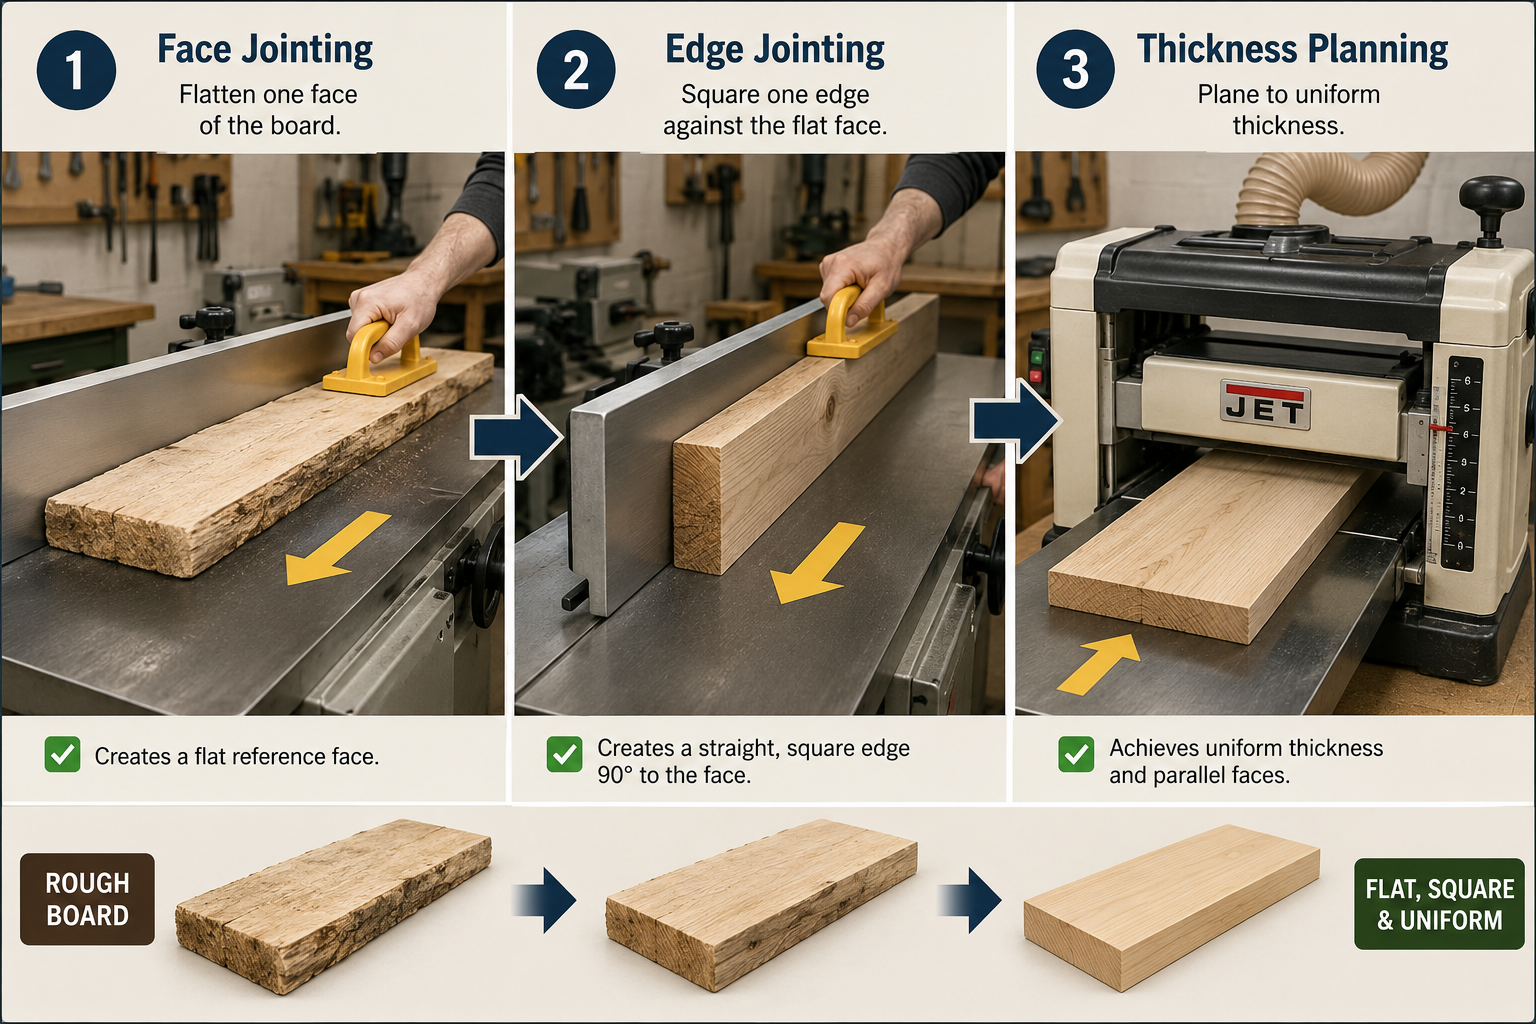
Jointer Operations: Achieving Flat Faces and Square Edges
The process of milling a board on the jointer typically involves two main steps:
Jointing One Face Flat:
- Inspect the board for the “worst” face – the one with the most cup, bow, or twist. This will be the first face you joint.
- Position yourself to the side of the jointer, never directly behind the board, to avoid kickback.
- Apply firm downward pressure over the infeed table and cutterhead, and then transition pressure to the outfeed table as the board passes.
- Feed the board slowly and consistently. For cupped boards, start with the concave side down. For bowed boards, place the convex side down.
- Make multiple shallow passes until the entire face is flat. You’ll know it’s flat when you get a continuous, full-width shaving across the entire length.
- Tip: Mark the high spots with a pencil; the jointer will erase these marks as it flattens the surface.
Jointing One Edge Square:
- Once one face is flat, turn the board on its edge.
- Place the newly jointed flat face against the fence.
- Apply firm pressure against the fence and downward pressure on the tables.
- Feed the board through the jointer until the edge is perfectly straight and square to the face. Check squareness with a square at various points along the edge.
- This jointed face and edge will serve as your two primary reference surfaces for all subsequent milling.
Safety First: Always use push blocks, especially for shorter pieces. Keep hands clear of the cutterhead. Ensure guards are functioning correctly. For more on essential woodworking tools and safety, consider our guide on Essential Hand Tools for Every Woodworker.
Mastering the Planer: Achieving Consistent Thickness and Parallel Faces
After the jointer has established one flat face and one square edge, the thickness planer takes over. The planer’s role is to make the second face perfectly parallel to the first jointed face, bringing the board to a uniform thickness. It cannot flatten a board on its own; it will simply replicate any existing cup or twist if a reference face hasn’t been established.
Planer Fundamentals
- Infeed/Outfeed Rollers: These rollers grip and move the workpiece through the machine.
- Cutterhead: Similar to the jointer, this houses the knives that remove material.
- Table: The planer table supports the workpiece and is typically adjustable for height, which determines the final thickness.
- Depth Scale/Wheel: Used to set the desired thickness.
Planer Operation: Step-by-Step
- Set Desired Thickness: Begin by adjusting the planer table to a slightly higher setting than your target final thickness. Remember, it’s better to take multiple shallow passes than one deep one.
- First Pass (Reference Face Down): Place the board on the planer table with the jointed flat face down. This is crucial because the planer uses the table as a reference to create a parallel surface on the top.
- Multiple Shallow Passes: Take light passes (typically 1/32 to 1/16 inch at a time), flipping the board end-for-end between passes to help minimize snipe and achieve a more even cut. Continue until the second face is clean and parallel to the first.
- Achieving Final Thickness: Once both faces are clean, jointed face down, continue taking shallow passes until you reach your desired final thickness. Measure frequently with calipers or a ruler.
- Jointing the Second Edge (Optional but Recommended): After planing, you have two parallel faces. For precision woodworking, it’s often best to return to the jointer to square the second edge to the previously jointed face. This ensures all four sides are perfectly milled. For projects like DIY Wooden Wall Clocks: Precision Joinery and Modern Designs, this level of precision is non-negotiable.
Preventing Common Planer Issues
- Snipe: This is a slight depression at the beginning or end of a board caused by unsupported ends tipping into the cutterhead. To minimize snipe, support longer boards with infeed and outfeed rollers or tables. Taking shallow passes and feeding boards end-for-end can also help.
- Tear-Out: Occurs when wood fibers are torn rather than cleanly cut. This is more common with highly figured grain or dull knives. Take shallower passes, use a slower feed rate if available, and ensure knives are sharp.
- Knife Marks: Subtle ridges left by the knives. These are often unavoidable but can be minimized with sharp knives and slower feed rates. They are usually removed with light sanding.
The Synergy of Jointer and Planer for Precision Woodworking
The true power of these machines lies in their combined use. They are not interchangeable but complementary. The jointer creates the initial flat and square surfaces, setting the stage, and the planer refines the thickness, ensuring consistency. This two-step process is the bedrock of precise joinery and furniture making.
Workflow for Perfectly Milled Stock
- Select Rough Stock: Choose lumber slightly oversized for your final dimensions.
- Joint One Face: Use the jointer to create one perfectly flat reference face.
- Plane to Near Thickness: Take the board to the planer, jointed face down, and plane the opposite face until it is flat and parallel to the first. Get close to your desired thickness, leaving a little extra.
- Joint One Edge: Return to the jointer and square one edge to your newly flattened face. This is your second reference surface.
- Rip to Width (Table Saw): Use your table saw, with the jointed edge against the fence, to rip the board to its final width. This ensures a parallel and straight second edge.
- Plane to Final Thickness: Go back to the planer for the final pass(es) to achieve your precise thickness. This often means very shallow cuts to remove any residual planer marks from the previous steps.
By following this sequence, you ensure that every piece of lumber has truly flat faces and square edges, which is essential for projects involving Advanced Joinery for Unique Wooden Gift Boxes or Mastering Modern Hand-Cut Joinery.
Maintenance for Optimal Performance
Maintaining your jointer and planer is as important as knowing how to operate them.
- Keep Knives Sharp: Dull knives lead to tear-out, burning, and increased motor strain. Replace or sharpen knives regularly. Some jointers and planers use disposable carbide inserts, which simplify this task.
- Clean Machines: Regularly clean dust and resin build-up from tables, fences, and rollers. A clean machine operates more smoothly and accurately.
- Lubrication: Follow manufacturer guidelines for lubricating moving parts, especially table adjustment mechanisms.
- Check Belts and Bearings: Inspect drive belts for wear and ensure bearings are running smoothly.

Understanding the symbiotic relationship between the jointer and planer is fundamental to achieving excellence in woodworking. These machines, when used correctly, eliminate the frustrating battle against warped and uneven stock, allowing you to focus on the craftsmanship of your design. For those interested in Profitable Woodworking for Beginners, mastering these tools will significantly elevate the quality and marketability of your creations.
Conclusion
Mastering the jointer and planer is a cornerstone of precision woodworking, transforming rough lumber into perfectly flat and square stock. This foundational skill enables accurate joinery, seamless assembly, and ultimately, superior finished projects. By understanding the specific function of each machine, performing diligent setup and calibration, adhering to proper operational techniques, and prioritizing safety, woodworkers can consistently achieve professional-grade results. In 2026, the demand for high-quality, handcrafted wooden items remains strong, and your ability to mill stock with exacting precision will set your work apart. Invest the time to master these essential machines, and you will unlock a new level of accuracy and satisfaction in your woodworking endeavors.
SEO Meta Title: Mastering Jointer & Planer: Flat, Square Wood for Precision SEO Meta Description: Achieve perfectly flat and square stock for precision woodworking in 2026. Master jointer and planer techniques, setup, and safety for superior results.
