


Achieving a truly flawless finish on wood can feel like an elusive art, often the dividing line between a good project and a magnificent one. Many aspiring woodworkers grapple with uneven surfaces, swirl marks, or finishes that just don’t pop. The secret to bridging this gap, especially for beginners, often lies in mastering a single, versatile tool: the random orbital sander. This guide is dedicated to Choosing and Using Your First Orbital Sander: Achieving Flawless Finishes Every Time, empowering you to transform rough lumber into silky-smooth masterpieces ready for the perfect stain or topcoat in 2026.
Key Takeaways
- Understanding Orbital Sanders: Random orbital sanders combine rotary and orbital motion to prevent swirl marks, making them ideal for smooth finishes.
- Key Selection Criteria: Focus on power, disc size, dust collection, and ergonomic design when buying your first sander.
- Grit Progression is Crucial: Always start with a coarser grit for material removal and progressively move to finer grits for a smooth, ready-to-finish surface.
- Proper Technique Prevents Mistakes: Use light, even pressure, keep the sander moving, and overlap passes by about two-thirds to avoid uneven sanding and swirl marks.
- Dust Management is Essential: Effective dust collection not only keeps your workspace clean but also improves sanding efficiency and extends sandpaper life.
Demystifying the Random Orbital Sander: Why It’s Your Go-To Tool
The random orbital sander stands out in the world of woodworking for its unique ability to deliver smooth, swirl-free finishes. Unlike traditional vibratory sheet sanders or belt sanders, which can leave noticeable scratch patterns, the random orbital sander moves its sanding disc in small, unpredictable ellipses while simultaneously rotating it. This “random” action ensures that no single abrasive particle follows the same path twice, effectively minimizing the dreaded swirl marks that can mar an otherwise perfect project.

For anyone new to woodworking, Choosing and Using Your First Orbital Sander: Achieving Flawless Finishes Every Time becomes a cornerstone skill. It’s the tool you’ll reach for constantly, whether you’re preparing a tabletop for staining, smoothing out cabinet doors, or refining the edges of a custom wooden plant stand. Its versatility and user-friendliness make it an indispensable asset in any beginner’s workshop.
How Random Orbital Sanders Work
At its core, a random orbital sander employs a motor that drives a circular pad. This pad not only spins but also oscillates eccentrically, meaning it moves in tiny, off-center circles. This combined motion prevents the abrasive grit from repeatedly tracking over the same path. The result is a much finer and more uniform scratch pattern, which becomes virtually invisible as you progress through finer grits.
The sanding pads typically attach with a hook-and-loop (Velcro-like) system, making sandpaper changes quick and easy. Most models also feature integrated dust collection systems, which are vital for both cleanliness and sanding efficacy, as excess dust can impede the abrasive action and clog sandpaper.
Choosing Your First Orbital Sander: Key Considerations for Flawless Finishes
When it comes to Choosing and Using Your First Orbital Sander: Achieving Flawless Finishes Every Time, the selection process is critical. While many models are available, focusing on a few key features will ensure you pick a tool that meets your needs and budget without overwhelming you.
Here are the primary factors to consider:
1. Power Source: Corded vs. Cordless
- Corded Sanders: These are generally more powerful and offer continuous operation without worrying about battery life. They are often lighter since they don’t carry a battery pack and are usually more budget-friendly. For a first orbital sander, a corded model is often the best choice, providing reliable power for extended projects.
- Cordless Sanders: Offer unmatched portability and convenience, allowing you to sand anywhere without an outlet. However, they are typically heavier, more expensive, and require battery management. Battery life can be a limiting factor for larger projects.
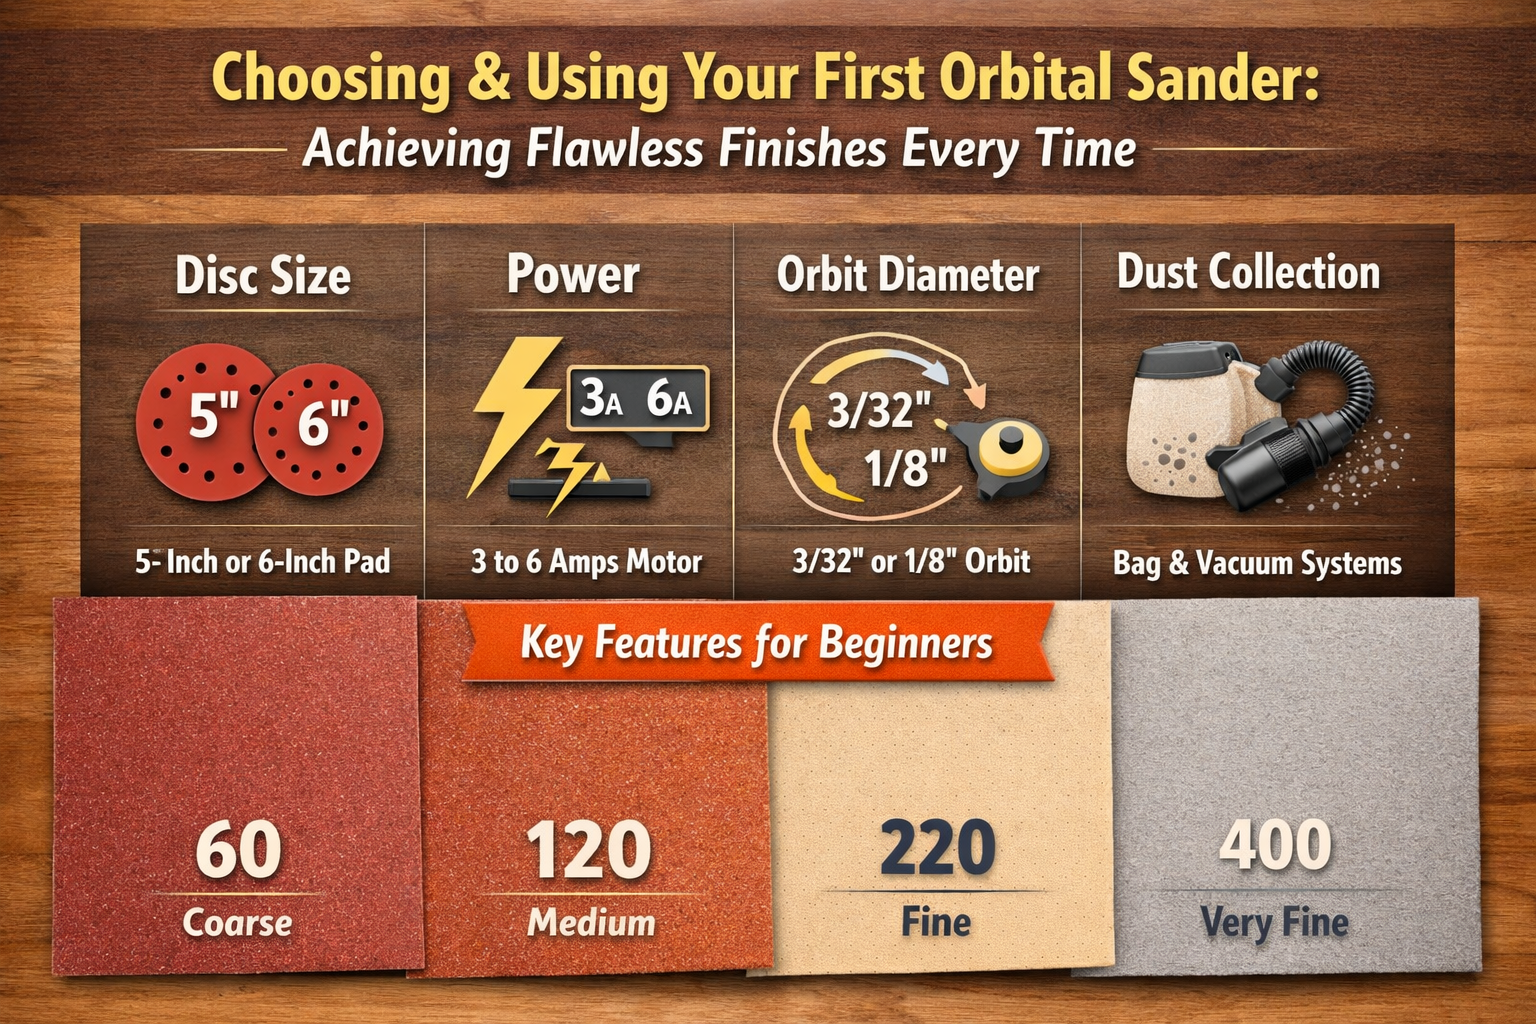
2. Disc Size
The most common disc sizes are 5-inch and 6-inch.
- 5-inch Disc: This is the most popular size for general woodworking. It’s versatile, maneuverable, and readily available, making it an excellent choice for a beginner’s first sander.
- 6-inch Disc: Covers a larger surface area, making it more efficient for big projects like tabletops or large panels. However, it can be less maneuverable for intricate work and sandpaper can be slightly more expensive.
3. Power (Amps or Volts)
For corded models, power is measured in amps. A higher amperage typically indicates a more robust motor that can maintain speed under load, leading to more efficient sanding. For beginners, a sander in the 2.5 to 3.5 amp range is usually sufficient. Cordless models are measured in volts (e.g., 18V, 20V), with higher voltage generally equating to more power and longer runtimes.
4. Orbit Diameter
This refers to how wide the eccentric motion of the pad is. A larger orbit diameter removes material faster but can leave a slightly coarser finish. A smaller orbit diameter (e.g., 3/32″ or 1/8″) is ideal for fine finishing work. Many orbital sanders fall into the 1/8″ orbit diameter range, offering a good balance for general-purpose sanding.
5. Variable Speed Control
A highly recommended feature for your first sander. Variable speed control allows you to adjust the sanding speed based on the material and the stage of sanding. Slower speeds are better for delicate work, heat-sensitive materials, and initial passes, while faster speeds are suitable for aggressive material removal.
6. Dust Collection
Effective dust collection is non-negotiable. Look for a sander with a robust dust collection bag or, even better, one that can attach to a shop vacuum. Good dust collection keeps your workspace cleaner, improves visibility, and extends the life of your sandpaper. Many modern sanders feature through-pad dust holes that efficiently pull dust away from the sanding surface. Consider integrating your sander with a mobile dust collection cart for maximum efficiency.
7. Ergonomics and Comfort
You’ll be holding this tool for extended periods. Test different models for comfort, grip, and vibration levels. A comfortable sander reduces fatigue and allows for more precise control.
Table: Orbital Sander Features for Beginners
| Feature | Recommendation for First-Time Buyers | Why It Matters |
|---|---|---|
| Power Source | Corded (2.5-3.5 Amps) | Consistent power, no battery limits, often lighter and more affordable. |
| Disc Size | 5-inch | Versatile, good maneuverability for most projects, sandpaper is widely available and affordable. |
| Variable Speed | Essential | Allows adjustment for different materials and stages of sanding, crucial for achieving fine finishes and preventing damage. |
| Dust Collection | Integrated bag + shop vac attachment capability | Keeps workspace clean, improves sanding effectiveness, prolongs sandpaper life. |
| Ergonomics & Vibration | Comfortable grip, low vibration | Reduces user fatigue, allows for longer work sessions, and improves control for better results. |
| Brake System | Pad brake (prevents aggressive spinning on startup) | Prevents swirl marks and gouging when the sander is first placed on the material, especially important for beginners. |
Mastering the Art of Sanding: Techniques for Achieving Flawless Finishes Every Time
Once you’ve made your choice, the next step is mastering the techniques for Choosing and Using Your First Orbital Sander: Achieving Flawless Finishes Every Time. Proper sanding is a systematic process, not a rushed one, and adherence to these steps will make all the difference.

1. Prepare Your Workspace
Ensure your workpiece is securely clamped to a workbench. A stable surface prevents movement and allows for consistent pressure. Clear the area of debris and set up your dust collection system.
2. Choose the Right Grit Progression
This is arguably the most critical aspect of achieving a flawless finish. Starting with too fine a grit will be ineffective, while skipping grits can leave deep scratches that are impossible to remove later.
- Start Coarse: Begin with a grit suitable for the initial condition of the wood. If you’re working with rough-sawn lumber or removing old finishes, 80-grit or even 60-grit might be necessary. For already smooth but unfinished wood, 100 or 120-grit is a good starting point.
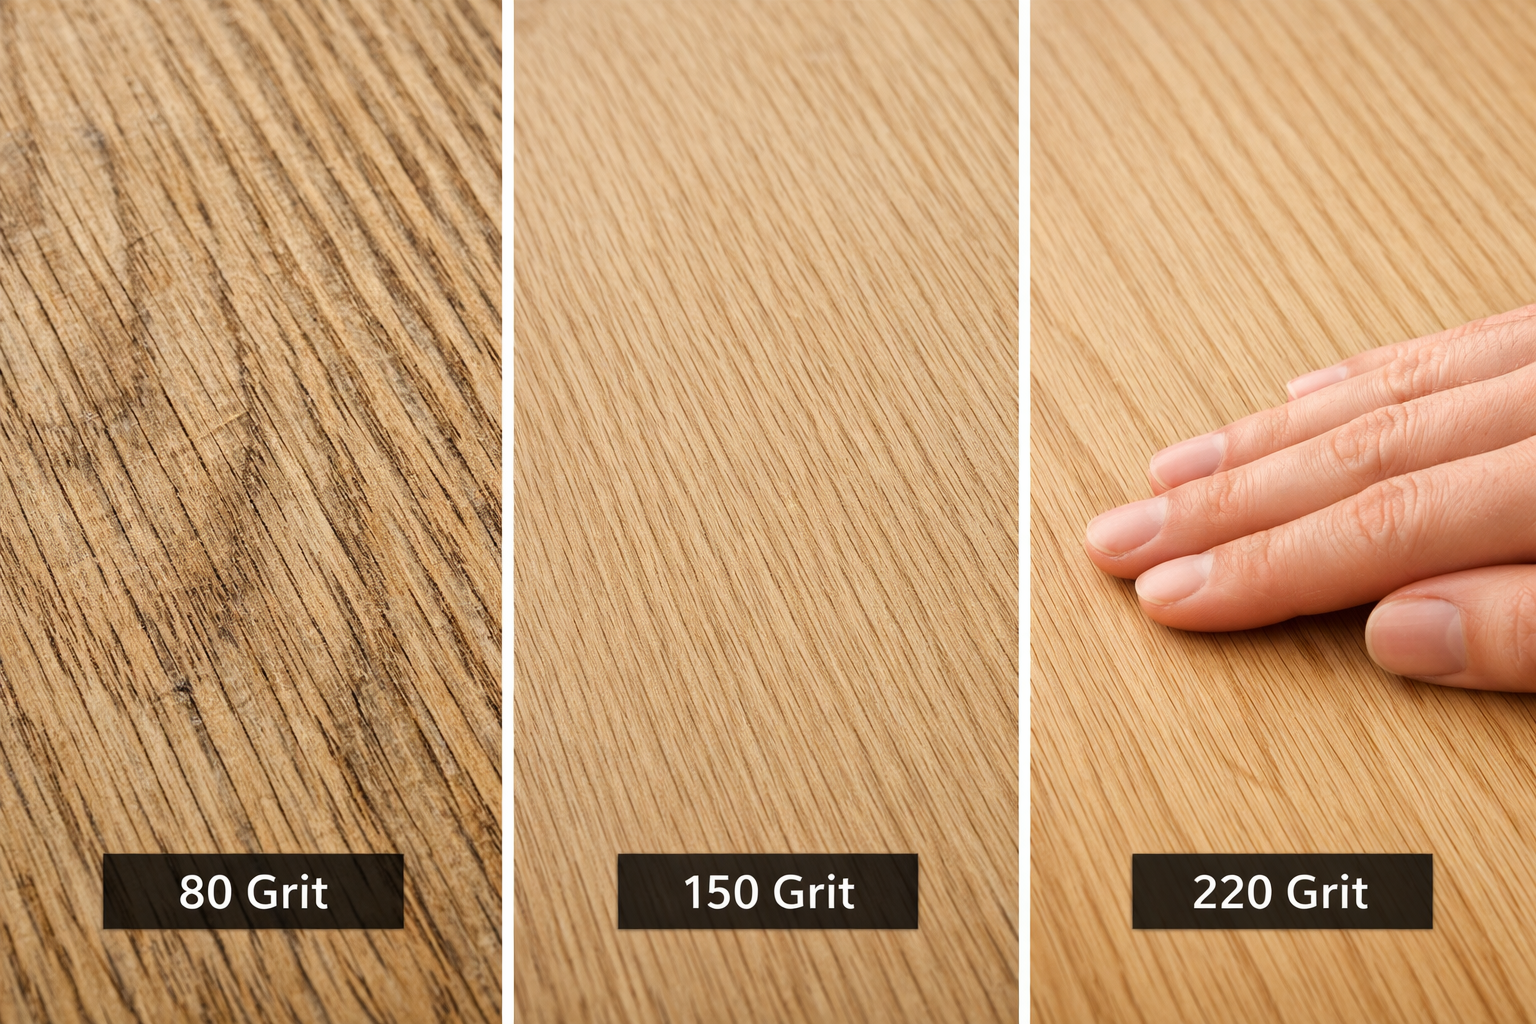
- Progress Systematically: The general rule is to jump no more than one or two grit sizes at a time. A common progression for a smooth finish might be: 80-grit → 120-grit → 150-grit → 180-grit → 220-grit. For extremely fine finishes, you might go up to 320 or 400-grit. Each successive grit removes the scratch marks left by the previous, coarser grit.
- Check Your Progress: After each grit, carefully inspect the surface under good light. Ensure all previous scratch marks are gone before moving to the next finer grit. Wiping the surface with a damp cloth or mineral spirits will temporarily highlight any remaining imperfections.
3. Proper Sanding Technique
- Install Sandpaper Correctly: Ensure the hook-and-loop pad is clean and the sandpaper is perfectly centered and flat on the pad.
- Start Off the Workpiece: Always start the sander with the pad lifted off the wood surface. Once it’s up to speed, gently lower it onto the workpiece. This prevents the sander from aggressively digging into the wood and leaving swirl marks.
- Light, Even Pressure: Let the sander do the work. Excessive pressure can bog down the motor, cause uneven sanding, and generate excessive heat, leading to premature sandpaper wear and potential burn marks on the wood. Guide the sander gently with both hands, allowing its weight to provide sufficient pressure.
- Keep It Moving: Never let the sander sit in one spot while running. Keep it moving in slow, overlapping passes. Overlap each pass by about two-thirds to ensure even coverage.
- Sanding Direction: While random orbital sanders are less sensitive to grain direction than other sanders, it’s still good practice to follow the general direction of the wood grain, especially with coarser grits. This helps ensure a uniform finish.
- Edges and Corners: Be extra careful around edges, as it’s easy to round them over or sand through veneers. For tight corners that the round pad can’t reach, you may need to finish by hand sanding with a block or use a detail sander.
- Clean Between Grits: Thoroughly clean the workpiece and your workspace after each grit. Dust and loose abrasive particles from coarser grits can contaminate finer sandpaper, leading to unexpected scratches. A shop vacuum and a tack cloth are your best friends here.
- Stop Off the Workpiece: Just like starting, lift the sander off the wood before turning it off. This prevents the decelerating pad from leaving a swirl mark.
4. Sanding for Specific Projects
- Furniture Building: For projects like a custom wood workbench or DIY wooden plant stands, a thorough sanding job is paramount for a professional look.
- Live Edge Slabs: When working with live edge slabs, pay extra attention to the natural edges, often requiring hand sanding for unique contours.
- Finishing Wood: The goal of sanding is to prepare the surface for the chosen finish. If you plan to stain, sanding to at least 180 or 220-grit is usually sufficient. For a clear coat or oil finish, going to 220 or even 320-grit will yield a smoother, richer appearance. Be aware that sanding too finely (e.g., beyond 220-grit for most woods) can sometimes “close” the wood pores too much, making it difficult for stain to penetrate evenly. For unique finishes, explore different unique wood finishing techniques.
By diligently following these steps, you will quickly become proficient in Choosing and Using Your First Orbital Sander: Achieving Flawless Finishes Every Time, ensuring your woodworking projects always have that professional, touch-me smoothness.
Conclusion
The journey of Choosing and Using Your First Orbital Sander: Achieving Flawless Finishes Every Time is a fundamental step for any aspiring woodworker aiming for professional-looking results. By understanding the core mechanics of this versatile tool, making an informed choice based on power, disc size, dust collection, and ergonomics, and diligently applying proper sanding techniques and grit progression, you lay the groundwork for truly exceptional finishes. Remember that patience and attention to detail are your greatest allies in this process. With your random orbital sander in hand and these guidelines in mind, you are now equipped to transform raw materials into beautifully smooth surfaces, ready for the perfect stain, paint, or clear coat, elevating your craftsmanship in 2026 and beyond.
SEO Meta Title: Master Your First Orbital Sander for Flawless Finishes SEO Meta Description: Learn how to choose and use your first orbital sander for woodworking in 2026. Achieve perfectly smooth, flawless finishes every time with this comprehensive guide.
