


The notion that achieving invisible, robust joints in furniture demands expensive specialized machinery is a common misconception among woodworkers. In reality, mastering dowel joinery for furniture, especially for cabinets, offers an exceptionally strong and aesthetically clean alternative that can often be achieved with accessible power tool jigs and even precise hand methods. This article explores the fundamentals of dowel joinery, comparing its real-world durability to biscuit and domino joints, and guides you through achieving precision drilling and effective strength testing for your cabinet projects in 2026.
Key Takeaways
- Dowel joinery provides robust, invisible joints ideal for furniture and cabinets.
- Precision drilling is paramount and can be achieved with various jigs or careful hand methods.
- Proper dowel selection, hole depth, and glue application are critical for joint strength.
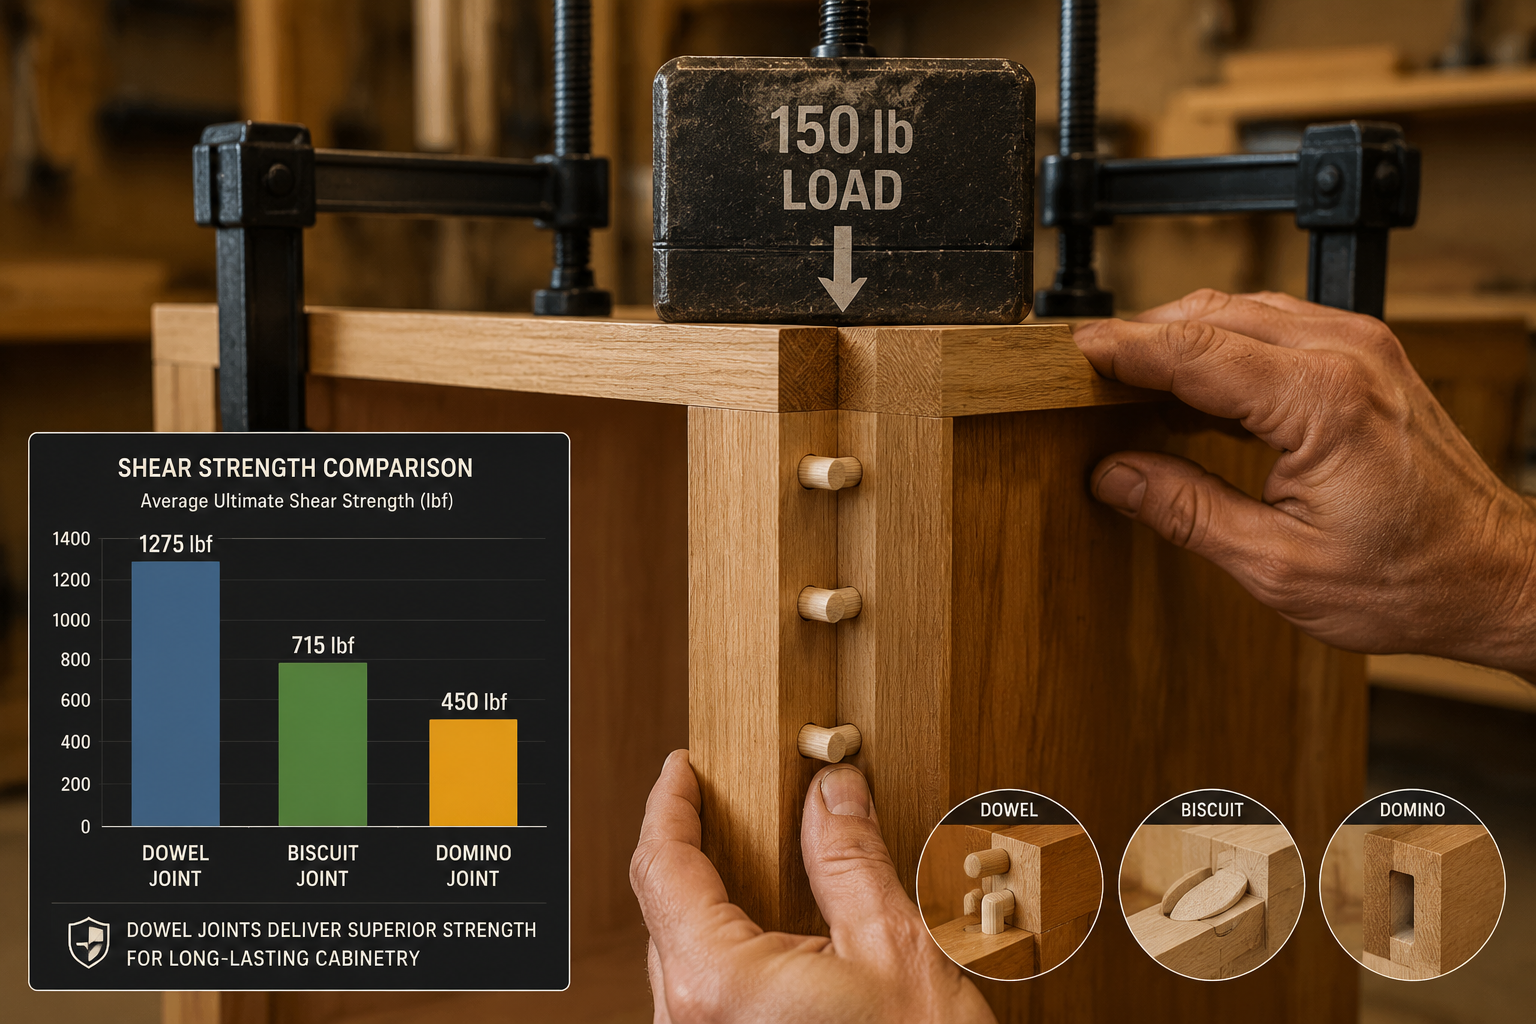
- Dowel joints often rival or exceed the strength of biscuit and domino joints when executed correctly.
- Strength testing validates joint integrity and informs best practices for future builds.
Understanding Dowel Joinery and Its Advantages
Dowel joinery is a classic woodworking technique that involves inserting cylindrical wooden pins (dowels) into corresponding holes drilled into two pieces of wood, which are then glued together. The dowels act as internal reinforcement, preventing movement and significantly increasing the joint’s shear strength and rigidity. This method is particularly valued in furniture and cabinet making for its discreet appearance and structural integrity.

Compared to other common joinery methods, dowel joints offer several distinct advantages:
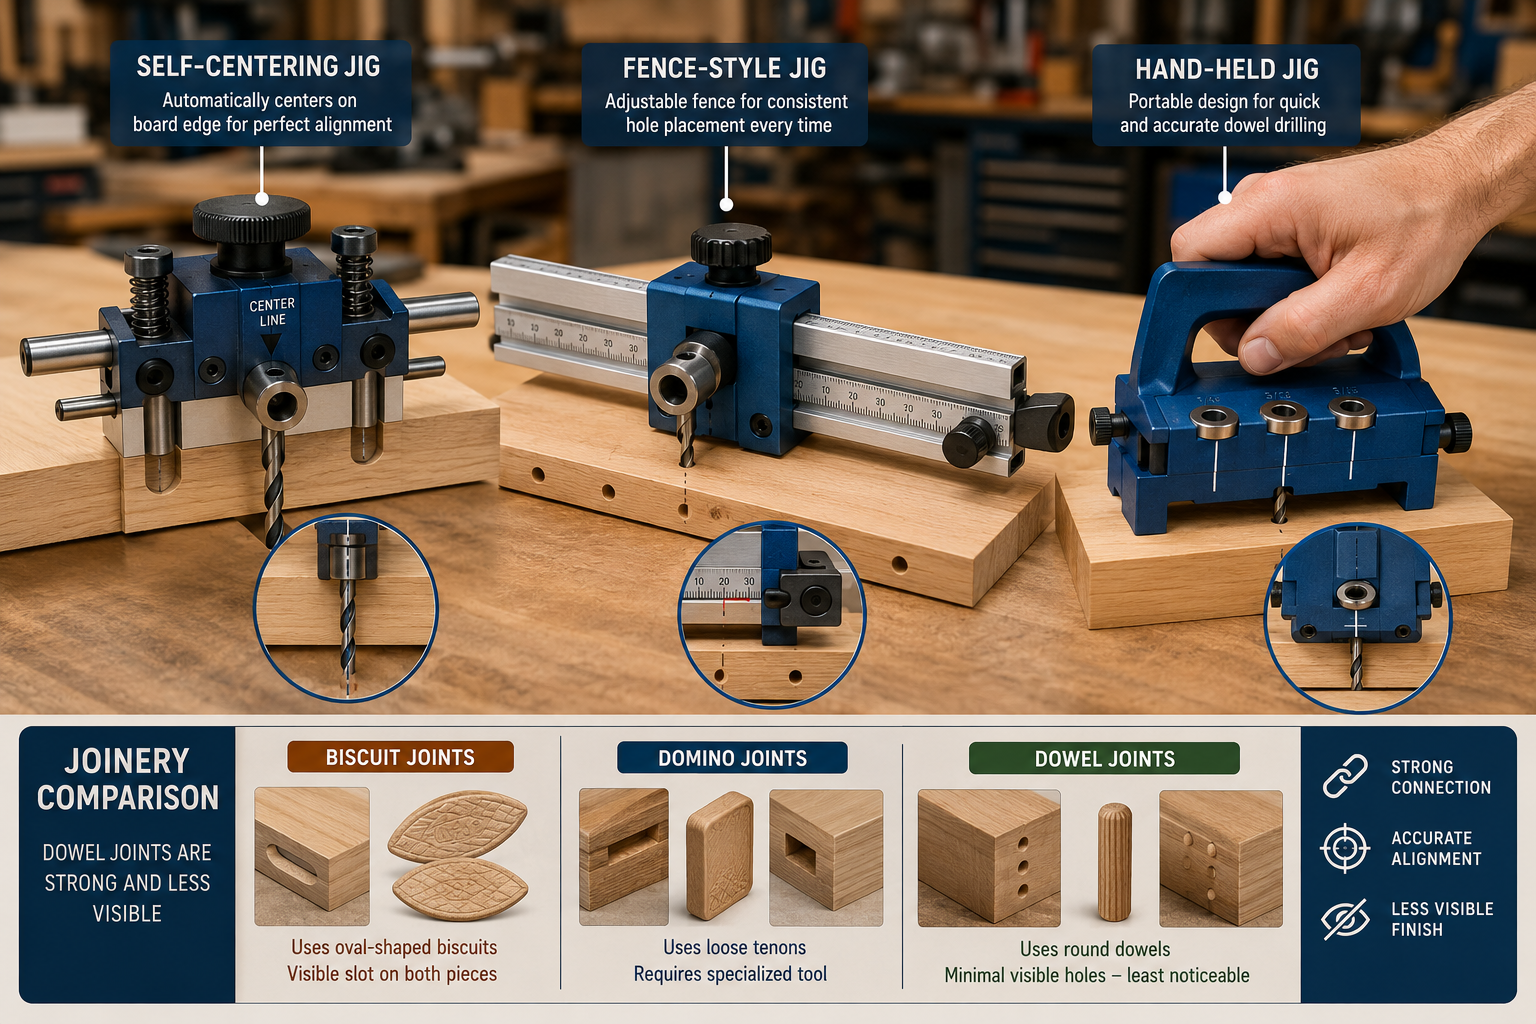
- Invisibility: When properly executed, dowels are entirely concealed within the joint, leaving no visible fasteners or joinery marks on the exterior of the finished piece. This contributes to a clean, high-end aesthetic, often preferred for visible furniture surfaces.
- Strength: Dowel joints, particularly when using multiple dowels and quality wood glue, can be incredibly strong. The multiple shear planes offered by dowels provide excellent resistance to racking and twisting forces, making them ideal for load-bearing structures like cabinet frames and table legs.
- Cost-Effectiveness: Dowel rods are generally inexpensive, and the necessary drilling jigs range from affordable hand-held versions to more sophisticated, yet still accessible, self-centering designs. This makes dowel joinery a budget-friendly option compared to systems requiring dedicated machines like biscuit joiners or domino joiners.
- Versatility: Dowels can be used in a wide range of joint types, including edge-to-edge, butt, T-joints, and corner joints, making them suitable for diverse furniture construction scenarios.
While biscuit joints offer good alignment and some strength for panel glue-ups, their primary role is often alignment rather than maximum structural integrity in high-stress applications. Domino joints, while exceptionally strong and precise, require a specialized (and often costly) tool. For many projects, particularly when aiming for a balance of strength, aesthetics, and cost-effectiveness, mastering dowel joinery for furniture: precision drilling guides and strength testing for cabinets proves to be a superior choice.
Precision Drilling Guides for Flawless Dowel Joints
The success of dowel joinery hinges entirely on the accuracy of your drilled holes. Even a slight misalignment can lead to gaps, weak joints, or pieces that simply don’t fit together. This section delves into various precision drilling guides and techniques to achieve flawless results.
Essential Drilling Techniques and Tools
Before selecting a jig, understanding the basics of drilling for dowels is crucial:
- Bit Selection: Use brad-point drill bits. Their sharp central point prevents wandering, ensuring the hole starts exactly where you intend. The flutes also efficiently clear chips, reducing friction and heat.
- Depth Control: Consistent hole depth is critical. Use a drill stop or wrap masking tape around your drill bit as a visual guide. Ensure the combined depth of opposing holes is slightly less than the dowel length to allow space for glue squeeze-out.
- Speed and Pressure: Drill at a moderate speed with steady, firm pressure. Too fast can burn the wood; too slow can cause tear-out.
- Practice: Always practice on scrap wood of the same type and thickness as your project material.
Types of Precision Drilling Guides
There are several categories of dowel jigs, each offering different levels of precision, ease of use, and cost.
Hand-Held Dowel Jigs
These are simple, often inexpensive jigs that clamp onto the edge or face of your workpiece. They typically feature hardened steel bushings to guide the drill bit.
- Pros: Portable, affordable, good for basic butt joints.
- Cons: Requires careful marking and clamping for accurate alignment, prone to user error.
- Tip: Mark both mating pieces simultaneously with the jig clamped for best results.
Self-Centering Dowel Jigs
A significant step up in precision, self-centering jigs clamp onto the workpiece and automatically center the drill bit on the edge or face. This eliminates the need for precise measurement from the edge, making them highly accurate for edge-to-edge and butt joints.
- Pros: Excellent accuracy, easy to use, ideal for consistent hole placement on board edges.
- Cons: Can be limited to certain stock thicknesses.
- Recommendation: A self-centering jig is often the best balance of cost and performance for cabinet and furniture making. For additional insights on improving accuracy in your workshop, consider exploring resources on essential woodworking jigs.
Fence-Style Dowel Jigs
These jigs feature a fence that registers against the edge of your workpiece, similar to a router table fence. They allow you to consistently drill holes a set distance from the edge, making them excellent for panel glue-ups and repeated hole patterns.
- Pros: High precision for repeatable tasks, good for multiple holes across longer pieces.
- Cons: Can be bulkier, requires careful setup.
- Application: Excellent for ensuring perfectly aligned shelves or cabinet sides.
Dowelmax and Similar Systems
High-end doweling systems like the Dowelmax offer unparalleled precision and versatility, allowing for a wide range of joint configurations with extreme accuracy. They are often more expensive but provide professional-grade results.
- Pros: Exceptional accuracy and versatility, built-in registration features.
- Cons: Higher cost, can have a steeper learning curve.
- Consideration: For professional cabinet makers or serious hobbyists building high-value pieces, these systems are a worthwhile investment.
When preparing your wood for dowel joinery, especially for cabinet carcasses, methods like resawing on a band saw or precision cuts with a router table are essential for creating flat, square surfaces that ensure joints fit perfectly. Proper preparation is the foundation for mastering dowel joinery for furniture: precision drilling guides and strength testing for cabinets.
Strength Testing and Best Practices for Durable Cabinet Dowel Joints
Building strong, lasting cabinets relies not just on precise drilling but also on understanding the factors that contribute to joint strength and how to test them. A well-executed dowel joint, combined with quality materials and proper technique, can create furniture that withstands decades of use.
Factors Influencing Dowel Joint Strength
Several elements collectively determine the durability of your dowel joints:
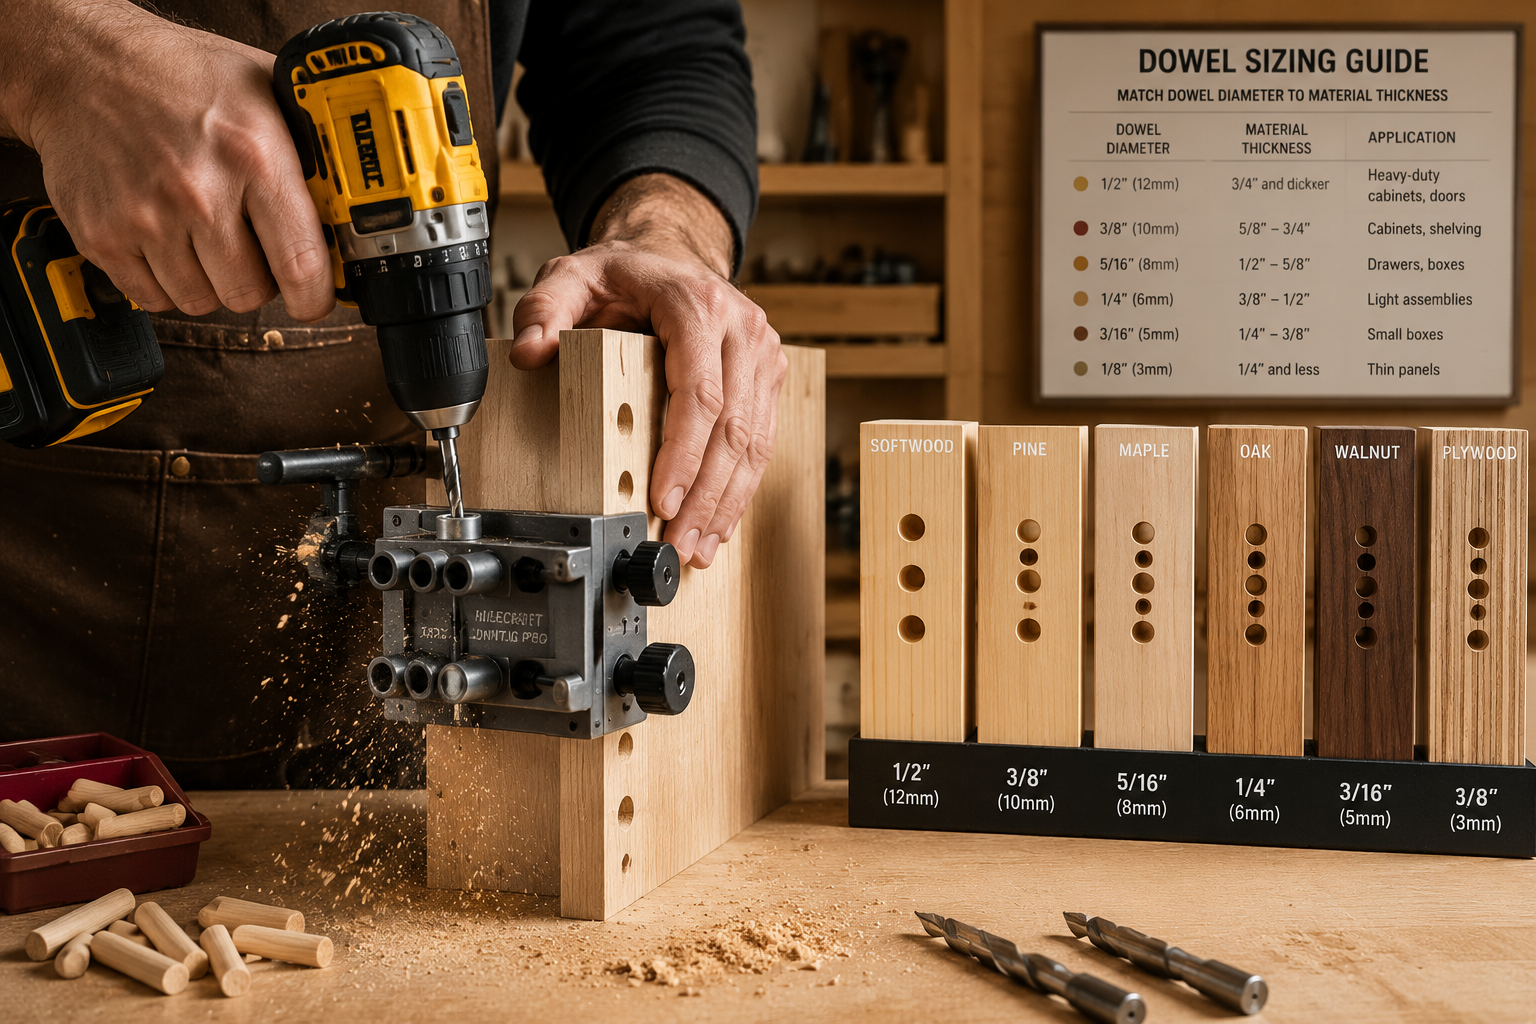
- Dowel Material: Hardwood dowels (e.g., maple, birch, oak) are generally stronger than softwood dowels. Spiral-grooved or fluted dowels are preferred as they allow excess glue and air to escape, ensuring better glue distribution and a stronger bond.
- Dowel Diameter and Length:
- Diameter: As a general rule, the dowel diameter should be approximately one-third the thickness of the thinnest workpiece. For example, a 3/4-inch thick cabinet side might use 1/4-inch or 5/16-inch dowels.
- Length: The dowel should penetrate deeply enough into both pieces to provide adequate shear strength, but not so deeply that it causes blow-out or bottoms out prematurely, preventing proper clamping. A good rule of thumb is for each hole to be slightly more than half the dowel’s length.
- Glue Type and Application: Use a high-quality woodworking glue (PVA glue is common and effective). Apply glue to the inside of the drilled holes and lightly coat the dowels themselves. Avoid excessive glue that can Hydraulic lock or prevent full seating.
- Clamping Pressure: Proper clamping pressure is essential to squeeze out excess glue and bring the joint surfaces into intimate contact, maximizing bond strength. Ensure even pressure until the glue cures.
- Number of Dowels: For wider panels or higher stress areas, using multiple dowels spaced appropriately enhances strength and prevents rotation.
- Wood Type: The strength of the joint is also influenced by the hardness and density of the wood being joined. Harder woods generally offer better screw and dowel holding power. Consider the properties of 1/2 plywood for cabinets if you’re working with sheet goods, as its layered construction affects joint strength.
Real-World Durability Testing
While scientific lab tests are often beyond the scope of a home workshop, simple strength testing on scrap pieces can provide valuable insights into your techniques and materials.

Common Test Methods:
- Leverage Test: Assemble a simple T-joint or butt joint using your standard doweling technique on scrap wood. Once the glue is fully cured, apply force to the joint using a lever (e.g., a long piece of wood clamped to one side) to pry it apart. Observe where the failure occurs:
- Wood failure: Indicates a very strong glue line and dowel, with the wood itself being the weakest link. This is the ideal outcome.
- Glue line failure: Suggests insufficient glue, poor clamping, or incorrect surface preparation.
- Dowel shearing/breaking: Could indicate undersized dowels, poor quality dowels, or insufficient penetration.
- Drop Test (for small assemblies): For smaller cabinet sub-assemblies or drawers, dropping a test piece from a moderate height onto a hard surface can reveal weaknesses that might appear under impact in daily use.
- Weight Bearing Test: For mock-ups of shelves or cabinet sides, gradually add weight to a dowel-joined test piece until failure. This helps determine practical load limits.
By regularly conducting these tests, even informally, you can refine your techniques, choose optimal dowel sizes, and build confidence in the structural integrity of your furniture. This iterative process is key to truly mastering dowel joinery for furniture: precision drilling guides and strength testing for cabinets. For projects like building statement furniture pieces or custom workbenches, robust joinery is non-negotiable, and dowels offer a reliable solution.
Conclusion
Mastering dowel joinery for furniture, particularly for cabinets, is a skill that elevates your woodworking projects. It offers a powerful combination of aesthetic invisibility and structural integrity, often rivaling or exceeding the performance of more complex or expensive joinery methods when executed with precision. By investing in quality precision drilling guides, understanding the nuances of dowel selection and glue application, and validating your techniques through practical strength testing, you can consistently produce durable, beautiful furniture. The journey to flawless dowel joints is one of practice and attention to detail, but the rewards are lasting pieces that stand as a testament to your craftsmanship.
Actionable Next Steps
- Invest in a Quality Jig: If you don’t already have one, purchase a self-centering dowel jig. It will dramatically improve your accuracy and consistency.
- Practice on Scraps: Before starting your next cabinet project, create several test joints with different dowel sizes and glue applications on scrap wood. Conduct simple leverage tests to assess their strength.
- Refine Your Technique: Pay close attention to drill bit selection, depth control, and clamping pressure. Small improvements in technique yield significant gains in joint quality.
- Explore Advanced Applications: Once comfortable, consider how dowels can be integrated into more complex designs, such as creating ergonomic workshop furniture or sturdy outdoor picnic tables.
SEO Meta Title: Mastering Dowel Joinery: Precision Drilling & Cabinet Strength SEO Meta Description: Achieve invisible, strong furniture joints with dowel joinery. Learn precision drilling, compare to biscuits/dominos, and test cabinet strength in 2026.
