


The profound satisfaction of creating something functional with your own hands often begins with the right foundation. For aspiring woodworkers, this foundation is frequently a sturdy workbench. While custom-built benches can cost thousands, a functional, reliable workbench for beginners is entirely within reach for a modest budget, typically under $200 in 2026 for materials, not including tools. Building a DIY Woodworking Bench for Beginners: Essential Features and Simple Construction offers an accessible entry point into woodworking, providing a dedicated space for projects and a hands-on lesson in practical carpentry. This article guides you through the process, focusing on simplicity, essential features, and cost-effective materials, ensuring your first foray into workbench building is a success.
Key Takeaways

- A DIY woodworking bench is an achievable first project for beginners, providing a crucial foundation for future work.
- Essential features like a sturdy top, dog holes, and a reliable vise are crucial for functionality and safety.
- Budget-friendly materials such as construction-grade lumber and plywood can create a robust bench without significant expense.
- Simple construction techniques, including butt joints reinforced with screws and glue, make this project manageable for novices.
- Proper planning, accurate measurements, and careful assembly are key to building a durable and effective workbench.
Why a DIY Woodworking Bench is the Perfect Beginner Project
Starting woodworking can seem daunting, with an array of tools and techniques to learn. However, constructing your own workbench is an ideal first project for several compelling reasons. It immediately provides a dedicated, stable surface for all subsequent projects, eliminating the frustration of working on makeshift tables or the floor. More importantly, it serves as a practical introduction to fundamental woodworking skills: measuring, cutting, drilling, and basic joinery. The satisfaction of building the very foundation of your workshop is immense, setting a positive tone for your woodworking journey.
For beginners, the emphasis should be on a functional, robust bench rather than a highly ornate or complex one. The goal is to create a stable platform that can withstand hammering, sawing, and clamping without wobbling or shifting. This stability is paramount for safety and precision in woodworking. A well-built bench enhances every task, from cutting lumber to assembling delicate joints. It also encourages organization, as a dedicated workspace naturally leads to better tool management and a tidier environment.
Furthermore, building a DIY woodworking bench allows you to customize it to your specific needs and available space. Whether you have a corner of a garage or a dedicated shed, a custom bench can optimize your workflow. It also provides an opportunity to learn about different types of wood, fasteners, and finishes, knowledge that will prove invaluable in future projects. This hands-on experience demystifies the building process, making other woodworking endeavors feel less intimidating.
Essential Features for a Beginner-Friendly Woodworking Bench
When you’re building a DIY woodworking bench for beginners, focusing on essential features ensures maximum utility without unnecessary complexity. The most critical elements are the workbench top, the support structure, workholding mechanisms, and appropriate dimensions.
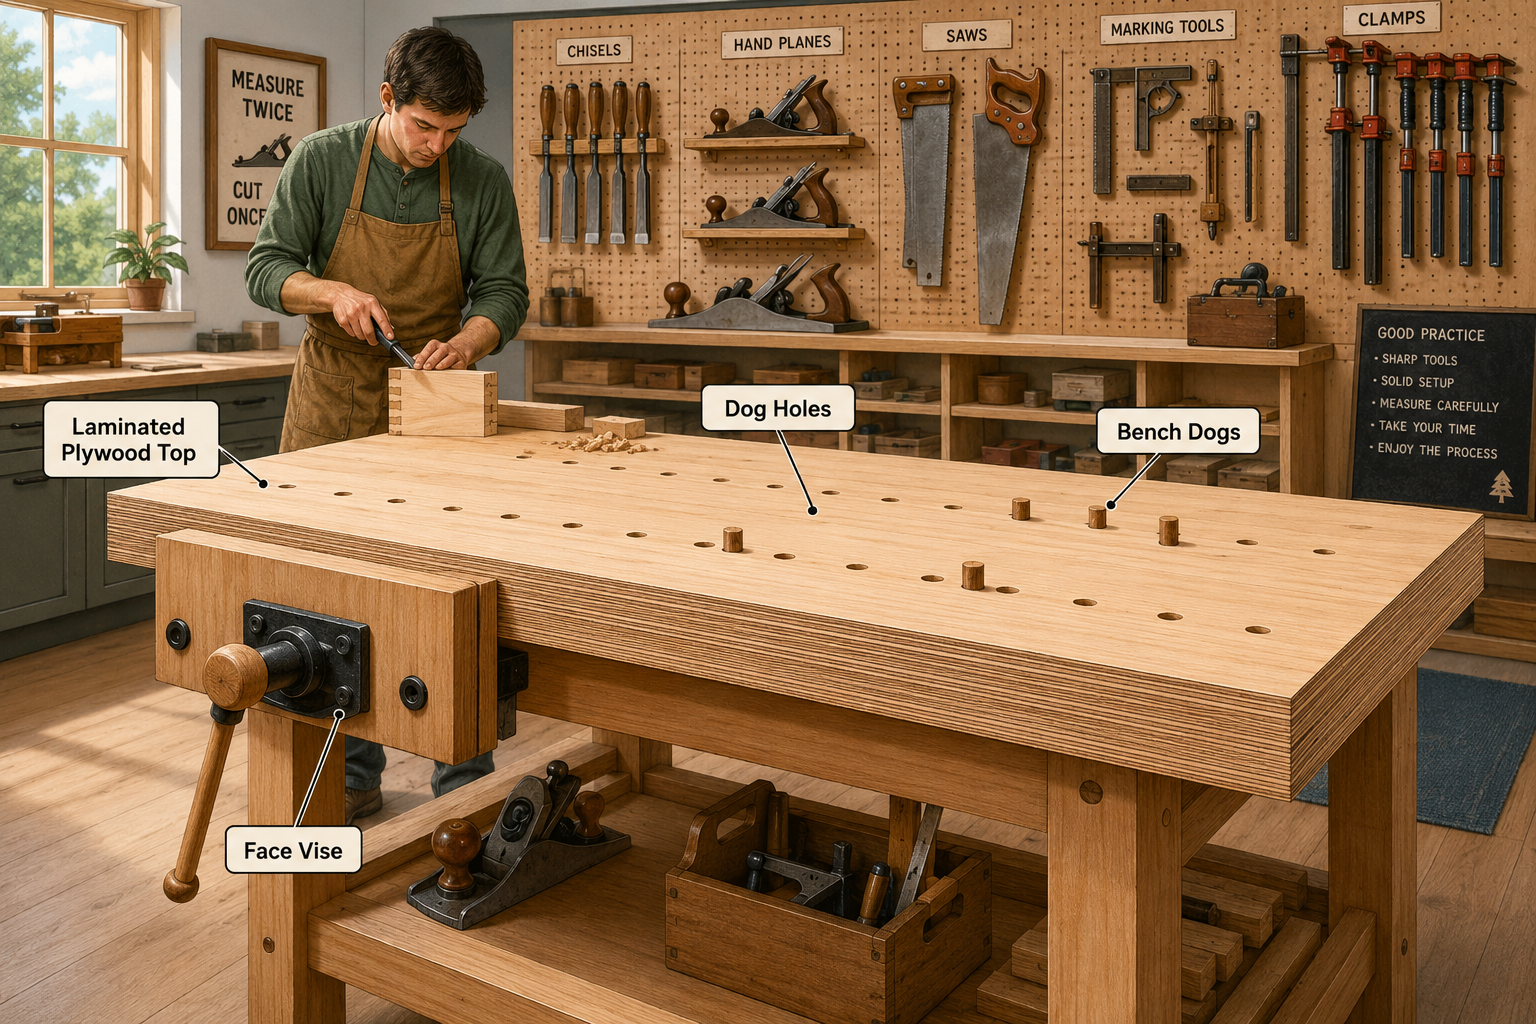
The Workbench Top
The top of your workbench is its most important surface. It needs to be flat, durable, and resistant to damage. For beginners, a laminated plywood top is an excellent choice. This involves gluing and screwing together multiple layers of plywood (typically two or three layers of 3/4-inch plywood) to create a thick, stable, and incredibly strong surface.
Advantages of a Laminated Plywood Top:
- Flatness: Plywood sheets are generally very flat, making it easier to achieve a true working surface.
- Durability: Multiple layers create a dense, impact-resistant top.
- Cost-Effective: Plywood is more affordable than solid hardwoods in the thickness required for a workbench.
- Repairable: If the top becomes too damaged over time, the top layer can be replaced or resurfaced.
A thickness of 1.5 to 2.25 inches (two or three layers of 3/4-inch plywood) is ideal. Consider adding a hardboard or MDF sacrificial top layer that can be easily replaced if it gets too scuffed or cut.
The Support Structure
The legs and stretchers form the skeleton of your bench, providing stability and strength. Construction-grade lumber, such as 2x4s or 2x6s, is perfect for this. They are readily available, inexpensive, and strong enough for most beginner projects.
Key Design Considerations for the Support Structure:
- Sturdy Legs: Use at least 4x4s (or laminated 2x4s) for the legs to prevent racking (sideways movement).
- Horizontal Stretchers: These connect the legs and prevent wobble. Install them at the top (under the workbench top) and near the bottom to create a solid frame.
- Bracing: Diagonal bracing, even simple plywood gussets in the corners, can dramatically increase stability.
- Height: The ideal workbench height is crucial for ergonomics. A common recommendation is to stand upright and measure the distance from the floor to your knuckles. This provides a comfortable working height that reduces back strain. Aim for around 34-36 inches for most adults.
- Footprint: A wider base is more stable. The size of your bench will depend on your available space, but a good starting size is often around 24-30 inches deep and 48-60 inches long.
Workholding Mechanisms: Vises and Dog Holes
Effective workholding is perhaps the most overlooked yet essential aspect of a functional workbench. Trying to saw or plane a piece of wood that is sliding around is frustrating and dangerous.
Front Vise: A sturdy front vise is indispensable. It clamps workpieces vertically or horizontally to the edge of the bench. For beginners, a simple, cast-iron quick-release vise or a basic wooden screw vise attached to the front apron of your bench is highly effective. Ensure the vise jaws are wide enough to hold a variety of stock.
Dog Holes: These are a series of evenly spaced holes drilled into the workbench top, typically 3/4-inch in diameter. They are used in conjunction with “bench dogs” – small posts that fit into the holes. When a workpiece is placed against a bench dog, it can be clamped by a vise or another bench dog to prevent movement. This system allows you to secure wide boards or irregularly shaped pieces across the benchtop. For more insights on workholding options, explore discussions on T-track vs. Dog Holes: Workbench Essentials.
Storage and Organization
While not strictly part of the core structure, integrated storage enhances a workbench’s utility. A simple lower shelf, made from plywood, provides valuable space for tools, lumber, or even a dust collection system. Consider adding a small set of drawers later if needed. Efficient storage promotes a cleaner workspace and better workflow. For ideas on maximizing space, you might find inspiration in Building Modular Wood Storage Systems for Small Workshops: Maximizing Space and Organization.

Simple Construction: Building a DIY Woodworking Bench for Beginners
The construction process for a beginner-friendly workbench prioritizes straightforward techniques and readily available tools. This approach makes the project accessible and enjoyable.
Materials List (Approximate for a 2’x4′ bench, adjust for size)
| Item | Quantity | Notes |
|---|---|---|
| 3/4″ Plywood | 2-3 sheets | For the laminated workbench top and lower shelf |
| 2×4 Lumber | 8-10 (8 ft) | For legs, aprons, and stretchers |
| Wood Glue | 1 large bottle | Essential for strong joints and laminating plywood |
| Wood Screws | Box of 2.5″ and 1.5″ | Exterior-grade or construction screws for strength |
| Bench Vise | 1 | Front-mounted, quick-release recommended for beginners |
| Bench Dogs | 4-6 | To fit 3/4″ dog holes |
| Sandpaper | Assorted grits | For smoothing surfaces |
| Wood Finish | Optional | Polyurethane or Danish oil for protection and appearance |
Tools Required
- Measuring Tape and Pencil: For accurate layout.
- Square: Combination square and a larger framing square for checking 90-degree angles.
- Circular Saw or Miter Saw: For cutting lumber and plywood. A circular saw is versatile for larger sheets.
- Drill/Driver: For pilot holes and driving screws.
- Clamps: Essential for laminating plywood and holding pieces during assembly. At least 4-6 clamps with 3-foot reach.
- Hand Plane or Router (optional): For truing the benchtop after lamination, though careful assembly can minimize this need.
- Safety Glasses and Hearing Protection: Always.
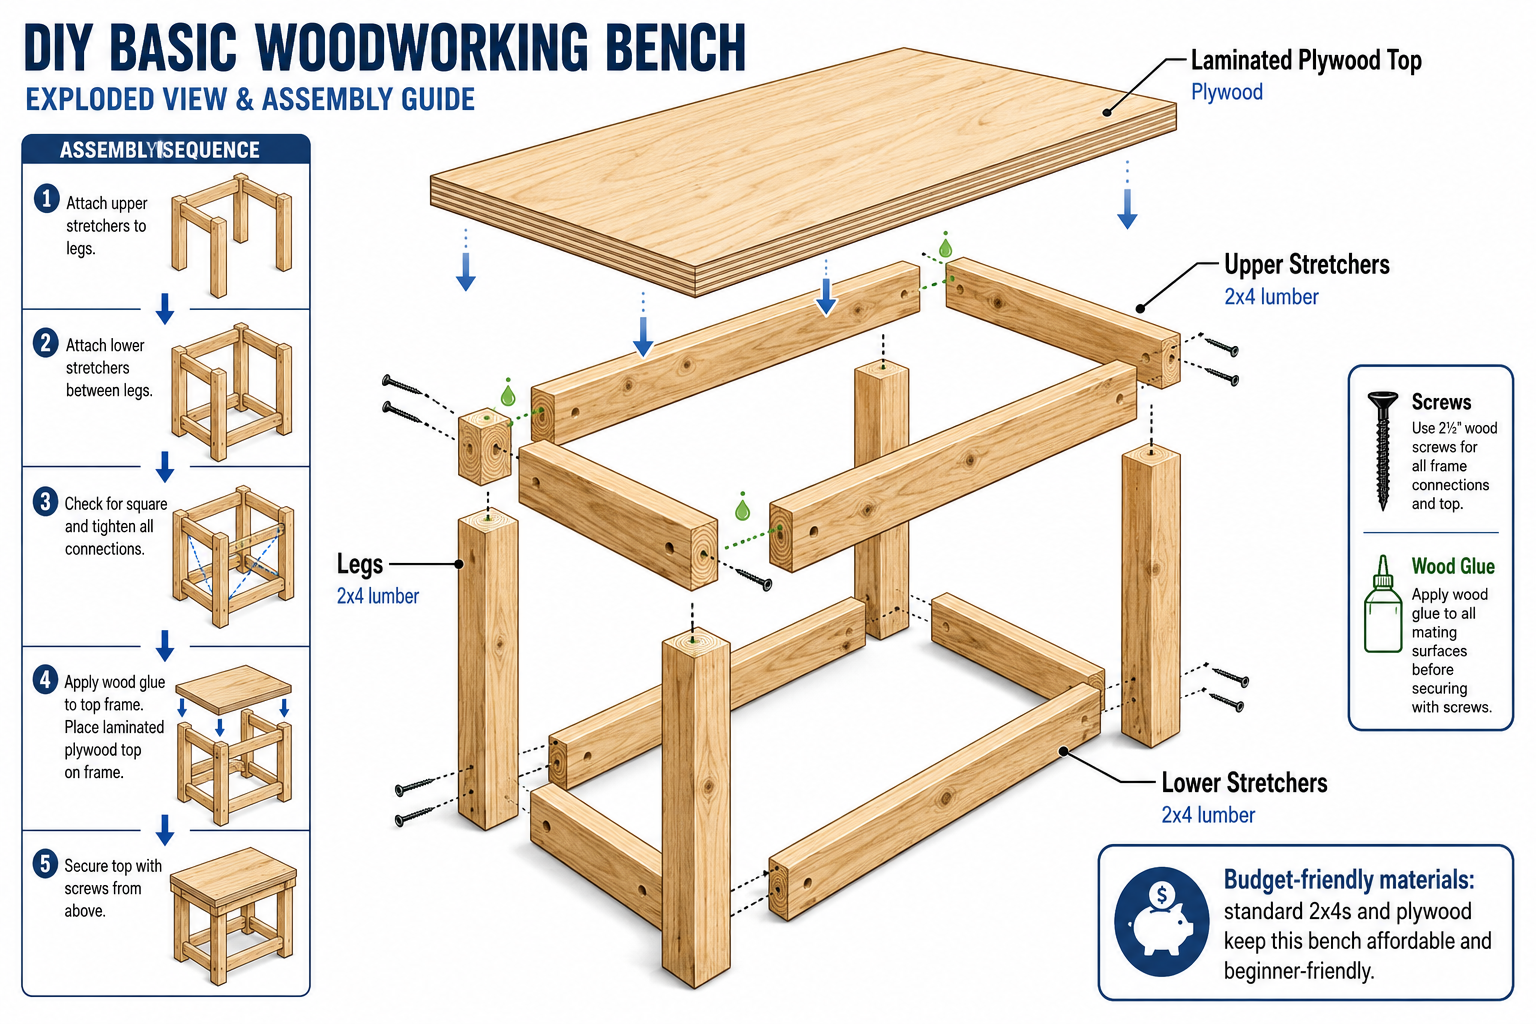
Step-by-Step Construction Guide
Cut Lumber for the Frame:
- Cut four legs to your desired height (e.g., 34 inches).
- Cut four long stretchers (e.g., 48 inches) for the front/back aprons and lower shelf supports.
- Cut four short stretchers (e.g., 20 inches) for the side aprons and lower shelf supports.
- Ensure all cuts are square for a stable frame.
Assemble the Leg Assemblies:
- Lay two legs parallel on a flat surface.
- Attach two short stretchers between them using wood glue and 2.5-inch screws. One stretcher should be flush with the top of the legs (or slightly recessed to allow for the benchtop), and the other around 8-10 inches from the bottom for the shelf.
- Pre-drill pilot holes to prevent splitting.
- Repeat for the other set of legs and stretchers.
Connect the Leg Assemblies:
- Stand both leg assemblies upright.
- Connect them with the long stretchers, again using wood glue and 2.5-inch screws. Ensure the frame is square at every joint. This creates the main workbench frame.
- Periodically check for squareness and levelness as you assemble.
Construct and Attach the Workbench Top:
- Cut two or three pieces of 3/4-inch plywood to your desired benchtop dimensions (e.g., 24″x48″).
- Apply a generous, even layer of wood glue between the plywood sheets.
- Stack the sheets, aligning them perfectly.
- Secure them with 1.5-inch screws every 6-8 inches, driving them from the top layer down. Pay special attention to the edges.
- Immediately clamp the laminated top aggressively. Allow the glue to dry completely (24 hours is often recommended).
- Once dry, remove clamps and sand any uneven edges.
- Center the finished top on your workbench frame and attach it using screws driven up from the top stretchers into the underside of the top.
Install the Lower Shelf:
- Cut a piece of plywood to fit the lower frame, resting on the bottom stretchers.
- Secure it with 1.5-inch screws from the top down into the stretchers. This adds rigidity and storage.
Install the Vise and Dog Holes:
- Vise: Follow the manufacturer’s instructions for installing your chosen vise. Typically, this involves mounting it to the front apron and often recessing the movable jaw flush with the benchtop’s edge.
- Dog Holes: Using a 3/4-inch Forstner bit (for clean, flat-bottomed holes), drill a series of holes into your benchtop. A common pattern is a grid, spaced 6-8 inches apart, running parallel to the front edge and extending back. Ensure these holes are perpendicular to the benchtop. Consider drilling a line of holes directly in front of the vise jaw for maximum clamping flexibility.
Finishing Touches:
- Sand all surfaces smooth, breaking any sharp edges.
- Apply a protective finish, such as polyurethane or Danish oil, to the entire bench, especially the top. This protects against spills and wear. For advice on various finishes, you might want to look into Danish Oil vs. Linseed: The Ultimate Wood Finishing Guide.
- Ensure the bench is level in its final location using shims if necessary.
Building this bench is a project that prioritizes learning and functionality. Don’t strive for perfection on your first attempt; focus on sturdy construction and essential features.
Customization and Future Upgrades
Once your basic woodworking bench is complete, you’ll quickly realize its limitations and potential for customization. This is where the beauty of a DIY bench truly shines. As your skills grow and your projects evolve, you can incrementally add features and make upgrades.
Enhancing Workholding
While a single front vise and dog holes are a great start, expanding your workholding capabilities will improve efficiency and versatility.
- End Vise: Adding an end vise to the short side of your bench allows for clamping long boards across the benchtop, ideal for planing edges or routing.
- Bench Hooks and Holdfasts: These simple accessories fit into dog holes or can be clamped to the bench, providing quick, versatile workholding for smaller pieces.
- T-Track Systems: For those who prefer a more modular approach, embedding T-tracks into your benchtop allows for flexible clamping with various jigs and fixtures. Compare this system with traditional dog holes to understand what best suits your style: T-track vs. Dog Holes: Workbench Essentials.
Storage Solutions
A basic lower shelf is a good starting point, but a well-organized workbench can significantly boost productivity.
- Drawers and Cabinets: Building simple drawers or enclosed cabinets under the bench provides dust-free storage for tools and supplies. This can be a rewarding follow-up project, teaching you more advanced joinery or drawer slide installation.
- Pegboards and Tool Racks: Mounting a pegboard to the wall behind your bench, or building a small custom tool rack, keeps frequently used hand tools within easy reach. For more ideas on organizing your space, consider looking at Building Modular Wood Storage Systems for Small Workshops: Maximizing Space and Organization.
- Mobile Base: If your workshop space is limited or needs to be multi-functional, adding locking casters to your bench allows you to easily move it out of the way when not in use.
Workbench Surface Upgrades
As you gain experience, you might consider enhancing your benchtop.
- Hardwood Edges: Adding hardwood edging to your plywood top provides a more durable and attractive edge, protecting the plywood layers from impact.
- Sacrificial Top: As mentioned, a removable hardboard or MDF top layer protects your primary benchtop from dings, cuts, and glue spills. It’s much easier and cheaper to replace a sacrificial layer than to resurface your entire bench.
- Router Table Integration: For those using a router frequently, integrating a router table insert flush with your workbench surface can save space and add functionality.
Specialized Jigs and Fixtures
Your workbench isn’t just a surface; it’s a platform for creating specialized jigs and fixtures that simplify complex tasks.
- Shooting Board: An essential jig for accurately squaring and trimming end grain.
- Planing Stop: A simple wooden stop that fits into dog holes, allowing you to plane boards without them shifting.
- Saw Guides: Custom guides for your circular saw can turn your workbench into a precision cutting station.
Remember, the process of building and upgrading your workbench is part of the woodworking journey itself. Each addition or modification offers new learning opportunities and refines your workspace to better suit your evolving needs. Embrace the iterative nature of woodworking, and let your bench grow with you.

Conclusion
Embarking on the journey of building a DIY woodworking bench for beginners is more than just constructing a piece of furniture; it’s about laying the groundwork for countless future projects and developing fundamental skills. By focusing on essential features like a sturdy laminated plywood top, robust framing with 2x4s, effective workholding through vises and dog holes, and simple, durable construction techniques, even a novice can create a highly functional and stable workbench. This project, achievable with readily available materials and basic tools, provides immediate utility and immense satisfaction.
As you complete your bench, you’ll not only have a dedicated workspace but also a significant confidence boost in your woodworking abilities. This first major build serves as a tangible testament to your growing skills and opens the door to more complex and rewarding projects. Remember to prioritize safety, measure twice, and enjoy the process of bringing your workshop’s heart to life.
Now that you have a solid foundation, consider exploring other beginner-friendly projects to hone your skills further, perhaps by trying some high-demand woodworking projects for 2026 or learning about essential hand tools like Japanese hand saws. Your DIY woodworking bench is not just a workstation; it’s the starting line for your creative woodworking adventures in 2026 and beyond.
