

The average home bar or kitchen island in 2026 demands more than just off-the-shelf seating; it calls for thoughtful design and personalized comfort. Generic bar stools often fall short, failing to complement unique counter heights, existing décor, or individual user needs. This article will guide woodworkers through Building Custom Bar Stools from Scratch: Joinery, Comfort, and Height Standards Explained, empowering them to create durable, comfortable, and perfectly proportioned pieces that enhance any living space. We will cover everything from foundational joinery techniques to crucial ergonomic considerations and the precise height standards that ensure a functional and pleasing experience.
Key Takeaways
- Custom bar stools offer superior aesthetics, comfort, and durability compared to mass-produced options.
- Strong joinery, such as mortise and tenon or bridle joints, is critical for the structural integrity of a bar stool.
- Ergonomic factors like seat depth, width, contour, and footrest placement significantly impact comfort.
- Accurate height measurement based on your specific counter is paramount for proper function and user experience.
- Designing with leg angles and stretcher layouts contributes to both stability and visual appeal.
Mastering Joinery for Robust Bar Stool Construction
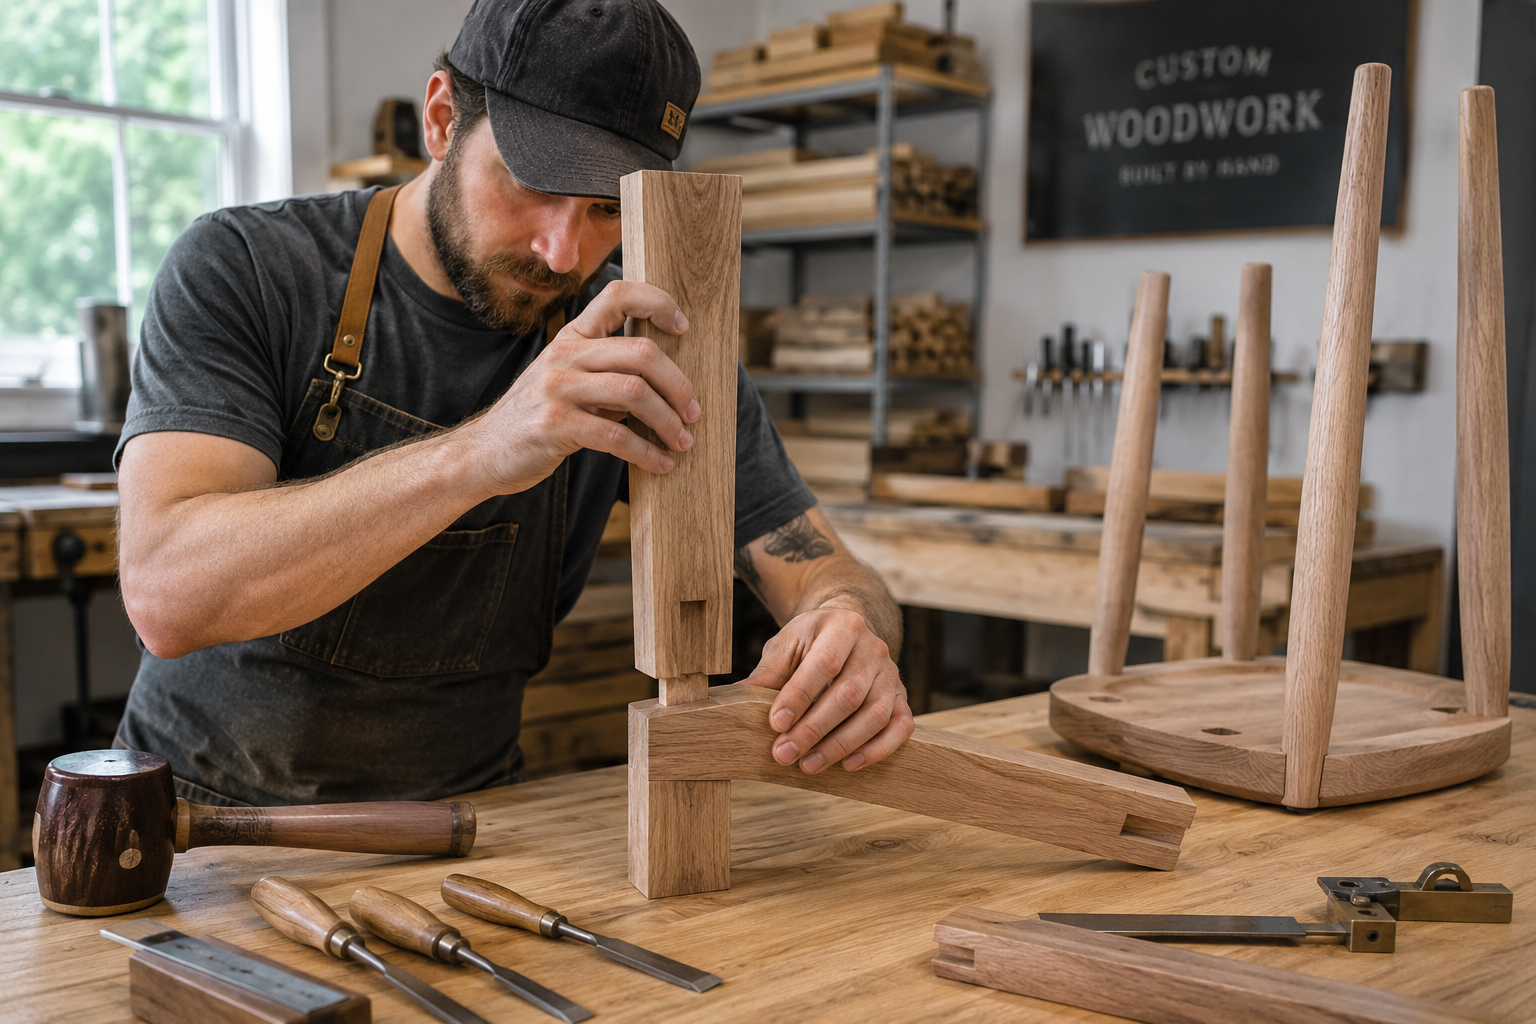
The foundation of any durable piece of furniture lies in its joinery, and bar stools, with their inherent stresses from constant use and shifting weight, demand particularly strong connections. When Building Custom Bar Stools from Scratch: Joinery, Comfort, and Height Standards Explained, selecting and executing the right joinery ensures longevity and stability.

Essential Joinery Techniques
For bar stools, the most reliable joints are those that offer maximum surface area for glue adhesion and mechanical interlock.
Mortise and Tenon Joints: This is the gold standard for connecting legs to aprons (the rails connecting the legs just below the seat) and stretchers (horizontal supports between legs). A tenon (a projection on one piece) fits precisely into a mortise (a recess or hole) in another.
- Through Mortise and Tenon: The tenon passes completely through the mortise, allowing for decorative wedging or pinning.
- Blind Mortise and Tenon: The tenon does not pass through, creating a cleaner look, though potentially slightly less strong if not perfectly fitted.
- Haunched Mortise and Tenon: A shoulder on the tenon adds strength and prevents twisting.
Pro Tip: When cutting mortises, a mortising machine or a router with a guide can achieve high precision. For tenons, a table saw with a tenoning jig or a bandsaw followed by hand-planing works well.
Bridle Joints: Similar to mortise and tenon but with an open mortise, offering strong corner connections, particularly suitable for top rails or where a clean, exposed joint is desired. The mating piece (the tenon) has two shoulders that fit around the mortised piece.
Dowel Joints: While simpler to execute, dowel joints can be effective for stretchers or less stressed connections if properly aligned and glued. They rely heavily on precise drilling for alignment. For more on advanced joinery techniques, explore articles like “Mastering Dovetail Joints with Hand Tools: A Step-by-Step Guide for Flawless Wood Joinery” and “Beyond the Basic Box: Advanced Joinery for Unique Wooden Gift Boxes” for foundational knowledge applicable to many woodworking projects.
Designing Leg Angles and Stretcher Layouts
The angles of the legs and the placement of stretchers are not just aesthetic choices; they significantly impact the stool’s stability and strength.
- Leg Splay: A slight outward angle (splay) in the legs, typically 5-10 degrees, increases the stool’s footprint and thus its stability, preventing tipping. This angle must be consistent on all legs for a balanced look and feel.
- Stretcher Placement: Stretchers reinforce the leg-to-apron joints and provide a crucial footrest.
- Lower Stretchers: Place these closer to the floor for maximum stability and visual balance.
- Footrest Stretcher: This is the most critical stretcher. Its height must be ergonomically correct (see the comfort section below). Ensure it is robust, as it will bear significant weight and wear. Consider adding a wear strip of harder wood or a metal plate to the top surface of the footrest stretcher for durability.
Remember that wood movement is a factor in all furniture construction. Understanding “Understanding Wood Movement: How to Design and Build Furniture That Lasts Through Seasonal Changes” will help you account for seasonal expansion and contraction, preventing cracks or joint failures.
Prioritizing Comfort and Ergonomics in Your Bar Stool Design
A custom bar stool isn’t truly successful unless it’s comfortable. When Building Custom Bar Stools from Scratch: Joinery, Comfort, and Height Standards Explained, integrating ergonomic principles from the outset ensures a pleasant user experience.
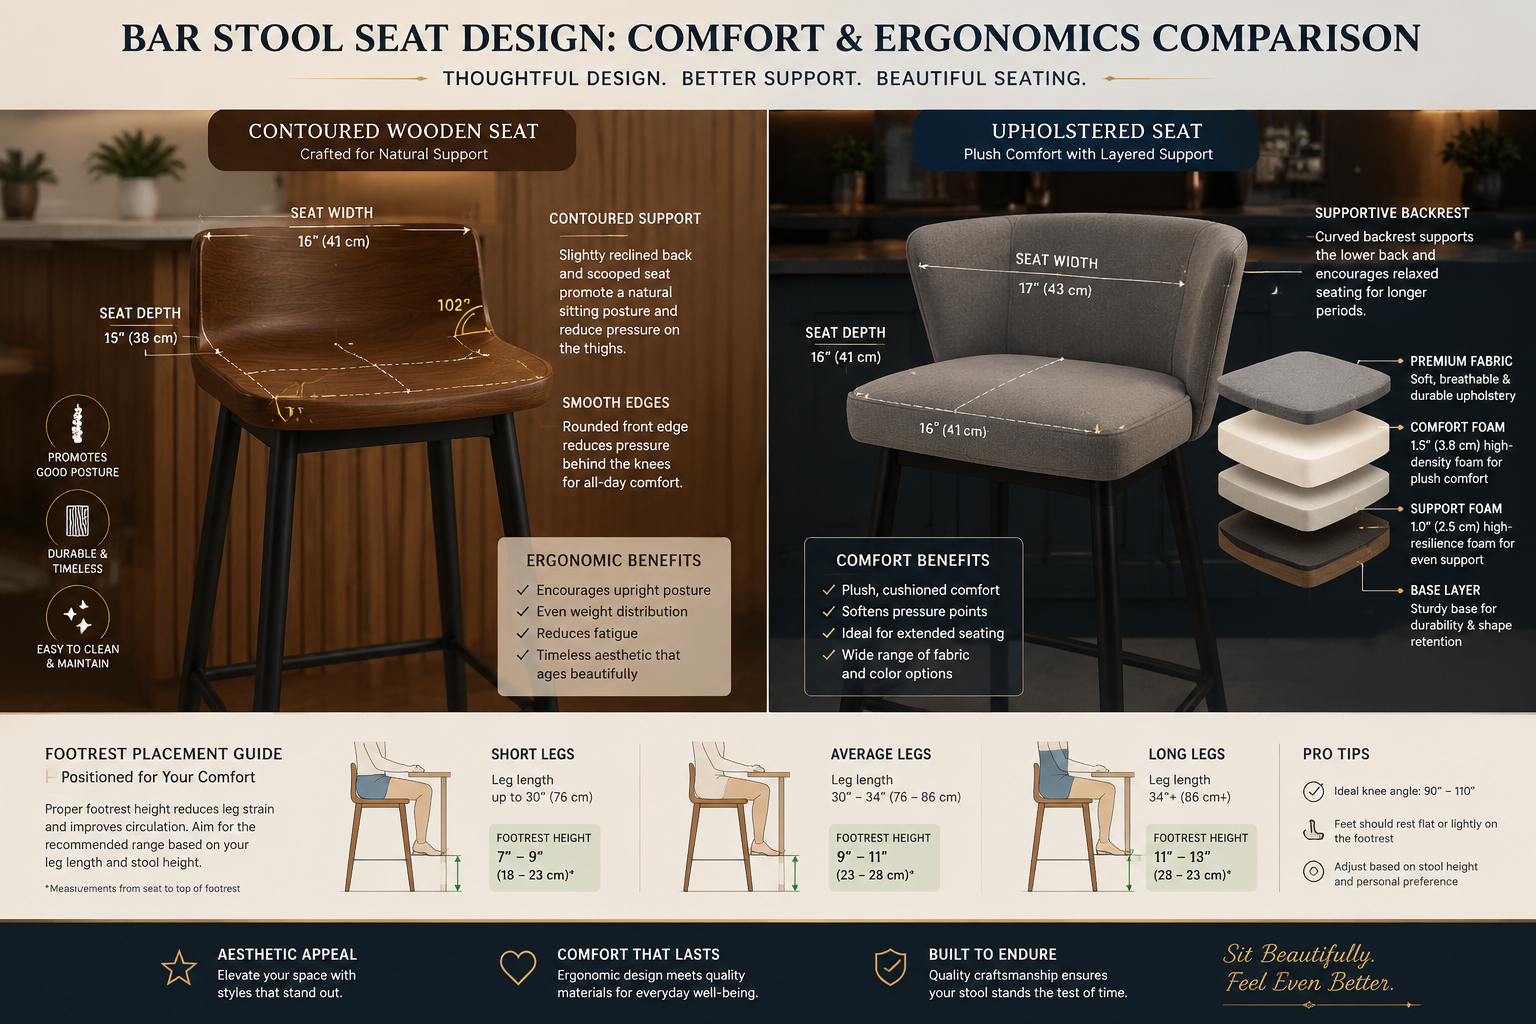
Seat Design: Wood-Only vs. Upholstered
The choice between a wood-only or upholstered seat depends on aesthetic preference, desired comfort level, and the time you’re willing to spend.
Wood-Only Seats:
- Contouring: Even solid wood seats can be made comfortable through careful contouring. A slight dish or saddle shape prevents pressure points and cradles the user. This can be achieved with a carving gouge, an angle grinder with a shaping disc, or a router jig.
- Edge Treatment: Softening the edges with a slight round-over or chamfer greatly improves comfort, especially on the front edge where legs rest.
- Material: Choose a wood that is stable and resists denting, such as oak, maple, or walnut.
Upholstered Seats:
- Foam Density: Use high-density foam (e.g., 2.2-2.5 lb/cu ft) for the base layer to prevent sagging over time. A softer, thinner layer of foam or Dacron wrap on top can add extra plushness.
- Fabric Durability: Select an upholstery fabric that is durable and easy to clean, especially for kitchen or bar environments. Marine vinyls or commercial-grade fabrics are excellent choices.
- Support: Ensure the seat base (typically plywood) is thick enough (¾-inch minimum) and well-supported by the stool’s apron to prevent flex.
Ergonomic Considerations for Optimal Seating
Beyond the seat itself, several factors contribute to overall comfort.
- Seat Depth: An ideal seat depth is typically 15-17 inches. This allows most users to sit back fully without the front edge digging into the backs of their knees.
- Seat Width: Aim for at least 16-18 inches in width to provide ample space without feeling cramped. Wider seats (20+ inches) can be built for specific preferences or for a more generous feel.
- Backrest (if applicable): If including a backrest, ensure it provides lumbar support. The angle should be slightly reclined (5-10 degrees from vertical) for comfort, and the height should support the lower to mid-back.
- Footrest Placement: This is crucial. The footrest should allow the user’s knees to form roughly a 90-degree angle, preventing dangling feet or excessive knee bend. A general rule is to place the footrest approximately 18-20 inches below the top of the seat.
Pull Quote: “A truly custom bar stool doesn’t just fit the counter; it fits the user, cradling them in comfort for extended conversations and meals.”
For workshops, creating ergonomic furniture is also essential. Check out “Creating Ergonomic Workshop Furniture: Building Custom Workbenches” for ideas on building supportive seating that prevents strain.
Understanding Height Standards and Customizing for Your Space
The most common pitfall in bar stool design is incorrect height. When Building Custom Bar Stools from Scratch: Joinery, Comfort, and Height Standards Explained, precise measurement is non-negotiable.
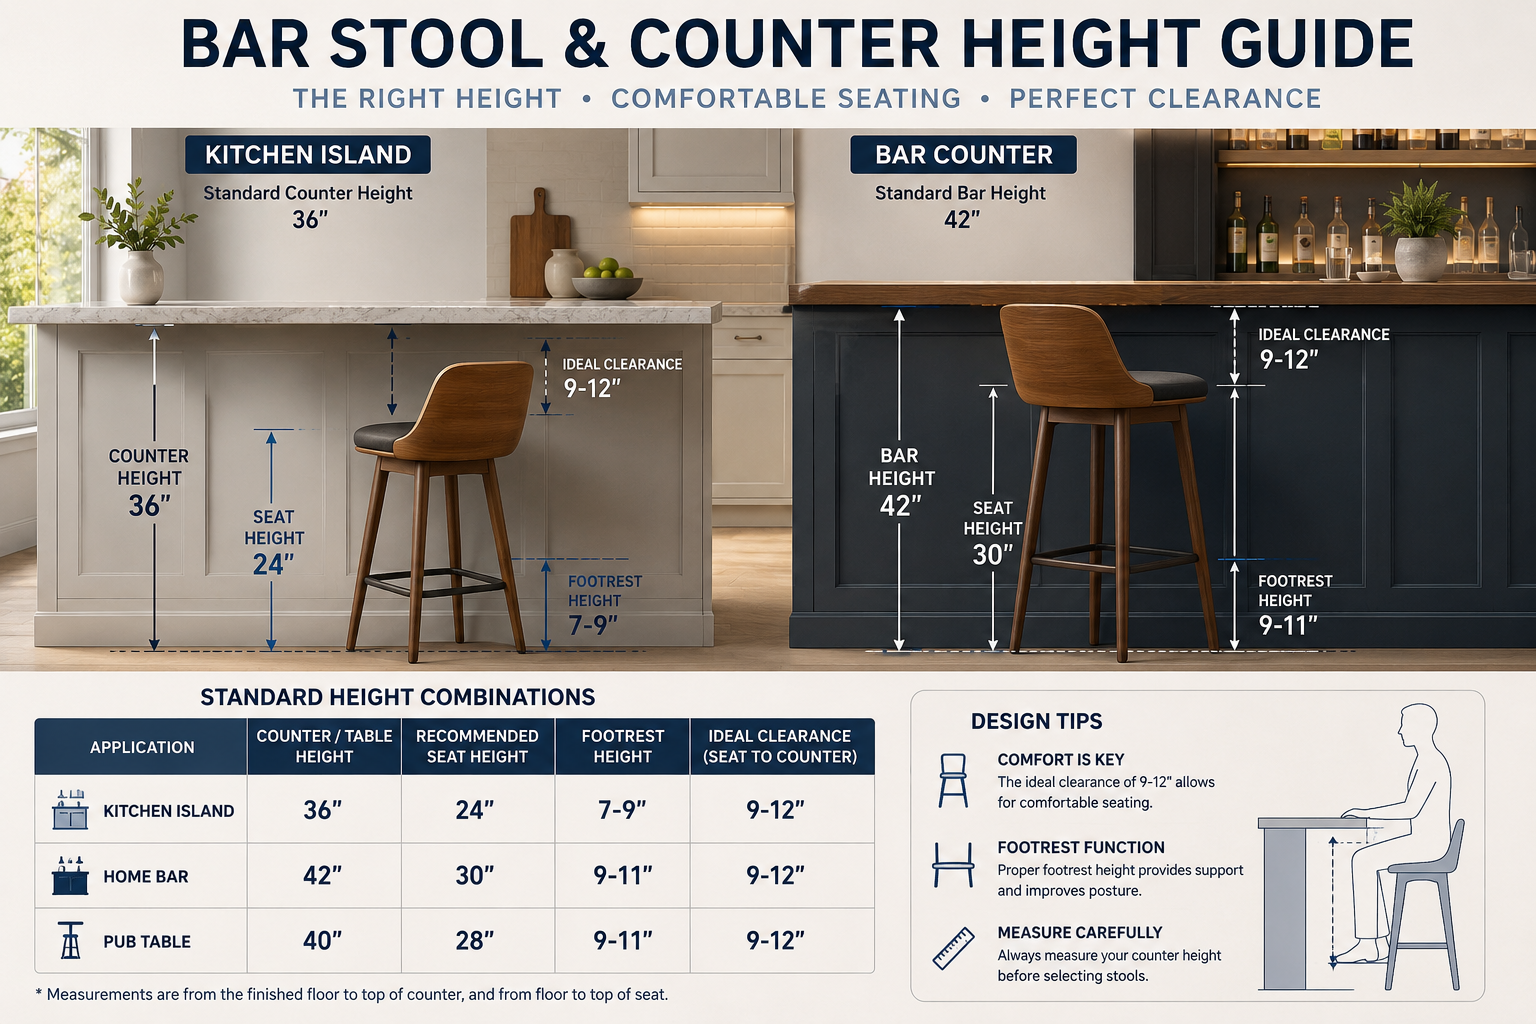
Standard Bar Stool Heights
Before cutting any wood, measure your counter or bar precisely. The critical measurement is the distance from the floor to the underside of the countertop.
Here are general guidelines for standard seating heights:
| Counter Type | Counter Height (inches) | Recommended Seat Height (inches) | Ideal Seat-to-Counter Gap (inches) |
|---|---|---|---|
| Kitchen Island | 35-37 | 24-26 (Counter Stool) | 9-11 |
| Standard Bar | 41-43 | 29-31 (Bar Stool) | 10-12 |
| Pub Table | 44-47 | 32-34 (Extra Tall Bar Stool) | 10-13 |
The “Ideal Seat-to-Counter Gap” is the most critical factor. This gap allows comfortable legroom. Aim for 9-13 inches between the top of the bar stool seat and the underside of the countertop. Any less, and knees will be cramped; any more, and users will feel too low.
Customizing for Unique Spaces
Not all spaces adhere to standard measurements. This is where the true value of Building Custom Bar Stools from Scratch: Joinery, Comfort, and Height Standards Explained shines.

- Measure Your Own Counter: Always measure your specific counter’s height from the floor to the top surface. Then, subtract the ideal seat-to-counter gap (e.g., 10 inches) to determine your target seat height.
- Consider User Height: If the stools are primarily for one or two specific individuals, measure their preferred seating height. Have them sit comfortably in a standard chair and measure from the floor to their seated knee height, then adjust for the counter.
- Adjust Footrest Accordingly: Once the seat height is determined, the footrest height should be about 18-20 inches below the seat. This maintains the ergonomic 90-degree knee bend. If the stool is particularly tall, consider multiple footrest options or a wider footrest area.
- Materials and Finish: The choice of wood and finish should complement your existing décor. Hardwoods like oak, maple, cherry, or walnut offer durability and beauty. For finishing, consider options like “Weathered Wood Finishing Techniques” or “Natural Wood Finishing Techniques” to match your home’s aesthetic.
Conclusion
Building Custom Bar Stools from Scratch: Joinery, Comfort, and Height Standards Explained offers an incredibly rewarding project for any woodworker. By meticulously planning your joinery, carefully considering ergonomic principles, and precisely measuring for the perfect height, you can create pieces that are not only structurally sound and visually appealing but also exceptionally comfortable. These custom stools will serve as functional art in your home for years to come, tailored precisely to your needs and preferences. Embrace the challenge, enjoy the process, and take pride in crafting furniture that truly fits.
Actionable Next Steps:
- Measure Your Counter: Get the exact height of your bar or kitchen island.
- Sketch a Design: Draw out your bar stool, incorporating desired leg splay, stretcher locations, and seat style.
- Choose Your Joinery: Select the most appropriate joinery for strength and skill level.
- Source Materials: Select quality lumber and any upholstery materials.
- Build a Prototype: Consider a scaled-down model or a single stool to test your design and measurements before committing to a full set.
SEO Meta Title: Build Custom Bar Stools: Joinery, Comfort & Height Guide SEO Meta Description: Learn building custom bar stools from scratch. Master joinery, ergonomic comfort, and precise height standards for perfect home bar seating in 2026.
