
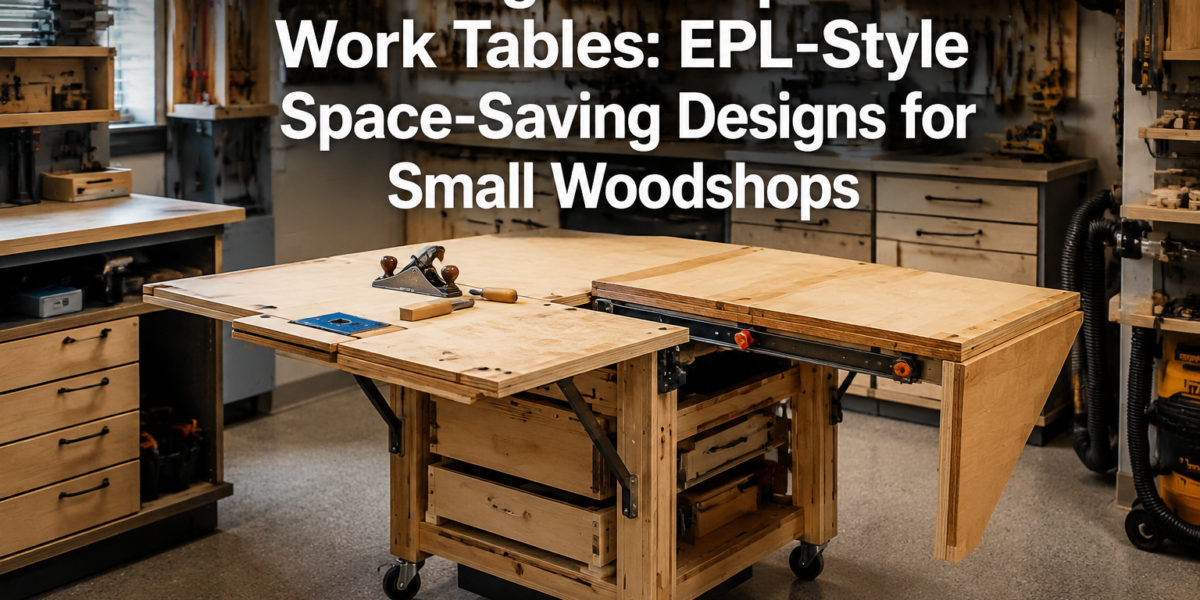

In small woodshops, every square foot is a premium, often dictating the scope and scale of projects a woodworker can undertake. However, the advent of clever, space-saving solutions like DIY Folding and Expandable Work Tables, particularly those inspired by EPL-style designs, has revolutionized how enthusiasts and professionals alike utilize their limited workshop real estate. This article breaks down the mechanisms behind these ingenious tables and provides a comprehensive guide to building a folding work table that extends effortlessly for assembly or routing and tucks away discreetly afterward, ensuring your small shop feels much larger than it is.
Key Takeaways
- Space Optimization: EPL-style designs are crucial for small woodshops, transforming minimal footprint into substantial workspace.
- Mechanism Focus: Understanding folding, sliding, and pivoting hardware is key to successful expandable table construction.
- Versatility: These tables can serve multiple functions, from assembly and routing to general workbench tasks.
- DIY Empowerment: Building your own allows for customization to specific workshop dimensions and needs.
- Enhanced Productivity: A well-designed, easily deployable workspace reduces setup time and improves workflow.
Understanding EPL-Style and Other Expandable Table Mechanisms
The core genius of a DIY Folding and Expandable Work Table: EPL-Style Space-Saving Designs for Small Woodshops lies in its mechanism. “EPL-style” often refers to a common type of European-influenced design where a central tabletop panel remains fixed, and one or more additional panels (leaves) slide out from underneath or pivot upwards to extend the work surface. This design is highly efficient because it minimizes the footprint when collapsed, yet offers a robust, full-sized work area when expanded.

There are several variations of expandable table mechanisms, each with its own advantages for different applications and shop sizes.
Common Expandable Table Mechanisms
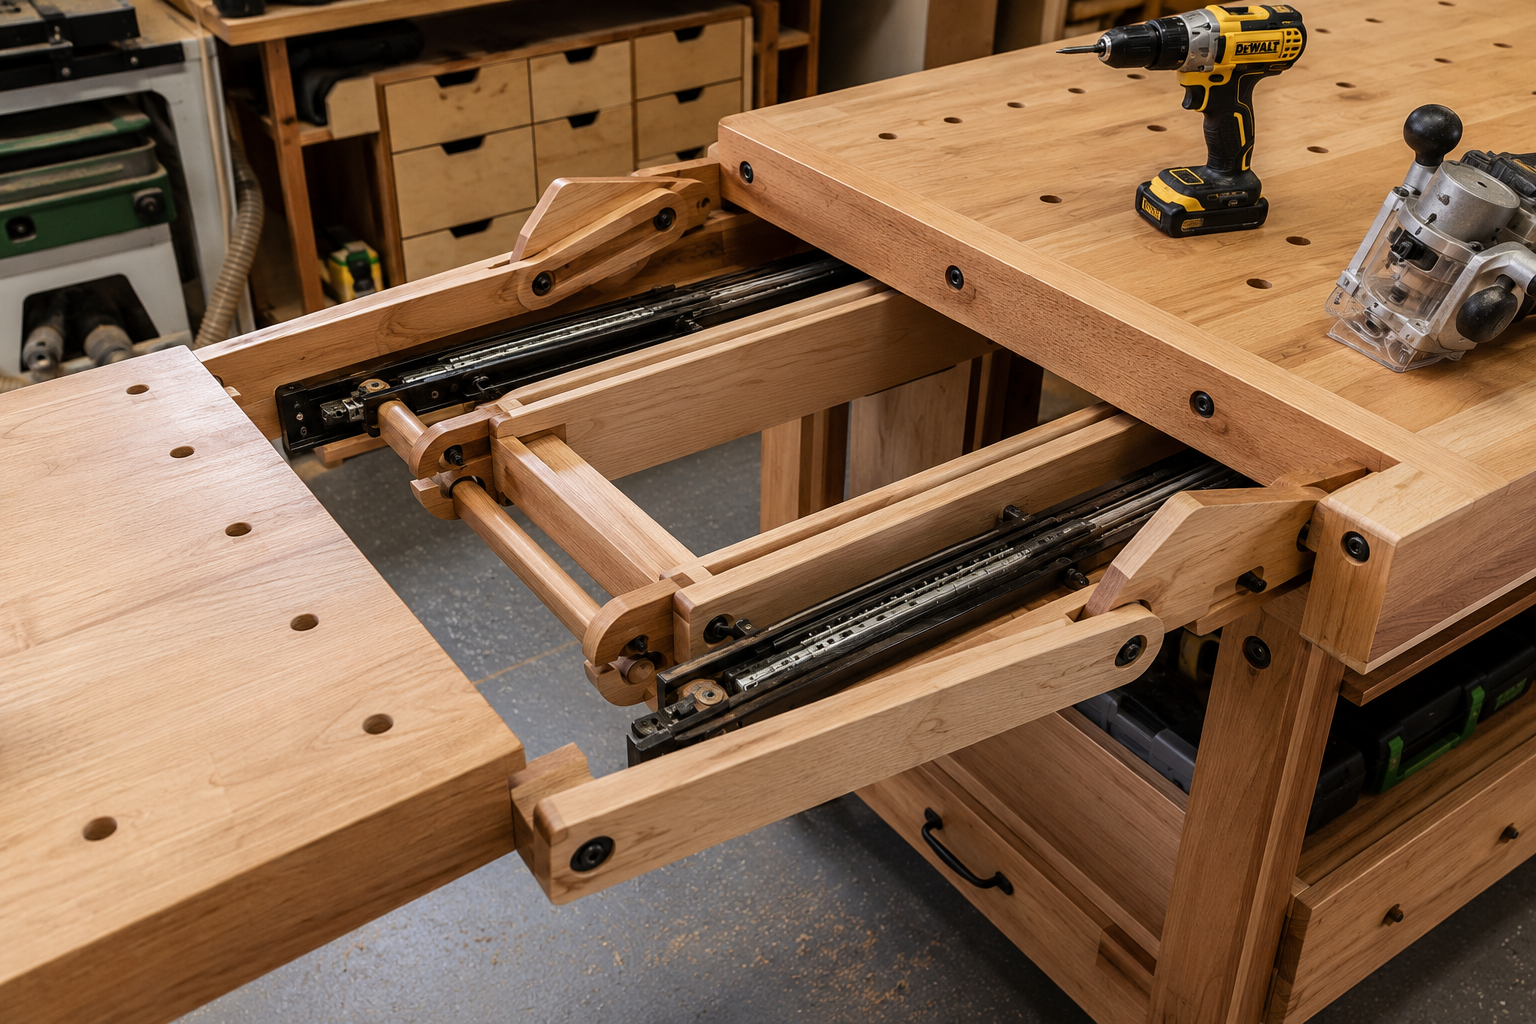
Sliding Leaf Systems (EPL-style):
- Description: The most prevalent type for workbenches. Leaves are stored beneath the main table and slide out on rails or channels, sometimes requiring a central split in the main table to accommodate them. Once extended, the leaves are often supported by pull-out arms or swing-out legs, and sometimes by the main table itself via interlocking mechanisms.
- Advantages: Offers a very sturdy expanded surface, often flush with the main table. Excellent for routing, assembly, and larger projects.
- Considerations: Requires precise joinery and hardware installation to ensure smooth operation and stability.
- Application: Ideal for a permanent, albeit foldable, workbench solution.
Drop-Leaf Systems:
- Description: Leaves are attached to the sides of the main table with hinges and are supported by swing-out arms, folding legs, or a gate-leg mechanism when raised.
- Advantages: Simpler construction, often requiring less complex hardware. Good for quick extensions.
- Considerations: The hinged connection can sometimes create a seam that is not perfectly flush, and the support arms/legs need to be robust.
- Application: Suitable for secondary workspaces, outfeed tables, or temporary setups.
Accordion/Scissor Lift Systems:
- Description: These involve a complex series of interconnected levers that allow the table to expand in both length and width, or to rise in height.
- Advantages: Highly versatile in terms of expansion and often height adjustability.
- Considerations: Much more complex to design and build, usually requiring specialized hardware or metal fabrication skills.
- Application: More common in industrial settings or specialized commercial tables, less so for DIY woodshop workbenches due to complexity.
Nested/Storable Table Systems:
- Description: Not truly expandable, but a clever space-saving technique where smaller tables or modules fit neatly under a larger one, or into a dedicated storage slot.
- Advantages: Simple to implement, no complex mechanisms required.
- Considerations: Each “leaf” is a separate table, potentially requiring individual setup.
- Application: Good for modular workshop configurations, where different stations can be pulled out as needed.
For those building a custom work surface, understanding these mechanisms is crucial. The choice influences the complexity of the build, the required materials, and the final stability and functionality of your DIY Folding and Expandable Work Tables: EPL-Style Space-Saving Designs for Small Woodshops. When planning your design, consider how much force the table will endure and the tools it will support. A router table extension, for instance, demands a very stable and flat surface.
Designing Your DIY Folding and Expandable Work Tables: EPL-Style Space-Saving Designs for Small Woodshops

Creating effective DIY Folding and Expandable Work Tables: EPL-Style Space-Saving Designs for Small Woodshops requires thoughtful design. The goal is to maximize functionality when deployed and minimize intrusion when stowed. Start by assessing your available space and identifying critical dimensions. Consider the existing footprint of your small woodshop. For ideas on optimizing small spaces, explore concepts like building a compact and ergonomic workbench for small workshops.
Key Design Considerations
Size and Footprint:
- Collapsed: How small can it be? Can it fold against a wall or slide under another workbench?
- Expanded: How much work surface do you truly need? Consider the largest pieces you typically work on.
- Height: Ensure it matches your ergonomic requirements, especially if it’s for routing or intricate assembly. For guidance on ergonomic setups, see creating ergonomic workshop furniture.
Material Selection:
- Top Surface: Plywood (Baltic birch for durability), MDF for flatness (if sealing it), or solid wood for a premium feel. Plywood is often the most cost-effective and stable choice.
- Frame/Legs: Sturdy hardwoods (oak, maple) or construction-grade lumber (pine, fir) for the frame and legs.
- Hardware: Heavy-duty hinges, drawer slides, and locking mechanisms are crucial for stability and longevity. Don’t skimp on quality here.
Stability and Support:
- Legs: Robust legs are non-negotiable. Consider folding legs with positive locking mechanisms or integrated, sturdy pull-out supports.
- Frame: A strong sub-frame prevents racking and ensures the table can handle clamping pressure and tool vibrations.
- Leveling: Adjustable feet can compensate for uneven floors, a common issue in many workshops.
Versatility Features:
- Dog Holes: Integrate dog holes into the tabletop for clamping workpieces. Learn more about T-track vs. dog holes for workbench essentials.
- T-Tracks: Useful for jigs, clamps, and router fence systems.
- Integrated Storage: Small drawers or shelves can be incorporated into the fixed section of the table or its base for storing frequently used tools or accessories.
- Portability: If your “small woodshop” is truly multi-purpose (e.g., a garage shared with a car), consider heavy-duty locking casters for easy repositioning.
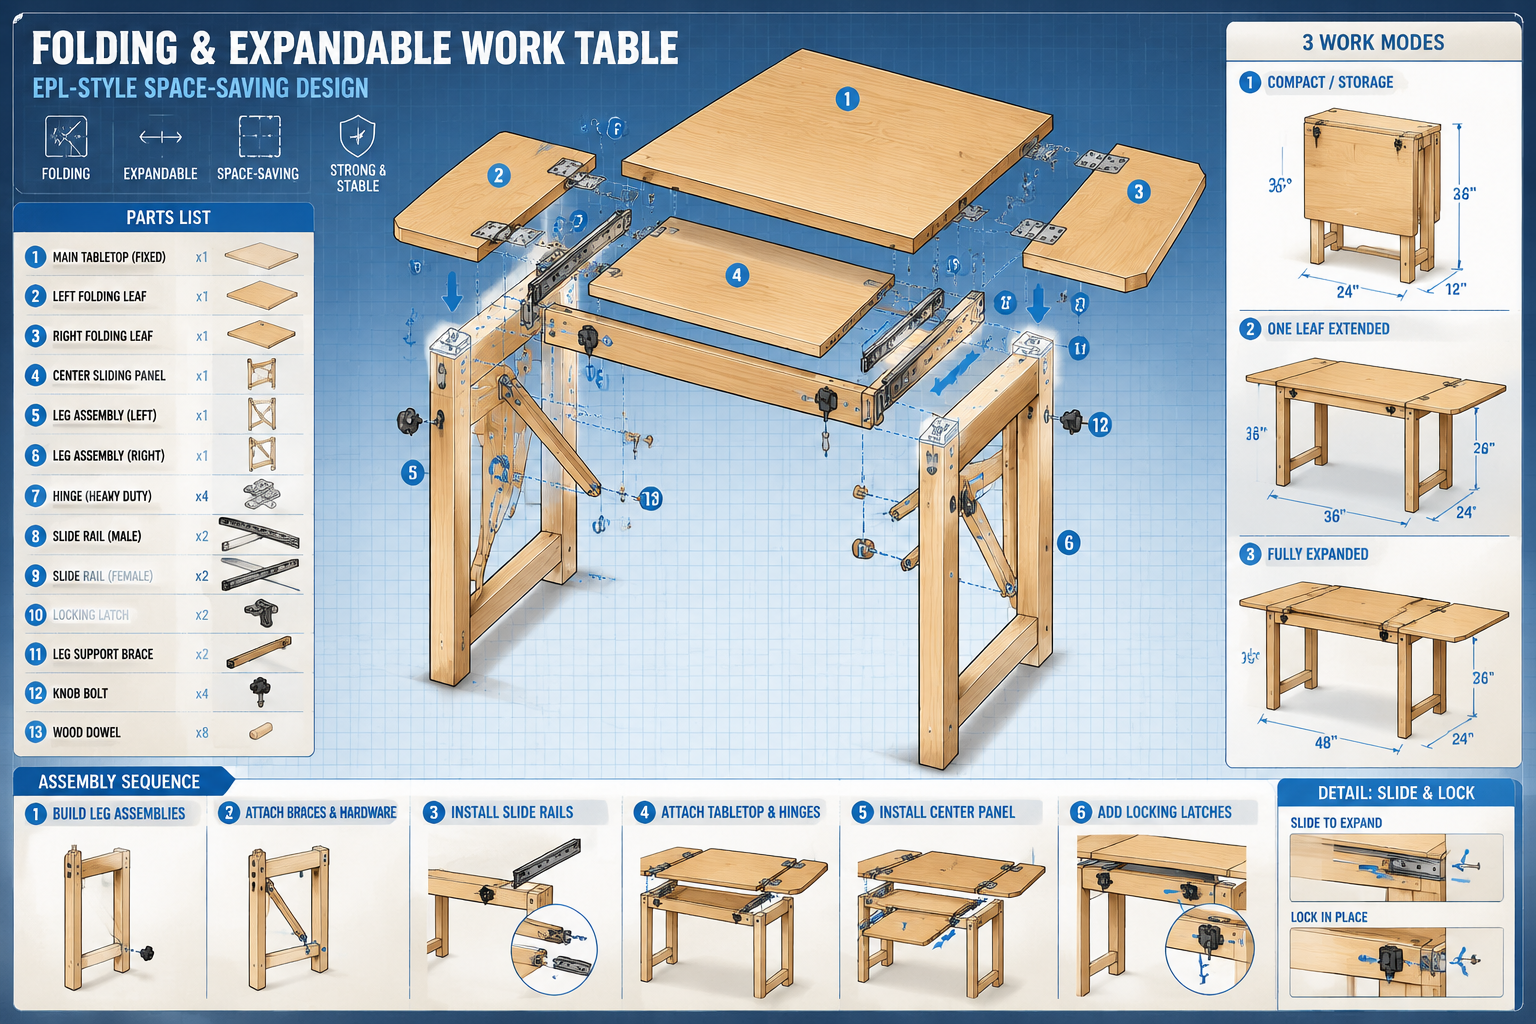
Example EPL-Style Design Concept
Imagine a core workbench section, approximately 24×48 inches, fixed to a wall or part of a larger cabinet. On either side, or just one, a leaf slides out using robust full-extension drawer slides, possibly with additional pivoting support arms that swing out from the underside of the main table. When fully extended, the total surface could reach 24×96 inches, offering ample space for large panel glue-ups or long stock routing. The expanded leaves would rest flush with the main table, creating a seamless surface.
- Step 1: Build the Core Frame. Construct a rigid frame for the main tabletop using 2x4s or 2x6s, ensuring it’s square and level.
- Step 2: Install the Main Top. Attach a high-quality plywood top (e.g., 3/4-inch Baltic birch) to the core frame.
- Step 3: Design and Fabricate Sliding Leaves. Cut additional plywood pieces for the expandable leaves. These should be slightly narrower than the main tabletop to allow for the sliding mechanism.
- Step 4: Install Sliding Hardware. Mount heavy-duty full-extension drawer slides to the underside of the main table and the edges of the leaves. Ensure they can handle the weight when extended.
- Step 5: Add Support Mechanisms. For stability, incorporate pivoting support arms that lock into place when the leaves are extended. These can be made from sturdy timber and secured with robust hinges and latch mechanisms.
- Step 6: Finish and Customize. Sand all surfaces smooth, apply a durable finish to protect against spills and wear, and add optional features like dog holes, T-tracks, or tool holders.
Construction Techniques and Best Practices
Building your DIY Folding and Expandable Work Tables: EPL-Style Space-Saving Designs for Small Woodshops is a rewarding project that significantly enhances your workshop’s utility. Precision in measurement and execution is paramount for smooth operation and stability. Here, we’ll outline key construction techniques and best practices to ensure a successful build.
Essential Construction Techniques
Accurate Measurements and Cuts:
- Measure Twice, Cut Once: This adage is especially true for expandable tables where clearances for sliding parts are tight.
- Precision Tools: Use a high-quality table saw or track saw for perfectly straight and square cuts on your plywood or lumber.
- Test Fits: Dry fit components before permanent assembly, particularly for sliding mechanisms, to check for smooth movement and alignment.
Robust Joinery:
- Frame Construction: For the main frame and legs, use strong joinery methods. Mortise and tenon, dowel joints, or robust pocket hole joinery with wood glue and screws are excellent choices. Avoid butt joints relying solely on screws, as they lack strength. Refer to our beginner’s guide to essential woodworking joints for more details.
- Tabletop Attachment: Secure the main tabletop to its frame using screws driven from underneath, allowing for seasonal wood movement if using solid wood. Plywood tops can be glued and screwed.
Hardware Installation:
- Heavy-Duty Slides: For EPL-style designs, invest in high-quality, heavy-duty full-extension drawer slides. Ensure they are rated for the anticipated weight of your workpieces and tools. Follow manufacturer instructions meticulously for mounting.
- Sturdy Hinges: For drop-leaf designs, use robust piano hinges or multiple heavy-gauge butt hinges to prevent sag and ensure smooth folding.
- Locking Mechanisms: Incorporate positive locking mechanisms for extended leaves and folding legs. Barrel bolts, heavy-duty latches, or custom-made wooden stops can prevent accidental collapse.
Best Practices for Longevity and Functionality
Material Preparation:
- Acclimate Wood: Allow plywood and solid lumber to acclimate to your workshop environment for a few days before cutting to minimize warping after assembly.
- Seal MDF: If using MDF for a tabletop, seal all edges and faces with a primer or paint to prevent moisture absorption and swelling.
Reinforcement and Stability:
- Cross-Bracing: Add diagonal cross-bracing to the leg assemblies or frame to prevent racking and enhance overall stability.
- Leg Design: Ensure legs are thick enough and designed to transfer weight effectively to the floor, even when the table is fully loaded.
- Adjustable Feet: Install adjustable leveling feet to ensure a perfectly flat work surface, which is critical for precision tasks like routing or planning.
Smooth Operation:
- Clearances: Maintain precise clearances around sliding parts. Too tight, and they bind; too loose, and they wobble. A tolerance of 1/32″ to 1/16″ is often appropriate.
- Lubrication: Use dry lubricant (like paraffin wax or specialized dry film lubricants) on wooden sliding surfaces and on drawer slides as recommended by the manufacturer to ensure smooth, effortless extension and retraction.
Finishing:
- Durable Finish: Apply a hard-wearing finish to the tabletop, such as polyurethane, epoxy, or a hardwax oil. This protects against scratches, spills, and makes cleanup easier. For inspiration on finishes, refer to articles like maple wood finishing techniques.
- Edge Banding: Consider applying edge banding to plywood edges for a more finished look and to protect the plies from damage.
By adhering to these construction techniques and best practices, you can build a highly functional, durable, and space-saving work table that will be a valuable asset to your small woodshop for years to come. Such a project not only enhances your working environment but also builds your woodworking skills.
Conclusion
The pursuit of an efficient, well-organized woodshop is a continuous journey, and DIY Folding and Expandable Work Tables: EPL-Style Space-Saving Designs for Small Woodshops stand as a testament to intelligent design meeting practical need. By understanding the various mechanisms and carefully planning your build, you can transform a cramped workspace into a versatile powerhouse. These tables offer the invaluable flexibility to expand for large projects and shrink for easy storage, allowing woodworkers to tackle ambitious endeavors without the constraints of limited space.
Building your own expandable workbench is more than just a functional upgrade; it’s an opportunity to hone your joinery skills, experiment with hardware, and create a truly custom piece that perfectly suits your workflow. The investment in robust materials and precise construction techniques will pay dividends in stability, durability, and daily satisfaction. As you embark on this project in 2026, remember that a well-designed work surface is the foundation of every successful woodworking venture.
Actionable Next Steps:
- Assess Your Space: Measure your workshop thoroughly, noting available wall space, existing machinery, and desired traffic flow.
- Choose Your Mechanism: Based on your space and intended use, select the most appropriate expandable table mechanism (e.g., EPL-style sliding leaves, drop-leaf).
- Sketch and Plan: Draw detailed plans, including dimensions, material lists, and hardware specifications. Consider integrating features like dog holes or T-tracks.
- Source Quality Materials: Invest in high-grade plywood, sturdy lumber, and heavy-duty hardware to ensure longevity and stability.
- Build with Precision: Follow best practices for cutting, joinery, and hardware installation to guarantee a functional and durable table.
Meta Title: DIY Folding & Expandable Work Tables: Space-Saving Woodshop Designs Meta Description: Build your own DIY folding and expandable work table for a small woodshop using EPL-style designs. Maximize space, enhance efficiency, and learn key construction techniques for 2026.
