

Less than 20% of homeowners with garages or spare rooms fully optimize their space for hobbies and projects, often due to the perceived permanence and bulk of traditional workbenches. This common challenge can be overcome with a versatile solution: a DIY folding work table. Building your own space-saving workshop or craft table that stores flat offers an unparalleled advantage, transforming cramped areas into productive zones in minutes. This article guides you through constructing a robust, functional, and easily storable work surface, perfect for any small workshop, garage, or multi-purpose room.
Key Takeaways
- A DIY folding work table maximizes limited space, offering a full-sized work surface when needed and storing flat when not.
- The design emphasizes sturdy construction, incorporating locking legs for safety and stability during use.
- A replaceable tabletop extends the table’s lifespan and allows for customization based on project needs.
- Careful material selection, precise measurements, and proper joinery are crucial for durability and functionality.
- This project is suitable for intermediate woodworkers and can be adapted for various craft or workshop applications.
Planning Your DIY Folding Work Table: How to Build a Space-Saving Workshop or Craft Table that Stores Flat
Effective planning is the cornerstone of any successful woodworking project, especially when building a DIY folding work table that needs to be both sturdy and space-saving. This initial phase involves critical decisions about design, materials, and tools, ensuring your finished table meets specific needs for your workshop or craft area.

Design Considerations and Features
The core concept behind a folding work table is its ability to transition between a functional workbench and a compact, stored form. Key design elements include:
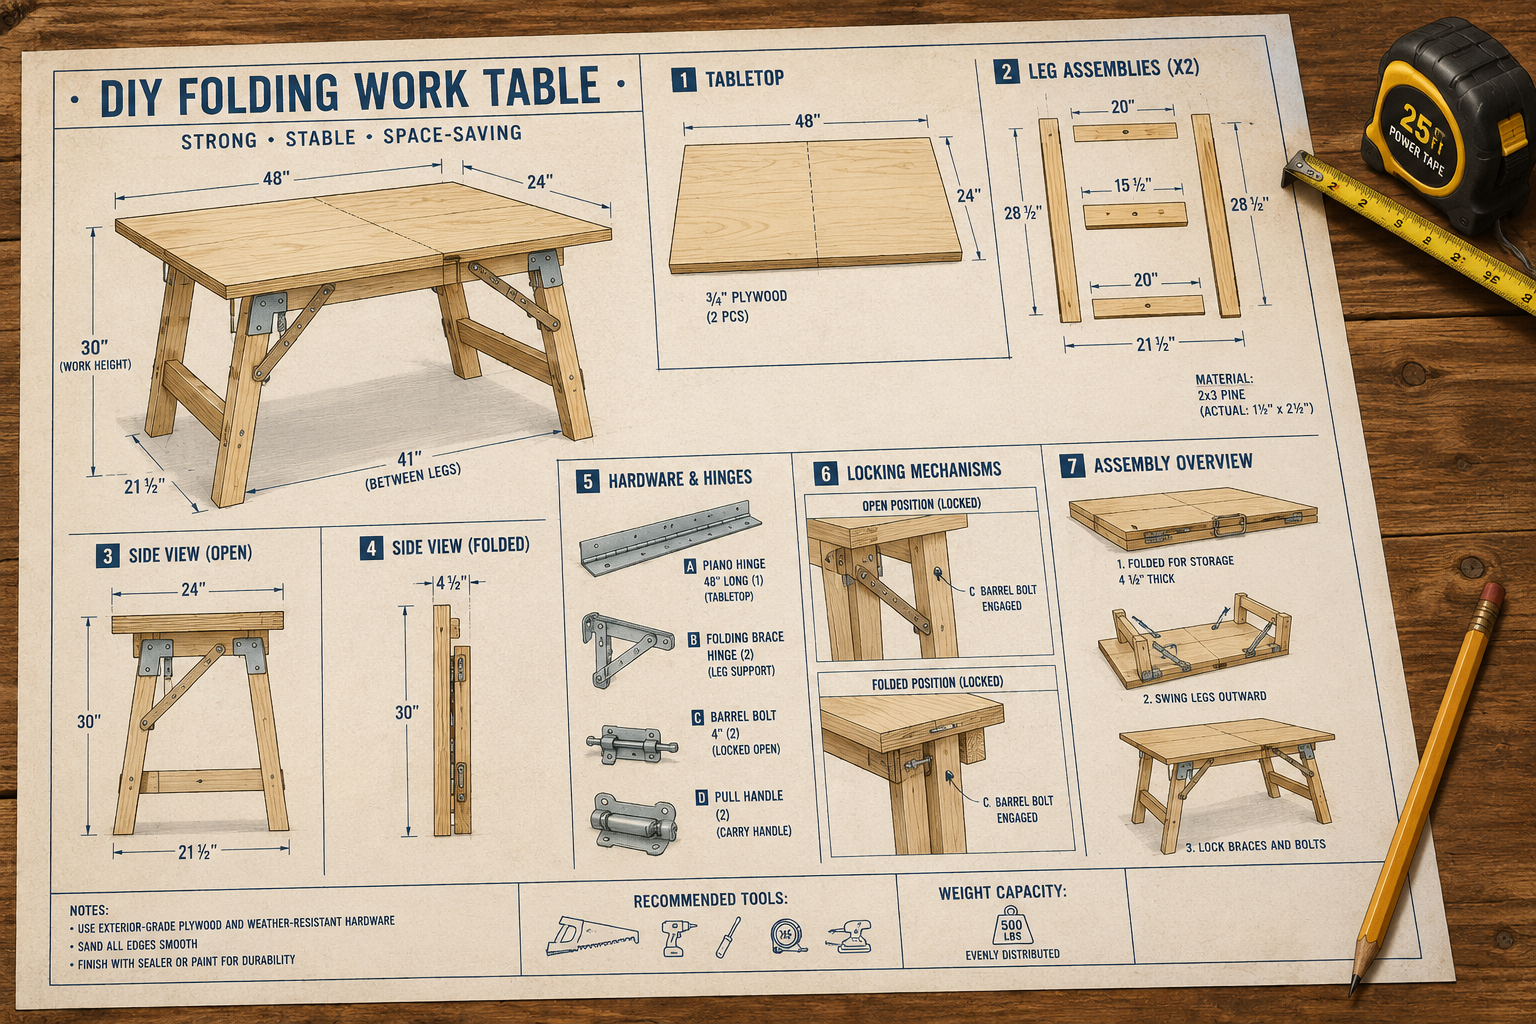
- Tabletop Size and Material: Consider the largest items you typically work with. A common size might be 24×48 inches or 30×60 inches. For the material, ¾-inch plywood is a cost-effective and durable choice. If you anticipate heavy wear, a replaceable top made from MDF or hardboard can be added over the plywood.
- Leg Mechanism: The legs must be able to fold flat against the underside of the tabletop. A robust hinge system is essential. Furthermore, a secure locking mechanism is paramount to prevent accidental collapse during use, ensuring safety. Common options include barrel bolts, toggle clamps, or simple brace-and-pin systems.
- Sturdiness and Stability: Despite being foldable, the table must provide a stable work surface. This requires thoughtful design of the leg bracing and connections. Cross-bracing or a wider stance can significantly improve stability.
- Storage Profile: The table should ideally fold to a minimal thickness, allowing it to be leaned against a wall, slid under a bed, or hung in a garage.
- Portability: While the focus is on storage, consider if you might need to move the table frequently. Casters can be added to one end, or handles for easier transport.
Material Selection for Your Folding Work Table
Choosing the right materials impacts both the table’s durability and its overall cost.
Table 1: Material Selection Guide
| Component | Recommended Material | Notes |
|---|---|---|
| Tabletop | ¾-inch Plywood (Birch or ACX) | Provides a rigid, flat surface. Birch offers a smoother finish, ACX is more economical. |
| Replaceable Top | ¼-inch Hardboard or MDF | Optional. Easily replaced if damaged by cutting, painting, or heavy use. Secure with screws or double-sided tape. |
| Legs | 2×4 Lumber (Pine or Douglas Fir) | Sturdy and readily available. Ensure pieces are straight and free of large knots. |
| Leg Bracing | 1×4 or 1×6 Lumber | Provides lateral stability to the leg assemblies. |
| Hinges | Heavy-duty Barrel Hinges or Piano Hinge | Must withstand repeated folding and support the weight. Barrel hinges offer strength, piano hinge provides continuous support. |
| Locking Mechanism | Barrel Bolts, Toggle Clamps, or Gate Latch | Essential for safety. Choose a mechanism that is easy to operate but secure when engaged. |
| Fasteners | Wood Screws (e.g., 2-inch, 1¼-inch) | Predominantly use wood screws. Consider specific sizes for hinges and locking hardware. Predrill to prevent splitting. |
| Adhesive | Wood Glue (e.g., Titebond II) | For all structural joints to enhance strength. |
| Finish | Polyurethane, Varnish, or Paint | Protects the wood from moisture and wear. A matte finish can reduce glare. |
For sourcing quality wood, consider local lumberyards, which often have better selection and pricing than big box stores. Learning about sourcing reclaimed and salvaged wood could also offer unique aesthetic and sustainable options.
Essential Tools
A well-equipped workshop simplifies the building process. For this DIY folding work table, you will need:
- Measuring and Marking: Tape measure, ruler, carpenter’s square, pencil.
- Cutting Tools: Circular saw, miter saw (for precise angle cuts on legs), jigsaw (for any curved cuts). A table saw can also be beneficial for ripping plywood and lumber accurately.
- Drilling: Cordless drill/driver, drill bits (pilot holes, counter-sinking), driver bits for screws.
- Clamping: Wood clamps of various sizes.
- Safety Gear: Safety glasses, hearing protection, dust mask.
- Finishing: Sandpaper (various grits), sanding block or orbital sander, paint brushes or rollers for finish application.
Prioritizing safety with essential woodworking jigs can also improve accuracy and efficiency throughout the build.
Step-by-Step Construction of Your DIY Folding Work Table: How to Build a Space-Saving Workshop or Craft Table that Stores Flat
With careful planning complete, the actual construction phase begins. This section details the steps to build a sturdy and reliable DIY folding work table, ensuring both functionality and the ability to store flat. Precision in cutting and assembly is key to a stable and durable piece.
Cutting and Preparing Components
Accuracy during the cutting phase is critical for proper assembly.
- Cut the Tabletop:
- Using your circular saw or table saw, cut your ¾-inch plywood to your desired dimensions (e.g., 30×60 inches).
- If using a replaceable top, cut the ¼-inch hardboard or MDF to the exact same dimensions.
- Cut the Leg Frame Components:
- From your 2×4 lumber, cut four identical pieces for the vertical legs. The length will determine the table’s height when open (e.g., 30 inches for a 36-inch tall table, accounting for the tabletop thickness).
- Cut two longer 2×4 pieces for the upper horizontal supports of the leg frames. These should be slightly shorter than the tabletop width to allow for folding.
- Cut two shorter 2×4 pieces for the lower horizontal supports of the leg frames. These will match the length of the upper supports.
- Cut four 1×4 or 1×6 pieces for the cross-bracing or diagonal supports within each leg frame. These provide rigidity.
- Prepare for Assembly:
- Sand all cut edges and surfaces to remove splinters and prepare for finishing. Start with 80-grit, then move to 120-grit, and finally 220-grit for a smooth finish.
- Lay out all components to ensure you have everything before beginning assembly.
Assembling the Leg Frames and Attaching Hinges
The leg frames are the structural backbone of your folding table. Building them square and strong is essential.
- Assemble the Leg Frames (Two Identical Units):
- Take two vertical 2×4 legs. Attach one longer 2×4 horizontal support to the top end and one shorter 2×4 horizontal support to the bottom end, forming a rectangular frame.
- Use wood glue on all mating surfaces and secure with 2-inch wood screws. Ensure the frame is square using your carpenter’s square.
- Install the 1×4 or 1×6 cross-bracing/diagonal supports within each frame for added rigidity. These can be attached with screws or pocket hole joinery for a cleaner look. Repeat for the second leg frame.
- Allow glue to dry completely before proceeding.
- Attach Hinges to Leg Frames:
- Lay one leg frame flat on your workbench, with the top horizontal support facing up.
- Position two heavy-duty barrel hinges (or a piano hinge) along the top edge of this horizontal support, ensuring they are evenly spaced and flush with the edge.
- Mark and pre-drill pilot holes for the hinge screws. Attach the hinges securely to the top edge of the leg frame.
- Repeat this process for the second leg frame.
- Attach Hinged Leg Frames to Tabletop:
- Flip your tabletop upside down on a clean, protected surface.
- Position one hinged leg frame on the underside of the tabletop, aligning the hinges with the desired edge (e.g., 2-3 inches in from the long edge). Ensure the legs will fold inwards without obstruction.
- Mark and pre-drill pilot holes for the hinge screws into the tabletop.
- Securely attach the hinges to the tabletop.
- Repeat for the second hinged leg frame on the opposite side of the tabletop. Test the folding action to ensure smooth movement.
Installing Locking Mechanisms and Finishing
The locking mechanism is crucial for safety, and a good finish protects your investment.
- Install the Locking Mechanism:
- With the table in its open, upright position, identify the points where the legs can be securely locked.
- Consider using barrel bolts installed on the inside of the leg frames, extending into pre-drilled holes on the underside of the tabletop.
- Alternatively, toggle clamps can be mounted on the leg frames to grip the tabletop, or a simple gate latch can connect the leg frames to the tabletop structure.
- Ensure the chosen mechanism is easy to engage and disengage, but provides a firm, wobble-free lock when the table is in use. Test thoroughly for stability.
- For enhanced stability, you might consider adding folding support braces that swing out and lock into place, similar to those found on camping tables, though this adds complexity to the “stores flat” requirement.
- Add the Replaceable Top (Optional):
- If using, place the ¼-inch hardboard or MDF on top of the ¾-inch plywood tabletop.
- Secure it with small wood screws around the perimeter, or use double-sided tape for easier replacement. Keep screw heads flush or slightly recessed.
- Apply Finish:
- Ensure all surfaces are clean and dust-free.
- Apply your chosen finish (polyurethane, varnish, or paint) according to manufacturer instructions. For a workbench, a durable clear coat like polyurethane offers excellent protection against spills and abrasion.
- Apply multiple thin coats, sanding lightly with fine-grit sandpaper (e.g., 220-grit) between coats for a smooth, even finish.
- Allow ample drying time between coats and before heavy use.

Once complete, your DIY folding work table is ready to serve as a versatile workstation. This table can complement other projects like building ergonomic workshop furniture or serve as a base for profitable woodworking projects for beginners.
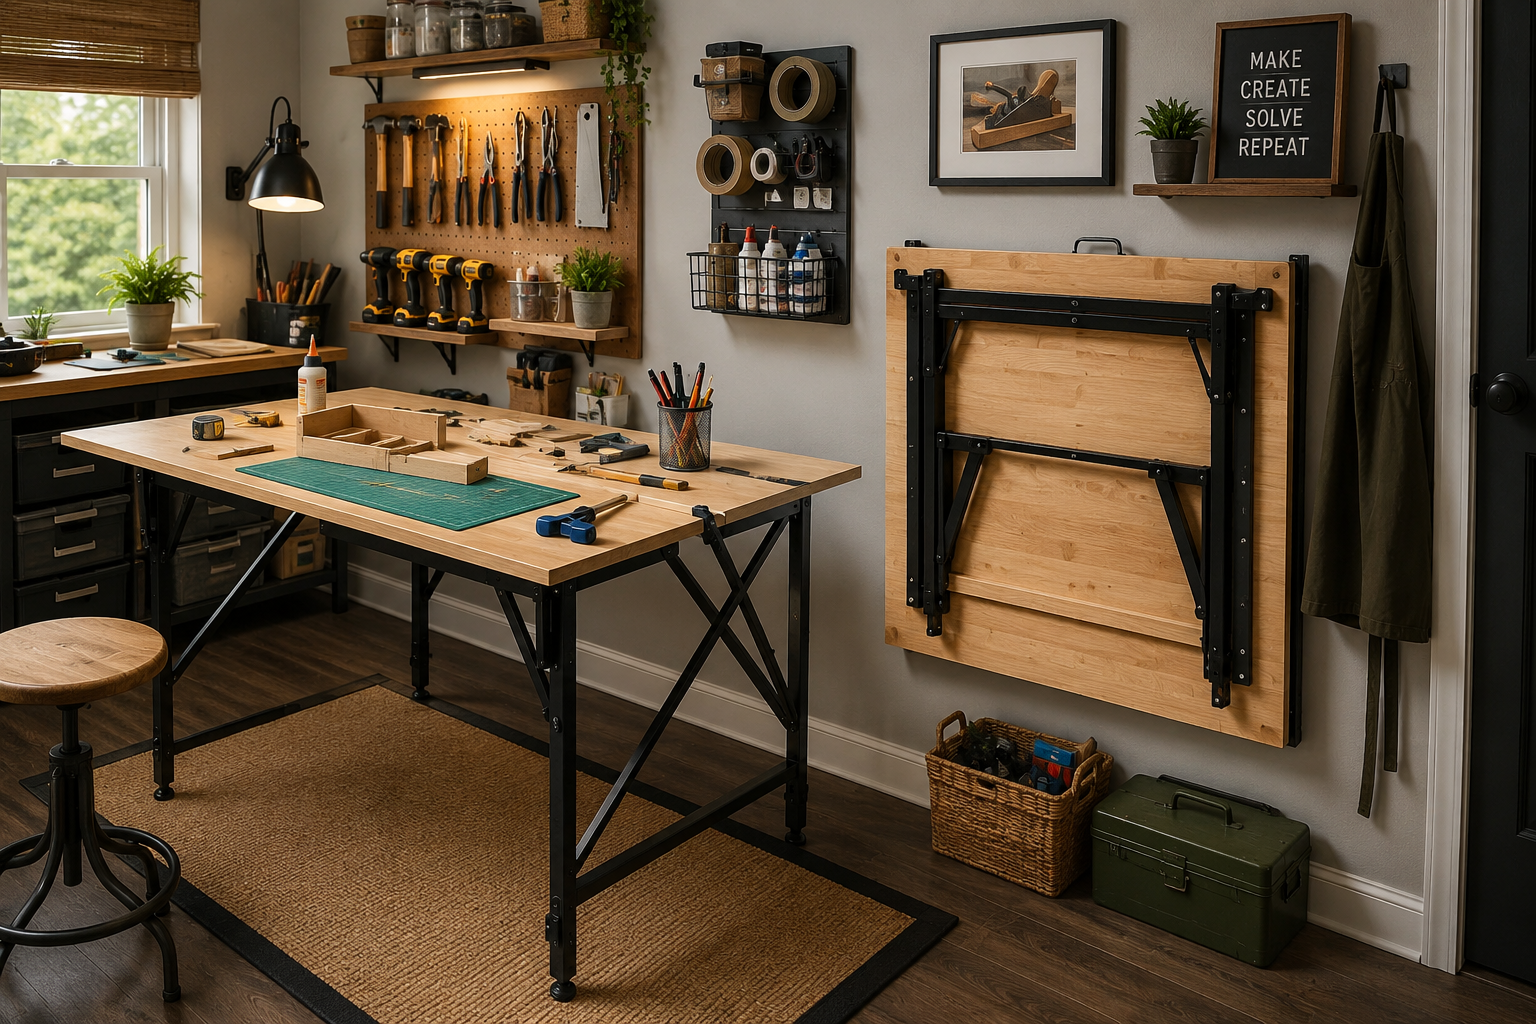
Maximizing Space and Versatility with Your DIY Folding Work Table
A DIY folding work table is more than just a surface; it’s a strategic investment in optimizing your workspace. Its inherent adaptability makes it invaluable for various applications, from dedicated craft rooms to multi-purpose garages. This section explores how to fully leverage its design for ultimate space-saving and functional versatility.
Optimizing Small Workshops and Craft Areas
The primary benefit of a folding work table is its ability to free up floor space.

- Garage Workshop: In a garage, this table allows you to park vehicles when not working, or opens up space for other storage and activities. When folded flat, it can be hung on a wall using heavy-duty hooks or leaned discreetly against a corner. Integrating it with DIY smart workshop dust collection system components can keep your space clean even in a convertible setup.
- Dedicated Craft Room: For crafters, the table provides a large, dedicated surface for projects like sewing, scrapbooking, or jewelry making, without permanently taking up valuable room real estate. When folded, the room can easily revert to a guest room or home office.
- Multi-Purpose Rooms: Ideal for spare rooms that serve various functions. Set it up for woodworking, then fold it away for family gatherings or exercise sessions.
- Tool Storage Integration: Consider adding small hooks or a magnetic strip to the underside of the tabletop or the folded leg frames to store frequently used hand tools or craft supplies, making them accessible even when the table is folded.
“A well-designed folding workbench isn’t just about saving space; it’s about making your available space work smarter, adapting to your project needs and lifestyle.”
Enhancing Functionality and Adaptability
The design of a DIY folding work table allows for several enhancements to boost its utility.
- Replaceable Top: As mentioned, a sacrificial top made of hardboard or MDF protects your primary plywood surface. This is particularly useful for projects involving glue, paint, heavy cutting, or impact. When heavily damaged, it can be easily replaced, extending the life of your workbench.
- Integrated Vise or Clamping Solutions: While a folding table might not accommodate a permanently mounted woodworking vise, you can use portable clamping systems. Attach C-clamps or quick-release bar clamps directly to the tabletop when needed. A bench dog system could also be drilled into the tabletop for flexible clamping.
- Mobility Options: If you need to move the table around your workspace, consider adding two small, non-swiveling casters to one end of the leg assembly. When the table is upright, these casters would be off the ground. When tilted slightly, the table can be rolled. Ensure the casters are robust enough to handle the table’s weight.
- Adjustable Height (Advanced): For a more advanced build, integrating adjustable leg hardware (similar to what’s found on some folding sawhorses) could allow for different working heights, catering to various tasks or user preferences. This would, however, add complexity to the “stores flat” design.
- Lighting Solutions: Attach a portable LED work light to the table or use a freestanding shop light to ensure adequate illumination for detailed tasks, regardless of where the table is set up.
By embracing these optimization strategies, your DIY folding work table transforms from a simple workbench into a dynamic, adaptable hub for all your projects, reflecting a thoughtful approach to space management in 2026. This approach mirrors the principles of warm minimalism in woodworking, focusing on functional design that serves a clear purpose without clutter.
Conclusion
Building a DIY folding work table that stores flat is a highly rewarding project that directly addresses the challenges of limited space in workshops and craft areas. This guide has detailed every step, from meticulous planning and material selection to precise construction and strategic enhancements. By following these instructions, you can create a sturdy, functional, and exceptionally versatile workbench that maximizes your productivity without compromising your precious floor space. The ability to deploy a full-sized work surface and then neatly tuck it away when not in use transforms any area into a dynamic, multi-purpose environment. Embrace this project not just as a woodworking endeavor, but as an investment in a more organized, efficient, and adaptable creative or practical space in 2026.
Actionable Next Steps:
- Assess Your Needs: Determine the ideal dimensions and features (e.g., replaceable top, specific locking mechanism) based on your typical projects and available storage space.
- Gather Materials and Tools: Compile a comprehensive list and acquire all necessary lumber, hardware, and tools before starting.
- Prioritize Safety: Always wear appropriate personal protective equipment (PPE) and follow safe operating procedures for all tools.
- Build with Precision: Take your time with measurements, cuts, and assembly to ensure squareness and structural integrity.
- Personalize and Optimize: Consider adding custom features like a replaceable top, portable clamps, or integrated storage to best suit your workflow.
Meta Title: Build a DIY Folding Work Table: Space-Saving Workshop & Craft Solution Meta Description: Learn how to build a sturdy, space-saving DIY folding work table that stores flat. Perfect for small workshops, garages, and craft rooms in 2026.
