


The average kitchen size in new homes has decreased by nearly 10% in the last decade, making intelligent space utilization more critical than ever in 2026. For many homeowners, this translates to a persistent challenge: how to host guests comfortably without a dedicated dining room, or simply enjoy daily meals in a functional yet aesthetically pleasing environment. The answer often lies in ingenious, multi-functional furniture. This article provides a comprehensive guide to Building a Compact Round Dining Table with Integrated Leaf for Small Kitchens, offering a practical and rewarding woodworking project that delivers both style and exceptional versatility.
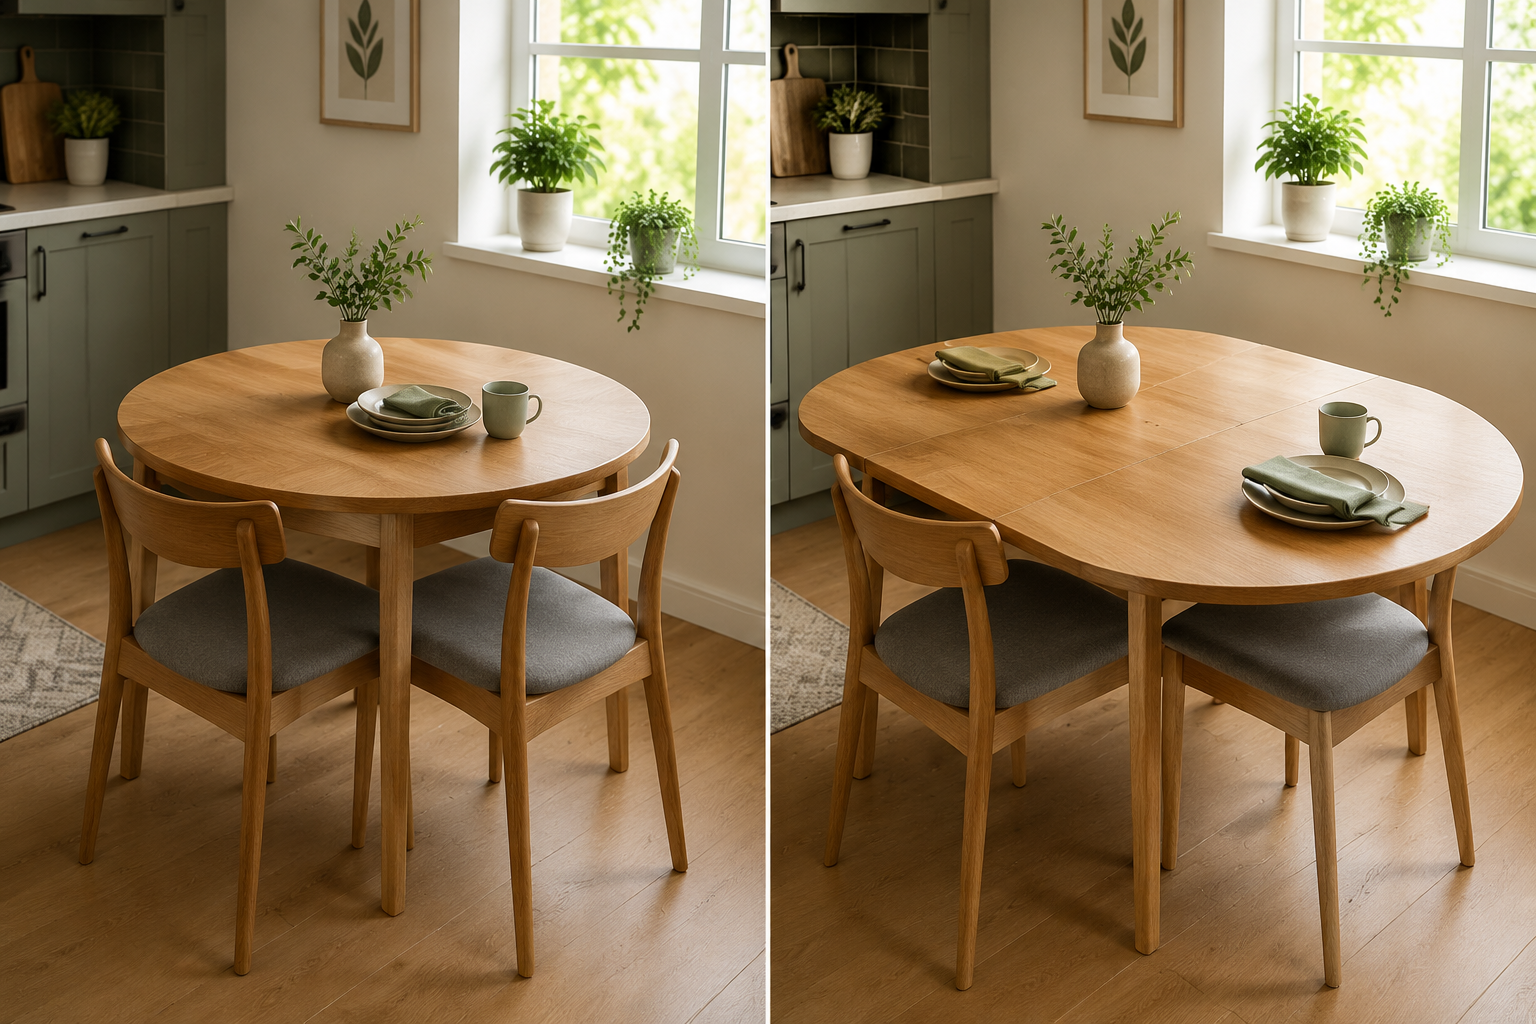
A compact round dining table, especially one featuring an integrated leaf, offers a brilliant solution to the spatial constraints of smaller kitchens. It provides intimate seating for daily use and effortlessly expands to accommodate additional guests, transforming a cozy nook into a vibrant dining area. This project is not just about building a piece of furniture; it’s about crafting a flexible cornerstone for your home that adapts to your lifestyle.

Key Takeaways
- A compact round dining table with an integrated leaf maximizes functionality in small kitchens, providing both everyday utility and expandable seating.
- Careful planning, including material selection, design, and joinery, is crucial for a durable and aesthetically pleasing table.
- Precision woodworking techniques, particularly for the leaf mechanism and tabletop, are essential for seamless operation.
- Proper finishing protects the wood and enhances the table’s appearance, making it suitable for a kitchen environment.
- This project is a fulfilling endeavor for woodworkers looking to create a highly practical, custom furniture piece that significantly improves living spaces.
Design and Planning: Crafting Your Compact Round Dining Table with Integrated Leaf
The success of Building a Compact Round Dining Table with Integrated Leaf for Small Kitchens hinges on meticulous design and planning. Before cutting any wood, consider the dimensions, materials, and the specific leaf mechanism that best suits your needs and skill level.
Determining Dimensions and Seating Capacity
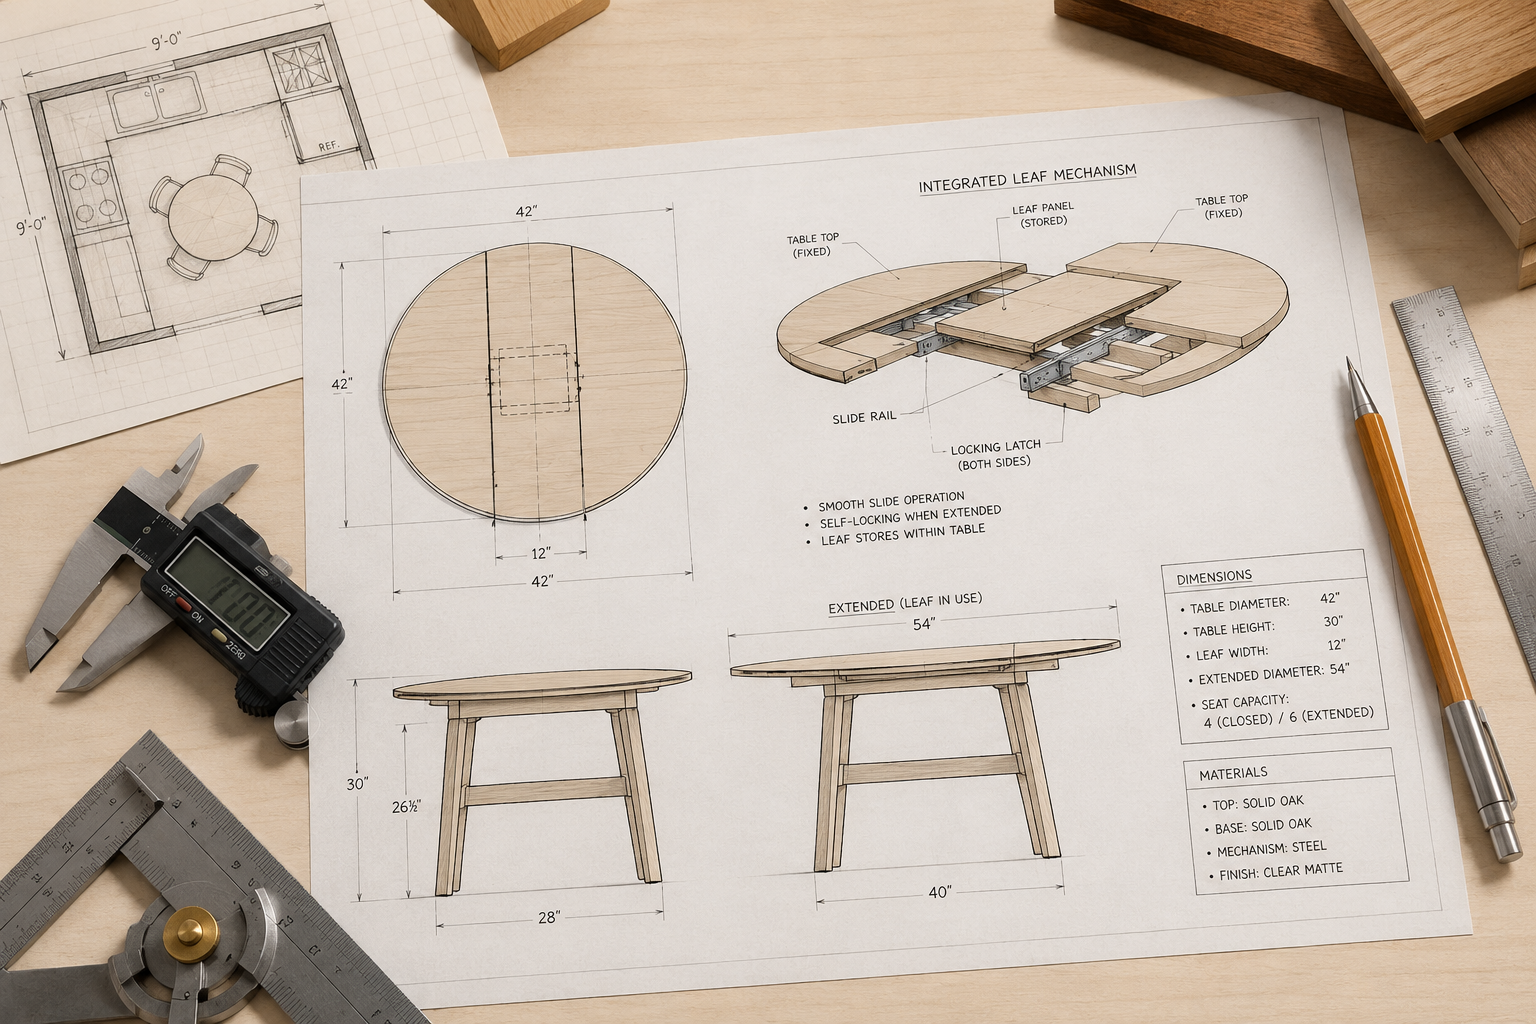
The “compact” aspect is paramount for small kitchens. A typical compact round table might range from 36 to 48 inches in diameter. The integrated leaf will then add additional length when extended.
Compact Round Diameter:
- 36 inches: Comfortably seats 2-3. Ideal for very small spaces.
- 42 inches: Comfortably seats 3-4. A versatile choice for most small kitchens.
- 48 inches: Comfortably seats 4. Becomes more compact than square when leaf is stored.
Leaf Extension: An integrated leaf typically adds 12-18 inches to the table’s length. For a round table, this often transforms it into an oval shape when extended, providing space for 1-2 extra diners.
When planning, visualize the table in your kitchen. Measure the available space, considering walkways and other furniture. Ensure there’s ample room for chairs to be pulled out comfortably, even with the leaf extended.
Material Selection for Durability and Aesthetics
Choosing the right wood is critical for both the table’s longevity and its visual appeal. Hardwoods are generally preferred for dining tables due to their durability and resistance to dents and scratches.
| Wood Type | Characteristics | Best Use Cases |
|---|---|---|
| Oak (Red/White) | Very durable, strong grain, excellent stability. | High-traffic kitchens, rustic or traditional styles. White oak offers better moisture resistance. |
| Maple | Very hard, fine grain, light color, excellent for smooth finishes. | Modern or contemporary kitchens, where a sleek, uniform surface is desired. Resists dents well. |
| Cherry | Moderate hardness, beautiful reddish-brown hue that deepens with age. | Elegant, traditional, or transitional kitchens. Requires careful finishing to protect softer surface compared to oak or maple. |
| Walnut | Strong, rich dark color, good workability, high-end appearance. | Luxury kitchens, statement pieces. Its natural beauty often requires minimal staining, enhancing its inherent grain. |
| Ash | Strong, good elasticity, similar grain to oak but lighter in color. | Versatile, can be stained to mimic other woods, good value. |
| Plywood/MDF Core | (For substrate beneath veneer) Stable, flat, less prone to wood movement. | When using veneer for the tabletop surface, a stable substrate is essential. Remember to account for understanding wood movement when combining different materials. |
Beyond the tabletop, consider the wood for the legs and apron (the frame beneath the tabletop). These components need to be robust to support the weight of the table and the integrated leaf mechanism.
Integrated Leaf Mechanisms
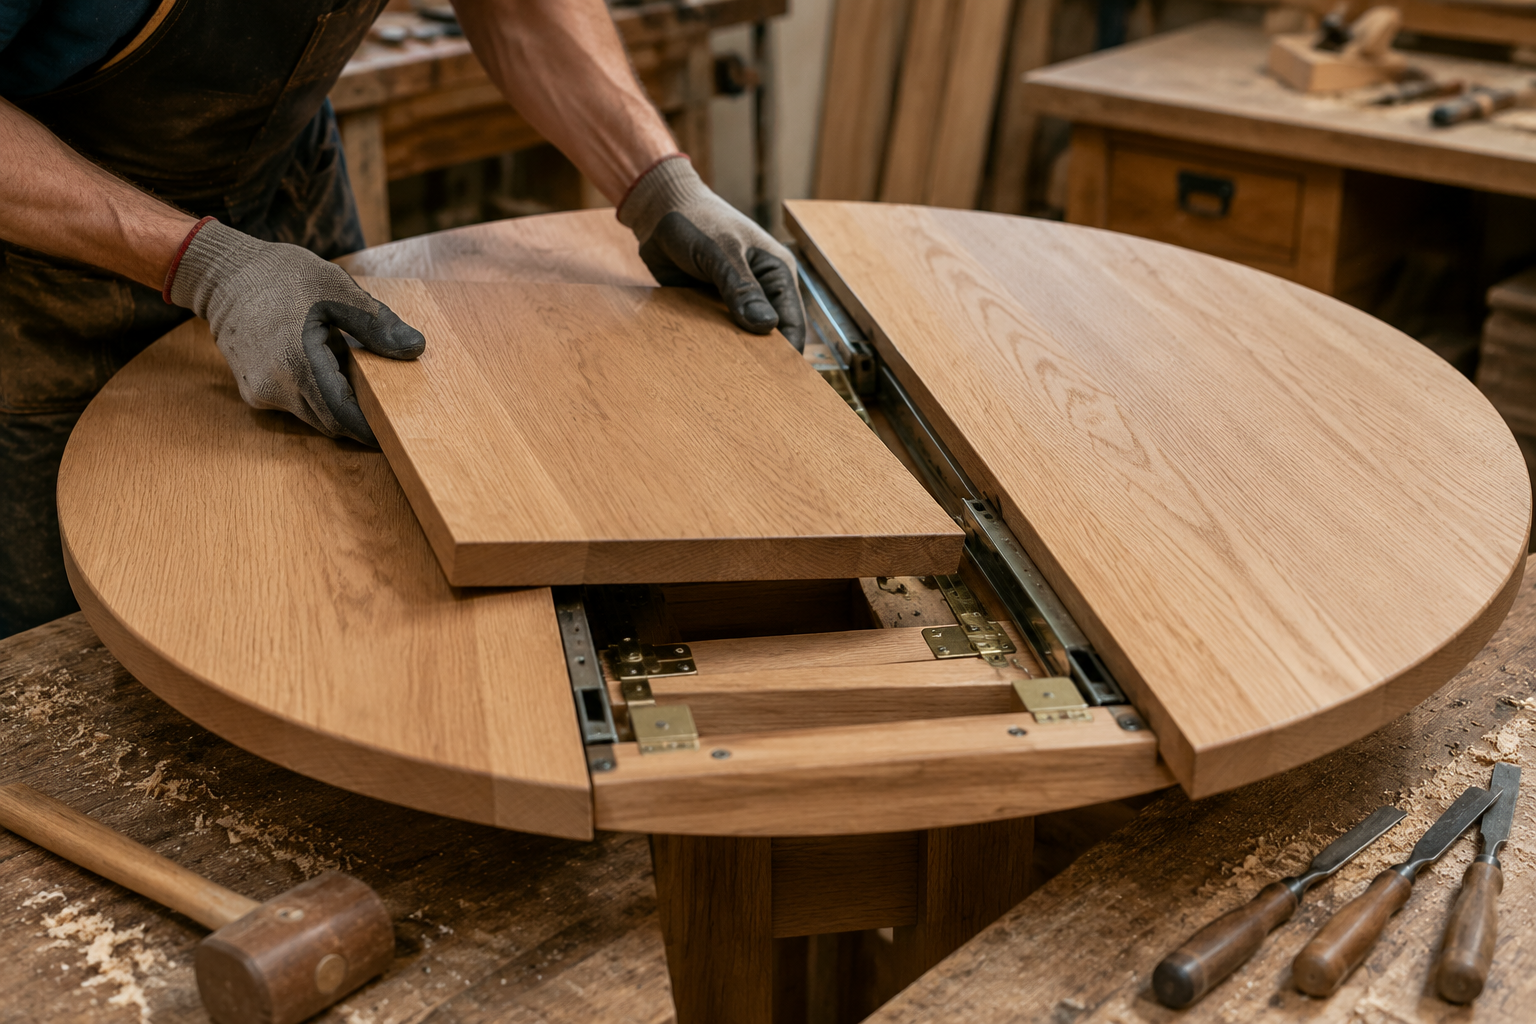
The “integrated leaf” is the defining feature of this project. Unlike traditional drop leaves or separate leaves that store elsewhere, an integrated leaf is stored within the table structure itself, usually by folding or sliding.
Butterfly Leaf: This is the most common and elegant integrated solution for round tables. The leaf is typically divided into two halves, hinged together, and folds in on itself, tucking neatly beneath the tabletop when not in use. When extended, it “butterflies” open and rests on extension slides. This mechanism requires precise routing and sturdy slides.
Self-Storing Leaves (Drawer/Slide Mechanism): Some designs incorporate leaves that slide out from under the main tabletop, sometimes on dedicated runners or drawer slides. This is less common for round tables due to the complex geometry but can be adapted.
Pedestal Base Considerations: Round tables often feature a pedestal base for maximum legroom. If using a butterfly leaf, the pedestal must be designed to allow the tabletop to split and the leaf to unfold without obstruction. This often means the pedestal splits as well, or the base is wide enough to accommodate the extended leaf.
For a detailed understanding of joinery and general furniture construction principles, resources like Profitable Woodworking for Beginners: Building and Selling H can provide foundational knowledge applicable to this project.
Construction: Precision and Joinery for an Expandable Design
Building a Compact Round Dining Table with Integrated Leaf for Small Kitchens demands precision at every step, especially when crafting the expandable tabletop and robust base.
Crafting the Round Tabletop and Leaf
The tabletop is the centerpiece of this project. Whether you are using solid wood planks or veneered plywood, achieving a perfect circle and ensuring the leaf integrates seamlessly is paramount.
Panel Glue-Up (Solid Wood): If using solid wood, select planks with complementary grain patterns. Joint and plane the edges for tight, invisible seams. Use a quality wood glue and clamps to create a large panel. Allow ample drying time. For optimal stability and to minimize wood movement, alternate the grain direction of adjacent boards. Understanding Wood Movement is crucial here.
Cutting the Circle: Once the panel is dry, mark the center point. Attach a pivot point (a nail or screw) at the center and use a trammel arm with a router or a band saw to cut a perfect circle. This ensures an even perimeter.
Splitting for the Leaf: This is a critical step. Mark the exact center line where the table will split to accommodate the leaf. Using a fine-toothed blade on a table saw or a track saw, carefully cut the table in half. The cut must be perfectly straight and smooth for the leaf to integrate without gaps.
Creating the Leaf:
- Butterfly Leaf: The leaf will typically be made from two smaller pieces, hinged together. The dimensions of these pieces must precisely match the gap created by splitting the main tabletop. Edge-band the exposed plywood edges if using veneered stock.
- Matching Grain: Whenever possible, cut the leaf from the same glued-up panel as the main tabletop halves. This ensures the grain matches across the entire table when extended.
Installing Extension Slides: High-quality table extension slides are essential for smooth operation. These heavy-duty slides attach to the underside of the table halves and allow them to pull apart, creating the space for the leaf. Ensure they are aligned perfectly and securely fastened. These slides are often specific to butterfly leaf mechanisms, ensuring the leaf is supported when unfolded.
Constructing the Robust Base
A compact round dining table with an integrated leaf requires a sturdy base, especially if it’s a pedestal design, to handle the table’s expansion.
Pedestal Design: A central pedestal offers the most legroom. The pedestal itself can be a single, substantial turned column, or a combination of square posts joined to a wider base.
- Central Column: If using a single column, ensure it’s wide enough at its base for stability and securely attached to a wide footed cross-base.
- Split Pedestal: For tables with larger leaves, some designs feature a pedestal that also splits, with each half moving with its respective tabletop section. This provides continuous support along the table’s length when extended.
Apron Construction: The apron is the frame directly under the tabletop. It connects the tabletop to the legs or pedestal. For a table with an integrated leaf, the apron must be designed to accommodate the extension slides and the stored leaf.
- Mortise and Tenon or Dominos: These strong joints are ideal for attaching the apron rails to the legs or pedestal base, providing excellent durability.
- Recessed Area for Leaf: The apron design must include a recessed area or specific channeling to allow the butterfly leaf to fold and store completely flat beneath the tabletop.
Attaching Top to Base: The tabletop is typically attached to the apron using tabletop fasteners (Z-clips, figure-8 fasteners, or cleats). These allow for the natural expansion and contraction of the wood tabletop due to humidity changes, preventing warping or cracking. This principle is vital in all furniture construction, as detailed in Understanding Wood Movement.
For complex joinery, especially in circular or curved forms, you might find valuable insights in articles focused on precision, such as Mastering Dovetail Drawers for Cabinets or even general guides on Power Tool Mastery for Decorative Wood Projects which can help with precision cuts and routing techniques.
Finishing and Maintenance: Ensuring Longevity and Beauty
Once the construction phase of Building a Compact Round Dining Table with Integrated Leaf for Small Kitchens is complete, the finishing process becomes critical. A well-applied finish not only enhances the table’s aesthetic appeal but also provides essential protection against spills, heat, and daily wear and tear.
Sanding and Surface Preparation
Proper surface preparation is the foundation of a beautiful finish.

Gradual Sanding: Start with a coarser grit sandpaper (e.g., 100 or 120-grit) to remove any tool marks, glue squeeze-out, and imperfections. Progress through finer grits (150, 180, 220-grit). For tabletops, some woodworkers even go up to 320 or 400-grit for an ultra-smooth feel. Always sand with the grain of the wood.
Dust Removal: After each sanding stage, thoroughly remove all dust using a vacuum, compressed air, and finally a tack cloth. Remaining dust can get trapped in the finish, creating a rough surface.
Wipe Down: For certain finishes, a final wipe down with mineral spirits or denatured alcohol can help reveal any remaining imperfections and ensure a clean surface for adhesion.
Choosing and Applying a Durable Finish
For a dining table, especially one in a kitchen environment, durability is paramount. The finish must withstand moisture, heat, and abrasion.
Polyurethane (Oil-Based or Water-Based):
- Oil-Based Polyurethane: Known for its exceptional durability, ambering effect (which can deepen the wood’s natural color), and resistance to moisture and abrasion. It applies thicker and takes longer to dry.
- Water-Based Polyurethane: Dries faster, is clearer (less ambering), and has lower VOCs. It’s also very durable but might require more coats to achieve the same protective thickness as oil-based. For easy application and a smooth finish, consider using sprayable water-based polyurethane.
- Application: Apply thin, even coats, sanding lightly with a fine-grit sandpaper (e.g., 320 or 400-grit) between coats to ensure adhesion and smooth out any dust nibs. Typically 3-5 coats are recommended for a dining table.
Conversion Varnish: A professional-grade finish offering superior durability and chemical resistance. It’s often used in commercial furniture production due to its hardness and protective qualities. Requires specialized spray equipment and good ventilation due to strong fumes.
Hardwax Oils: A newer class of finishes that penetrate the wood, offering good protection while maintaining a natural, matte look and feel. They are often easier to repair locally than film-forming finishes. Brands like Rubio Monocoat or Osmo are popular. They typically require fewer coats but proper application is key.
Staining (Optional): If you desire a different wood tone, apply a wood stain after sanding and before the topcoat. Always test the stain on a scrap piece of the same wood to ensure the desired color is achieved. Allow ample drying time for the stain before applying the topcoat.
Caring for Your Integrated Leaf Table
Proper maintenance will ensure your compact round dining table remains beautiful and functional for years.
- Regular Cleaning: Wipe the table clean with a damp cloth and mild soap (if necessary). Avoid harsh chemical cleaners, as they can damage the finish.
- Protect from Heat and Moisture: Always use coasters for drinks and trivets for hot dishes. Prolonged exposure to heat or moisture can damage the finish and potentially the wood itself.
- Prevent Scratches: Use placemats and avoid dragging sharp objects across the surface.
- Addressing Wood Movement: Even with a stable design, wood will naturally expand and contract with changes in humidity. This is normal. Ensure the leaf mechanism operates smoothly and lubricate slides if needed. Occasionally, a slight seasonal gap might appear at the leaf seam; this is a natural characteristic of solid wood furniture.
- Refinishing: Over time, the finish may show signs of wear. Depending on the finish type, you might be able to lightly sand and reapply a topcoat, or in some cases, a full refinishing might be necessary. Hardwax oils are often easier to repair specific damaged areas.
By diligently following these finishing and maintenance steps, your custom-built compact round dining table will serve as a resilient and attractive focal point in your small kitchen for many years to come.
Conclusion
Building a Compact Round Dining Table with Integrated Leaf for Small Kitchens is a woodworking project that offers immense practical value and creative satisfaction. It addresses a common challenge in modern homes by providing a versatile, space-saving solution that can adapt from intimate daily meals to larger gatherings. From the initial meticulous design and material selection to the precise execution of joinery and the final protective finish, each step contributes to a piece of furniture that is both beautiful and highly functional.
This endeavor highlights the rewarding nature of custom woodworking, allowing you to create a bespoke item perfectly tailored to your space and needs. The skills honed in this project, precision cutting, intricate joinery, and careful finishing, are transferable to a myriad of other furniture-making tasks. As you enjoy meals around your expandable, custom-built table, you’ll appreciate not only its utility but also the craftsmanship embedded in every detail.
For those eager to continue refining their woodworking skills and exploring further projects, consider delving into resources on advanced joinery, specialized finishes, or even custom storage solutions to complement your newly built table. The journey of woodworking is one of continuous learning and creation, and this table is just one of many possibilities.
