
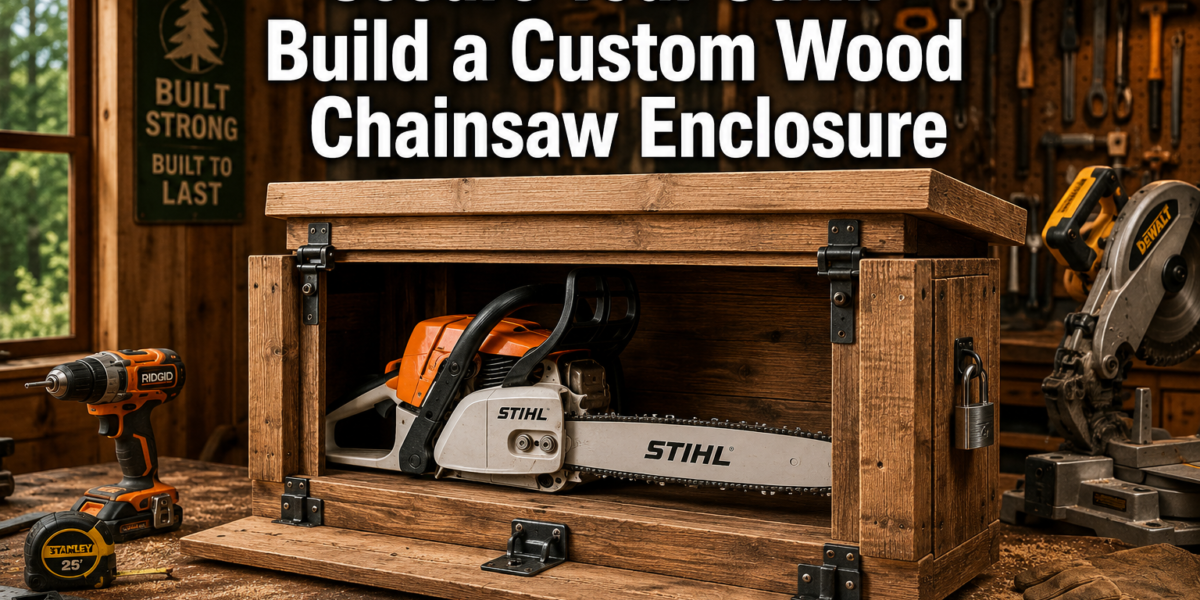

The average Stihl chainsaw represents a significant investment, often ranging from $200 for homeowner models to over $1,200 for professional-grade units. Protecting this investment from environmental damage, unauthorized access, and transport mishaps is crucial for its longevity and performance. This article provides a comprehensive guide to Building a Custom Wooden Enclosure for Your Stihl Chainsaw: Storage, Security, and Portability, offering a practical solution for woodworkers, arborists, and homeowners alike. A well-designed wooden enclosure not only safeguards your equipment but also enhances organization in your workshop or vehicle, making transport safer and more efficient.
Key Takeaways
- A custom wooden enclosure protects your Stihl chainsaw from physical damage, dust, moisture, and potential theft.
- Careful planning, including accurate measurements and material selection, is essential for a durable and functional enclosure.
- Incorporating features like internal compartments, secure latches, and comfortable handles significantly enhances usability.
- Proper finishing and maintenance ensure the enclosure’s longevity and continued protection for your valuable tool.
- Building your own enclosure allows for customization to perfectly fit your specific Stihl model and personal storage needs.
Design and Planning Your Custom Wooden Enclosure for Your Stihl Chainsaw
Before cutting a single piece of wood, thorough planning is paramount when Building a Custom Wooden Enclosure for Your Stihl Chainsaw: Storage, Security, and Portability. This initial phase determines the success of your project, ensuring the enclosure is perfectly suited for your specific Stihl model and your intended use.

Assessing Your Stihl Chainsaw and Its Accessories
Start by gathering all components you intend to store. This typically includes:
- The chainsaw body
- Guide bar(s) (note different lengths if you have them)
- Chains (new and used)
- Bar oil
- 2-stroke mix oil
- Filing kit (file, depth gauge, bar groove cleaner)
- Scrench (spark plug/bar nut wrench)
- Spare spark plug
- Safety gear (gloves, eye protection)
Measure your chainsaw meticulously. Pay close attention to:
- Overall length: From the tip of the longest guide bar to the furthest point of the handle.
- Height: From the base to the top of the handle/engine.
- Width: Including any protruding elements like the chain brake or muffler.
- Bar protection: Decide if the bar will be stored attached or detached. Storing it attached requires a longer, narrower design with a dedicated slot for the bar. Detaching it allows for a more compact box but requires a separate compartment for the bar.
Material Selection for Durability and Protection
Choosing the right wood is critical for an enclosure that withstands the rigors of workshop life and transport.
Recommended Materials:
- Plywood (¾-inch exterior grade or Baltic Birch): Excellent stability, resists warping, and offers good screw retention. Exterior grade provides better moisture resistance. Baltic Birch offers superior strength and a cleaner edge.
- Solid Wood (Pine, Poplar, or Oak): Can be used for frame components or for a more aesthetic finish. Pine and Poplar are cost-effective and easy to work with. Oak offers exceptional durability and resistance to impact.
- Hardware: Heavy-duty latches, hinges, handles, and possibly castor wheels. Ensure latches are robust enough to prevent accidental opening during transport.
Considerations:
- Weight: Plywood is generally lighter than solid wood for the same strength. Consider the total weight, especially if portability is a high priority.
- Moisture Resistance: If the enclosure will be stored in humid environments or transported in open vehicles, select exterior-grade plywood or treat the wood with a water-resistant finish.
- Cost: Balance durability with your budget. Plywood is often more cost-effective than solid hardwoods.
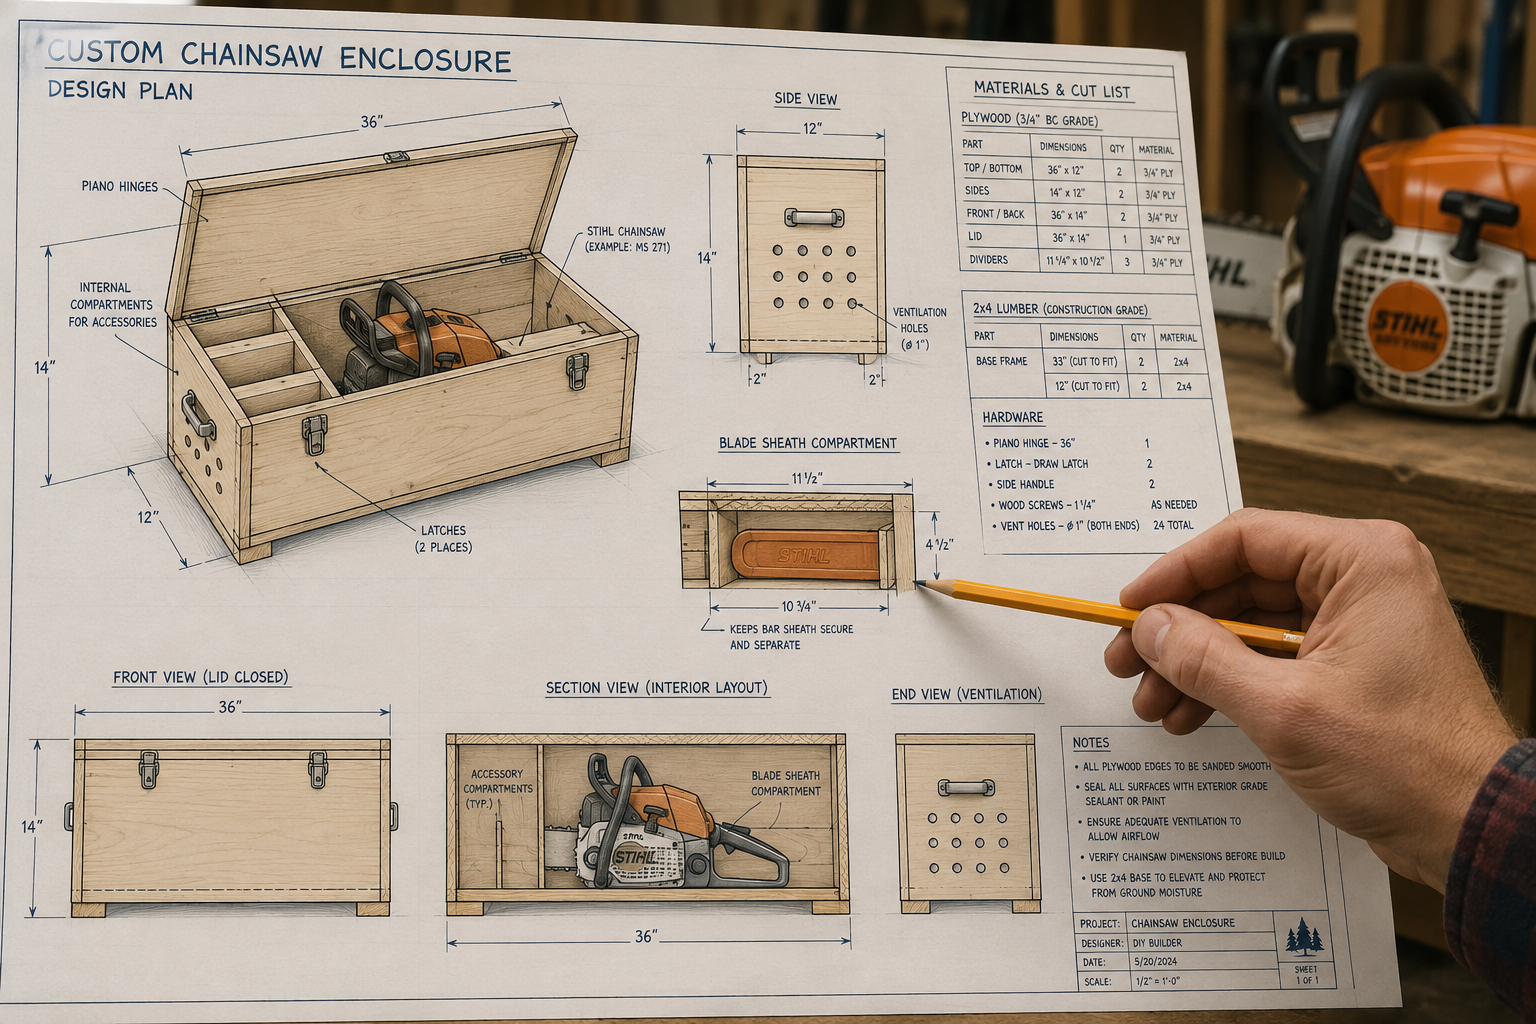
Sketching and Blueprinting Your Enclosure
Once measurements are taken and materials are chosen, it’s time to design.
- Rough Sketches: Begin with rough hand sketches, exploring different configurations. Will it be a simple box with a hinged lid, or a more complex design with internal dividers and drawers?
- Detailed Blueprint: Translate your sketches into a detailed blueprint.
- Dimensions: Clearly mark all external and internal dimensions.
- Compartments: Design specific compartments for each accessory. A slotted area for the bar and chain, small boxes for oil and tools, and perhaps a padded section for the main body of the saw.
- Ventilation: Chainsaws can emit fumes even when cool. Consider adding small, screened ventilation holes to prevent fume buildup.
- Access: Plan for easy access to the saw and accessories. A top-hinged lid is common, but side-opening panels might be suitable for specific designs.
- Reinforcement: Identify areas that might need extra reinforcement, such as corners or attachment points for handles.
Using graph paper or CAD software can help refine your design. Remember to account for the thickness of the wood in your internal dimensions. A common mistake is to only measure the saw and not add the necessary clearance for padding or slight variations in chainsaw fit. A well-planned design saves time, materials, and frustration during the building phase. For other workshop organization ideas, consider “DIY Smart Workshop Storage Solutions: Maximizing Space and Organization for Every Tool” which can offer additional insights into efficient storage planning.
Construction: Step-by-Step Assembly and Features for Security and Portability
With a solid design in hand, the next phase is the physical construction of your custom wooden enclosure. This section details the process, emphasizing precision, security, and portability features essential for Building a Custom Wooden Enclosure for Your Stihl Chainsaw: Storage, Security, and Portability.
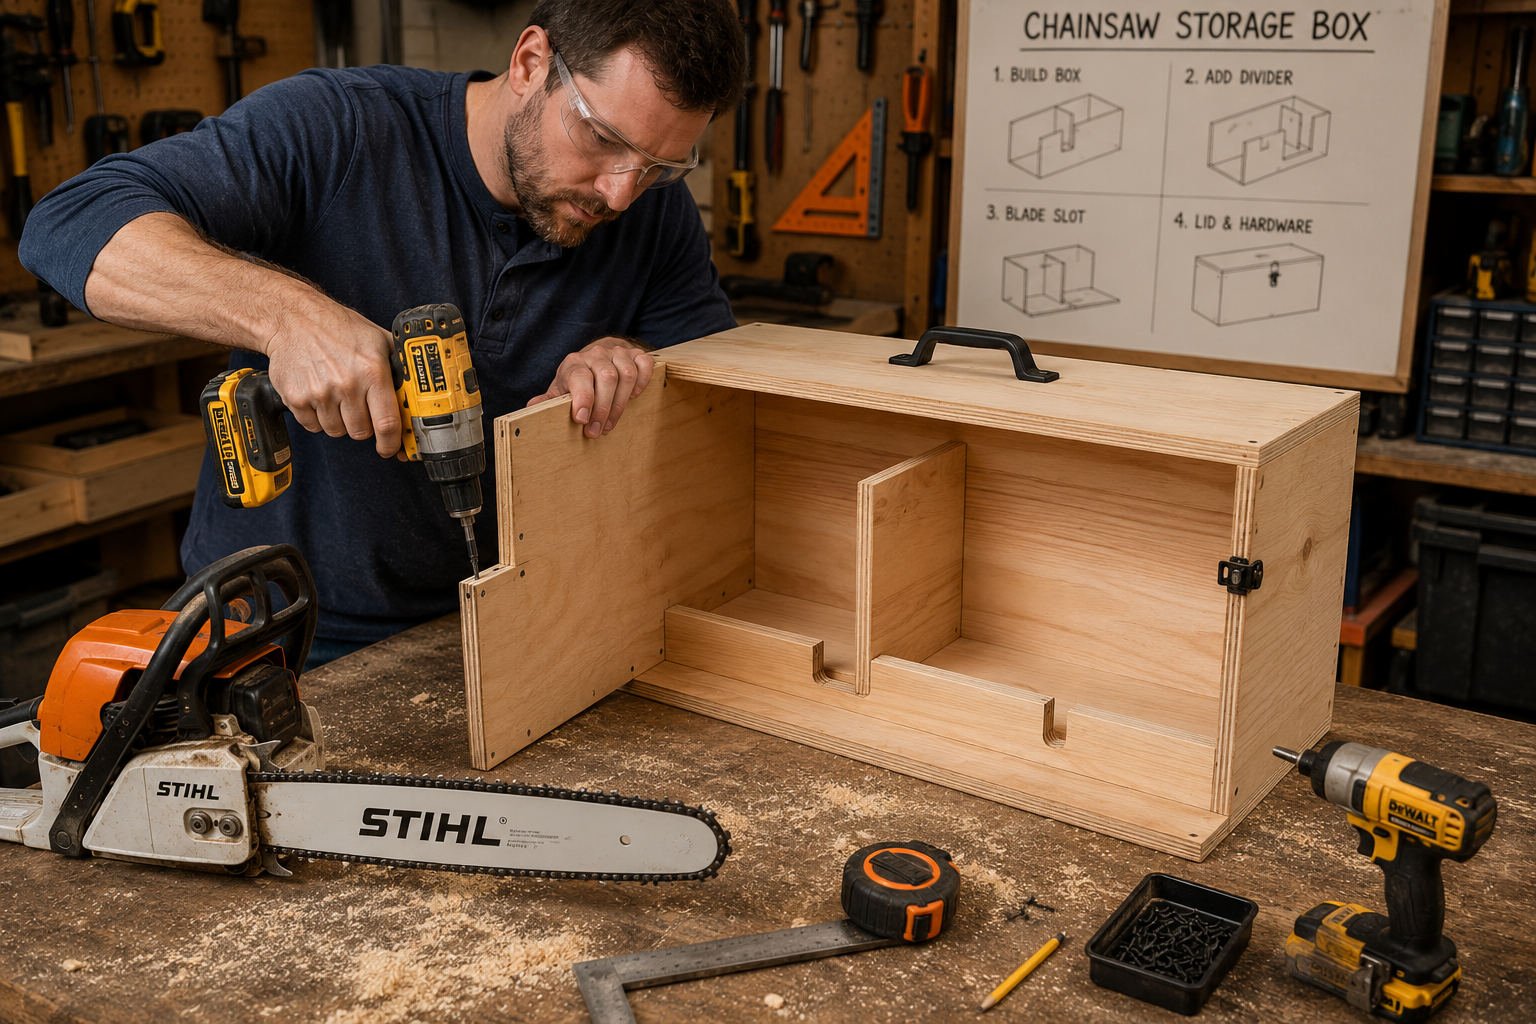
Cutting and Preparing Your Wood Components
Accuracy in cutting is crucial for a strong, well-fitting enclosure.
- Measure and Mark: Transfer all dimensions from your blueprint to your chosen wood. Use a sharp pencil and a reliable measuring tape or ruler. Double-check all measurements before cutting.
- Precise Cuts: Use a table saw or circular saw with a fine-tooth blade for clean, straight cuts. For more intricate cuts or curves, a jigsaw or band saw may be necessary. Label each piece as you cut it to avoid confusion during assembly.
- Sanding: Lightly sand all cut edges to remove splinters and prepare the wood for assembly and finishing. A 120-grit sandpaper is usually sufficient at this stage.
Assembling the Enclosure Frame and Panels
A strong frame provides the structural integrity for the entire enclosure.
- Base and Sides: Begin by assembling the base and side panels. Use wood glue and screws or nails. Pilot holes are essential to prevent splitting, especially near edges. For plywood, ensure screws are long enough to bite securely without penetrating the opposite side.
- Joinery: Consider using dadoes, rabbets, or lap joints for stronger connections, especially if the enclosure will experience heavy use or frequent transport. While butt joints reinforced with glue and screws are sufficient for lighter duty, advanced joinery greatly enhances durability. For more on joinery, explore “Mastering Dovetail Joinery for Drawers: Hand and Router Methods for Cabinet Builders”.
- Internal Dividers: Install any internal dividers or compartments. These should be securely fastened to prevent accessories from shifting and potentially damaging the chainsaw. Custom-fit blocks or foam inserts can cradle the chainsaw body and bar, preventing movement.
Table: Recommended Joinery for Chainsaw Enclosures
| Joinery Type | Strength | Difficulty | Best Use Case |
|---|---|---|---|
| Butt Joint | Moderate | Easy | Light-duty storage, quick assembly |
| Rabbet Joint | Good | Moderate | Stronger corners, easy alignment |
| Dado Joint | Very Good | Moderate | Internal shelves, secure dividers |
| Finger/Box Joint | Excellent | Advanced | High-strength corners, aesthetic appeal |
| Dovetail Joint | Exceptional | Advanced | Premium enclosures, maximum durability/security |
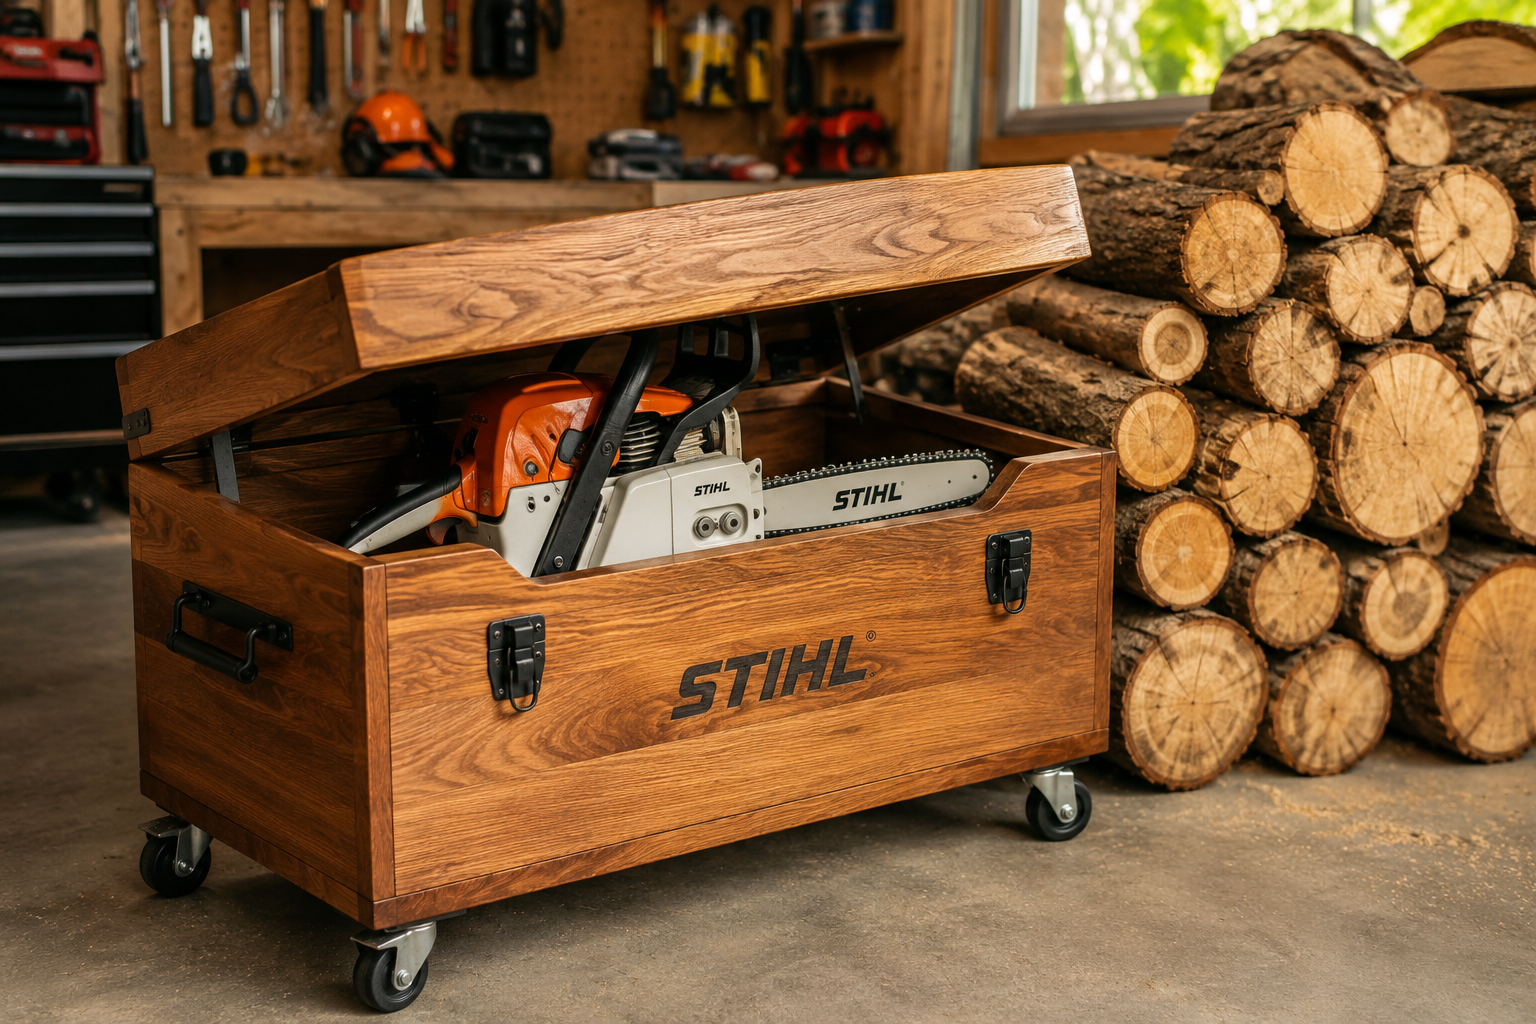
Integrating Security and Portability Features
These features are what truly distinguish a custom enclosure from a generic box.
- Latches: Install heavy-duty, lockable latches. Padlock compatibility is a must for security. Position latches to distribute closing pressure evenly across the lid.
- Hinges: Choose robust piano hinges or multiple heavy-duty butt hinges for the lid. They must withstand repeated opening and closing and the weight of the lid.
- Handles: Attach sturdy, ergonomic handles for comfortable carrying. Recessed handles can prevent snagging, while surface-mounted handles should be rated for the enclosure’s fully loaded weight.
- Padding: Line the chainsaw and bar compartments with dense foam or rubber padding. This absorbs shock during transport and prevents scratches. Adhere padding securely with contact cement.
- Wheels (Optional): For larger, heavier enclosures, consider adding heavy-duty castor wheels to one end. This makes moving the enclosure around a workshop or loading it into a vehicle much easier. When designing for mobility, refer to guides like “Building a Mobile Dust Collection Cart for Any Workshop: Design, Filtration, Portability” for inspiration on wheel selection and attachment.
- Storage for Small Items: Integrate small lidded compartments or tool clips for items like screnches, spark plugs, and sharpening files. This prevents them from rattling around and getting lost.
<code class="language-html"><div style="border: 2px solid #336699; padding: 15px; margin: 20px 0; background-color: #e6f2ff; border-radius: 8px;">
    <h3 style="color: #336699; margin-top: 0;">Pro Tip for Security:</h3>
    <p style="margin-bottom: 0; color: #333;">Beyond sturdy latches, consider reinforcing key stress points with metal corner protectors or strapping. For ultimate security, bolt the enclosure to a solid surface in your workshop or vehicle, preventing quick grabs.</p>
</div>
</code>
Ensure all hardware is installed squarely and securely. Loose hardware not only compromises security but can also lead to premature wear and tear on the enclosure. The goal is to create a robust, secure, and easily transportable home for your valuable Stihl chainsaw.

Enhancements, Finishing, and Long-Term Care for Your Custom Enclosure
Completing the construction is a major milestone, but the final steps of finishing and ongoing maintenance are crucial for the longevity, protection, and aesthetic appeal of your custom wooden Stihl chainsaw enclosure. These elements will finalize your project of Building a Custom Wooden Enclosure for Your Stihl Chainsaw: Storage, Security, and Portability.
Finishing for Protection and Aesthetics
The right finish protects the wood from moisture, chemicals, and wear, while also enhancing its appearance.
- Sanding: Thoroughly sand all exterior and interior surfaces. Start with 120-grit sandpaper to remove any remaining imperfections, then progress to 180-grit or 220-grit for a smooth finish. Remove all sanding dust before applying any finish.
- Stain (Optional): If you desire to change the wood’s color, apply a wood stain. Choose an oil-based or water-based stain according to your preference and follow the manufacturer’s instructions for application and drying times. Test the stain on a scrap piece of wood first.
- Protective Coat: Apply a durable protective coat.
- Polyurethane: Offers excellent abrasion and moisture resistance. Apply multiple thin coats, sanding lightly with fine-grit sandpaper (e.g., 320-grit) between coats.
- Spar Urethane: Ideal for enclosures that might be exposed to the elements, as it offers superior UV and moisture protection.
- Oil Finish (e.g., Danish Oil): Penetrates the wood, enhancing its natural grain and providing moderate protection. Requires reapplication periodically.
- Paint: Offers full coverage and color customization. Use a durable exterior-grade paint if the enclosure will be exposed to outdoor conditions.
Allow sufficient curing time for the finish before placing your chainsaw inside to avoid chemical odors transferring to the tool.
Customization and Branding
Personalizing your enclosure adds a professional touch and makes it uniquely yours.
- Stenciling/Decals: Add your name, workshop logo, or a Stihl emblem using stencils or vinyl decals.
- Tool Holders: Install small hooks or magnets on the inside of the lid or side panels to hold small tools like extra files or the scrench.
- Moisture Absorbers: Place a small desiccant packet or moisture absorber inside the enclosure, especially in humid environments, to prevent rust on metal components.
- External Labeling: Clearly label the enclosure as containing a chainsaw, especially if it will be transported frequently.
Maintenance for Longevity
Regular maintenance ensures your custom enclosure continues to protect your Stihl chainsaw effectively for years to come.
- Cleanliness: Periodically clean the inside of the enclosure to remove sawdust, oil residue, and debris. This prevents contamination of your chainsaw and keeps the enclosure looking tidy.
- Hardware Check: Inspect hinges, latches, and handles regularly. Tighten any loose screws and lubricate hinges if they start to squeak or stiffen. Replace any worn or damaged hardware promptly.
- Finish Reapplication: Depending on the finish chosen and the enclosure’s exposure, you may need to reapply a protective coat every few years. Look for signs of wear, dullness, or compromised protection.
- Damage Repair: Address any dings, dents, or cracks in the wood as soon as they appear. Sand down damaged areas, fill with wood filler if necessary, and reapply the finish.
By investing time in these final steps, you ensure that your custom wooden enclosure remains a durable, secure, and attractive home for your Stihl chainsaw. This commitment to detail reinforces the value of your woodworking efforts and the protection of your valuable equipment. For other projects that require meticulous finishing, consider guides like “Dark Wood Finishing Techniques” or “High-Gloss Wood Finishing Techniques.”
Conclusion
Building a Custom Wooden Enclosure for Your Stihl Chainsaw: Storage, Security, and Portability is a rewarding project that offers significant benefits for any chainsaw owner. From extending the life of your valuable Stihl tool by protecting it from environmental hazards and physical damage, to enhancing workplace organization and ensuring secure transport, a custom-built enclosure is an investment in efficiency and peace of mind. The process, while requiring careful planning and execution, results in a durable, tailored solution that perfectly fits your specific needs.
By following the detailed steps for design, construction, and finishing, you create more than just a box; you craft a dedicated storage system. The ability to customize internal compartments, integrate robust security features, and select materials for durability means your chainsaw will always be ready for action, whether stored in the workshop or transported to a job site.
Actionable Next Steps:
- Measure Your Chainsaw: Accurately measure your Stihl chainsaw and all intended accessories.
- Sketch Your Design: Create a detailed blueprint, incorporating internal compartments, ventilation, and hardware placement.
- Gather Materials: Purchase ¾-inch exterior-grade plywood or Baltic Birch, heavy-duty hardware (latches, hinges, handles), and appropriate padding.
- Cut and Assemble: Precisely cut your wood components and assemble the enclosure, prioritizing strong joints and secure fastening.
- Finish and Customize: Apply a protective finish and add personal touches like stenciling or internal tool holders.
- Regular Maintenance: Implement a routine to inspect and maintain your enclosure, ensuring its continued integrity and protection.
Embrace the satisfaction of crafting a functional and attractive home for your Stihl chainsaw, safeguarding your investment for years of reliable service.
SEO Meta Title: Build a Custom Stihl Chainsaw Enclosure: Storage & Security SEO Meta Description: Learn how to build a custom wooden enclosure for your Stihl chainsaw in 2026. Enhance storage, security, and portability with this comprehensive DIY guide.
