

The average household in 2026 contains at least one hallway, often a tight space presenting a unique design challenge: how to add functionality and aesthetic appeal without impeding traffic flow. Specifically, designing and building console tables for narrow hallways demands a keen understanding of physics, proportions, and practical anchoring techniques to ensure stability and safety. These slim, often elegant pieces can transform an otherwise overlooked transitional space into a practical entryway or a subtle display area, but only if engineered correctly to prevent tipping. This article explores how to design slim, stable console tables that won’t tip, offering expert insights into construction, materials, and installation for a professional finish.
Key Takeaways
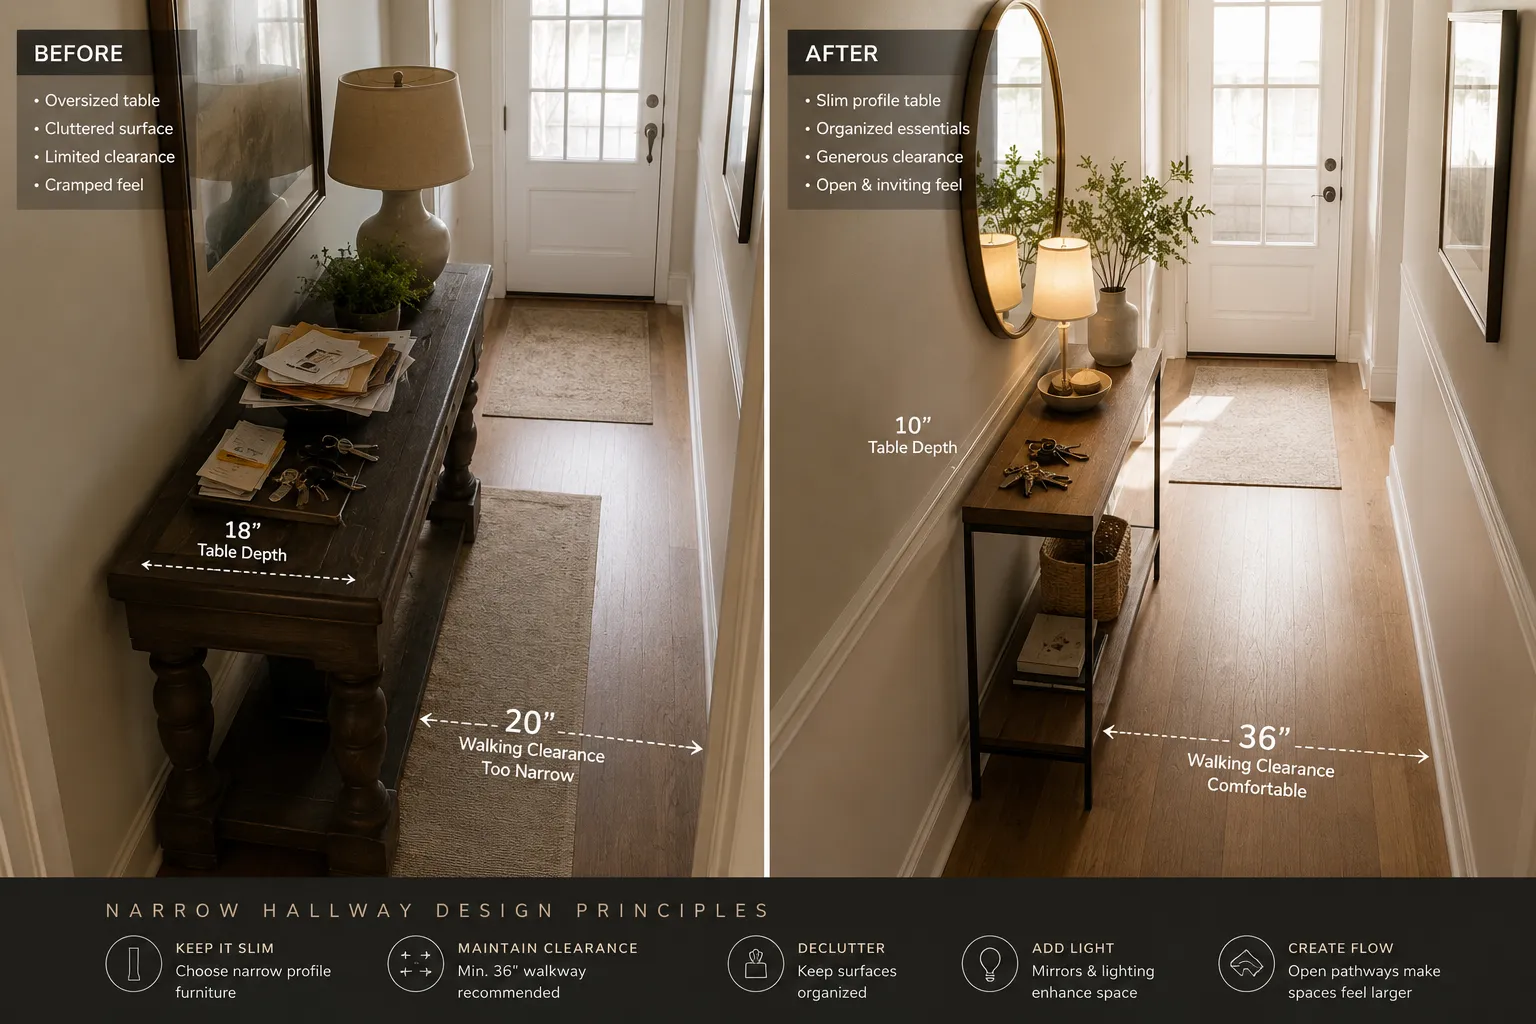
- Prioritize Depth and Proportion: For narrow hallways, a console table’s depth is critical. Aim for 8-12 inches (20-30 cm) to ensure it doesn’t obstruct passage.
- Ensure Structural Stability: Leg design, material choice, and joinery methods are crucial for preventing wobbling and tipping. Wider bases and splayed legs enhance stability.
- Utilize Wall Anchoring Systems: Even well-designed slim tables benefit from secure wall anchoring. Various discreet hardware options are available to prevent tipping accidents.
- Select Appropriate Materials: Hardwoods like oak, maple, and walnut offer durability and stability. Engineered woods can work if properly supported.
- Consider Functional Design Elements: Integrate drawers, shelves, or charging stations without compromising the table’s slim profile or stability.
Understanding the Core Challenge: Console Tables for Narrow Hallways
The primary challenge when introducing furniture into a narrow hallway is avoiding obstruction. A console table, by its very nature, is designed to be a surface for keys, mail, decorative items, or even a small lamp. However, if it’s too deep, too wobbly, or improperly secured, it becomes a hazard rather than an asset. The goal is to create a piece that is visually appealing, functionally practical, and, most importantly, stable. This means addressing factors beyond just aesthetics, diving deep into structural integrity and safety.
The Importance of Slim Design
A truly effective console table for a narrow hallway must be slim. This isn’t just about fitting it into the space; it’s about maintaining a comfortable and safe pathway. Hallways are high-traffic zones, and encroaching furniture can lead to bumps, scrapes, and even falls. The ideal depth for such a table typically ranges from 8 to 12 inches (20 to 30 cm). Anything wider risks making the hallway feel cramped or impassable.
When considering the design, think about the overall visual weight. A slim profile can be achieved not only with narrow dimensions but also through design choices like open shelving, slender legs, or even wall-mounted solutions that appear to float. Materials that are lighter in visual mass, such as those with open grains or lighter finishes, can also contribute to a less imposing presence.
Addressing Stability: Why Tables Tip
A common misconception is that all slim tables are inherently unstable. While a narrower base can reduce resistance to tipping, it’s not the sole determinant. Tipping usually occurs due to:
- Insufficient Base-to-Height Ratio: A tall, narrow table with a small base footprint is more prone to tipping, especially if weight is applied to the front edge.
- Poor Joinery: Weak or inadequate joints between legs and the tabletop can lead to wobbling, which over time compromises stability.
- Uneven Weight Distribution: Placing heavy items unevenly, particularly towards the front or sides, can shift the center of gravity and cause instability.
- External Forces: Accidental bumps, children leaning on the table, or pets jumping on it can easily destabilize an unsecured table.
Understanding these tipping factors is crucial for designing console tables for narrow hallways that are not only slim but also inherently stable.
Designing for Stability: Legs, Materials, and Joinery
The foundation of a stable console table lies in its design and construction. Every element, from the choice of wood to the method of joining components, contributes to its overall strength and resistance to tipping.
Leg Design and Footprint for Enhanced Stability
The legs are arguably the most critical component for a console table’s stability. For narrow hallway console tables, creative leg design can significantly improve stability without adding excessive depth.
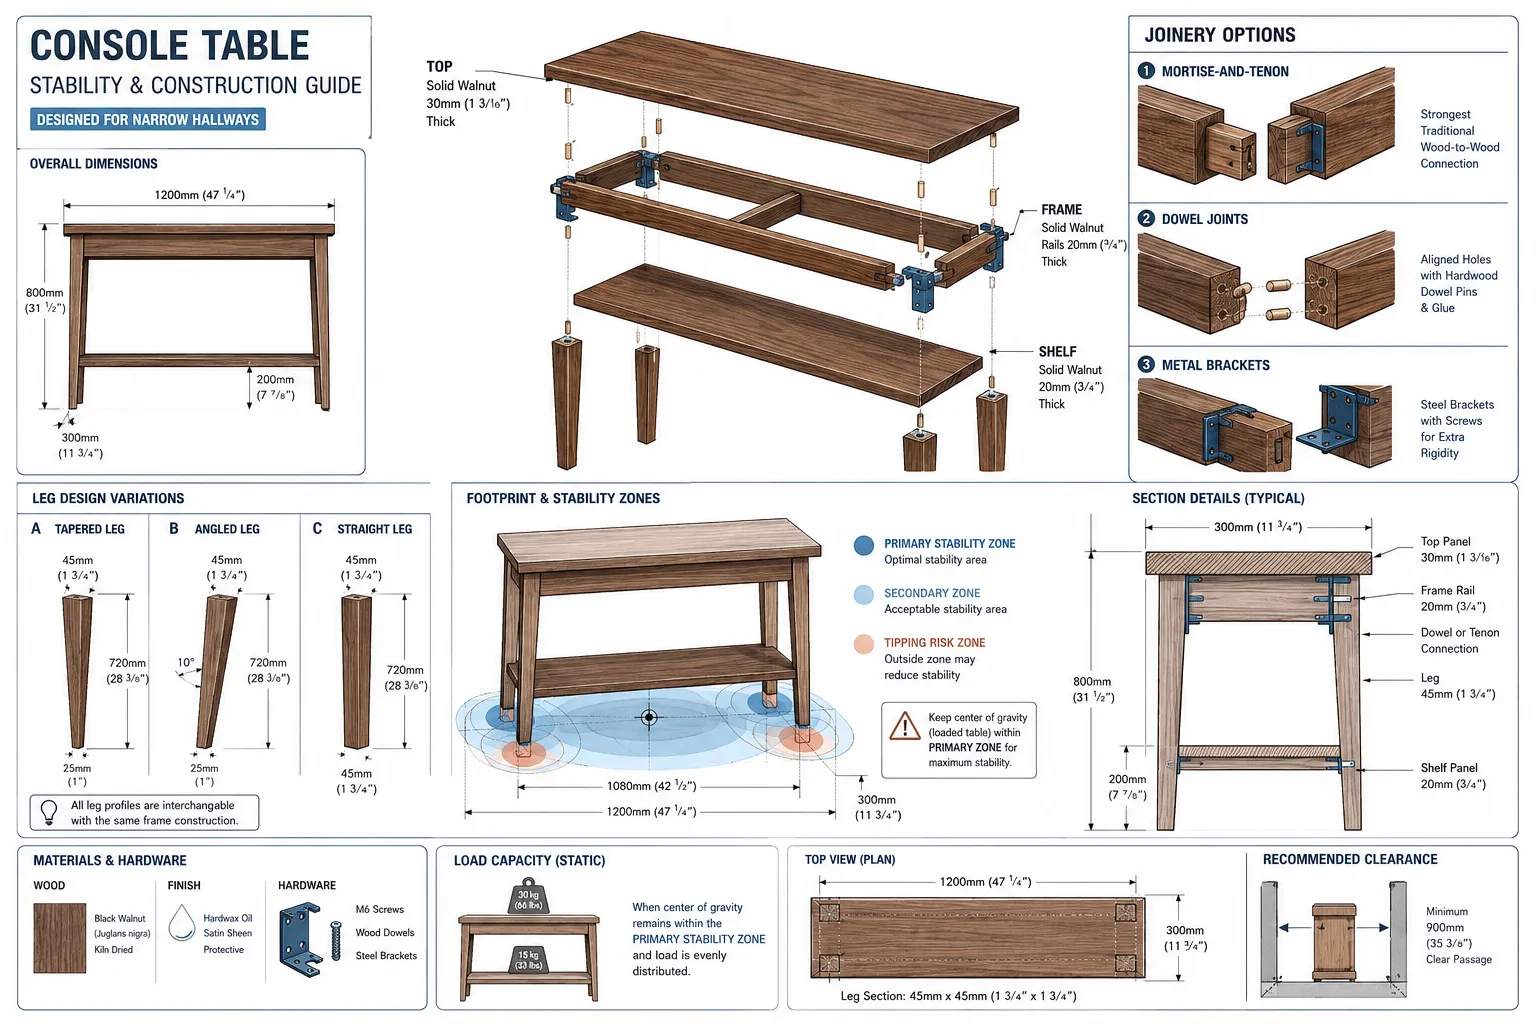
- Splayed Legs: Legs that angle outwards from the top to the bottom increase the table’s footprint, making it more stable against lateral forces. This design is particularly effective for preventing side-to-side wobble.
- T-Shape or C-Shape Base: Instead of four individual legs, a single, wider T-shaped base or C-shaped base at either end can offer superior stability. These designs spread the weight more effectively across the floor.
- Solid Pedestal Base: For a truly robust solution, a solid pedestal base, while visually heavier, provides excellent stability. The key here is to keep the overall depth minimal.
- Cross-Bracing: Adding stretchers or cross-bracing between legs, especially towards the bottom, dramatically increases rigidity and prevents racking. This is a simple yet highly effective stability enhancer.
- Adjustable Feet: Uneven floors are common, and adjustable feet (levelers) can eliminate wobble, ensuring all legs make solid contact with the ground.
Consider how the table base width for stability impacts your design. A wider base, even if the tabletop remains slim, significantly improves resistance to tipping.
Material Selection for Durability and Weight
The material used greatly influences both the stability and durability of the console table.
| Material Type | Pros | Cons | Best Use Case |
|---|---|---|---|
| Hardwoods | Excellent strength, durability, natural beauty. | Heavier, can be more expensive, harder to work with. | Premium, long-lasting tables where stability is key. |
| Plywood | Stable, cost-effective, good strength-to-weight. | Edges need finishing, can delaminate if poor quality. | Modern designs, painted finishes. |
| MDF/Particleboard | Smooth finish, very cost-effective. | Low strength, heavy, susceptible to moisture damage. | Avoid for structural elements; fine for decorative panels. |
| Metal (Steel/Iron) | Extremely strong, allows for slender designs. | Can be heavy, requires specific fabrication skills. | Industrial or minimalist designs where thin profiles are desired. |
For console tables for narrow hallways, hardwoods like oak, maple, or walnut are often preferred due to their inherent stability and resistance to warping. For more modern or minimalist designs, metal frames combined with a solid wood top offer a robust yet visually light solution. When using wood, remember to account for understanding wood movement to prevent future instability or cracking.
Superior Joinery Techniques
Strong joints are the backbone of any stable furniture piece. For console tables, especially slim ones, robust joinery is non-negotiable.
- Mortise and Tenon: This classic woodworking joint offers exceptional strength and resistance to racking. It’s ideal for attaching legs to aprons or tabletops.
- Dovetail Joints: While often used for drawers, dovetails can also be incorporated into leg-to-apron connections for superior mechanical strength and aesthetic appeal. For more on this, check out our guide on ultimate DIY end tables with dovetail drawers.
- Dowels and Biscuits: These are suitable for reinforcing butt joints, offering good strength when combined with quality wood glue.
- Reinforced Screw Joints: While direct screwing isn’t as strong as traditional joinery, screws can be used effectively when combined with metal brackets, corner blocks, or pocket hole joinery for added reinforcement.
- Through Bolts and Barrel Nuts: For metal-to-wood or detachable leg designs, through bolts offer strong, secure connections that can be tightened over time.
“Good joinery is not merely about holding pieces together; it’s about creating a unified structure that resists external forces.”
Utilizing proper woodworking tools and techniques, such as those covered in mastering the router table or a beginner’s guide to essential woodworking joints, will ensure your joints are precise and strong.
The Ultimate Safeguard: Wall Anchoring Systems
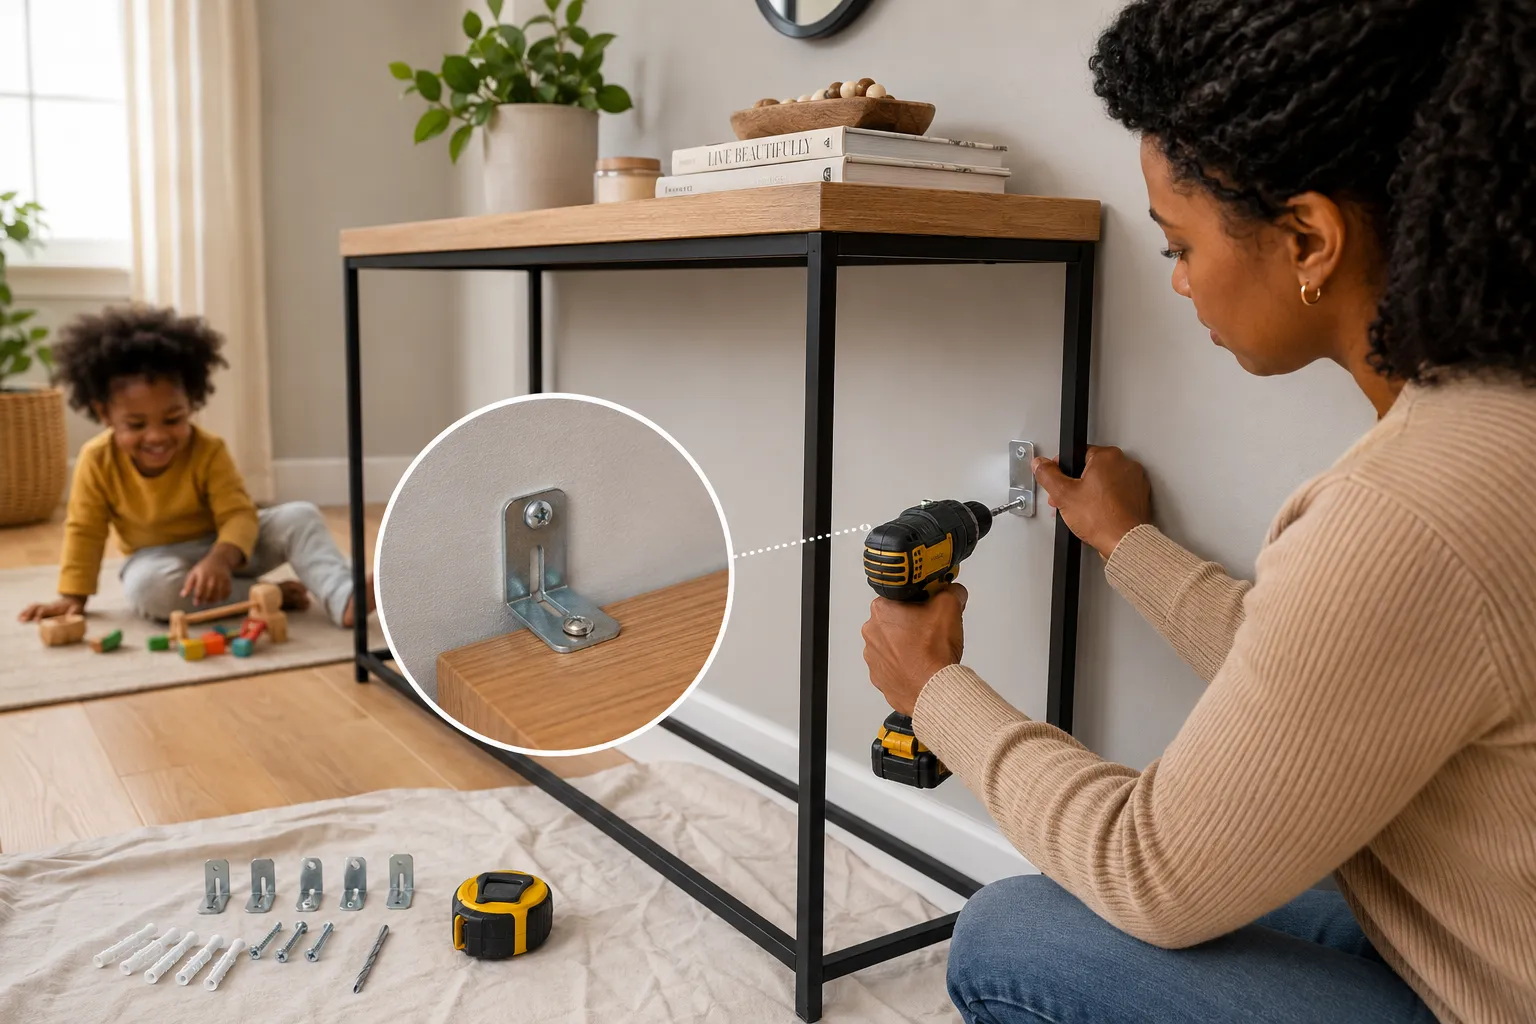
Even with the most meticulously designed and constructed console tables for narrow hallways, an external anchoring system is the ultimate guarantee against tipping. This is especially critical in homes with children or pets. Wall anchoring doesn’t diminish the table’s inherent stability; rather, it adds a crucial layer of safety.
Types of Wall Anchoring Hardware
Various hardware options exist, ranging from simple straps to more robust brackets, each suited for different wall types and aesthetic preferences.
- Anti-Tip Straps: These are common, inexpensive, and often included with ready-made furniture. They typically consist of a nylon or metal strap that connects a bracket on the furniture to a bracket on the wall stud.
- L-Brackets: Small metal L-brackets can be discreetly installed at the top rear of the console table, attaching it directly to a wall stud. For a cleaner look, they can sometimes be recessed or painted to match the wall.
- Cable Anchors: Similar to straps, but often made of thin, strong wire cable, these can be less noticeable.
- French Cleats: While often used for heavier wall-mounted items, a smaller, thinner French cleat system can be used if the console table is designed to sit flush against the wall and primarily support its weight from the wall. This offers exceptional stability and load-bearing capacity.
When installing, always locate wall studs. If a stud isn’t available where you need it, use appropriate drywall anchors (toggle bolts or self-drilling anchors) rated for the weight and pull-out force they might experience. Never rely solely on plastic wall plugs for heavy or frequently disturbed furniture.
Integration and Aesthetics of Anchoring
The key to successful wall anchoring is integrating it discreetly so it doesn’t detract from the table’s appearance.
- Positioning: Place anchors as high as possible on the back of the table to maximize leverage against tipping. If possible, align them with the table’s vertical elements (e.g., behind legs or structural supports) to make them less visible.
- Color Matching: Use hardware that matches the wall or the table’s finish, or paint visible components for a seamless look.
- Concealment: In some designs, a false back panel or a cleverly placed decorative element can hide the anchoring hardware entirely.
It’s important to remember that anchoring isn’t just for heavy items. Even lightweight console tables can pose a tipping hazard if bumped hard, especially if they have items on them that could be knocked off. Safety should always be paramount, especially in a busy hallway. For those interested in building custom wooden key holders or other wall-mounted solutions, similar anchoring principles apply.
Practical Considerations and Finishing Touches
Beyond structural design and anchoring, several practical considerations contribute to a functional and beautiful console table for a narrow hallway.
Proportions and Scale
The overall dimensions of your console table must be carefully chosen to complement the hallway.
- Height: A typical console table height is between 28-34 inches (71-86 cm), often matching or slightly exceeding sofa back heights if placed in a living area. In a hallway, consider the eye level for placing items and ensuring it doesn’t feel too tall or too short in the space.
- Length: The length should be proportionate to the wall space it occupies. Avoid a table that looks too short or too long for the wall. A good rule of thumb is for the table to be about two-thirds to three-quarters the length of the wall section it’s on.
- Depth (Revisited): As discussed, 8-12 inches (20-30 cm) is ideal for narrow hallways. Measure your hallway’s clear width to determine the maximum acceptable depth.
Remember that warm minimalism in woodworking often emphasizes clean lines and appropriate scale, which is perfect for narrow spaces.
Integrated Functionality and Storage
Even slim console tables can offer useful storage without compromising stability.
- Shallow Drawers: A single, shallow drawer can be perfect for keys, mail, or small essentials. Ensure the drawer mechanism is smooth and doesn’t add significant depth.
- Open Shelving: A bottom shelf provides space for baskets, books, or decorative items, adding visual interest and functionality. Ensure the shelf is well-supported and doesn’t interfere with legroom if people will sit near it.
- Hidden Charging Stations: Integrate a small, discreet compartment with power outlets for charging phones or other devices. This keeps cords tidy and out of sight. For larger electronic components, consider designs similar to crafting custom wooden record player consoles.
Finishing and Care
The finish not only protects the wood but also enhances its aesthetic.
- Durable Finishes: In high-traffic areas like hallways, opt for durable finishes such as polyurethane (spray or brush application), lacquer, or a hard wax oil. These finishes resist scratches, moisture, and general wear. Learn more about spray vs. brush polyurethane for optimal application.
- Color and Grain: Choose a wood species and finish that complements your home’s decor. Lighter woods or finishes can make a narrow hallway feel more open, while darker woods can add a touch of sophistication.
- Maintenance: Advise users on proper cleaning and care to maintain the table’s appearance and longevity.
By thoughtfully considering these practical aspects, you can design and build a console table that is not only stable and safe but also a beautiful and functional addition to any narrow hallway in 2026.
Conclusion
Designing and building console tables for narrow hallways presents a unique blend of aesthetic opportunity and engineering challenge. The critical balance lies in creating a piece that is visually light, functionally useful, and absolutely stable against tipping. By focusing on slim proportions, robust leg designs, superior joinery techniques, appropriate material selection, and, most importantly, secure wall anchoring, you can achieve this balance.
The process of crafting such a table is a testament to thoughtful woodworking, where every inch and every joint contributes to the final product’s safety and elegance. Whether you are a seasoned woodworker or a dedicated DIY enthusiast, the principles outlined here, prioritizing depth and stability, choosing strong materials, and implementing reliable anchoring systems, will guide you in creating beautiful, durable, and tip-resistant console tables. Embrace these considerations, and transform your narrow hallways into inviting and functional spaces with confidence.
Actionable Next Steps:
- Measure Your Hallway: Precisely determine the maximum permissible depth and ideal length for your console table.
- Sketch Designs: Experiment with various leg styles (splayed, T-base, C-base) and storage options (shallow drawers, open shelves) to maximize stability and utility within your depth constraints.
- Select Materials: Choose hardwoods or high-quality plywood for structural components, ensuring durability.
- Plan Joinery: Opt for strong joints like mortise and tenon or reinforced screw joints for lasting stability.
- Incorporate Anchoring: Always include plans for a wall anchoring system, such as L-brackets or anti-tip straps, to secure the table firmly to wall studs.
- Build and Test: Construct your table with precision, and before placing items on it, gently test its stability and securely install the wall anchoring system.
References
- Fine Woodworking. (2018). Build a Console Table that Won’t Wobble. The Taunton Press.
- Peters, S. (2021). The Complete Guide to Joinery. Fox Chapel Publishing.
- Wood Magazine. (2023). Furniture Stability and Safety: Anchoring Tips. Meredith Corporation.