

The average woodworker inhales approximately 1.5 teaspoons of fine dust for every hour spent operating machinery without adequate protection, a startling figure that underscores the silent threat to respiratory health. In any woodworking environment, especially in compact spaces, effective dust management is not merely a convenience but a critical safety measure. This guide delves into Dust Collection and Air Filtration Systems: DIY Builds, Sizing, and Integration with Small Workshop Layouts, providing the essential knowledge to protect your health and maintain a cleaner, more efficient workspace in 2026. Understanding the nuances of air volume, filtration efficiency, and strategic placement can transform a dust-choked garage into a pristine crafting haven.
Key Takeaways
- Properly sizing your dust collection system involves calculating the Cubic Feet per Minute (CFM) requirements for your largest tools and matching them to a collector’s capacity.
- Air filtration units complement dust collectors by capturing ambient fine dust, providing a comprehensive air quality solution in small workshops.
- DIY dust collection systems, often using PVC or repurposed components, can be cost-effective but require careful planning for efficiency and safety.
- Strategic integration of dust collection and air filtration within a small workshop maximizes space and workflow, ensuring both health and productivity.
- Regular maintenance, including filter cleaning and duct inspection, is crucial for maintaining optimal system performance and longevity.
Sizing Your Dust Collection and Air Filtration Systems: The Foundation of Clean Air
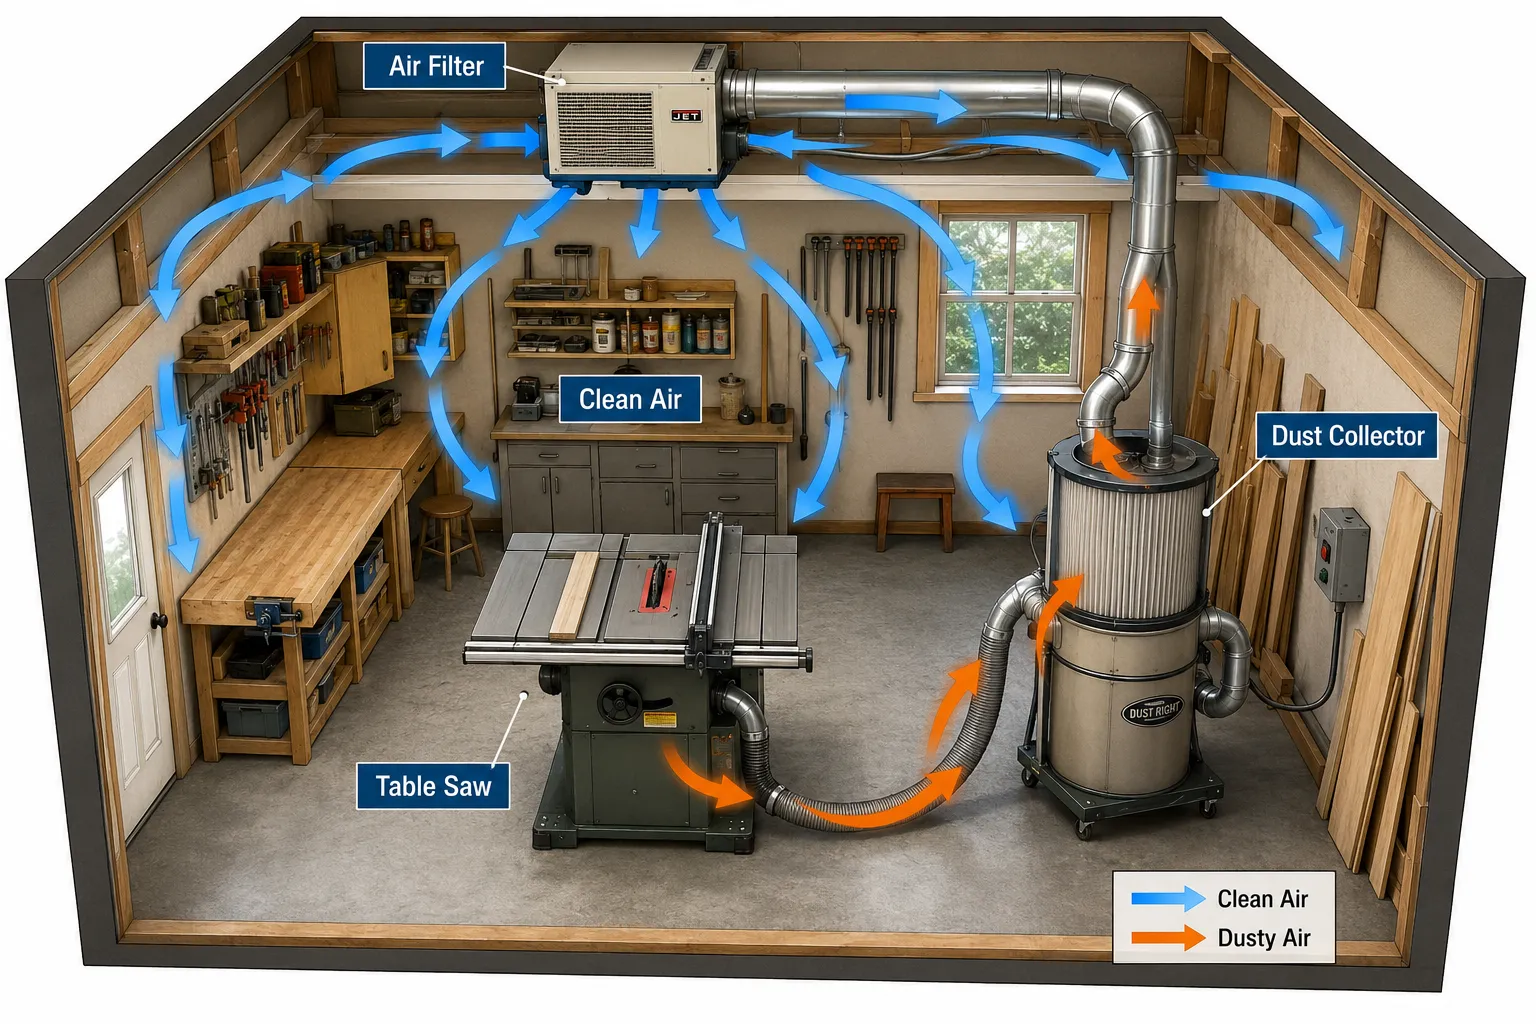
Before embarking on any build or purchase, understanding the science behind air movement and filtration is paramount. The primary goal is to remove harmful particulate matter from the air, ranging from large wood chips to microscopic dust that poses the greatest health risk. This section focuses on sizing Dust Collection and Air Filtration Systems: DIY Builds, Sizing, and Integration with Small Workshop Layouts effectively.
Understanding CFM, Static Pressure, and Air Changes
- Cubic Feet per Minute (CFM): This is the most critical metric. CFM measures the volume of air a system moves in one minute. Each woodworking machine has a recommended CFM requirement for effective dust extraction. For instance, a table saw might require 350-400 CFM, while a planer could demand 600-800 CFM. Always aim for a dust collector that can meet or exceed the highest CFM requirement of any single tool you plan to connect.
- Static Pressure (SP): Static pressure refers to the resistance to airflow within your ducting system. Longer runs, more bends, and smaller diameter ducts all increase static pressure, which can reduce the effective CFM delivered to your tools. Good system design minimizes SP.
- Air Changes Per Hour (ACH): For ambient air filtration, ACH is key. It indicates how many times the air in your workshop is completely replaced or filtered in one hour. A general recommendation for woodworking shops is 6-10 ACH. To calculate required CFM for an air filter, multiply your workshop’s volume (Length x Width x Height in feet) by the desired ACH, then divide by 60 minutes.
Example Workshop Calculation: Let’s assume a small workshop measures 12 feet by 15 feet with an 8-foot ceiling.
- Workshop Volume: 12 ft x 15 ft x 8 ft = 1440 cubic feet
- Desired ACH: 8 (a good balance for active woodworking)
- Required Air Filter CFM: (1440 cubic feet x 8 ACH) / 60 minutes = 192 CFM
Therefore, an ambient air filter with a clean air delivery rate (CADR) of at least 192 CFM would be suitable.
Dust Collectors vs. Ambient Air Filters
It’s crucial to understand the distinct roles of these two systems:
- Dust Collectors: These are designed for point-of-source extraction, meaning they connect directly to woodworking machines to capture chips and dust as they are generated. They typically handle larger volumes of air and particulate matter. Dust collectors are essential for visible dust and larger debris.
- Ambient Air Filters: Often ceiling-mounted, these units are designed to capture the fine, invisible dust particles that escape the dust collector and remain suspended in the air. They continuously filter the air to improve overall air quality and reduce airborne irritants.
For a comprehensive solution, both a dust collector and an ambient air filtration system are recommended, especially in small workshops where dust can quickly permeate the entire space.
DIY Dust Collection System Builds and Component Selection
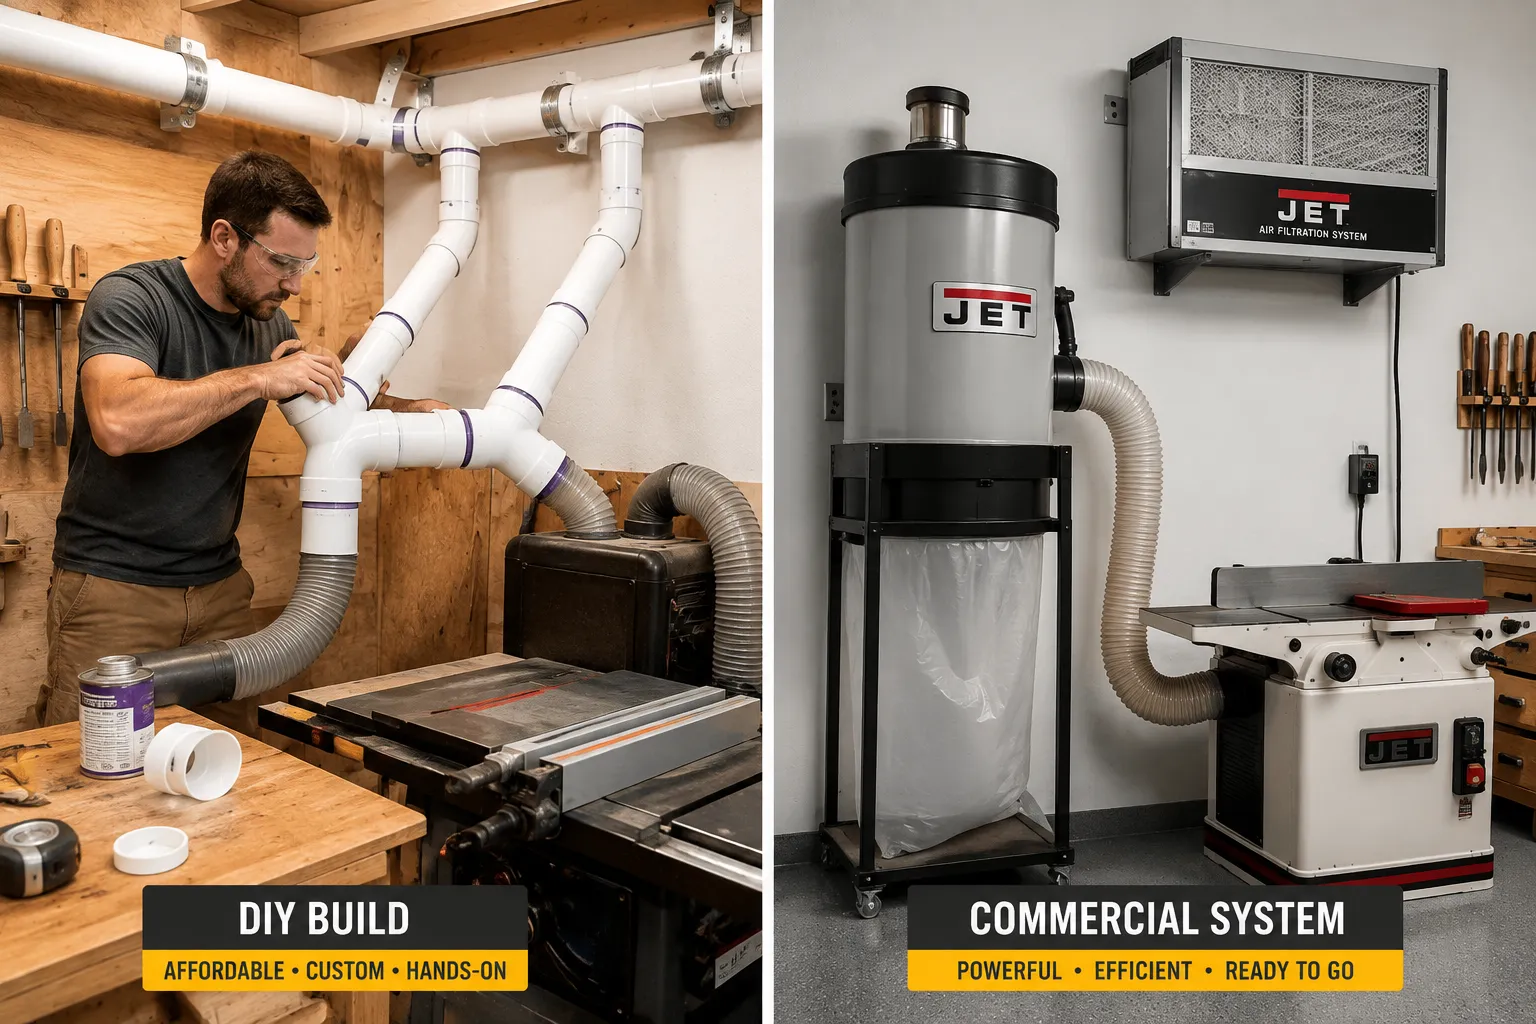
Building your own dust collection system can be a rewarding and cost-effective endeavor, offering customization tailored to your specific workshop layout. This approach for Dust Collection and Air Filtration Systems: DIY Builds, Sizing, and Integration with Small Workshop Layouts requires careful planning and component selection.
Essential Components for a DIY System
- The Fan/Motor Unit (Impeller): This is the heart of your system. You can repurpose a commercial dust collector’s motor or, for very light duty, even a powerful shop vac. However, a dedicated dust collector impeller is designed for continuous duty and high airflow.
- Collection Bags/Canisters:
- Chip Separator (Cyclone or Thien Baffle): This is highly recommended for DIY systems. A cyclone or Thien baffle separates larger chips and heavy dust particles before they reach the main filter, preserving filter efficiency and extending its life. This can be built from a large trash can or a custom-built conical separator.
- Filter Bag/Canister: After the separator, fine dust passes to the filter. High-quality pleated cartridge filters (e.g., 1 micron or 0.5 micron) are far superior to standard cloth bags for capturing fine dust.
- Ducting:
- Main Trunk Line: Often 4-inch or 6-inch PVC or metal ducting. Larger diameters reduce static pressure and maintain CFM. For most small workshops, 4-inch PVC is a practical choice.
- Branch Lines: Connect from the main trunk to individual tools. These are typically 2.5-inch to 4-inch diameter, depending on the tool’s CFM requirement.
- Fittings: Elbows, Y-branches, blast gates, and couplers are necessary. Always use Y-fittings instead of T-fittings to reduce turbulence and static pressure.
- Blast Gates: Manual or automated gates that seal off unused branch lines, directing all suction to the active tool. For automating your dust collection system, consider integrating smart controls for tool activation. Learn more about building a DIY smart workshop dust collection system.
- Hoses: Flexible hoses connect tools to blast gates or short sections of rigid ducting. Minimize flexible hose length as it creates significant static pressure.
Choosing Ducting Materials and Layout
- PVC vs. Metal: PVC is affordable, easy to work with, and readily available. However, it can build up static electricity, which needs to be grounded to prevent dust explosions. Metal ducting (spiral-seam or snap-lock) is more expensive but inherently grounded and more durable. For most DIY woodworkers, PVC with proper grounding is a viable option.
- Layout Principles:
- Shortest Runs: Position your dust collector centrally or at a location that allows the shortest possible main trunk line to most tools.
- Minimum Bends: Every 90-degree elbow significantly increases static pressure. Use 45-degree bends or long, sweeping bends where possible.
- Gradual Transitions: When changing duct diameter (e.g., from a 4-inch main to a 2.5-inch branch), use gradual reducers rather than abrupt transitions.
- Downsizing: Only downsize branch lines if absolutely necessary, and ensure the tool’s port matches the branch size to avoid choking airflow.
When planning your layout, visualize your primary workflow. You might find it beneficial to design your workshop for optimal efficiency and ergonomics. Check out our guide on creating ergonomic workshop layouts for more inspiration.
Pull Quote: “A well-designed DIY dust collection system is a testament to resourceful craftsmanship, transforming a basic setup into a powerful air quality guardian.”
Integrating Dust Collection and Air Filtration with Small Workshop Layouts
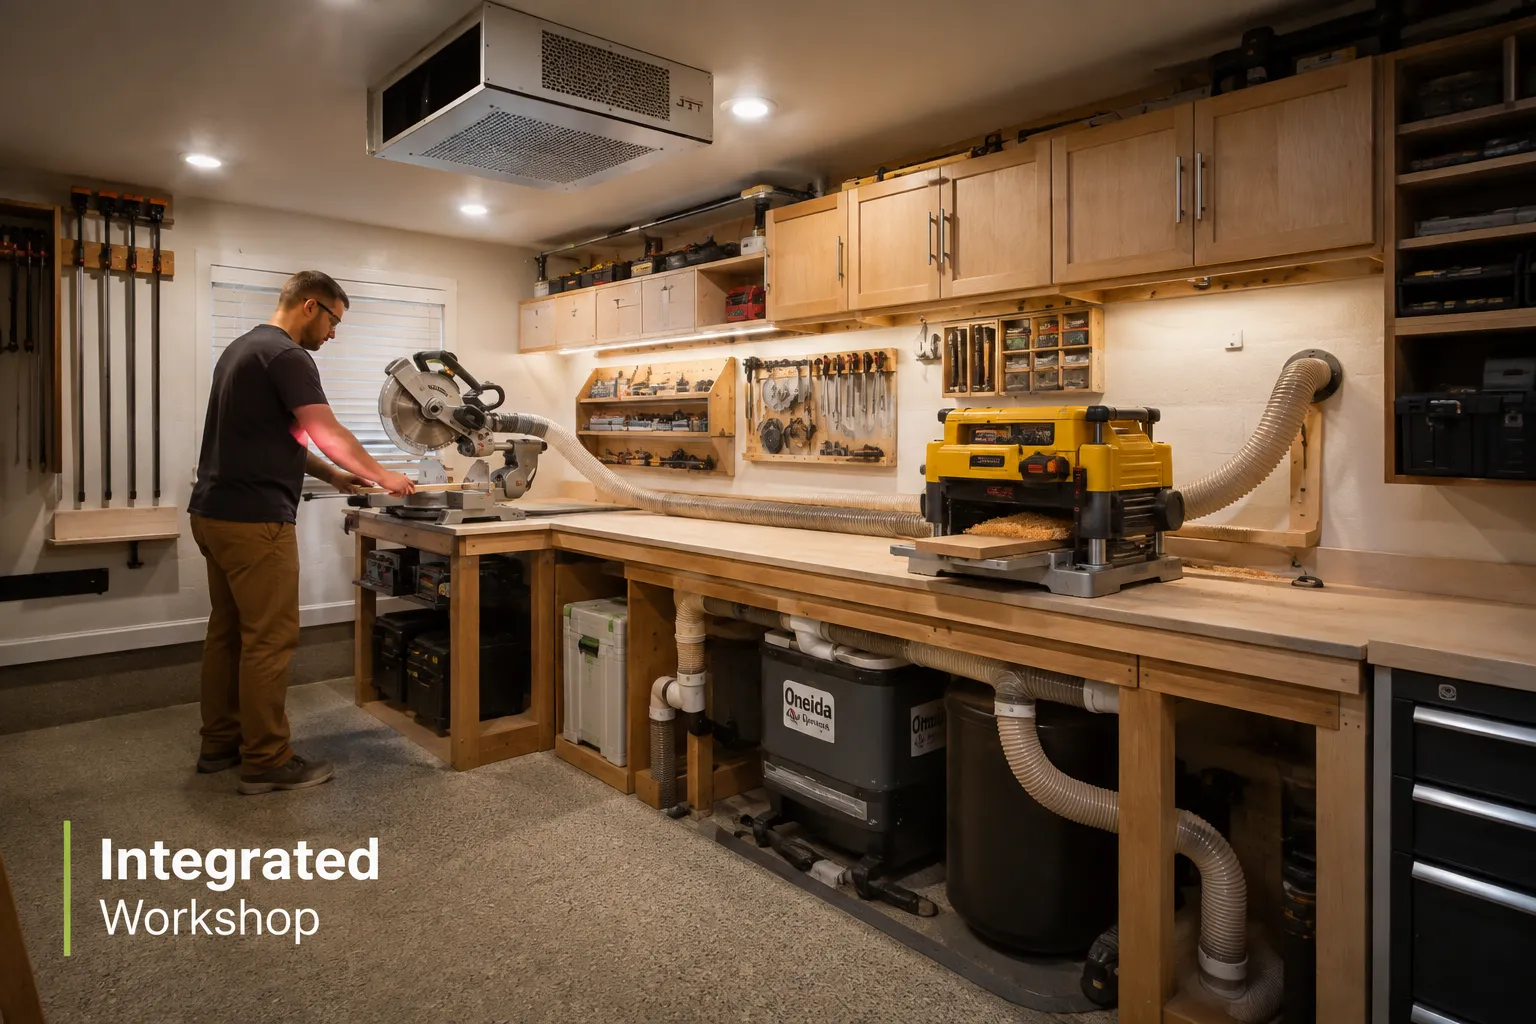
Small workshops demand ingenious solutions to maximize space while maintaining functionality and a healthy environment. Integrating Dust Collection and Air Filtration Systems: DIY Builds, Sizing, and Integration with Small Workshop Layouts effectively is a puzzle requiring careful thought.
Strategic Placement for Maximized Space
Dust Collector Placement:
- Out of the Way: If space permits, position the dust collector in a less-trafficked area, perhaps in a corner or under a workbench, especially if it’s a mobile unit.
- Centralized: If you have a fixed system, a central location minimizes ducting runs.
- External Venting (if feasible): For ultimate dust control, consider venting the dust collector outdoors. This removes all fine dust, but is usually only practical for larger systems and in specific climates.
- Under Bench Integration: Custom-building a cabinet under your workbench to house a compact dust collector can be an excellent space-saving solution. For ideas on maximizing bench space, explore building a compact and ergonomic workbench for small workshops.
Ambient Air Filter Placement:
- Ceiling Mounted: The most common and effective placement. Mount the filter near the center of the workshop or in a location that promotes circular airflow, ensuring it’s not obstructed by tall machinery or shelving.
- Corner Placement: If ceiling mounting isn’t possible, a high shelf in a corner can work, but airflow might be less efficient.
Ducting Routing in Confined Spaces
- Overhead vs. Floor Level:
- Overhead Ducting: Often ideal for small shops. It keeps the floor clear for movement and tool placement. Run main trunk lines along walls or ceiling joists. Use drops (vertical branches) to connect to tools.
- Floor-Level Ducting: Can be trip hazards. Consider running ducting along walls at floor level, but avoid crossing high-traffic areas.
- Modular Connections: Use quick-connect fittings and flexible hoses to easily move dust collection between portable tools or workstations. This is particularly useful for tools like sanders or routers that might be used at a dedicated workbench or a folding table. For small shops, folding tables for tiny woodshops can be a game-changer.
- Tool-Specific Adaptations: Many tools have non-standard dust ports. Invest in or fabricate adapters to ensure a tight, efficient connection to your ducting. For example, a table saw with an integrated stand might have a specific dust port design.
Maintenance and Best Practices
- Regular Filter Cleaning: Clean or replace dust collector filters and air filter pre-filters regularly. Clogged filters dramatically reduce performance.
- Empty Collection Bags: Don’t let collection bags or canisters overfill. This impedes airflow and can damage your system.
- Ducting Inspection: Periodically check ducting for blockages, leaks, or loose connections. Even small leaks can significantly reduce suction.
- Grounding: If using PVC, ensure your system is properly grounded to dissipate static electricity. This usually involves running a bare copper wire through the inside of the ducting and grounding it to an electrical ground.
- Personal Protective Equipment (PPE): Even with the best dust collection, always wear a respirator, safety glasses, and hearing protection when operating woodworking machinery.
By thoughtfully designing and maintaining your dust collection and air filtration systems, you create a safer, cleaner, and more enjoyable woodworking environment, making your small workshop a place where creativity can truly thrive in 2026.
Conclusion
Creating a healthy and efficient woodworking environment, particularly in a small workshop, hinges on a well-planned and meticulously integrated dust collection and air filtration system. From accurately calculating CFM requirements and understanding the roles of various components to strategically integrating DIY builds or commercial units, every decision contributes to the overall air quality and workflow. Prioritizing safety through effective dust management not only protects your long-term health but also enhances the enjoyment and precision of your woodworking projects. As you continue to refine your workshop in 2026, remember that a clean shop is a productive shop.
Actionable Next Steps:
- Assess Your Needs: List all your woodworking tools and their CFM requirements. Measure your workshop dimensions to calculate ambient air filtration needs.
- Plan Your Layout: Sketch out potential ducting runs, considering tool placement and minimizing bends and long flexible hose sections. Identify suitable locations for your dust collector and air filter.
- Source Components: Decide between a DIY build or a commercial system based on your budget, skills, and desired performance. Purchase or gather the necessary components.
- Install and Test: Carefully install your system, ensuring all connections are sealed and grounded (if using PVC). Test it thoroughly with each tool.
- Establish Maintenance Routine: Schedule regular cleaning of filters, emptying of collection bins, and inspection of ductwork to ensure optimal long-term performance.
SEO Meta Title: DIY Dust Collection & Air Filtration for Small Workshops SEO Meta Description: Learn to size, build DIY, and integrate dust collection and air filtration systems for small workshop layouts in 2026. Maximize space, ensure clean air.