
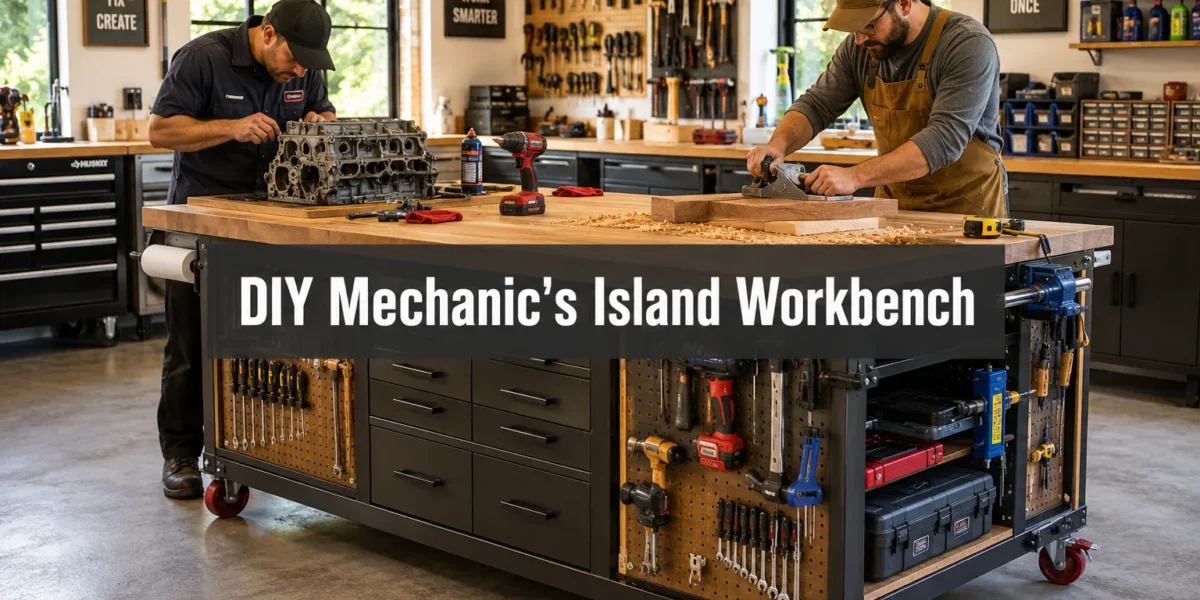
The average mechanic or serious DIY enthusiast spends countless hours searching for misplaced tools, navigating cluttered workspaces, or struggling with an inadequate surface for heavy-duty tasks. This inefficiency doesn’t just cost time; it can impact the quality and safety of work. The solution, for many, lies in a purpose-built workspace: a DIY Mechanic’s Island Workbench: Heavy-Duty Workshop Furniture for Tool Storage and Assembly. This article explores how to design and construct a robust, multi-functional island workbench, ideal for both automotive and woodworking projects, featuring integrated tool storage, durable surfaces, and essential mobility to transform any garage or workshop into an efficient powerhouse in 2026.
Key Takeaways
- A DIY mechanic’s island workbench offers centralized, organized tool storage and a dedicated workspace.
- Heavy-duty construction, often involving solid wood and steel, is essential for durability and stability.
- Integrating diverse storage solutions like drawers, shelves, and pegboards maximizes utility.
- Mobility features, such as locking casters, enhance workspace flexibility.
- The design should accommodate both automotive and woodworking tasks, making it highly versatile.
Designing Your Ultimate DIY Mechanic’s Island Workbench: Heavy-Duty Workshop Furniture for Tool Storage and Assembly
Creating a DIY Mechanic’s Island Workbench: Heavy-Duty Workshop Furniture for Tool Storage and Assembly begins with thoughtful design. This isn’t just about throwing some wood together; it’s about engineering a centerpiece that supports your specific workflow, whether you’re rebuilding an engine, assembling furniture, or performing intricate repairs. The objective is to maximize efficiency, durability, and versatility.
Consider your primary tasks. Will you mostly be working on automotive components, which might require a more oil-resistant surface and heavy-duty vises? Or will woodworking dominate, necessitating a flat, smooth surface and dedicated clamp storage? A truly versatile island workbench can seamlessly transition between these roles.
Core Design Principles
- Robustness: The workbench must withstand significant weight, impact, and vibration. This dictates the material choices for the frame and worktop.
- Functionality: Integrated storage, power access, and specialized tool mounts are critical for an efficient workflow.
- Ergonomics: The height of the work surface should be comfortable for standing tasks, reducing strain during long projects.
- Adaptability: The ability to move the bench, or reconfigure its components, adds immense value.
The ideal footprint will depend on your available workshop space and the scale of your projects. An island design naturally provides 360-degree access, which is invaluable for larger projects like engine work or assembling sizable wood pieces. When planning your workshop layout for 2026, integrating such a central unit is a smart move. For those with smaller spaces, consider how a robust island can still fit by optimizing its dimensions, possibly even incorporating a design similar to a portable folding workbench for maximum adaptability.
Essential Components and Materials
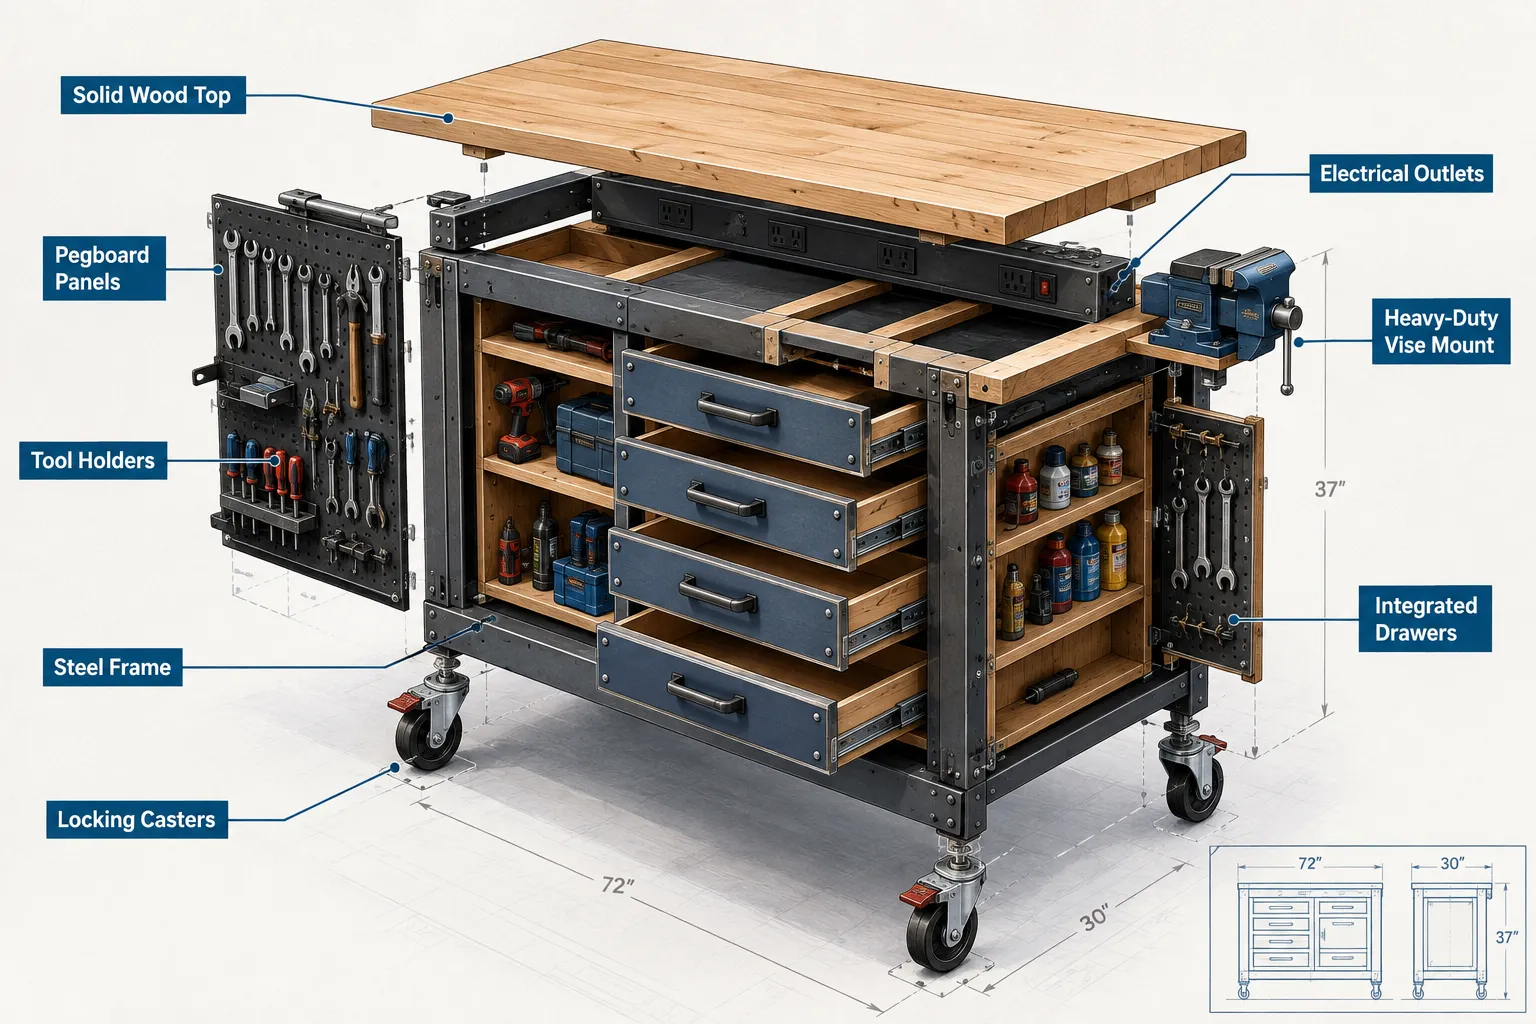
A heavy-duty island workbench typically incorporates several key elements:
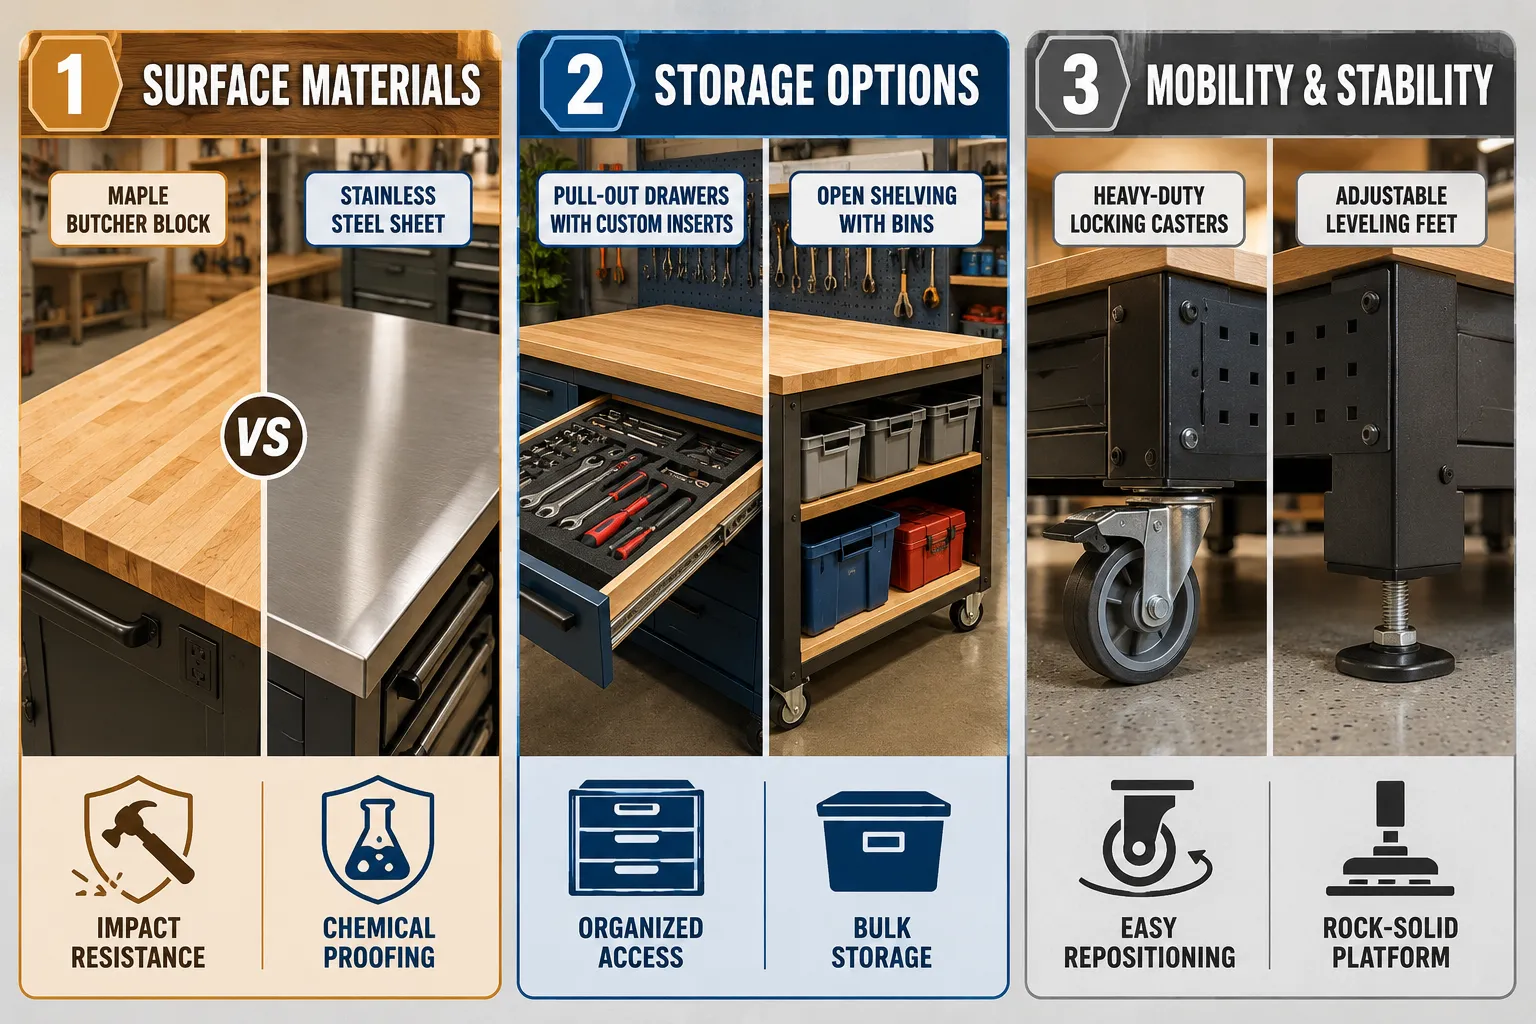
- Worktop: This is the most crucial surface. Options include:
- Butcher Block: Excellent for woodworking due to its density and ability to be resurfaced. It’s also sturdy enough for most mechanic tasks.
- Steel Plate: Ideal for heavy automotive work, welding, and high-impact tasks. Less forgiving for woodworking tools.
- High-Density Plywood/MDF with Laminate: A more economical option, but often requires a sacrificial layer or extra protection for extreme tasks.
- Frame: The structural backbone.
- Heavy-Gauge Steel Tubing: Provides unparalleled strength and rigidity, often preferred for commercial-grade benches.
- Solid Hardwood (e.g., Douglas Fir, Oak): Offers excellent strength and a more traditional aesthetic, often used in conjunction with robust joinery.
- Storage: A mix of solutions caters to different tool types.
- Drawers: Full-extension, heavy-duty slides are a must. Varying drawer depths allow for hand tools, power tools, and specialized equipment.
- Shelving: Adjustable shelves offer flexibility for larger items or bins.
- Pegboard/Slatwall: Essential for organizing frequently used hand tools, keeping them visible and accessible.
- Cabinets: Enclosed storage protects sensitive tools from dust and debris.
- Mobility:
- Heavy-Duty Locking Casters: Allows you to move the workbench for different tasks, cleaning, or reconfiguring your space. Look for casters with a high weight rating and reliable locking mechanisms.
- Leveling Feet: For scenarios where the workbench needs to be absolutely static and level.
Integrating Power and Specialized Mounts
For a truly modern workshop experience in 2026, integrating power directly into your workbench is a game-changer. Consider:
- Built-in Outlets: Strategically placed power strips or individual outlets reduce the need for extension cords, improving safety and convenience.
- USB Charging Ports: Handy for charging cordless tool batteries, phones, or diagnostic devices.
- Air Compressor Hookups: For mechanics, quick-connect air fittings can be incredibly useful.
Specialized mounts enhance functionality. A sturdy mounting point for a heavy-duty vise is almost mandatory for both disciplines. Other considerations might include:
- Grinder or buffer mounts
- Small drill press mount
- Dedicated clamp storage racks
- Magnetic tool bars
When planning the electrical aspects, ensure all wiring is properly enclosed and grounded, adhering to local electrical codes. For enhanced tool security, integrating smart systems could also be beneficial. Learn more about DIY Smart Workshop Security Systems Integrating Motion Sensors Cameras And Smart Locks For Tool Protection.
Building Your Heavy-Duty Workshop Furniture for Tool Storage and Assembly
The construction phase of your DIY Mechanic’s Island Workbench: Heavy-Duty Workshop Furniture for Tool Storage and Assembly demands precision and robust techniques. Skimping on materials or construction methods here will compromise the entire project’s longevity and functionality.
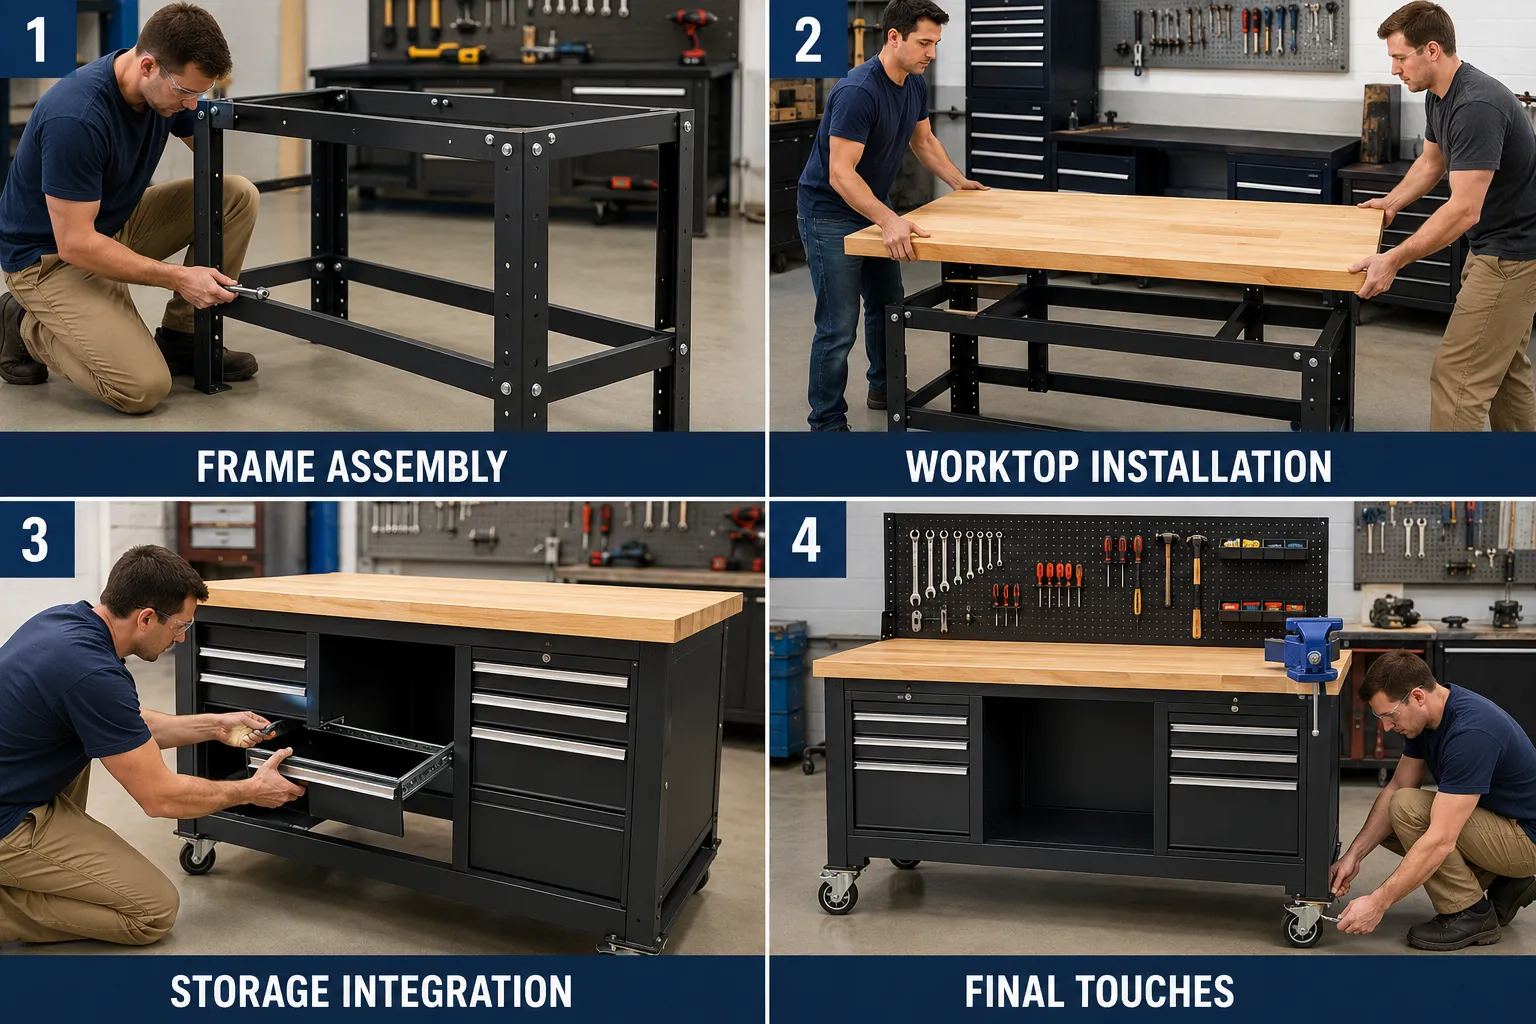
Frame Construction
Whether you opt for a steel or solid wood frame, stability is paramount.
- Steel Frame: Welding is the most secure method for steel. If welding isn’t an option, use heavy-duty bolted connections with thick-gauge steel tubing. Ensure all joints are square and true before tightening. For a robust structure, aim for tubing with a wall thickness of at least 1/8 inch.
- Wood Frame: Use construction-grade lumber like 4x4s for legs and 2x4s or 2x6s for stretchers. Employ strong joinery methods. Hand tool joinery for visible wood joints can create incredibly strong and aesthetically pleasing connections, though heavy-duty bolts and lag screws with wood glue are often sufficient for a purely utilitarian workbench. Cross-bracing is crucial to prevent racking.
Consider the workbench height carefully. A common height is around 34-36 inches (86-91 cm), allowing for comfortable standing work. If you plan to use it primarily with a shop stool, you might adjust this, but ensure it remains comfortable for a wide range of tasks.
Worktop Installation
The worktop needs to be securely fastened to the frame while allowing for potential future replacement or resurfacing.
- Butcher Block: Fasten from underneath using screws driven up through the frame into the worktop. Use oversized holes in the frame to allow for wood expansion and contraction.
- Steel Plate: Bolt the steel plate directly to a supporting frame or a plywood substrate, which is then attached to the main frame. Ensure adequate support to prevent flexing.
- Plywood/MDF: Secure with screws from above or below, depending on whether you want a clean top surface. Always use construction adhesive in addition to fasteners for maximum rigidity.
A slight overhang on all sides of the worktop can be beneficial for clamping and access.
Integrated Storage Solutions
Building in drawers and shelves requires careful planning and execution.
- Drawers: Use high-quality, full-extension, heavy-duty drawer slides that can support at least 100-150 pounds (45-68 kg) per pair. Construct drawer boxes from robust plywood (at least 1/2 inch thick). Custom drawer inserts or foam cutouts are excellent for tool organization, preventing tools from shifting during movement. For advanced organization, explore DIY Smart Tool Storage Integrating Rfid And Bluetooth For Inventory Management And Quick Access.
- Shelving: Adjustable shelf pins offer the most flexibility. Use sturdy plywood or lumber for shelves themselves.
- Pegboard/Slatwall: Mount directly to the side or back of the workbench frame. Ensure a small gap between the wall and the pegboard to allow peg hooks to fully engage.
Adding Mobility and Final Touches
Choosing and installing the right casters is vital for workbench mobility.
- Casters: Select casters with a combined weight rating that far exceeds your estimated total workbench weight (including tools). For example, if your workbench is expected to weigh 500 lbs, choose four casters each rated for at least 200-250 lbs. Ensure they are industrial-grade, swivel, and have reliable foot-operated locking mechanisms.
- Vise Mounts: Integrate a thick piece of lumber or steel plate as a dedicated mounting point for your vise. This ensures stability during heavy-duty clamping or hammering.
Once the main structure is complete, finish the wood surfaces. Sand all wood smooth and apply a durable finish like polyurethane or spar varnish to protect against moisture, chemicals, and wear. For metal components, a rust-inhibiting paint is advisable. Proper lighting is also crucial for any workbench; consider DIY Smart Workshop Lighting Optimizing Visibility And Energy Efficiency With Automated Woodworking Illumination to ensure your workspace is always well-lit.
Optimizing Your DIY Mechanic’s Island Workbench: Heavy-Duty Workshop Furniture for Tool Storage and Assembly
Once your DIY Mechanic’s Island Workbench: Heavy-Duty Workshop Furniture for Tool Storage and Assembly is built, the next step is to optimize it for maximum efficiency and longevity. This involves smart tool placement, ongoing maintenance, and potential future upgrades.
Strategic Tool Organization
The effectiveness of your island workbench hinges on organized tool storage. Clutter negates the benefits of a dedicated workspace.
- “Point of Use” Principle: Store frequently used tools within arm’s reach of where they are used. Hand tools for general tasks might be on pegboards, while specialized automotive tools could be in dedicated drawers.
- Drawer Dividers and Foam Inserts: Custom-fit foam or commercial drawer dividers keep tools from sliding around and make it immediately clear if a tool is missing.
- Vertical Storage: Maximize space by using vertical organizers for wrenches, screwdrivers, and pliers. Magnetic strips are excellent for small metal tools.
- Labeling: Label drawers, bins, and even pegboard outlines to ensure tools are returned to their proper place quickly.
A well-organized workbench reduces setup and cleanup time, allowing more time for actual work. It also contributes to a safer environment by minimizing tripping hazards and making tools easy to find when needed.
Maintenance and Durability
Even the most robust workbench requires ongoing maintenance to ensure its heavy-duty performance.
- Worktop Care:
- Wood: Regularly clean and re-oil or re-seal butcher block tops to protect against spills and wear. Address any dents or gouges promptly.
- Steel: Clean up oil and grease spills immediately to prevent buildup. Periodically inspect for rust and treat as necessary.
- Frame Inspection: Regularly check all bolts and fasteners for tightness. Vibration from heavy work can loosen connections over time. For wooden frames, inspect joints for any signs of weakening.
- Drawer Slides and Casters: Keep drawer slides clean and lightly lubricated for smooth operation. Inspect casters for wear, ensuring they swivel freely and the locking mechanisms engage securely. Replace any damaged casters.
- Electrical Components: Periodically check electrical outlets and wiring for damage or loose connections.
Proactive maintenance extends the life of your workbench and ensures it remains a safe and reliable asset in your workshop.
Future Upgrades and Customization
A DIY workbench offers the flexibility for future expansion and customization as your needs evolve.
- Additional Storage Modules: Easily add more drawers, shelves, or cabinets. Consider integrating a modular system for greater flexibility.
- Specialized Attachments: You might add a dedicated sharpening station, a small parts storage carousel, or even a mini dust collection port specifically for the workbench (for woodworking tasks).
- Lighting Enhancements: Incorporate task lighting directly above the work surface, or upgrade to brighter, more energy-efficient LED fixtures.
- Finishing Systems: For those who frequently work on small parts or intricate assemblies, a dedicated painting or finishing station can be integrated, perhaps with an exhaust fan for ventilation.
 This adaptable nature means your initial investment in a DIY Mechanic’s Island Workbench: Heavy-Duty Workshop Furniture for Tool Storage and Assembly will continue to pay dividends for years to come. By consistently evaluating your workflow and making thoughtful additions, your workbench will remain the heart of an efficient and productive workshop. For those looking to streamline their workspace further, considering efficient layouts or portable solutions can also be helpful, such as exploring efficient small workshop layouts for 2026 mobile tool stations and dust collection upgrades.
Conclusion
A well-designed and constructed DIY Mechanic’s Island Workbench: Heavy-Duty Workshop Furniture for Tool Storage and Assembly is more than just a piece of furniture; it’s a foundational element of a productive and enjoyable workshop. By focusing on robust materials, intelligent storage solutions, essential mobility, and strategic power integration, you can create a versatile hub capable of tackling everything from intricate engine repairs to precise woodworking projects. The investment of time and effort in building such a workbench in 2026 will undoubtedly be repaid through increased efficiency, reduced clutter, and a more streamlined workflow.
Start by assessing your specific needs and available space. Then, meticulously plan your design, prioritizing durability and functionality. During construction, commit to quality materials and sound building techniques. Finally, implement smart organization and regular maintenance practices to ensure your heavy-duty island workbench serves as the reliable core of your workshop for many years to come. This project empowers you not only with a superior workspace but also with the satisfaction of having crafted it yourself.