
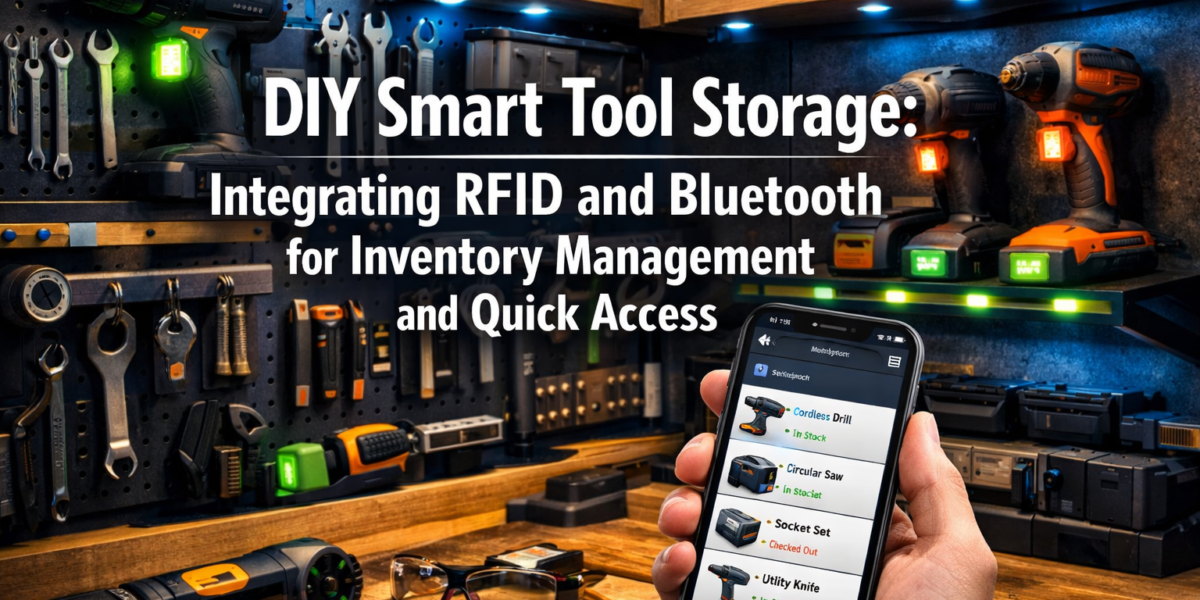

Losing precious minutes searching for a misplaced wrench or a specialized router bit isn’t just frustrating; it’s a tangible drag on productivity that costs serious time and effort over the course of a project. Imagine a workshop where every tool is accounted for, its location precisely known, and accessible with a few taps on your smartphone. This isn’t a futuristic dream from a sci-fi movie; it’s the immediate reality made possible by DIY Smart Tool Storage: Integrating RFID and Bluetooth for Inventory Management and Quick Access in 2026. This comprehensive guide explores how you can harness the power of readily available technology to revolutionize your workshop organization, ensuring you spend less time searching and more time crafting.
Key Takeaways
- Enhanced Organization: RFID and Bluetooth transform traditional storage into intelligent systems, precisely locating every tool.
- Real-time Inventory: Keep an accurate, up-to-date digital log of all your tools, reducing loss and simplifying project planning.
- Quick Access: Locate specific tools instantly using a smartphone app, saving valuable workshop time.
- Customizable Solutions: Design and build smart storage tailored to your unique tool collection and workshop layout.
- Cost-Effective Implementation: Leverage affordable components like microcontrollers and passive RFID tags for a powerful DIY solution.
The Foundation of Smart Tool Storage: RFID and Bluetooth Explained
At the heart of any effective DIY Smart Tool Storage: Integrating RFID and Bluetooth for Inventory Management and Quick Access system lies the intelligent interplay of these two wireless technologies. Understanding how they function, both individually and together, is crucial for designing and implementing your own smart workshop solution.

RFID: The Digital Fingerprint for Every Tool
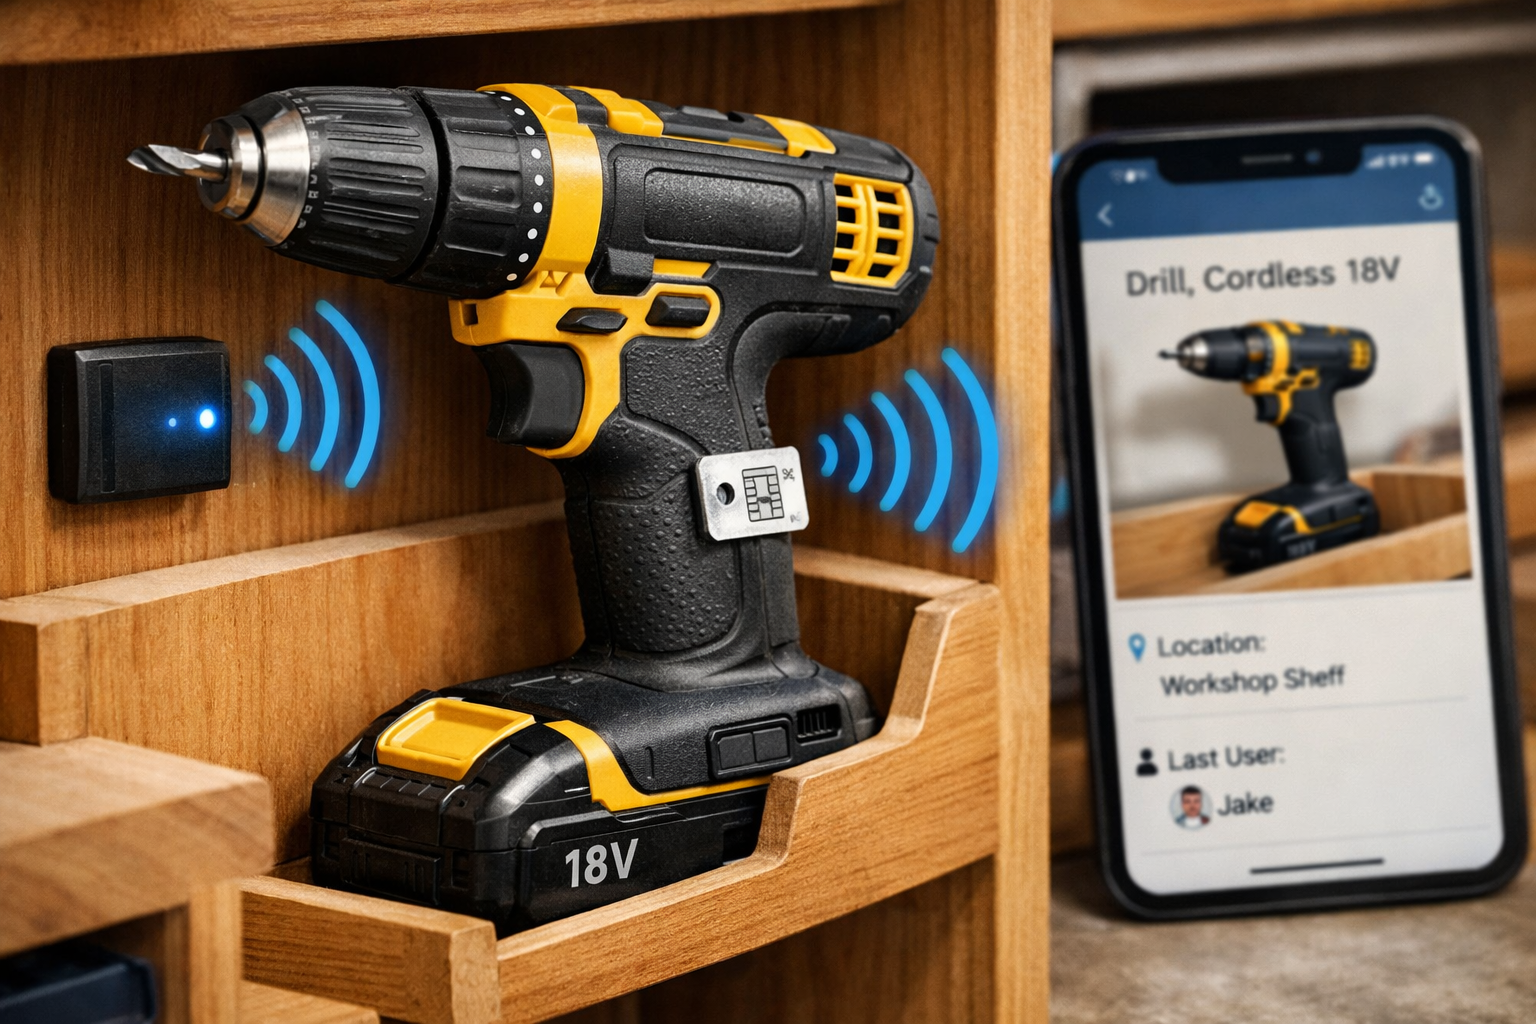
Radio-Frequency Identification (RFID) technology uses electromagnetic fields to automatically identify and track tags attached to objects. In a smart tool storage context, this means affixing small, inexpensive RFID tags to each of your tools. When an RFID reader, strategically placed within your storage unit, scans the area, it can detect the unique identifier of any tagged tool nearby.
There are two main types of RFID tags:
- Passive RFID Tags: These are battery-free and draw power from the electromagnetic field emitted by the reader. They are typically smaller, cheaper, and have a shorter read range (a few inches to several feet). Ideal for individual tools within a contained drawer or cabinet.
- Active RFID Tags: These tags have their own power source (battery) and can transmit signals over longer distances. While more expensive and larger, they could be useful for tracking larger equipment or tools moved frequently between different areas of a larger workshop. For most DIY tool storage, passive tags offer the best balance of cost and functionality.
The primary benefit of RFID is its ability to identify multiple items simultaneously, even if they are not in direct line of sight. This “batch reading” capability makes it incredibly efficient for quickly taking inventory of a drawer or a whole cabinet of tools. Imagine simply walking past your tool chest with a handheld reader or having built-in readers scan automatically to confirm all tools are present.

Bluetooth: Connecting Your Storage to Your Smartphone
Bluetooth technology, familiar from headphones and smart devices, plays a complementary role in your smart tool storage system. While RFID excels at identifying tools within a localized area, Bluetooth is perfect for establishing a short-range wireless connection between your smart storage unit and your smartphone or tablet.
Here’s how Bluetooth enhances the system:
- Location Tracking: Small Bluetooth Low Energy (BLE) beacons can be placed within specific compartments or zones of your tool storage. Your smartphone, running a custom app, can detect the signal strength of these beacons, providing a more granular indication of a tool’s general area. For instance, if an RFID reader confirms a tool is in a particular drawer, a BLE beacon in that drawer can then communicate with your phone to pinpoint the exact drawer.
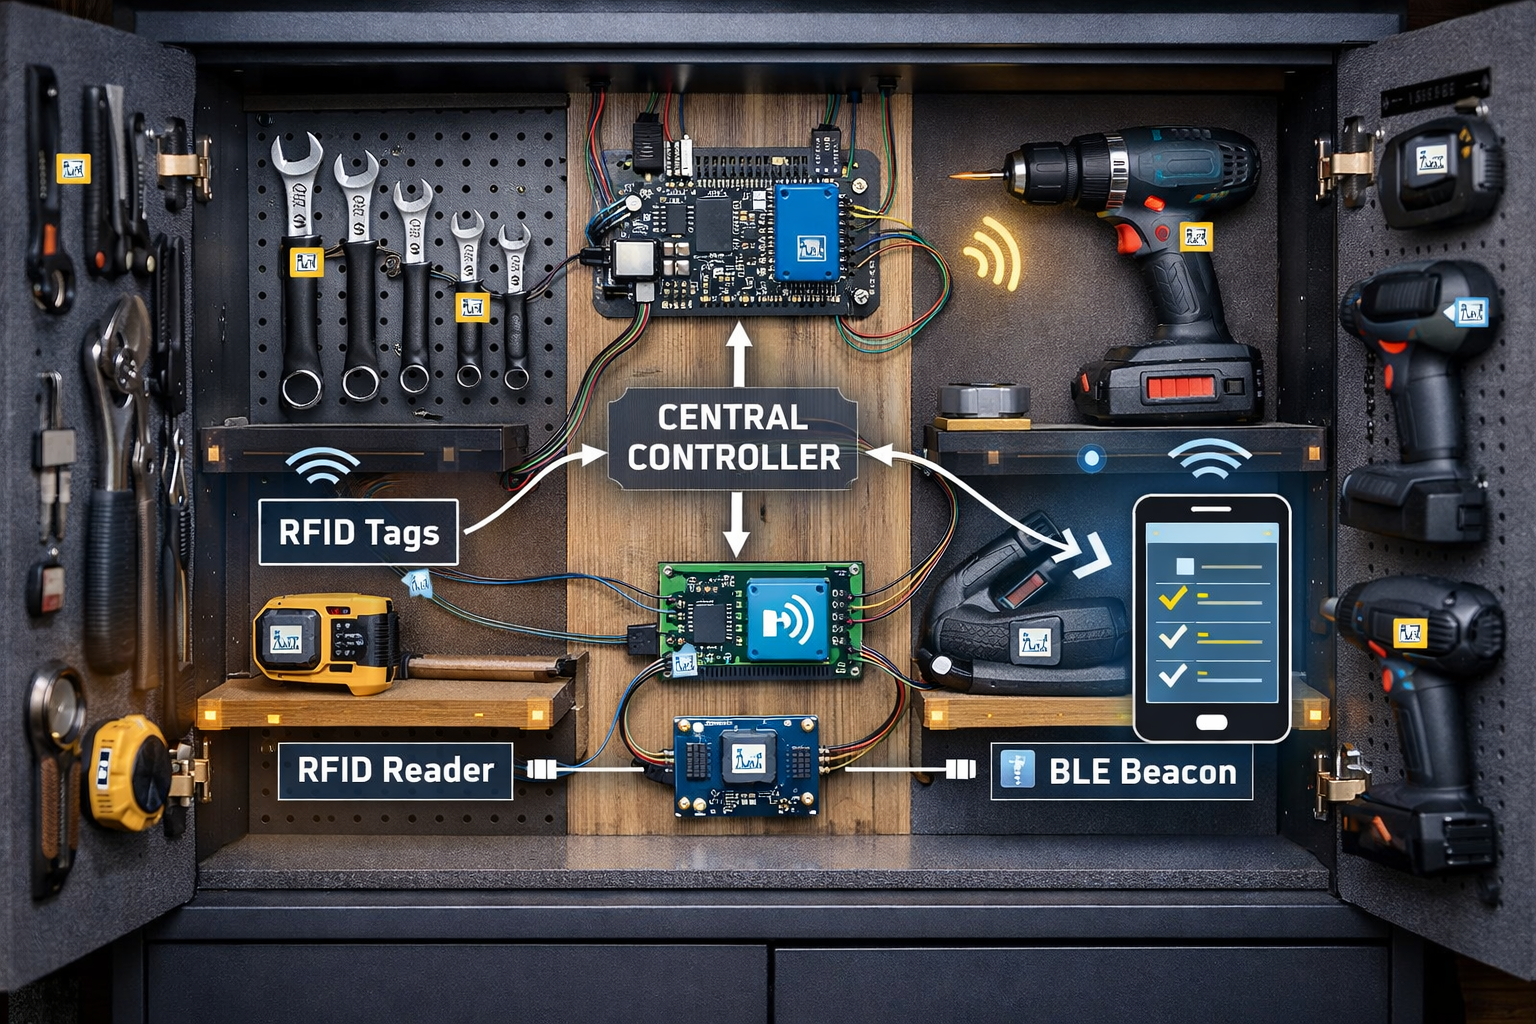
- Data Synchronization: A central microcontroller (like an Arduino or Raspberry Pi) integrated into your storage unit can communicate with both the RFID readers and BLE beacons. This microcontroller can then use Bluetooth to send real-time inventory data, tool locations, and alerts directly to your smartphone app.
- User Interface: Your smartphone acts as the intuitive interface for your entire smart storage system. Through the app, you can search for tools, view their last known location, check inventory status, and even receive notifications if a tool is removed or left out of its designated spot.
Combining RFID’s precise identification with Bluetooth’s connectivity creates a powerful, integrated system. RFID tells you what tool you have, and Bluetooth helps you know where it is and communicates that information directly to you. This seamless integration allows for quick inventory checks and rapid tool retrieval, truly embodying the spirit of DIY Smart Tool Storage: Integrating RFID and Bluetooth for Inventory Management and Quick Access. For those looking to further automate and integrate their workspace, exploring DIY Smart Workshop Upgrades: Integrating AI and IoT for Enhanced Precision and Safety can offer additional ideas for a truly connected environment.
Designing and Building Your DIY Smart Tool Storage System
Creating your own DIY Smart Tool Storage: Integrating RFID and Bluetooth for Inventory Management and Quick Access system is a rewarding project that combines woodworking skills with basic electronics and programming. The process involves several key stages, from planning your physical storage to setting up the technological backbone.
Phase 1: Planning and Physical Construction
Before diving into the electronics, consider the physical structure of your smart storage.
- Assess Your Tools: Catalog your entire tool collection. Group similar tools and identify frequently used items that would benefit most from smart tracking.
- Design Your Storage: This is where your woodworking skills shine. Whether it’s custom drawers, tool boards, cabinets, or modular shelving units, design spaces that are optimized for your tools. Think about dedicated slots, foam cutouts, or hanging systems. Remember that each distinct storage area (e.g., drawer, shelf, compartment) will eventually house an RFID reader and/or Bluetooth beacon. For inspiration on maximizing space, check out Smart Workshop Storage Solutions: Maximizing Small Spaces with Modular Systems and DIY Organizers.
- Material Selection: Plywood, MDF, and solid wood are excellent choices. Ensure the design allows for easy integration of electronics and cable management. Consider incorporating features like soft-close drawers or magnetic latches to protect components.
- Power Access: Plan for power outlets or battery packs near your storage units to power the electronics.
Table 1: Key Design Considerations for Smart Tool Storage
| Feature | Description | Benefit |
|---|---|---|
| Modular Compartments | Individual sections for tools (drawers, bins, hooks) | Allows for precise tool location and targeted RFID scanning |
| Cable Management | Channels or concealed pathways for wires | Neat, safe, and protects electronic components |
| Ventilation | Small openings for airflow if using enclosed electronics | Prevents overheating of microcontrollers and readers |
| Accessibility | Easy access to electronics for maintenance or upgrades | Simplifies troubleshooting and future enhancements |
| Durability | Sturdy construction to withstand workshop conditions | Ensures longevity of both the storage and the integrated tech |
Phase 2: Selecting and Integrating Electronic Components
This is where the “smart” aspect comes to life.
- Microcontroller: A Raspberry Pi or Arduino is the brain of your system. A Raspberry Pi offers more processing power and operating system capabilities, making it ideal for running a full-fledged inventory database and web server. Arduino is simpler for basic RFID reading and Bluetooth communication.
- RFID Readers: Choose UHF (Ultra-High Frequency) readers for longer ranges or HF (High Frequency) readers for closer, more precise reads. You’ll need one reader for each major storage zone (e.g., one per drawer bank, one per large cabinet).
- RFID Tags: Purchase a bulk supply of passive RFID tags suitable for your tools. These can be adhesive stickers, small fobs, or even embedded tags.
- Bluetooth Modules/Beacons: Integrate BLE modules with your microcontroller or deploy standalone BLE beacons in various compartments.
- Power Supply: A stable 5V power supply for your microcontroller and peripherals.
- Wiring: Jumper wires, breadboards, and soldering iron for connecting components.
- Sensors (Optional): Reed switches for door/drawer open/close detection, ultrasonic sensors for detecting if a compartment is empty.
Integration Steps:
- Mount Readers: Securely mount RFID readers within each designated storage zone. Ensure their read range covers the entire area.
- Attach Tags: Affix an RFID tag to each tool. Record the unique ID of each tag and associate it with the specific tool name and its default storage location in your digital database.
- Install Microcontroller: Mount your chosen microcontroller in a protected, accessible spot within your storage unit.
- Wiring: Connect the RFID readers and Bluetooth modules to the microcontroller’s GPIO pins according to schematics. Ensure all connections are secure and neatly organized.
- Power Up: Connect the power supply and perform initial testing.
Phase 3: Software Development and App Interface
This is the final, crucial step to make your DIY Smart Tool Storage: Integrating RFID and Bluetooth for Inventory Management and Quick Access truly functional.
- Programming the Microcontroller: Write code (Python for Raspberry Pi, Arduino C++ for Arduino) to:
- Read data from the RFID readers.
- Process Bluetooth beacon signals.
- Store tool inventory (tool name, RFID tag ID, last known location).
- Manage data in a local database (e.g., SQLite).
- Communicate with your smartphone app via Bluetooth or Wi-Fi (if Raspberry Pi is used as a local server).
- Developing the Smartphone App: You can use platforms like MIT App Inventor, Glide Apps, or even build a native app with frameworks like React Native or Flutter for a more customized solution. The app should feature:
- Search Functionality: Easily find tools by name or type.
- Inventory List: A real-time list of all tools, indicating if they are in storage or out.
- Location Map: A visual representation of your storage unit, highlighting the location of a searched tool.
- Alerts: Notifications for misplaced tools or tools that haven’t been returned.
- Add/Edit Tools: Interface to add new tools and update their information.
Tip: For those comfortable with coding, a Raspberry Pi can host a simple web server accessible from any device on your local network, eliminating the need for a dedicated mobile app if you prefer a web-based interface.

This integrated approach not only keeps your tools organized but also provides an unprecedented level of control and knowledge over your workshop inventory. For more advanced projects that require precise tool handling and tracking, consider exploring Hand Tool Mastery for Detail Work: Chisels, Hand Planes, and Rasps for Refined Joinery and Finishing to understand how specific tool types might benefit from customized smart storage.
Maximizing Efficiency with Your Smart Tool Storage System
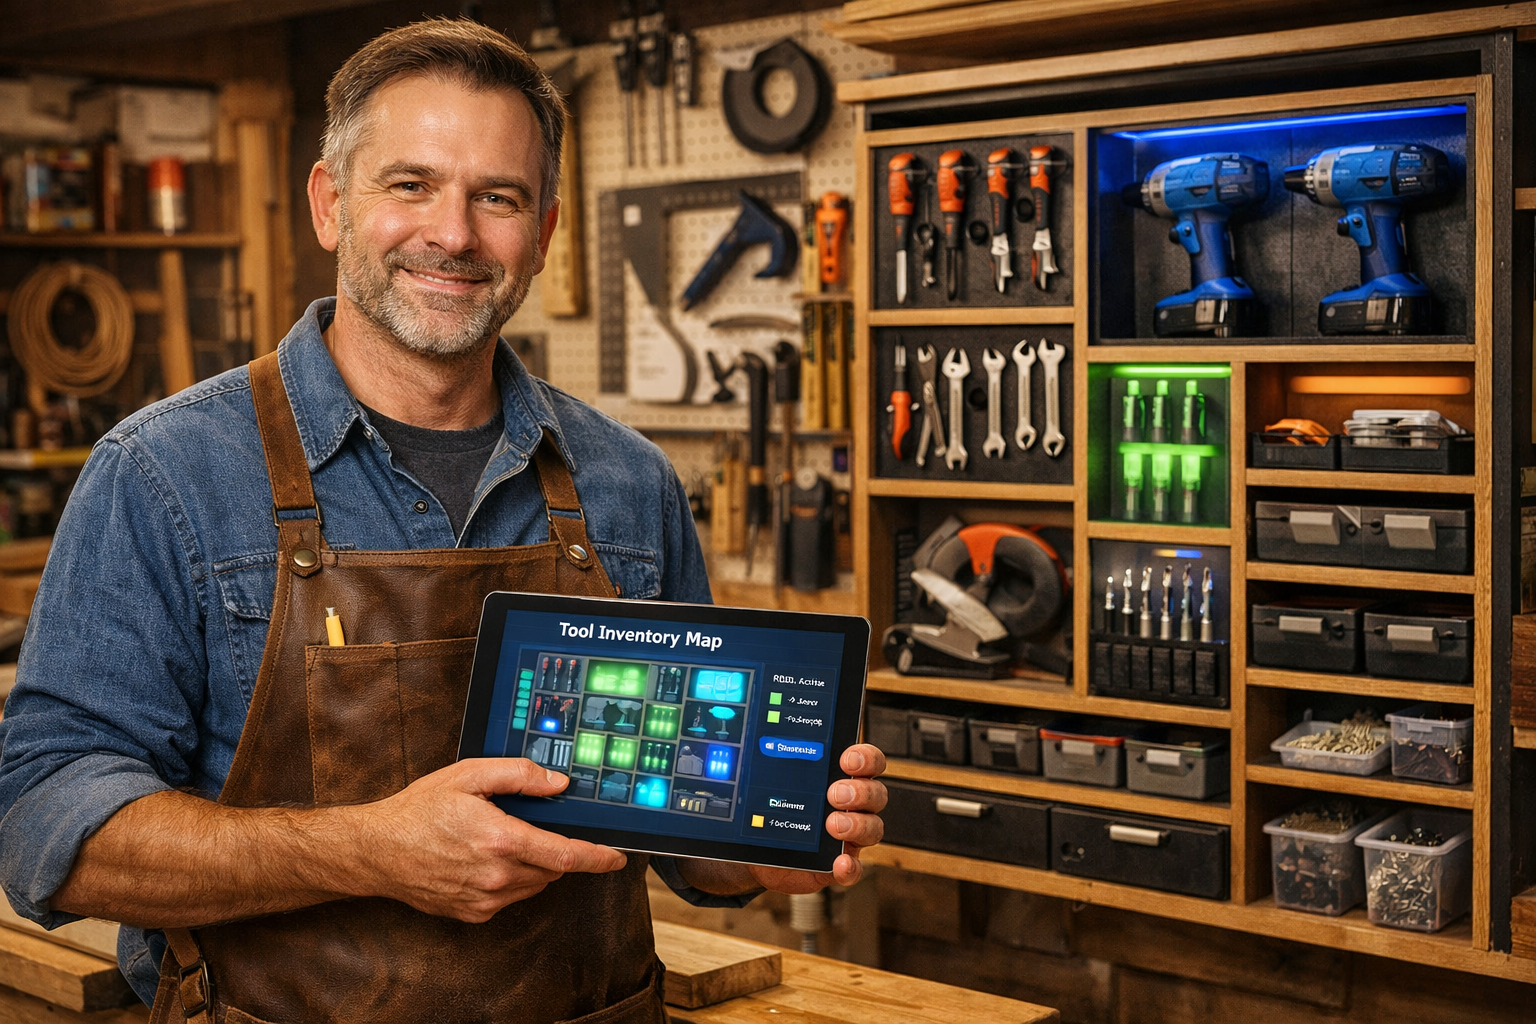
Once your DIY Smart Tool Storage: Integrating RFID and Bluetooth for Inventory Management and Quick Access system is up and running, the real benefits of enhanced productivity and organization begin to emerge. Maximizing its efficiency involves consistent usage, strategic placement, and continuous refinement.
Streamlining Workflow and Preventing Loss
The primary advantage of smart tool storage is the dramatic reduction in time spent searching for tools.
- Instant Tool Location: When you need a specific screwdriver or a particular router bit, a quick check of your smartphone app immediately tells you its precise location. No more rummaging through cluttered drawers.
- Real-time Inventory Checks: Before starting a project, a quick scan can confirm all necessary tools are present. At the end of the day, another scan ensures everything is returned to its designated spot, minimizing loss or misplacement. This proactive approach saves time and money associated with replacing lost tools.
- Checkout/Check-in System: For shared workshops or larger collections, implement a simple “checkout” feature within your app. When a tool is removed, the app registers it as “in use” and by whom, ensuring accountability. Upon return, the tool is “checked back in.”
- Automated Reminders: Configure your app to send notifications if a tool has been out of storage for an unusually long period, or if a crucial tool is missing as you’re preparing for a project.
Pull Quote: “The average woodworker spends up to 20% of their workshop time searching for tools. A smart storage system can reclaim most of that time, directly boosting project output.”
Advanced Features and Future Enhancements
Your DIY system is not static; it can evolve and improve over time.
- Voice Control Integration: Connect your system to smart home assistants like Amazon Alexa or Google Assistant. Imagine saying, “Alexa, where is my dado blade?” and receiving an audible response or seeing an LED light illuminate its location.
- Tool Usage Analytics: Over time, your system can collect data on which tools are used most frequently. This data can inform future organization decisions, helping you place high-use tools in the most accessible locations. It can also highlight underutilized tools, prompting decisions on whether to keep or sell them.
- Predictive Maintenance Reminders: For power tools, you could integrate hour meters or cycle counters. The smart system could then remind you when a tool is due for routine maintenance, blade sharpening, or battery replacement. For instance, after a certain number of cuts, your table saw might prompt a blade check.
- Security Features: Add door sensors and integrate them with your smart storage. If an unauthorized person opens a cabinet, or if a tool is removed outside of designated hours, you can receive an alert.
- Integration with Project Management: Link your tool inventory to your project management software. As you define a project, the system could automatically identify which tools are required and their availability.
Best Practices for Optimal Performance
- Consistent Tagging: Ensure every tool, even small bits and accessories, has an RFID tag. Inconsistency defeats the purpose of a comprehensive system.
- Regular Calibration: Occasionally verify that your RFID readers are accurately detecting all tags in their zones. Environmental factors can sometimes interfere.
- App Updates: Keep your smartphone app updated with new features and bug fixes. Regularly backup your tool inventory database.
- Ergonomic Design: Remember that the “DIY” aspect extends to making the system comfortable and intuitive to use. Position readers, beacons, and any physical interfaces logically. Crafting custom workshop furniture, like workbenches, to seamlessly integrate these smart features can significantly improve the user experience. See Creating Ergonomic Workshop Furniture: Building Custom Workbenches, Stools, and Storage to Prevent Strain and Increase Productivity for ideas.
- Battery Management: If using active RFID tags or battery-powered Bluetooth beacons, implement a schedule for battery checks and replacements to ensure continuous operation.
By following these guidelines, your DIY Smart Tool Storage: Integrating RFID and Bluetooth for Inventory Management and Quick Access will become an indispensable asset in your workshop, transforming how you interact with your tools and empowering you to focus more on the craft itself. This is not just about technology; it’s about intelligent organization that fuels creativity and efficiency.
Conclusion
The journey into DIY Smart Tool Storage: Integrating RFID and Bluetooth for Inventory Management and Quick Access represents a significant leap forward for any serious woodworker or DIY enthusiast in 2026. No longer constrained by chaotic clutter and lost tools, you now possess the knowledge to design and implement a sophisticated system that brings order, efficiency, and intelligence to your workshop. By leveraging affordable RFID tags and ubiquitous Bluetooth connectivity, you transform mere storage into an active, responsive inventory management system accessible directly from your smartphone.
This integration empowers you to locate tools instantly, track their usage, prevent loss, and ultimately, reclaim invaluable time that would otherwise be spent searching. Beyond the immediate benefits, a smart storage system offers a platform for future enhancements, from voice control to predictive maintenance, ensuring your workshop remains at the forefront of technological innovation.
Actionable Next Steps:
- Audit Your Tools: Start by thoroughly cataloging your existing tools and identifying specific pain points in your current organization.
- Plan Your Storage Design: Sketch out how your ideal smart storage unit would look, considering modularity and accessibility for both tools and electronics.
- Source Components: Begin acquiring a microcontroller (Raspberry Pi or Arduino), RFID readers, passive RFID tags, and Bluetooth modules.
- Start Small: Don’t feel overwhelmed. Begin by implementing the system for a single drawer or tool cabinet, perfect your setup, and then expand gradually.
- Embrace the Learning Curve: Dive into the programming and electronics with an open mind. Numerous online tutorials and communities exist to support your DIY journey.
Investing time in DIY Smart Tool Storage: Integrating RFID and Bluetooth for Inventory Management and Quick Access is an investment in your productivity, your sanity, and the future of your workshop. Take the first step today towards a more organized, efficient, and enjoyable crafting experience.
