
The hallmark of exceptional furniture frequently lies in its hidden details, particularly the construction of its drawers. A precisely fitted, durable drawer box with robust dovetail joinery elevates a piece from merely functional to truly artisanal. Building Custom Drawer Boxes and Dovetail Joinery: From Layout to Assembly for Furniture Makers is not just about creating storage; it’s about mastering a foundational skill that signifies superior craftsmanship and longevity in woodworking. This comprehensive guide will navigate the intricate steps, from initial measurements and wood selection to the final assembly, ensuring every drawer you build stands as a testament to your skill in 2026.
Key Takeaways
- Dovetail joinery provides unmatched strength and aesthetic appeal for custom drawer boxes.
- Accurate measurement and layout are critical for successful dovetail joints.
- Wood selection impacts both the durability and appearance of the finished drawer.
- Both hand-cut and machine-cut dovetail methods require precision and proper technique.
- Thoughtful assembly and finishing ensure longevity and smooth drawer operation.
Understanding Custom Drawer Boxes and Dovetail Joinery
A drawer box is more than just a container; it’s an integral component of furniture design, often subjected to daily use and significant stress. Its construction directly affects the functionality and perceived quality of a piece. Custom drawer boxes allow furniture makers to tailor dimensions, materials, and joinery to specific project requirements, ensuring a perfect fit and aesthetic harmony.
Among the various joinery methods, dovetails stand out for their exceptional mechanical strength and distinctive appearance. The interlocking “pins” and “tails” create a joint that resists being pulled apart, a crucial feature for a drawer front that experiences constant outward force. This strength, combined with the visual appeal of the exposed end grain, makes dovetail joinery a preferred choice for high-quality, heirloom-grade furniture.
When embarking on Masterful Craftsmanship The Art Of Custom Woodworking, the drawer box and its joinery often serve as a benchmark of a maker’s skill. The precision required for tight dovetails demonstrates attention to detail and a mastery of fundamental woodworking techniques.
Why Dovetail Joinery?
Dovetail joints offer several advantages for drawer construction:
- Strength: The unique interlocking shape provides superior resistance to racking and pull-out forces.
- Durability: Properly made dovetails will outlast most other joint types, ensuring the drawer remains functional for decades.
- Aesthetics: The visible pattern of pins and tails adds a classic, sophisticated touch that speaks to quality.
- Versatility: Dovetails can be adapted for various drawer depths, widths, and wood species.
Choosing the right wood for your custom drawer boxes is as important as the joinery itself. Hardwoods like maple, cherry, oak, and walnut are excellent choices due to their stability, strength, and workability. For drawer bottoms, thinner, stable materials like plywood or solid wood panels (often floating within a groove) are common.
Precision Layout and Marking for Dovetail Joints
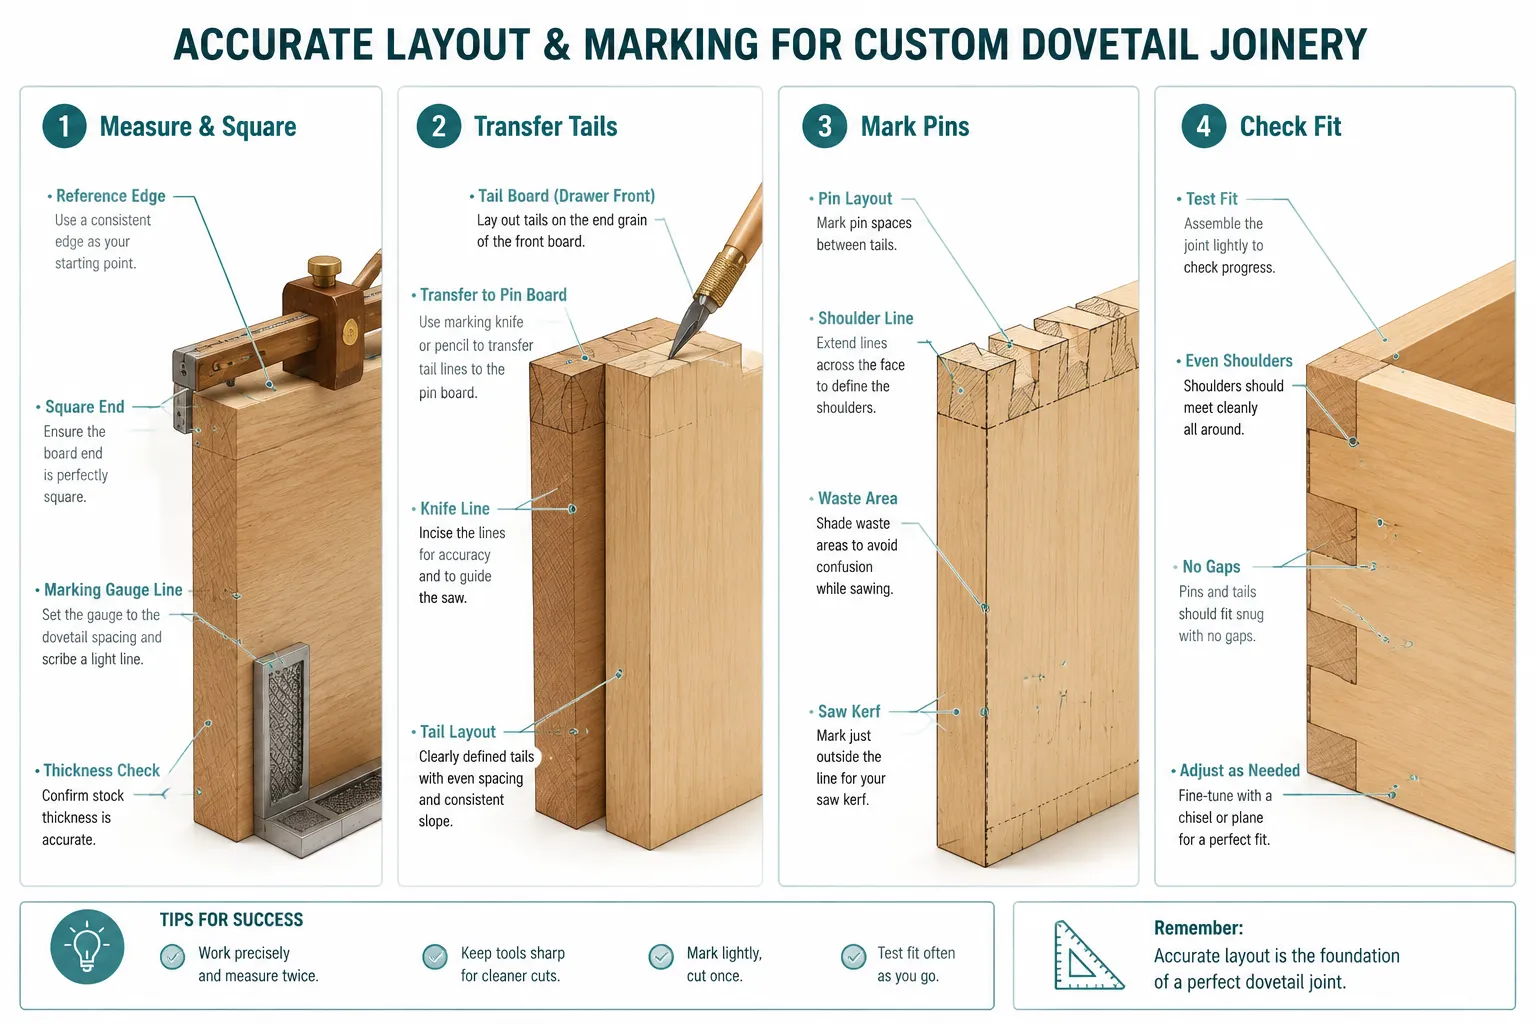
The success of a dovetail joint hinges entirely on accurate layout and precise marking. Even a millimeter off can result in gaps, misalignments, or a joint that simply won’t fit together cleanly. This stage demands patience and meticulous attention to detail.
Before any cutting begins, the material must be prepared. This involves milling the drawer sides and fronts to their exact final dimensions, ensuring all faces are perfectly flat, square, and parallel. Any inaccuracies here will compound into problems later. Once the boards are prepared, the precise layout for your dovetail joinery for Building Custom Drawer Boxes and Dovetail Joinery: From Layout to Assembly for Furniture Makers can begin.
Essential Tools for Layout and Marking
- Marking Gauge: For precise shoulder lines and thickness transfer.
- Dovetail Marker/Template: To establish the angle and spacing of tails.
- Pencil/Knife: A sharp pencil or a marking knife for crisp, visible lines. A knife often provides more accuracy.
- Square: A small, accurate square (e.g., engineer’s square) for checking squareness and transferring lines.
- Rule/Tape Measure: For initial dimensioning and spacing.
Step-by-Step Layout Process
- Determine Drawer Dimensions: Precisely measure the opening in the furniture piece where the drawer will sit. Account for drawer slides if used, and allow for slight clearance.
- Cut Drawer Components to Size: Mill the drawer front, back, and sides to their exact width, length, and thickness. Ensure all edges are square. Remember to dimension the drawer front slightly proud if it will overlay the cabinet opening, or flush if it will inset. For detailed guidance on similar projects, consider “Building a Nightstand Side Table: Joinery and Drawer Techniques for”.
- Mark Thickness and Shoulder Lines: Using a marking gauge, scribe a line on the inside face of all drawer components, marking the thickness of the opposing piece where the joint will form. These are your shoulder lines, and they are critical references.
- Lay Out Tails (Typically on Sides): Decide on the number and spacing of your dovetails. Using a dovetail marker or template, transfer the tail shapes onto the end grain of the drawer sides. Ensure the layout is symmetrical and aesthetically pleasing.
- Transfer Tail Lines to Pins (Front/Back): Once the tails are cut, the drawer sides are used as templates to mark the pins on the drawer front and back. This “transfer” method is crucial for ensuring a perfect fit between the two pieces. Align the cut tails precisely with the end grain of the pin board, then use a sharp marking knife to trace the exact shape of the tails onto the pin board.
- Mark Waste Areas: Clearly mark the wood that needs to be removed between the pins and tails to avoid cutting into the keepers.
Consistency is key. Use the same marking tools and techniques throughout the entire layout process.
Cutting and Assembling Dovetail Joints
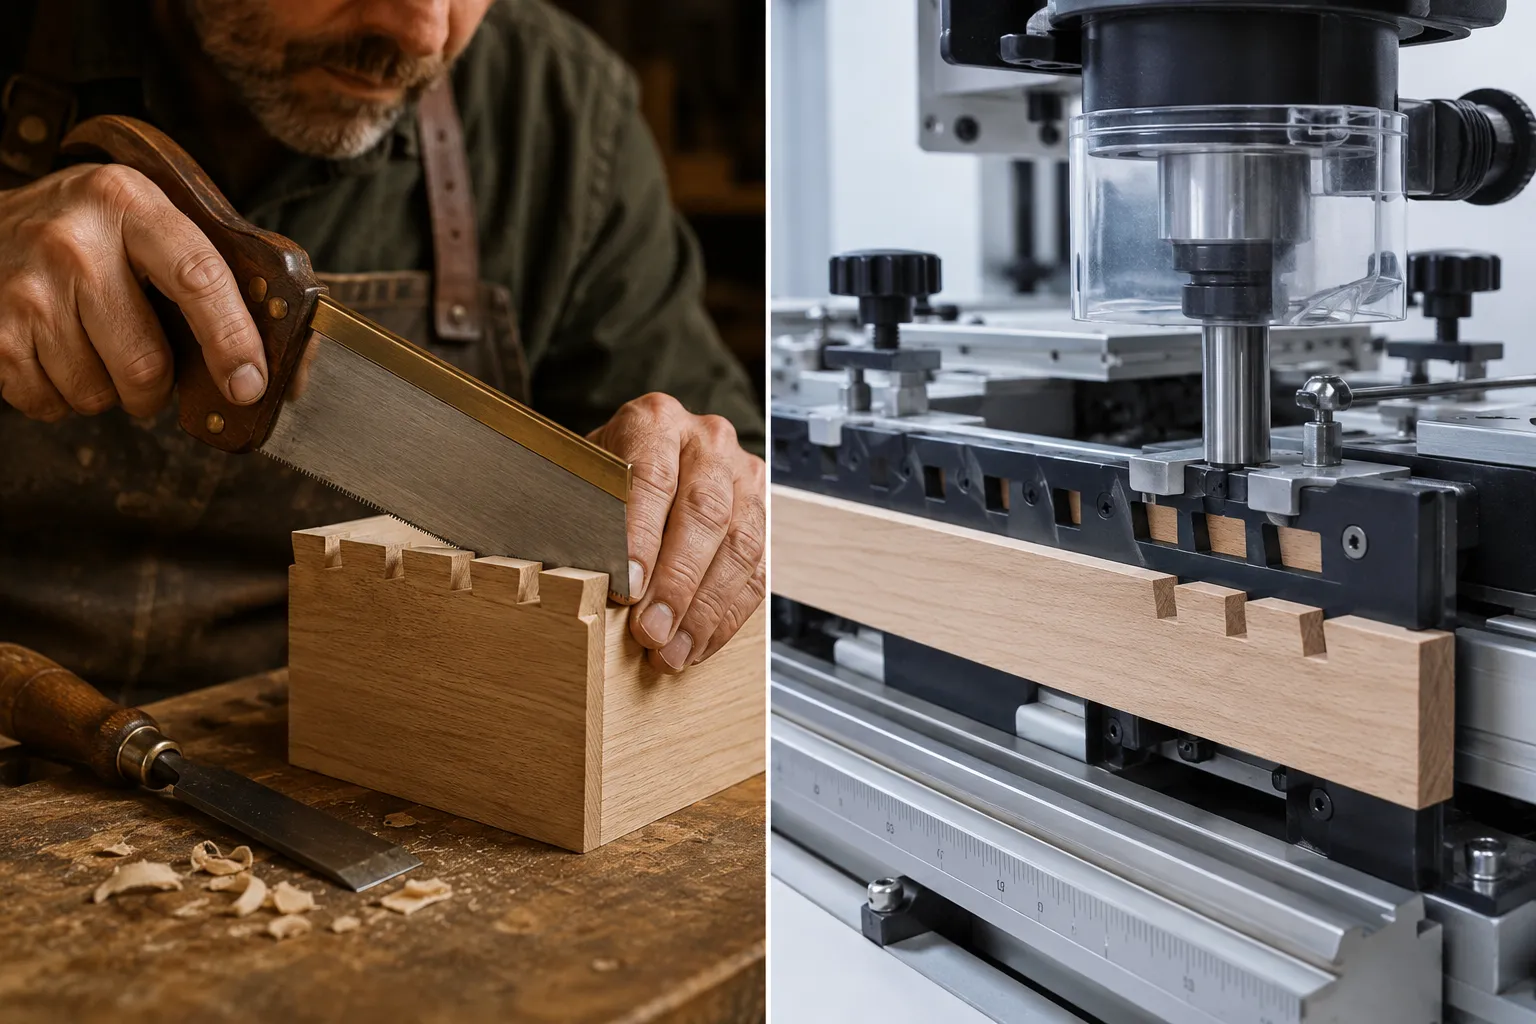
With the layout complete, the next phase involves the precise removal of waste wood to form the pins and tails. This can be achieved through traditional hand-cut methods, which offer unparalleled control and a truly custom feel, or with machine-assisted techniques that provide speed and repeatability, particularly for multiple drawers.
Hand-Cut Dovetails
Hand-cutting dovetails is a rewarding skill that allows for fine-tuning and a deep understanding of the grain.
Tools for Hand-Cutting
- Dovetail Saw: A fine-toothed backsaw designed for precision cuts.
- Chisels: A set of sharp chisels, ideally bevel-edge, for paring away waste.
- Mallet: For controlled striking of chisels.
- Coping Saw/Fret Saw: For removing larger waste sections between tails.
The Hand-Cutting Process
- Sawing the Tails: Carefully saw along your marked tail lines, ensuring the saw cut remains on the waste side of the line. Angle the saw precisely to match your layout.
- Removing Tail Waste: Use a coping saw or fret saw to remove the bulk of the waste between the tails. Then, with chisels, pare down to the shoulder line, ensuring the cut is flat and perfectly perpendicular to the face.
- Transferring and Sawing Pins: Once tails are cut, use them to mark the pins on the mating piece. Carefully saw along the pin lines, again staying on the waste side.
- Removing Pin Waste: Similar to the tails, remove waste with a coping saw, then pare with chisels down to the shoulder line. This step often requires careful attention to detail, especially in the tight corners.
Machine-Cut Dovetails
For those seeking efficiency and consistency, especially when Building Ergonomic Workshop Storage Solutions Custom Cabinets And Organizers For Health And Efficiency or multiple drawer units, machine-cut dovetails are an excellent option.
Tools for Machine-Cutting
- Router: A powerful router is essential.
- Dovetail Jig: Specialized jigs (e.g., Leigh, Incra, Porter-Cable) guide the router for precise cuts.
- Dovetail Router Bits: Specific bits are required for the chosen jig and dovetail angle.
The Machine-Cutting Process
- Set Up the Jig: This is the most critical step. Follow the jig’s instructions meticulously for setting bit height, guide bush position, and board alignment. Test cuts on scrap wood are essential to fine-tune the settings.
- Cut Tails: Position the drawer side in the jig and route the tail cuts.
- Cut Pins: Adjust the jig (or use a different template, depending on the jig type) and route the pin cuts on the drawer front and back.
- Test Fit: Always test the fit on scrap pieces before cutting your final drawer components. The goal is a snug fit that requires light tapping, not brute force.
Dry Fitting and Assembly
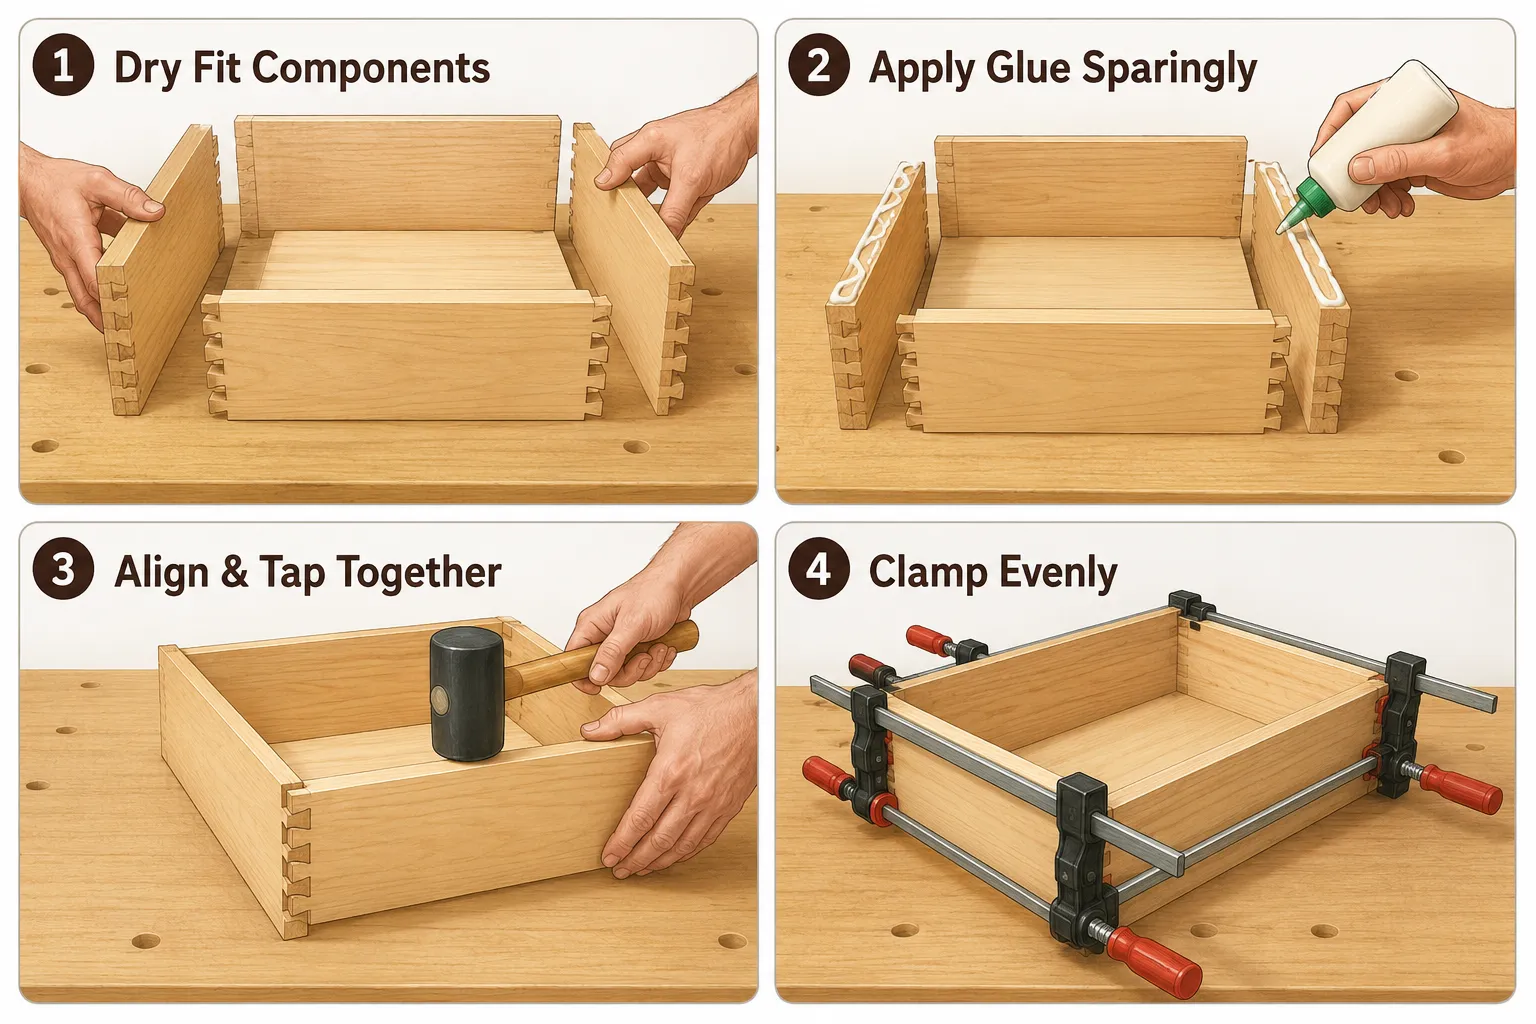
Regardless of the cutting method, a dry fit is crucial. Assemble the drawer components without glue to ensure all joints mate perfectly. Address any tight spots by carefully paring away small amounts of wood with a chisel. A loose joint, however, is difficult to rectify, emphasizing the importance of precise layout and cutting.
Once a perfect dry fit is achieved, the actual assembly begins.
- Apply Glue: Apply a thin, even coat of wood glue to all mating surfaces of the pins and tails. Avoid excessive glue, as it can make assembly messy and weaken the joint.
- Assemble: Carefully bring the pieces together. For dovetails, it often helps to assemble one joint at a time, tapping them together with a mallet and a block of wood to protect the delicate edges.
- Square and Clamp: Once all four sides are together, use clamps to apply even pressure. Crucially, check the drawer box for squareness. Use a square or measure diagonals to ensure opposite corners are equidistant. Adjust clamps or apply gentle pressure to bring the drawer into square before the glue sets.
- Clean Up: Immediately wipe away any glue squeeze-out with a damp cloth. Dried glue can be difficult to remove and can interfere with finishing.
- Drawer Bottom: If a grooved bottom is planned, ensure it is slid into place before final glue-up and clamping of the last corner. Consider “Diy Kitchen Organization Building Custom Drawer Dividers Pull Out Shelves And Cabinet Organizers” for ideas on optimizing drawer space.
Finishing and Installing Custom Drawer Boxes
After the glue has fully cured (typically 24 hours), the drawer box is ready for final sanding, finishing, and installation. These steps, while often overlooked in the excitement of joinery, are vital for the drawer’s aesthetics, durability, and smooth operation.
Sanding and Finishing
Proper sanding is crucial for a smooth, professional finish. Start with a medium-grit sandpaper (e.g., 120-grit) to remove any milling marks or dried glue, then progress through finer grits (e.g., 180, 220-grit) until the wood is silky smooth. Pay particular attention to the end grain and the exposed dovetail joints.
The choice of finish depends on the desired appearance and the expected use of the drawer.
- Oil Finishes: Penetrate the wood, enhancing its natural color and grain. They are easy to apply and repair but offer less protection than film finishes. Examples include Danish oil, tung oil, or linseed oil.
- Film Finishes: Create a protective layer on the surface of the wood. Varnish, lacquer, and polyurethane are durable options, providing excellent protection against moisture and wear. These finishes are ideal for frequently used drawers.
- Shellac: A natural finish that provides a warm glow and is easy to repair. It’s often used as a sealer before other finishes or as a standalone finish.
When applying any finish, follow the manufacturer’s instructions carefully regarding application, drying times, and recoats. Lightly sand between coats with a very fine-grit paper (e.g., 320-400 grit) for optimal smoothness.
Drawer Slide Selection and Installation
The type of drawer slide chosen significantly impacts the drawer’s feel and functionality.
- Side-Mount Slides: The most common type, offering full extension and various weight capacities. They mount to the sides of the drawer box and the cabinet opening.
- Under-Mount Slides: Hidden beneath the drawer box, providing a cleaner aesthetic. They often feature soft-close mechanisms.
- Center-Mount Slides: A single slide mounted underneath the drawer, often used for lighter-duty applications or a traditional look without visible hardware.
Installation Steps for Side-Mount Slides
- Mark Reference Lines: Mark the desired height for the drawer slides inside the cabinet opening and on the drawer box itself. Accuracy is paramount here to ensure level drawers.
- Attach Cabinet Members: Secure the longer cabinet members of the slides to the inside of the cabinet opening, aligning them with your reference marks. Ensure they are level and parallel.
- Attach Drawer Members: Separate the drawer members from the cabinet members. Attach them to the sides of the drawer box, again aligning with your marks.
- Insert Drawer: Carefully slide the drawer box, with its attached members, into the cabinet members. It should slide smoothly without binding. Adjust as needed.
For projects like “Building a Nightstand Side Table: Joinery and Drawer Techniques for”, precise slide installation is key to the overall user experience.
Attaching Drawer Fronts
If the drawer box is designed for an applied drawer front (an overlay or inset front that hides the drawer box edges), this is the final step.
- Position the Front: Use double-sided tape or hot glue to temporarily attach the drawer front to the drawer box, ensuring even gaps around all sides relative to the cabinet opening. Shims or spacers can help achieve consistent gaps.
- Secure from Inside: Once perfectly positioned, open the drawer slightly and secure the front to the drawer box from the inside using screws. Pilot holes are essential to prevent splitting the wood.
- Install Hardware: Finally, drill holes for drawer pulls or knobs and install the hardware.
Taking the time to ensure proper installation and alignment will result in a drawer that operates flawlessly and enhances the overall quality of your furniture piece.
Conclusion
Mastering the art of Building Custom Drawer Boxes and Dovetail Joinery: From Layout to Assembly for Furniture Makers is a defining skill that elevates woodworking to a professional level. From the initial precise measurements and careful wood selection to the meticulous layout of pins and tails, and through the final assembly and finishing, each step demands dedication and attention to detail. Whether opting for the timeless elegance of hand-cut dovetails or the efficiency of machine-aided methods, the outcome is a robust, beautiful, and functional drawer that speaks volumes about the craftsmanship invested. In 2026, the demand for custom-built furniture with such enduring quality remains strong, and by perfecting these techniques, furniture makers can confidently create pieces that will be cherished for generations. Continue honing your skills, embracing the precision required for each joint, and your custom drawer boxes will stand as a testament to your mastery.
References
- Duginske, M. (1995). The Dovetail Handbook: A Master’s Guide to Building and Installing Drawers. Taunton Press.
- Schwarz, C. (2009). The Anarchist’s Tool Chest. Lost Art Press.
- Underhill, R. (1981). The Woodwright’s Shop: A Practical Guide to Traditional Woodcraft. The University of North Carolina Press.
SEO Meta Title: Build Custom Dovetail Drawer Boxes: Layout to Assembly SEO Meta Description: Master building custom drawer boxes with dovetail joinery. Learn layout, cutting (hand & machine), assembly, and finishing for furniture makers in 2026.