
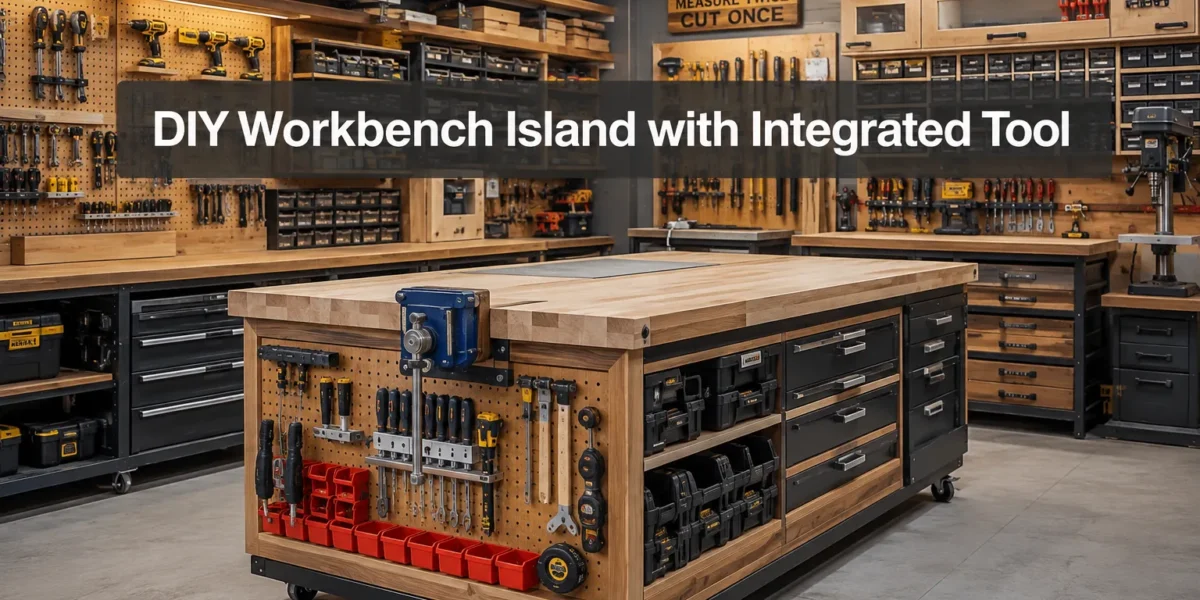
The persistent challenge of workshop disarray often hinders productivity and stifles creativity. Tools are misplaced, work surfaces become cluttered, and the entire flow of a project grinds to a halt. While many solutions exist, few address the core need for a centralized, highly organized, and efficient workspace that adapts to various tasks. This article explores the construction of the ultimate workshop centerpiece: a robust DIY Workbench Island with Integrated Tool Storage and Mechanic-Style Organization, designed to revolutionize your crafting and repair projects in 2026. This comprehensive guide details how to create a mobile, versatile hub that not only provides ample workspace but also keeps every tool precisely where it needs to be, mimicking the hyper-efficiency found in professional mechanic shops.
Key Takeaways
- A DIY workbench island centralizes your workspace, providing mobility and access from all sides.
- Integrated tool storage significantly reduces clutter and improves workflow efficiency.
- Mechanic-style organization principles (e.g., shadow boards, modular drawers) maximize tool accessibility and accountability.
- Careful planning of layout, materials, and power integration is crucial for a successful build.
- Customization allows the workbench island to perfectly suit your specific needs and tools.
Designing Your Ultimate DIY Workbench Island with Integrated Tool Storage
Creating an effective DIY Workbench Island with Integrated Tool Storage and Mechanic-Style Organization begins with meticulous planning. The goal is to build a structure that is not only robust and durable but also intuitively organized, making every tool and component readily available. This central island serves as the heart of any workshop, whether for woodworking, metalwork, or general repairs.
Conceptualizing the Core Structure and Dimensions
Before cutting any wood, consider the size and layout of your workshop. An island workbench offers 360-degree access, which is invaluable for larger projects or when working with long materials. However, it must allow for adequate clearance around all sides. Typical dimensions range from 3 ft x 5 ft to 4 ft x 8 ft, with a standard working height of 34-36 inches. Adjustable-height options are also popular for ergonomic versatility.
Consider the primary tasks you will perform. Will you need a heavy-duty surface for pounding and clamping, or a smoother finish for intricate assembly? This dictates your choice of countertop material. Butcher block, MDF, or even a steel plate are common options, each with distinct advantages. For example, a thick hardwood butcher block offers excellent durability and can be easily refinished, making it ideal for a DIY woodworking workbench.
The base of your island should be exceptionally sturdy. Using 2x4s or 4x4s for the frame, joined with strong methods like mortise and tenon or heavy-duty screws and bolts, ensures stability. Incorporating heavy-duty locking caster wheels is essential for mobility, allowing you to reposition the island for different projects or to clean your shop floor. Choose casters that can support significantly more than the anticipated weight of the workbench plus its contents to ensure safe and easy movement.
Integrating Storage Solutions for Maximum Efficiency
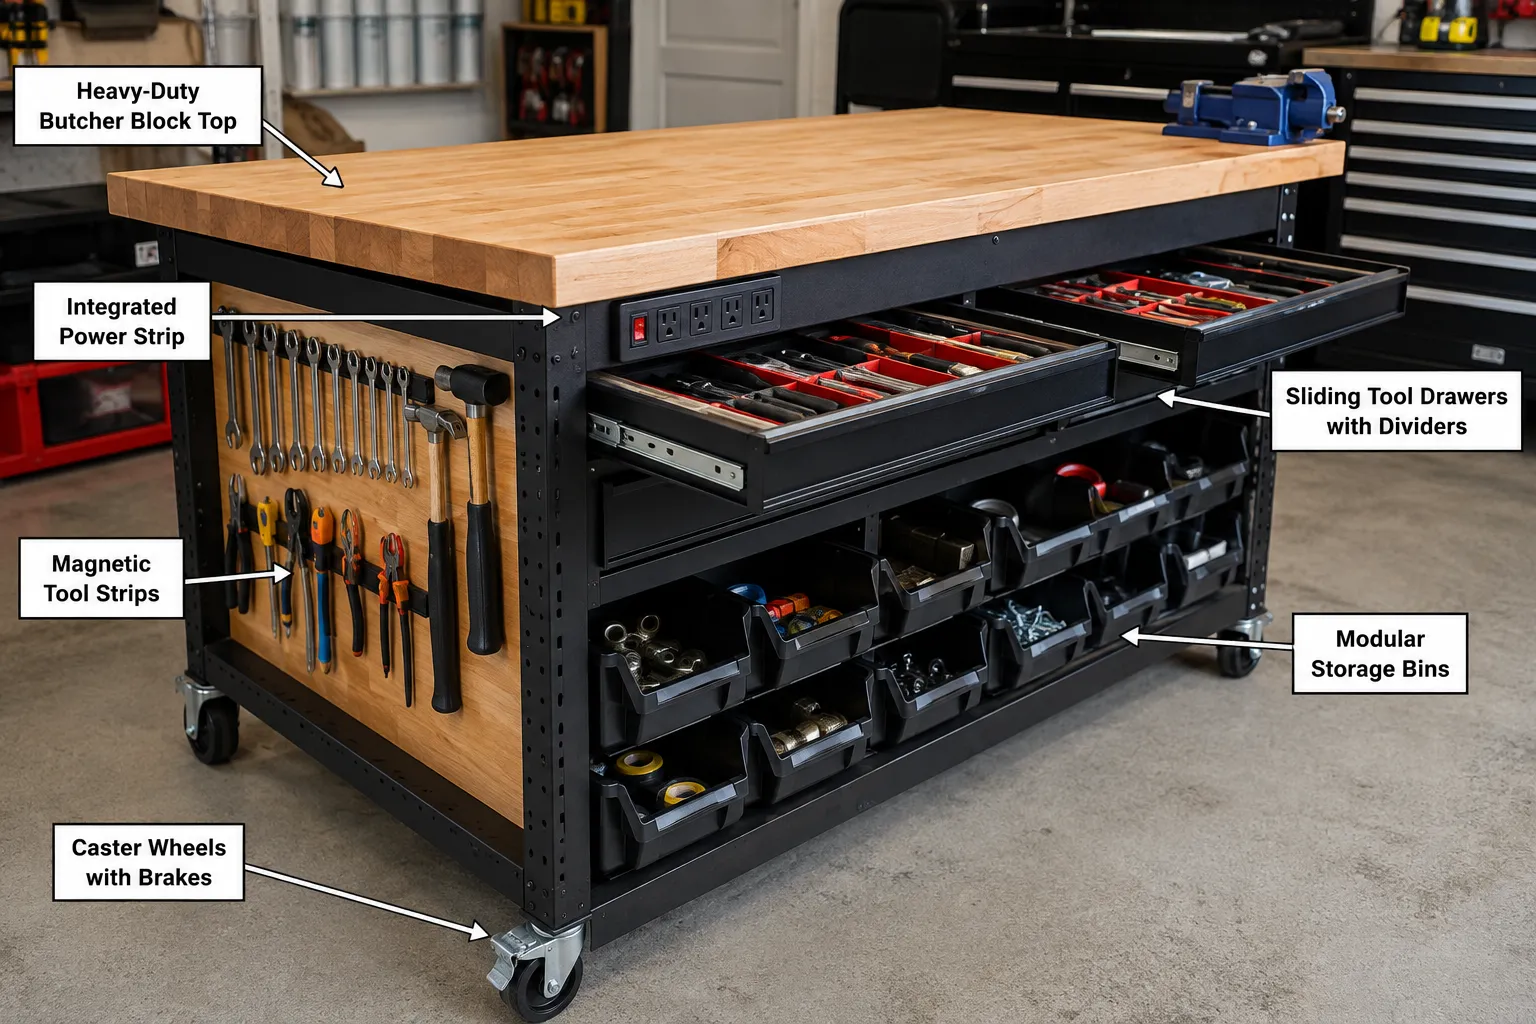
The hallmark of a truly effective DIY Workbench Island with Integrated Tool Storage and Mechanic-Style Organization is its seamless incorporation of various storage types. Think beyond simple shelves; consider drawers, cabinets, pegboards, and specialized holders.
- Drawers: Deep, full-extension drawers are ideal for power tools and larger items. Shallow drawers with custom dividers or foam inserts are perfect for hand tools, ensuring each wrench, screwdriver, or chisel has its own designated spot. Ball-bearing drawer slides are a must for smooth operation under heavy loads.
- Cabinets: Enclosed cabinets provide dust-free storage for delicate equipment or hazardous materials. Adjustable shelves within cabinets offer flexibility for different-sized items.
- Open Shelving: For frequently used items, open shelving allows for quick access. This is also a good place for material storage or larger jigs.
- Vertical Storage: The ends of the island are prime real estate for vertical storage solutions. A custom DIY clamp rack and tool holder wall can be mounted, keeping clamps, squares, and other long tools easily accessible without taking up valuable drawer space. Pegboard sections or French cleat systems can hold a variety of tools, allowing for flexible rearrangement.
Remember to consider power integration. Running power outlets directly into the workbench, perhaps with a retractable cord reel or multiple integrated power strips, eliminates extension cord clutter and improves safety.
Building Your Mechanic-Style Workbench Island
Once the design is finalized, the construction phase begins. This involves careful execution of joinery, precise measurements, and thoughtful installation of all storage and organizational elements. Building a custom workbench requires attention to detail, similar to crafting custom wooden console tables with unique leg designs.
Step-by-Step Construction Process
- Cut Materials: Accurately cut all lumber for the frame, cabinet carcasses, and drawer components according to your plans. Labeling each piece will streamline assembly.
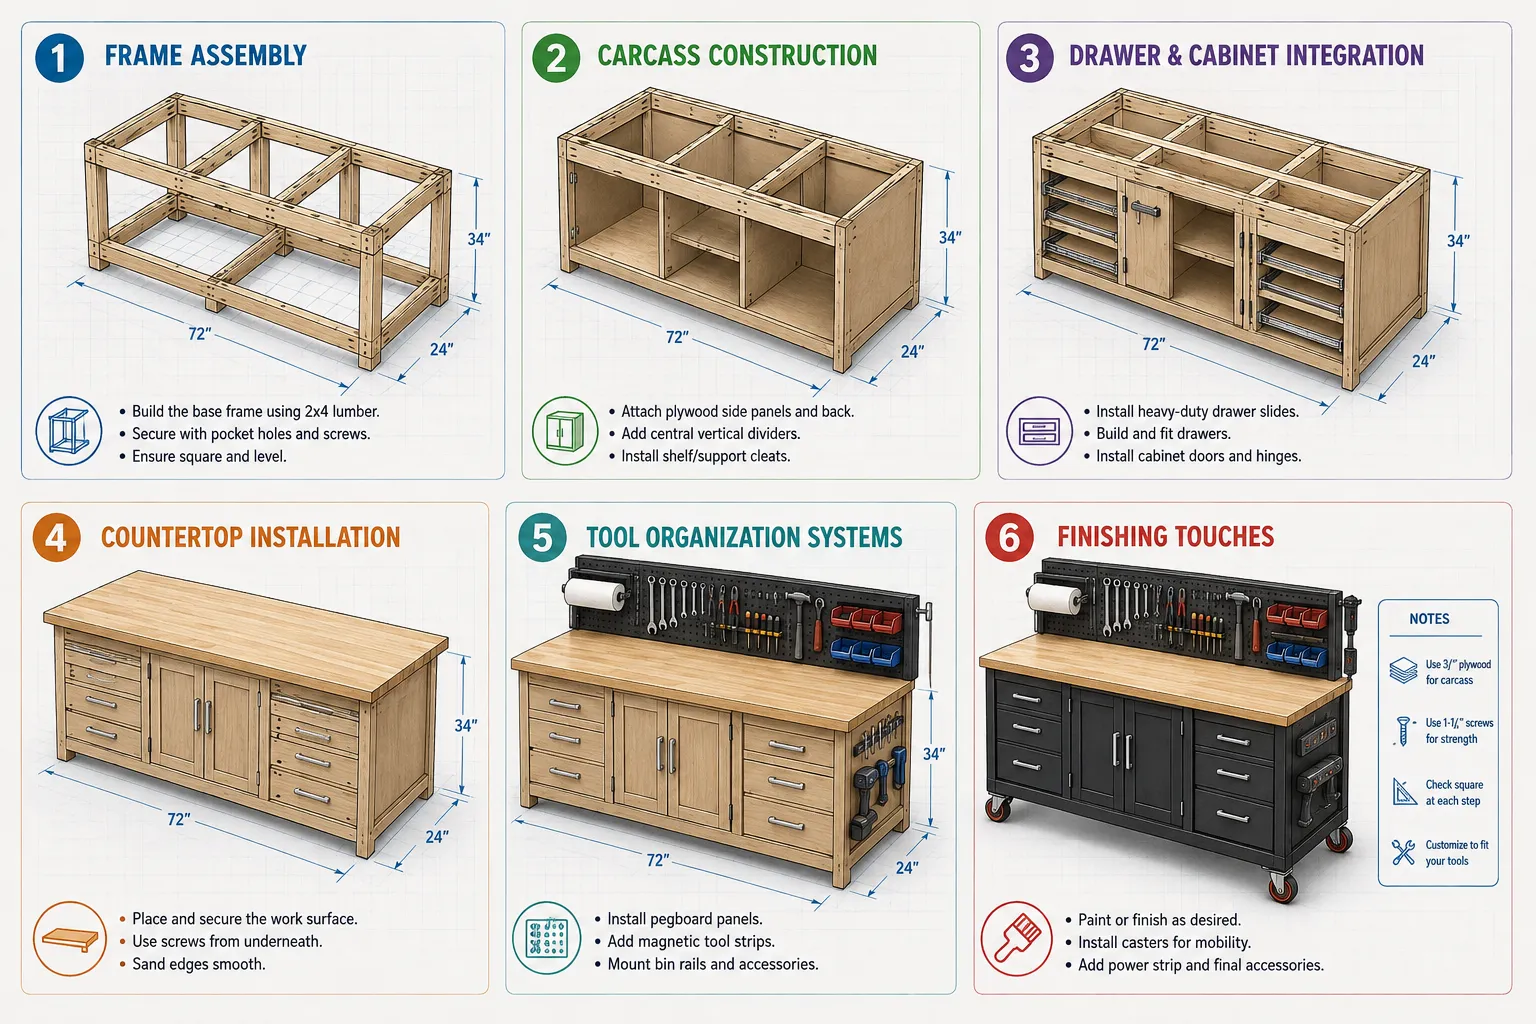
- Assemble the Base Frame: Construct the robust base frame that will support the entire island. Use strong joinery methods, such as pocket holes, mortise and tenon, or lap joints reinforced with construction adhesive and heavy-duty fasteners. Ensure the frame is perfectly square and level.
- Install Casters: Attach the heavy-duty locking swivel casters to the underside of the base frame. Use lag screws or bolts that penetrate deep into the lumber for maximum security.
- Build Cabinet Carcasses: Construct the side and back panels of your integrated cabinets and drawer banks. Plywood is an excellent choice for these components due to its stability and strength. Use dadoes, rabbets, or pocket holes for strong, square joints.
- Assemble Drawer Boxes: Build individual drawer boxes. Dovetail joints offer superior strength and aesthetics, but simple butt joints reinforced with glue and screws are also effective. Ensure precise measurements for smooth operation with drawer slides.
- Install Drawer Slides and Drawers: Attach full-extension ball-bearing drawer slides to the cabinet carcasses and the drawer boxes. It is crucial to install these level and parallel to ensure smooth action and prevent binding.
- Install Cabinet Doors (if applicable): Mount cabinet doors using appropriate hinges. Adjustable European-style hinges allow for easy alignment.
- Attach Worktop: Secure your chosen worktop material to the top of the island frame. If using butcher block, allow for wood movement by using fasteners that accommodate expansion and contraction (e.g., Z-clips, slotted holes).
- Integrate Electrical Components: Route wiring for power outlets and lighting. Install junction boxes, outlets, and switches according to local electrical codes. Consider a master switch to cut power to the entire island.
- Add External Storage Elements: Attach pegboards, French cleat systems, magnetic tool strips, or custom holders to the ends and sides of the island.
- Finish: Apply a durable finish to all wood surfaces, such as polyurethane, spar varnish, or a tough epoxy coating for the worktop. This protects against wear, spills, and corrosion.
It is worth reviewing resources on building your first DIY heavy-duty workbench for foundational techniques that apply to island construction.
Implementing Mechanic-Style Organization for Enhanced Workflow
The true power of a DIY Workbench Island with Integrated Tool Storage and Mechanic-Style Organization lies in its ability to facilitate a seamless workflow through disciplined organization. Mechanic-style organization focuses on visual cues, logical placement, and dedicated homes for every tool, minimizing downtime spent searching.
Principles of Mechanic-Style Organization
- Everything in its Place: The core principle. Every tool, fastener, and component has a specific, easily identifiable home. This prevents clutter and ensures quick retrieval.
- Visual Management: Make it easy to see what is missing or out of place. This is where techniques like shadow boards and transparent drawer fronts excel.
- Logical Grouping: Store tools where they are most likely to be used together. For example, all wrenches in one drawer, screwdrivers in another, and power drill accessories with the drill itself.
- Ergonomic Access: Frequently used tools should be within arm’s reach. Less common tools can be stored in lower cabinets or deeper drawers.
- Cleanliness and Maintenance: A well-organized shop is naturally cleaner. Regularly cleaning and maintaining your tools and workbench is part of the system.
Advanced Organizational Features for Your Island
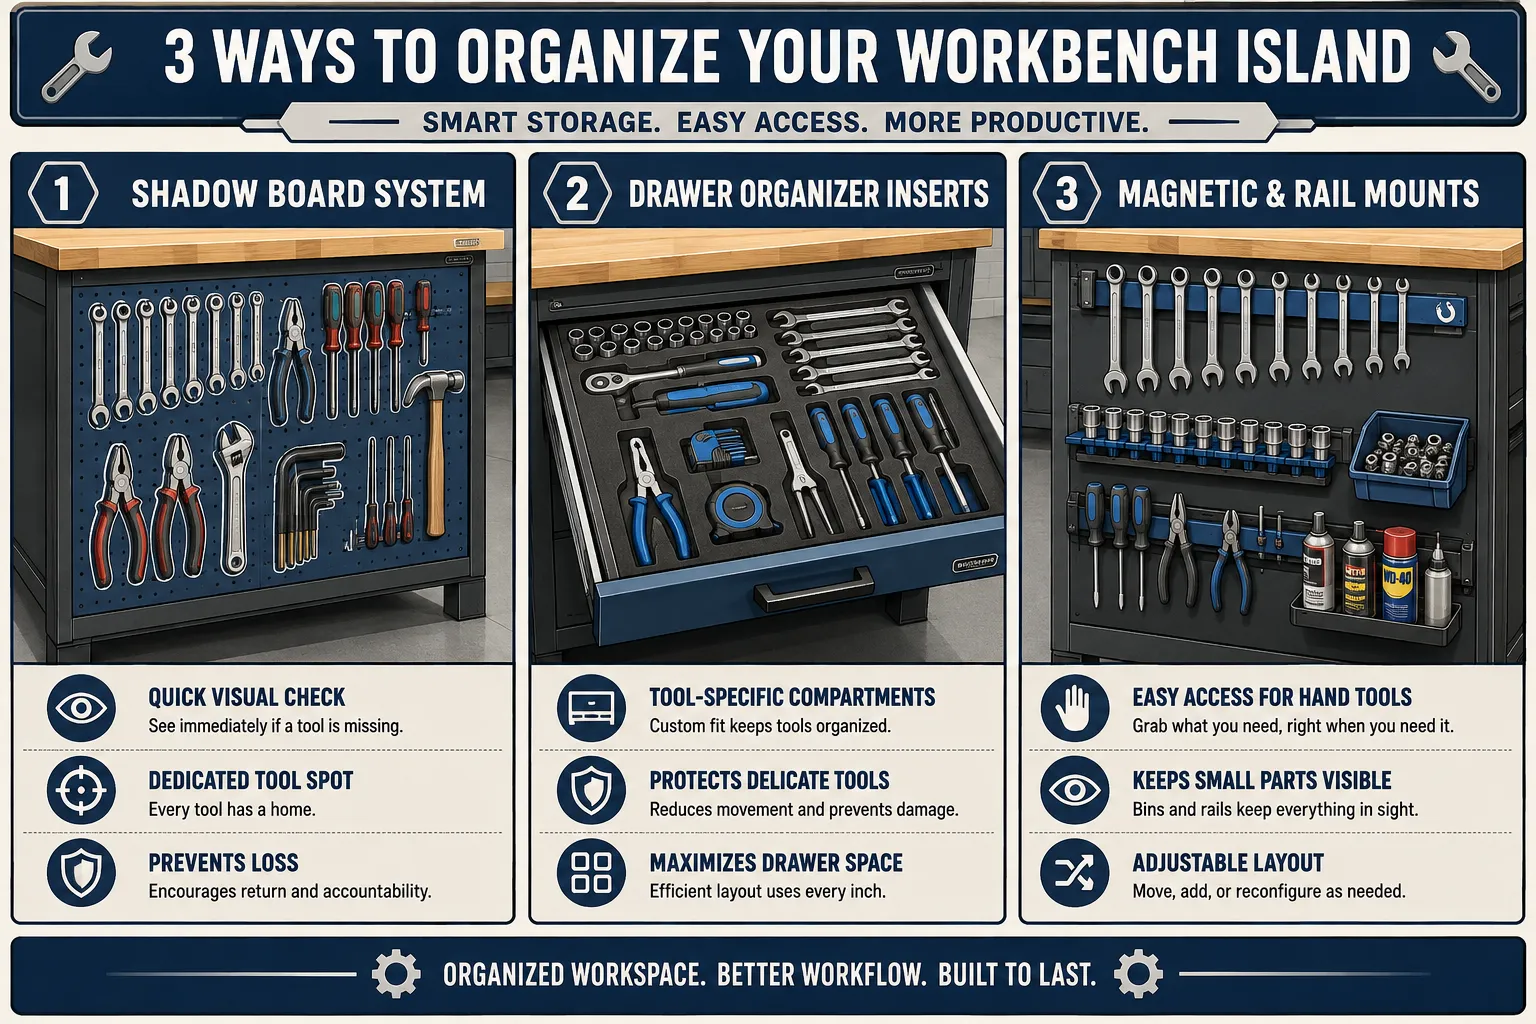
- Shadow Boards: For wall-mounted or end-of-island storage, trace the outline of each tool onto a pegboard or painted surface. This provides a clear visual indicator of where each tool belongs and instantly shows if a tool is missing.
- Custom Drawer Inserts: Cut foam inserts (like Kaizen Foam) to fit specific tools within drawers. This not only keeps tools perfectly organized but also protects them from damage. Alternatively, 3D-printed or custom-cut wooden dividers can achieve similar results.
- Magnetic Tool Holders: Install strong magnetic strips within drawers or on the side of the island for frequently used metal hand tools like screwdrivers, wrenches, and pliers. They offer quick access and a clear visual display.
- Socket Organizers: Use rail-mounted or tray-style socket organizers that allow for easy identification of sizes.
- Modular Bin Systems: For small fasteners, washers, and other components, clear, stackable, or wall-mounted modular bins are invaluable. Label them clearly.
- Dedicated Work Zones: Designate specific areas on your workbench island for different tasks. One end might be for assembly, another for drilling, and a central section for general work. This helps maintain focus and minimizes cross-contamination of tasks.
- Integrated Vise: A sturdy bench vise is indispensable. Mount it securely to a corner of the workbench, ensuring it can handle heavy clamping and hammering without compromising the island’s stability. For ideas on selecting a vise, check out our guide on the best budget-friendly bench vises for small woodworking workshops.
By incorporating these mechanic-style organization techniques, your DIY Workbench Island with Integrated Tool Storage will transform from a simple workspace into a highly efficient production hub. The investment in time and effort during the build and organization phases will pay dividends in increased productivity and enjoyment of your craft.
Conclusion
Building a DIY Workbench Island with Integrated Tool Storage and Mechanic-Style Organization is a significant undertaking, but the rewards in terms of efficiency, organization, and overall workshop enjoyment are immense. By thoughtfully designing your island, constructing it with durability in mind, and implementing mechanic-style organizational principles, you create a workspace that not only serves your immediate needs in 2026 but also grows with your skills and projects for years to come. This centralized, mobile, and meticulously organized hub will empower you to tackle any project with confidence and precision, making your workshop a true sanctuary of productivity. Embrace the challenge, and build the workbench island that elevates your craft.
References
- Dziadura, G. (2018). The Workbench Book: A Craftsman’s Guide to Workbenches for Every Type of Woodworking. Fox Chapel Publishing.
- Petersen, S. (2012). The Workbench: A Complete Guide to Creating Your Perfect Bench. Taunton Press.
SEO Meta Title: DIY Workbench Island with Integrated Tool Storage SEO Meta Description: Build a DIY workbench island with integrated tool storage & mechanic-style organization. Enhance workshop efficiency in 2026 with this comprehensive guide.