

The difference between a frustrating, splintered cut and a flawlessly smooth surface often lies not in the tool itself, but in its edge. A dull chisel, a chattering plane, or a binding saw blade can turn a woodworking project into a battle against your materials, leading to wasted effort and subpar results. Mastering Hand Tool Maintenance and Sharpening: Complete Guide to Chisels, Planes, and Saw Blades is not just a skill; it’s a foundational principle that elevates your craftsmanship and ensures your tools perform as intended. This comprehensive guide, applicable to both novices and seasoned woodworkers in 2026, will explore the essential techniques for keeping your hand tools in peak condition, transforming your workshop experience.
Key Takeaways
- Sharpness is paramount: A sharp tool is safer and more efficient, requiring less force and producing cleaner cuts.
- Regular maintenance prevents issues: Cleaning, oiling, and proper storage extend tool lifespan and prevent rust.
- Understand bevels and angles: Each tool has specific sharpening angles critical for optimal performance.
- Invest in quality sharpening equipment: Whetstones, diamond plates, and honing guides are essential for consistent results.
- Patience and practice yield mastery: Sharpening is a learned skill that improves with dedication.
The Foundation of Hand Tool Maintenance and Sharpening: Complete Guide to Chisels, Planes, and Saw Blades
Proper maintenance is the cornerstone of effective hand tool use. Neglecting your tools not only reduces their performance but can also lead to premature wear, rust, and even damage. Before delving into sharpening specifics, it’s crucial to establish a routine of care that keeps your tools ready for action.
Essential Maintenance Practices
- Cleaning: After each use, wipe down your tools to remove sawdust, sap, and grime. A stiff brush, a rag, and some mineral spirits can be effective.
- Rust Prevention: Moisture is the enemy of steel. Always ensure tools are dry before storage. Applying a thin coat of camellia oil, paste wax, or a dedicated rust-inhibiting product is highly recommended, especially for tools stored in humid environments. For effective long-term storage solutions, consider methods that protect metal surfaces from oxidation.
- Lubrication (for moving parts): For tools like hand planes with adjustment mechanisms, a light lubrication with a dry lubricant or a small amount of machine oil can prevent seizing and ensure smooth operation.
- Inspecting for Damage: Regularly check handles for cracks, ferrules for looseness, and metal parts for bending or other structural issues. Address minor problems promptly to prevent them from becoming major repairs.
Sharpening Chisels and Plane Irons
Chisels and plane irons are arguably the most frequently sharpened hand tools in a woodworker’s arsenal. Their cutting edges determine the quality of your joinery and surfacing. Achieving a razor-sharp edge involves several steps, starting from establishing the primary bevel to honing a micro-bevel.
Understanding Bevels and Grits
- Primary Bevel: This is the main angled face of the cutting edge. For most chisels and plane irons, a primary bevel of 25 to 30 degrees is standard.
- Micro-bevel (or Secondary Bevel): A slightly steeper angle (typically 3-5 degrees more than the primary bevel) ground at the very tip of the cutting edge. This makes sharpening quicker and extends the life of the primary bevel.
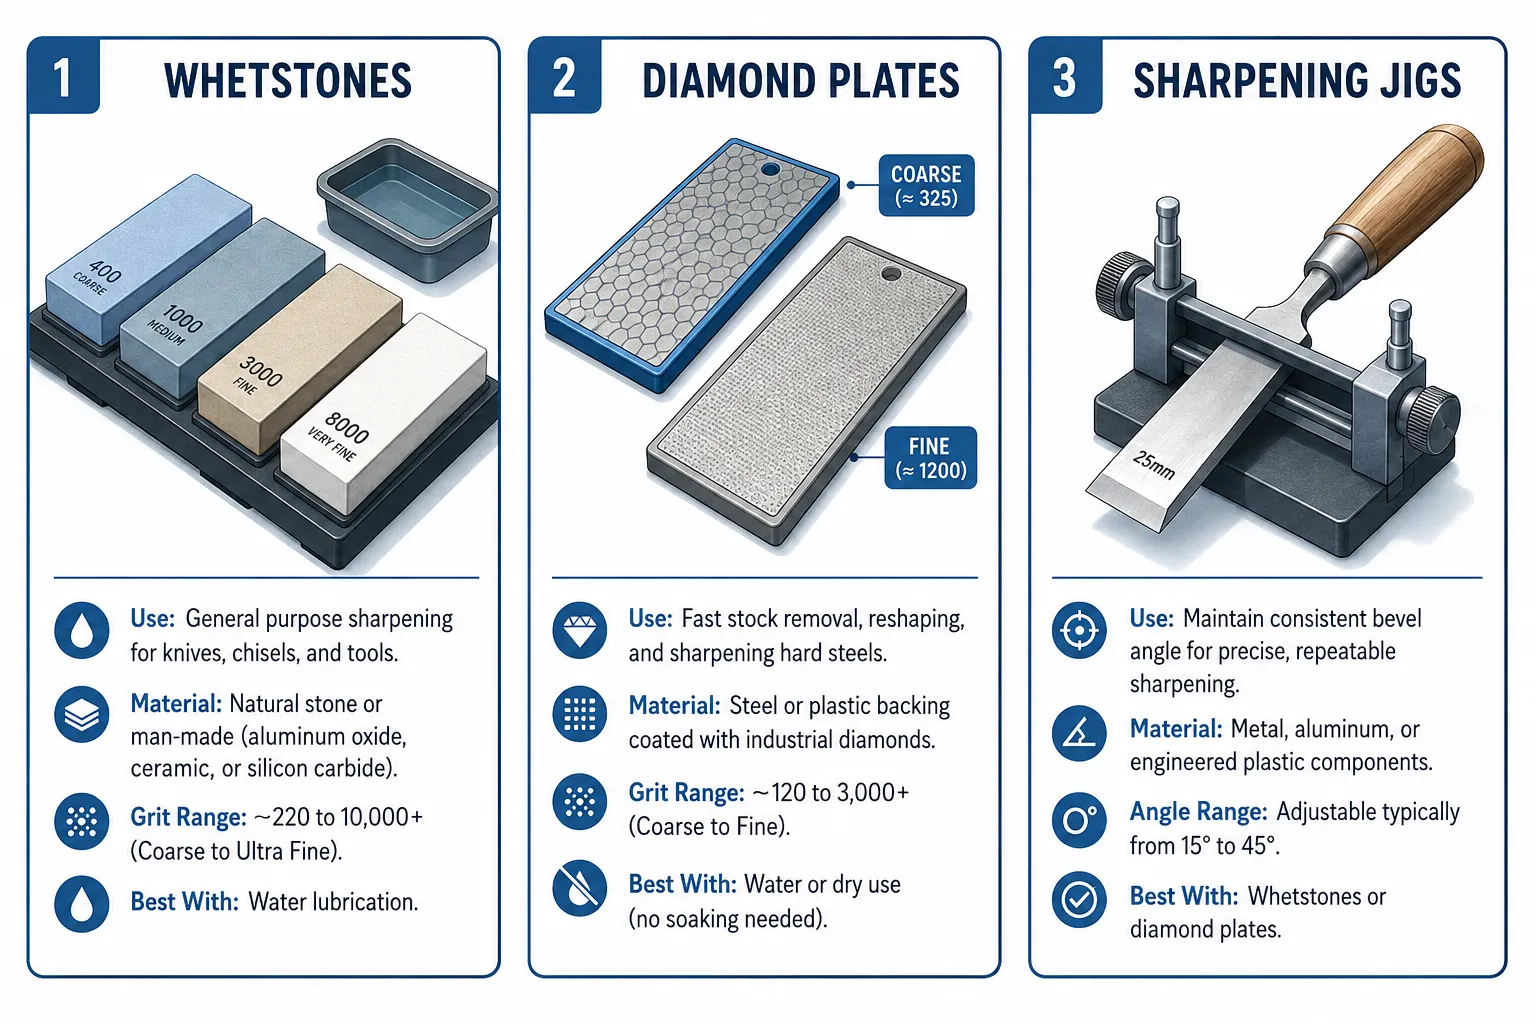
- Grits: Sharpening abrasives are categorized by grit size. Coarse grits (e.g., 200-1000) are for removing nicks and establishing the primary bevel. Medium grits (e.g., 1000-4000) refine the edge. Fine grits (e.g., 6000-12000+) are for honing a razor-sharp, mirror-polished edge.
Sharpening Process for Chisels and Plane Irons
- Flatten the Back: Before sharpening the bevel, the back (the flat side) of a new chisel or plane iron must be perfectly flat. This is critical for achieving a true, sharp edge. Use sandpaper on a flat surface (glass or granite) or a coarse diamond plate, progressing through grits (e.g., 220, 400, 800) until the first inch or two from the edge is mirror-flat.
- Establish the Primary Bevel: Using a honing guide is highly recommended for consistent angles. Set your tool in the guide to achieve the desired primary bevel angle. Start with a medium-grit stone (1000-grit) to remove any nicks and create a consistent bevel. Sharpen until you feel a “burr” (a wire edge) along the entire back of the blade.
- Hone the Micro-bevel: Increase the angle slightly (either by adjusting your honing guide or adding a small shim under the guide). Move to a finer grit stone (e.g., 4000-grit). Make a few light passes until a new, smaller burr forms.
- Refine and Polish: Progress to your finest grit stone (e.g., 8000-grit or 12000-grit). Lightly hone the micro-bevel again, then flip the tool over and gently remove the burr by making one or two very light passes with the back flat on the stone. Alternate between the micro-bevel and the back until the burr is gone and the edge is polished.
- Stropping: For the ultimate edge, strop the blade on a leather strop charged with honing compound. This removes any remaining microscopic burr and polishes the edge further.
| Sharpening Abrasive Type | Best For | Grit Range Common | Pros | Cons |
|---|---|---|---|---|
| Waterstones | General sharpening, fine polishing | 200 – 12000+ | Fast cutting, excellent finish, wide grit selection | Require soaking, wear down, need flattening |
| Oilstones | Durable general sharpening | 150 – 6000 | Very durable, slow wearing, good feedback | Slower cutting than waterstones, can load up with swarf |
| Diamond Plates | Flattening backs, fast material removal | 120 – 1200 (extra fine up to 8000) | Extremely durable, no flattening needed, fast cutting | Can be aggressive on very fine edges, high initial cost |
| Sandpaper on Glass | Economical, back flattening, occasional use | 180 – 2000 (auto-body sandpaper) | Cheap, versatile, easily replaced | Less tactile feedback, papers can tear or move |
| Ceramic Stones | Fine honing, maintenance | 1000 – 16000 | Durable, consistent, good for maintaining keen edges | Slower cutting on coarse grits, generally more expensive |
For more on selecting and using these essential tools, see our guide on Beginner Woodworking: How to Choose and Use Hand Planes, Chisels, and Saws for Precision Joinery.
Sharpening and Maintaining Hand Saw Blades
Unlike chisels and plane irons, sharpening a hand saw blade is a more intricate process, often requiring specialized files and a keen eye. However, proper maintenance can significantly extend the life and cutting efficiency of your saws.
Hand Saw Maintenance Basics
- Cleaning: Remove resin buildup and sawdust from the blade with a wire brush or fine steel wool and mineral spirits. This reduces friction and improves cutting action.
- Rust Prevention: Like other hand tools, saw blades are prone to rust. After cleaning, apply a thin coat of camellia oil or paste wax, especially in the teeth.
- Protecting Teeth: Store saws properly, either hung on a wall with blade protectors or in a dedicated saw till to prevent damage to the teeth.
- Checking Set: The “set” refers to how the teeth are bent outwards from the blade’s body. This creates clearance for the blade, preventing it from binding in the cut. If a saw binds, its set may be incorrect or lost. This can be adjusted with a saw set tool.
Sharpening Hand Saws: A Brief Overview
Sharpening a hand saw involves filing each tooth to a precise angle and ensuring proper set. This is a skill that takes considerable practice.
- Secure the Saw: Use a saw vise to hold the blade firmly, leaving the teeth exposed above the jaws.
- Jointing: Lightly run a flat file across the very tips of the teeth to bring them all to a uniform height. This creates a flat plane at the top of the teeth.
- Setting the Teeth: If needed, use a saw set tool to bend alternate teeth slightly outwards. The amount of set depends on the wood type (more set for green or softwoods, less for hardwoods).
- Filing the Teeth: This is the most critical step. Using a triangular file (specifically a saw file of the correct size for your saw’s teeth per inch), file each tooth according to its existing angle and rake. For rip saws, teeth are filed straight across. For crosscut saws, teeth are filed at an angle to create a knife-like edge. Alternate filing from one side of the blade to the other, ensuring consistent strokes and angles.
- Deburring/Stropping (Optional): Lightly run a fine stone or a piece of abrasive paper over the sides of the teeth to remove any burrs left by filing.
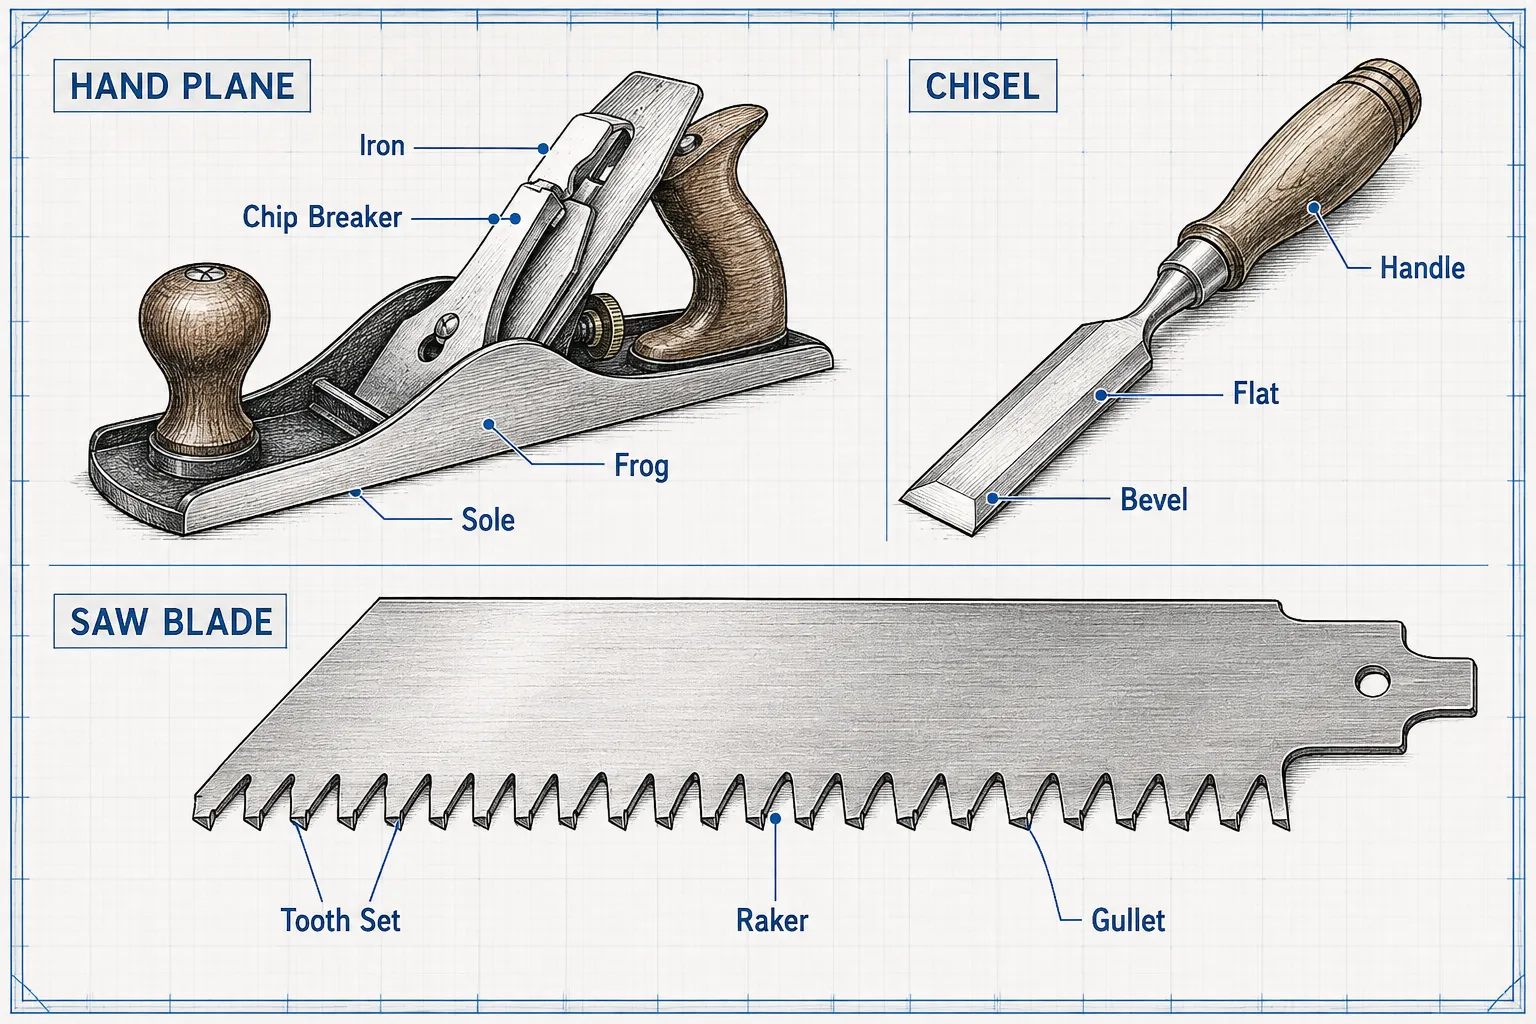
Understanding the mechanics of both hand planes and chisels, including their various components, is crucial for effective maintenance and sharpening. The subtle differences in bevel angles, blade materials, and the purpose of each tool dictate the specific care required. For instance, the chip breaker on a plane plays a vital role in tear-out prevention, and its interaction with a sharp iron significantly impacts performance. Similarly, the grind of a chisel’s bevel, whether a mortise chisel or a paring chisel, determines its suitability for different tasks in joinery. When you are constructing projects like a DIY Entryway Bench with Shoe Storage and Coat Rack, having precisely sharpened chisels for mortises or planes for surfacing is invaluable.
Advanced Considerations and Troubleshooting
Even with diligent Hand Tool Maintenance and Sharpening, challenges can arise. Knowing how to diagnose and address common issues can save time and frustration.
Common Sharpening Issues and Solutions
- Uneven Edge: Often caused by inconsistent pressure or angle during sharpening. A honing guide helps immensely. Re-establish the primary bevel on a coarser stone with a guide.
- Dull Spots: Occur when parts of the edge aren’t making contact with the sharpening stone. Ensure your stone is flat (especially waterstones) and that your technique covers the entire edge evenly.
- Excessive Burr: A small burr is good, but a large, floppy one means you’ve over-sharpened on one side without addressing the other. Lighten pressure and alternate passes between the bevel and the back to remove it.
- Chipping Edge: If your edge chips easily, it might be too thin (bevel angle too acute for the material) or the steel might be brittle. Slightly increase the micro-bevel angle.
- Plane Iron Chattering: This usually indicates a dull blade, an improperly set chip breaker, or a loose iron. Ensure the iron is razor-sharp, the chip breaker is set close to the edge (1/64″ to 1/32″), and the lever cap is tight.
Maintaining Sharpening Equipment
Your sharpening equipment also requires care:
- Flattening Waterstones: Waterstones wear unevenly and develop hollows. Use a flattening stone, a coarse diamond plate, or sandpaper on a flat surface to keep them perfectly flat. This ensures consistent contact with your tools.
- Cleaning Diamond Plates: Periodically scrub diamond plates with a stiff brush and soapy water to remove embedded swarf, which can reduce their cutting efficiency.
- Protecting Honing Guides: Keep your honing guide clean and free of rust. A light oil application on moving parts helps maintain its accuracy.
- Organizing Files: Store saw files separately to prevent them from dulling each other. Keep them clean.
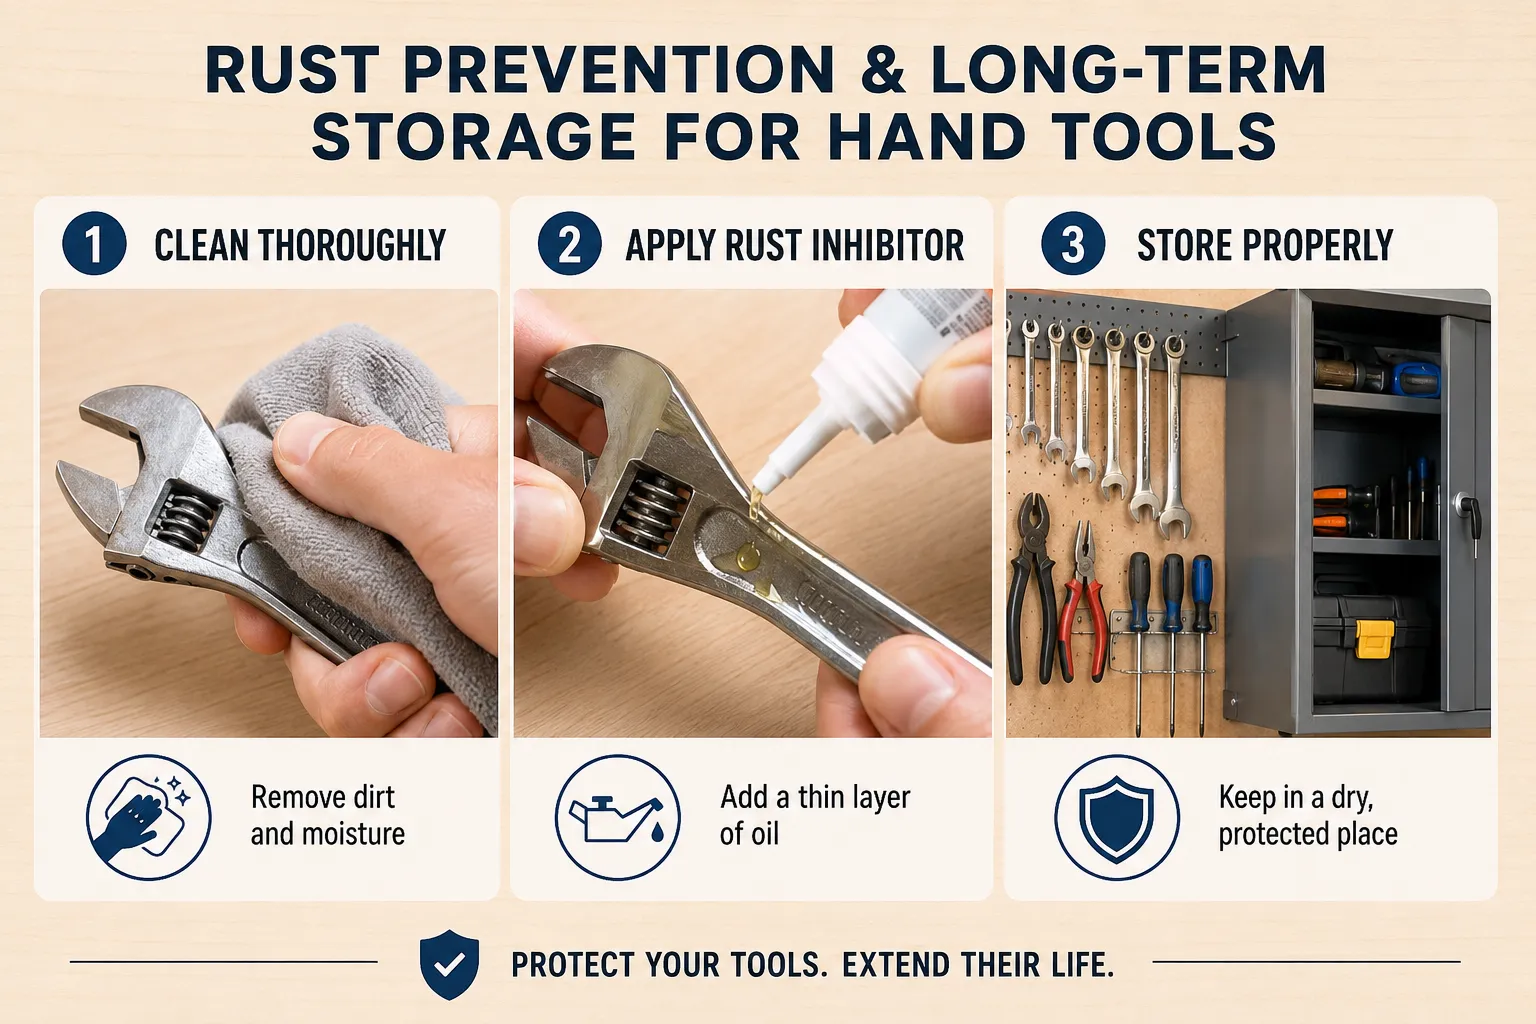
Proper tool care and maintenance extends beyond just the cutting edge. It involves creating a system for storage and organization that protects your investments. For example, building a Woodworking Plans for a Lawn Mower Storage and Maintenance Bench can include dedicated sections for hand tools, keeping them clean, dry, and readily accessible. Similarly, integrating hand tool storage into larger workshop solutions like Hybrid Wood Metal Tool Cabinets With Modular Inserts Smart Shop Organization For Growing Power Tool Collections ensures they are protected from environmental factors and accidental damage.
Conclusion
Mastering Hand Tool Maintenance and Sharpening: Complete Guide to Chisels, Planes, and Saw Blades is an ongoing journey that fundamentally improves your woodworking results. A sharp tool is a joy to use, providing superior control, cleaner cuts, and a greater sense of accomplishment. By consistently implementing the cleaning, rust prevention, and sharpening techniques outlined in this guide for your chisels, planes, and saw blades, you’ll not only extend the life of your valuable tools but also unlock new levels of precision and enjoyment in your craft throughout 2026 and beyond. Make tool care a habit, and your tools will reward you with exceptional performance for years to come.
SEO Meta Title: Hand Tool Maintenance & Sharpening: Chisels, Planes, Saws SEO Meta Description: Master hand tool maintenance and sharpening for chisels, planes, and saw blades in 2026. This complete guide ensures optimal performance and tool longevity.