
The difference between a good woodworking project and an extraordinary one often lies in its finish. While basic staining and sealing suffice for many applications, achieving truly premium, long-lasting results demands a deeper understanding of advanced wood finishing. This comprehensive guide, focused on Advanced Wood Finishing: Professional Polishing, Staining, and Protective Coating Techniques for Premium Results, will elevate your craftsmanship from competent to exceptional, ensuring your creations not only look stunning but also endure for decades.
Key Takeaways
- Preparation is Paramount: Meticulous surface preparation, including precise sanding and grain management, is the non-negotiable foundation for any high-quality finish.
- Stain Mastery: Beyond basic application, achieving professional stain results involves understanding wood characteristics, pre-conditioners, and various application methods to control color depth and uniformity.
- Advanced Polishing: Professional polishing isn’t just about shine; it involves progressive abrasion with fine compounds and buffing to create a deep, lustrous, mirror-like surface.
- Protective Coating Excellence: Selecting and applying the right protective coating, from durable polyurethanes to artistic lacquers and natural oils, is critical for aesthetics, longevity, and resistance to environmental factors.
- Systematic Approach: Professional results are achieved through a systematic, multi-step process, where each stage builds upon the last, demanding patience, precision, and the right tools.
The Foundation of Excellence: Surface Preparation for Advanced Wood Finishing
Achieving truly premium results in Advanced Wood Finishing: Professional Polishing, Staining, and Protective Coating Techniques for Premium Results begins long before any color or topcoat touches the wood. The quality of your final finish is directly proportional to the meticulousness of your surface preparation. Skipping steps here guarantees an inferior outcome.
Understanding Wood Grain and Imperfections
Every piece of wood is unique, possessing distinct grain patterns, varying porosity, and potential imperfections like mill marks, glue squeeze-out, or minor dents. A professional finisher’s first task is to read the wood, identifying these characteristics and planning the preparation accordingly. Grain direction impacts how stains absorb and how the surface sands. Imperfections, if not addressed, will become glaringly obvious under a clear finish.
Precision Sanding Techniques
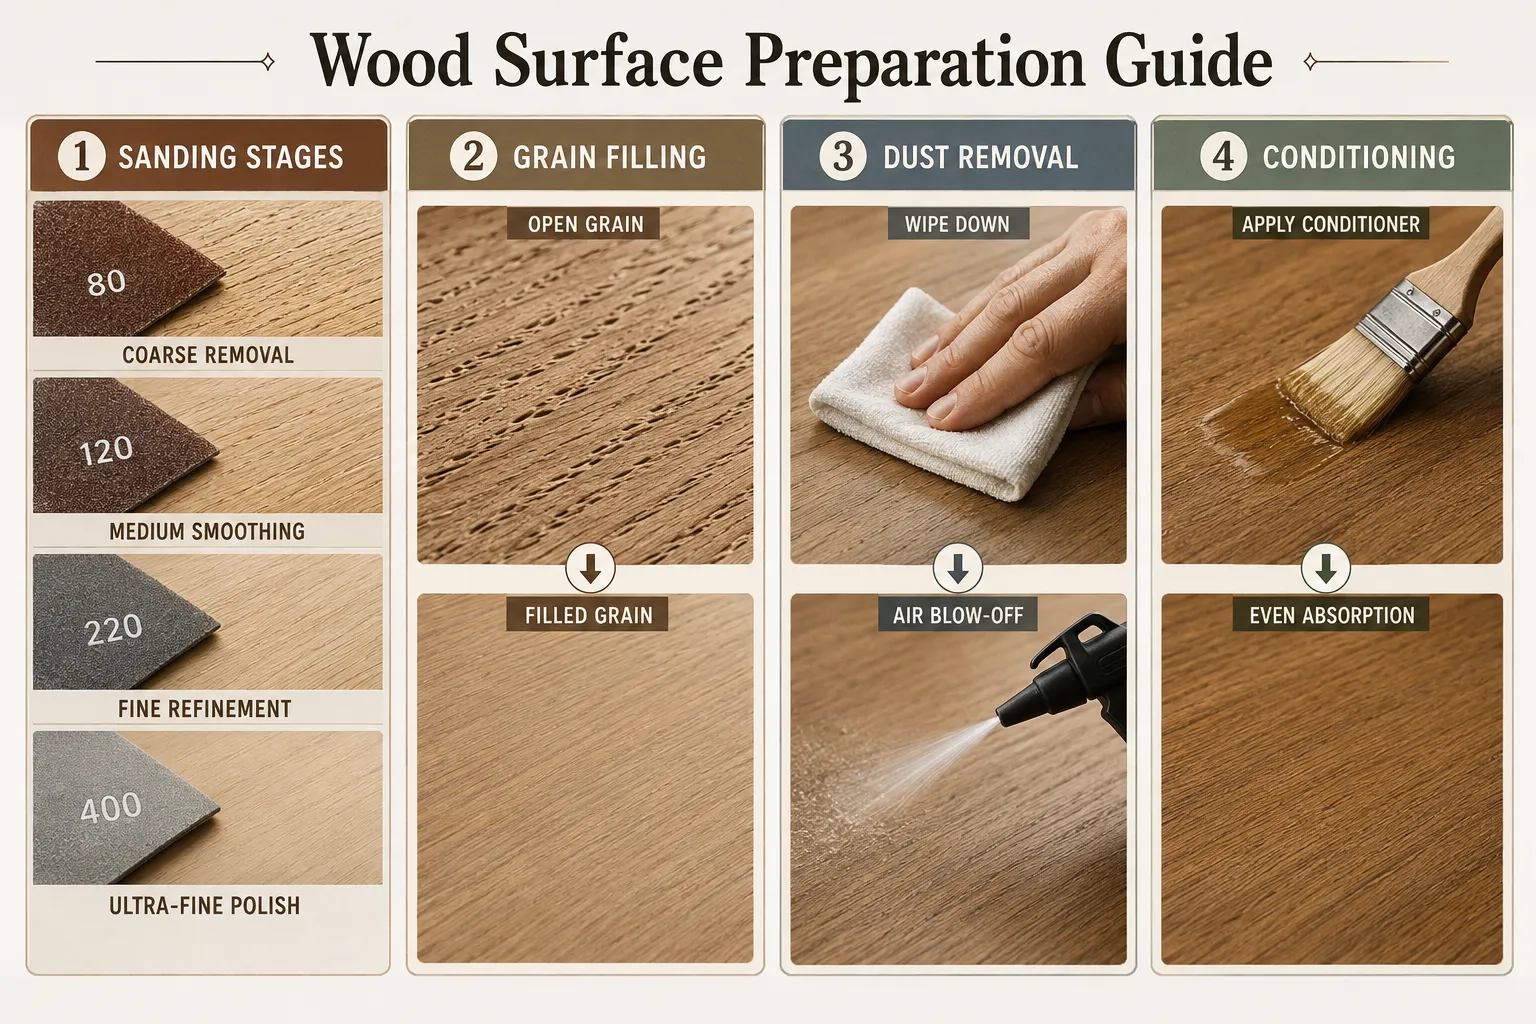
Sanding is not merely about making the wood smooth; it’s about progressively refining the surface to create an even texture that will accept stain and finish uniformly.
Sanding Schedule:
| Grit Range | Purpose | Application |
|---|---|---|
| 80-120 | Initial Material Removal & Leveling | Removes mill marks, glue lines, and major imperfections. Use a random orbital sander or belt sander for efficiency. |
| 150-180 | Refinement & Scratch Removal | Eliminates scratches from coarser grits. Essential for preparing the surface for staining. |
| 220 | Final Pre-Stain Smoothing | The standard stopping point before staining most woods. Provides a smooth surface without closing the grain too much, allowing for good stain absorption. |
| 320-400+ | Pre-Finish Smoothing & Between-Coats | Used for ultra-smooth surfaces, especially for clear finishes or after grain filling. Also used for scuff-sanding between finish coats. |
Always sand in the direction of the grain, particularly with finer grits. Cross-grain scratches are notoriously difficult to remove and will be magnified by stain or clear coats. Use a sanding block for flat surfaces to maintain flatness. For intricate curves or carvings, flexible sanding pads or hand-sanding with torn pieces of sandpaper can be effective. Advanced wood carving techniques may require specialized sanding approaches.
Grain Filling and Pore Management
Some open-grain woods, such as oak, ash, or mahogany, benefit from grain filling to achieve a glass-smooth surface under a high-gloss finish. Grain fillers are paste-like compounds that fill the pores, preventing the finish from sinking in and creating an uneven texture.
Steps for Grain Filling:
- Prepare the Surface: Sand to at least 220 grit.
- Apply Filler: Work the filler into the pores across the grain with a squeegee, rubber spatula, or stiff brush.
- Remove Excess: After a short flash-off time (as per product instructions), wipe off excess filler across the grain with a clean rag or squeegee, then lightly with the grain.
- Dry and Sand: Allow ample drying time, then light sand with 320-400 grit to remove any remaining filler residue on the surface, ensuring it only remains in the pores.
Dust Removal and Conditioning
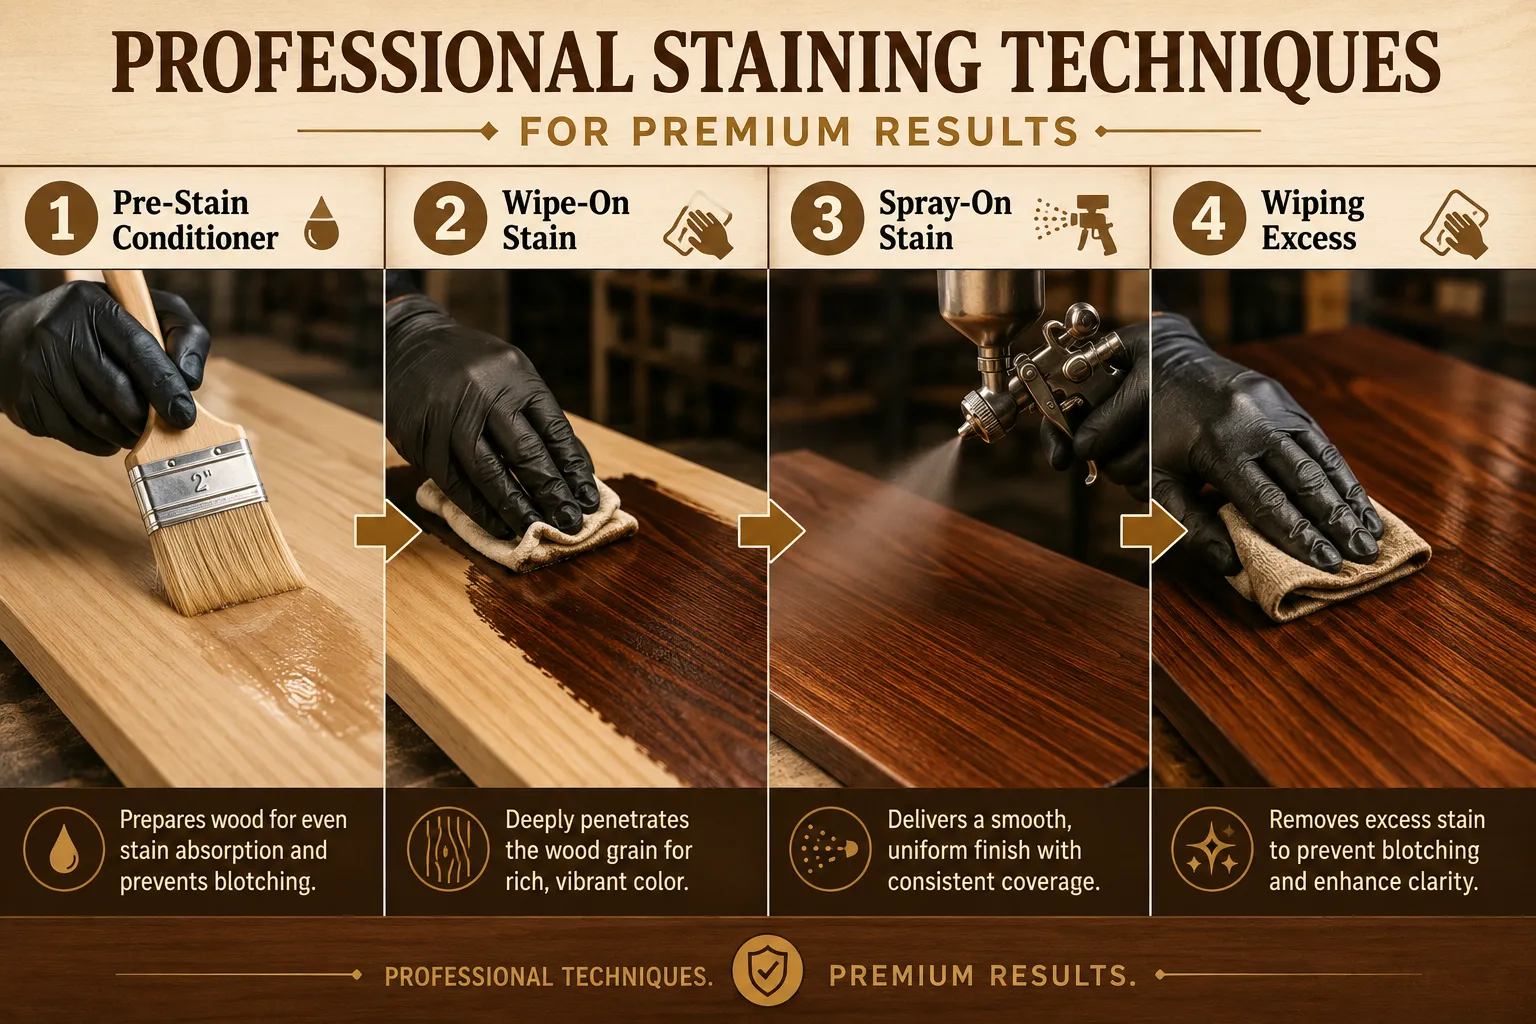
Dust is the enemy of a perfect finish. After sanding, meticulously remove all sanding dust using compressed air, a vacuum, and finally, a tack cloth or a damp (not wet) cloth. For certain woods prone to blotching (e.g., pine, maple, birch, cherry), a pre-stain wood conditioner is crucial. This helps to even out the wood’s porosity, ensuring uniform stain absorption and preventing splotchy results. Apply the conditioner, allow it to penetrate for the recommended time, and then proceed with staining.
Mastering Staining: Achieving Nuanced Color and Depth
Staining is where the wood’s natural beauty is enhanced, providing color, depth, and character. Professional staining goes beyond merely applying color; it involves selecting the right product and technique to achieve a desired aesthetic, which is a key part of Advanced Wood Finishing: Professional Polishing, Staining, and Protective Coating Techniques for Premium Results.
Types of Stains and Their Applications
Choosing the correct stain is critical, as each type interacts with wood differently.
- Oil-Based Stains: These are widely popular due to their long open time, allowing for easier application and blending. They penetrate deeply, offering rich, warm colors. They require mineral spirits for cleanup and a longer drying time.
- Water-Based Stains: Environmentally friendly and fast-drying, water-based stains are known for vibrant colors and minimal odor. They can raise the grain, necessitating a light sanding after the first coat, and offer less open time for blending.
- Gel Stains: Non-drip, thick consistency makes them ideal for vertical surfaces and woods prone to blotching. They sit more on the surface than penetrate, offering more uniform color.
- Dye Stains: Dyes penetrate deeply and offer incredible clarity, allowing the grain to show through vividly. They can be water-soluble or alcohol-soluble and are excellent for custom color mixing or for achieving intense, translucent hues.
Professional Staining Techniques
The method of application profoundly impacts the final look.
- Wiping Stains: The most common method involves applying stain generously with a brush or rag, allowing it to penetrate for a few minutes, then wiping off the excess. This method controls the depth of color; more dwell time equals darker color. Work in manageable sections to avoid lap marks.
- Spraying Stains: For large projects or complex shapes, spraying offers the most uniform application. HVLP (High Volume Low Pressure) spray guns are ideal for applying thin, even coats of stain. This technique requires practice to avoid runs and achieve consistent coverage.
- Glazing: Glazes are translucent colors applied over a base stain or sealer, often used to create antique effects, deepen contours, or add subtle color shifts. They have a long open time, allowing for artistic manipulation before wiping.
<code class="language-html"><div style="border: 1px solid #e0e0e0; padding: 15px; margin: 20px 0; border-radius: 8px; background-color: #f9f9f9;">
    <h3 style="color: #2c3e50; margin-top: 0; font-size: 1.2em;">Tip for Consistent Stain Application</h3>
    <p style="color: #34495e;">To ensure even stain penetration and avoid blotchiness on absorbent or uneven woods, consider applying a thin, diluted coat of the final topcoat (like shellac or a sanding sealer) as a pre-stain conditioner. This creates a uniform surface for the stain to adhere to, leading to more consistent color. Always test on scrap wood first!</p>
</div>
</code>
When working with reclaimed wood, special considerations apply to staining and finishing to highlight its unique texture and story. See our guide on Finishing Reclaimed Wood for 2026: Polishes That Highlight Texture And Story for more insights.
Protective Coatings and Professional Polishing: The Final Touch
The protective coating is the shield that guards your woodworking masterpiece, providing durability, enhancing appearance, and defining the piece’s longevity. Professional polishing then takes that protection to an unparalleled level of visual sophistication. This is the pinnacle of Advanced Wood Finishing: Professional Polishing, Staining, and Protective Coating Techniques for Premium Results.
Selecting the Right Protective Coating
The choice of topcoat depends on the desired aesthetic, level of protection, and intended use of the piece.
- Polyurethane (Oil-Based & Water-Based):
- Oil-Based: Extremely durable, ambering effect, excellent water and abrasion resistance. Slow drying.
- Water-Based: Clear, non-yellowing, faster drying, lower odor. Good durability, though typically less robust than oil-based for heavy-wear surfaces.
- Lacquer: Fast-drying, produces a very hard, clear film that is easy to repair. Often spray-applied for a flawless finish.
- Varnish: Similar to polyurethane in durability but often slower drying and can be more prone to yellowing. Traditional varnish offers deep, rich aesthetics.
- Shellac: A natural, traditional finish. Fast-drying, seals odors, blocks stains, and provides a beautiful amber glow. Less durable than polyurethanes or varnishes but easily repaired. Excellent as a barrier coat. For budget-friendly options, exploring oils, waxes, and shellac can yield professional results.
- Oils (Tung Oil, Linseed Oil): Penetrating finishes that nourish the wood and provide a natural, satin look and feel. Offer good water resistance but less abrasion resistance than film-building finishes. Requires regular maintenance.
Advanced Application Techniques
Applying topcoats professionally involves precision and control, especially for film-building finishes like polyurethane and lacquer.
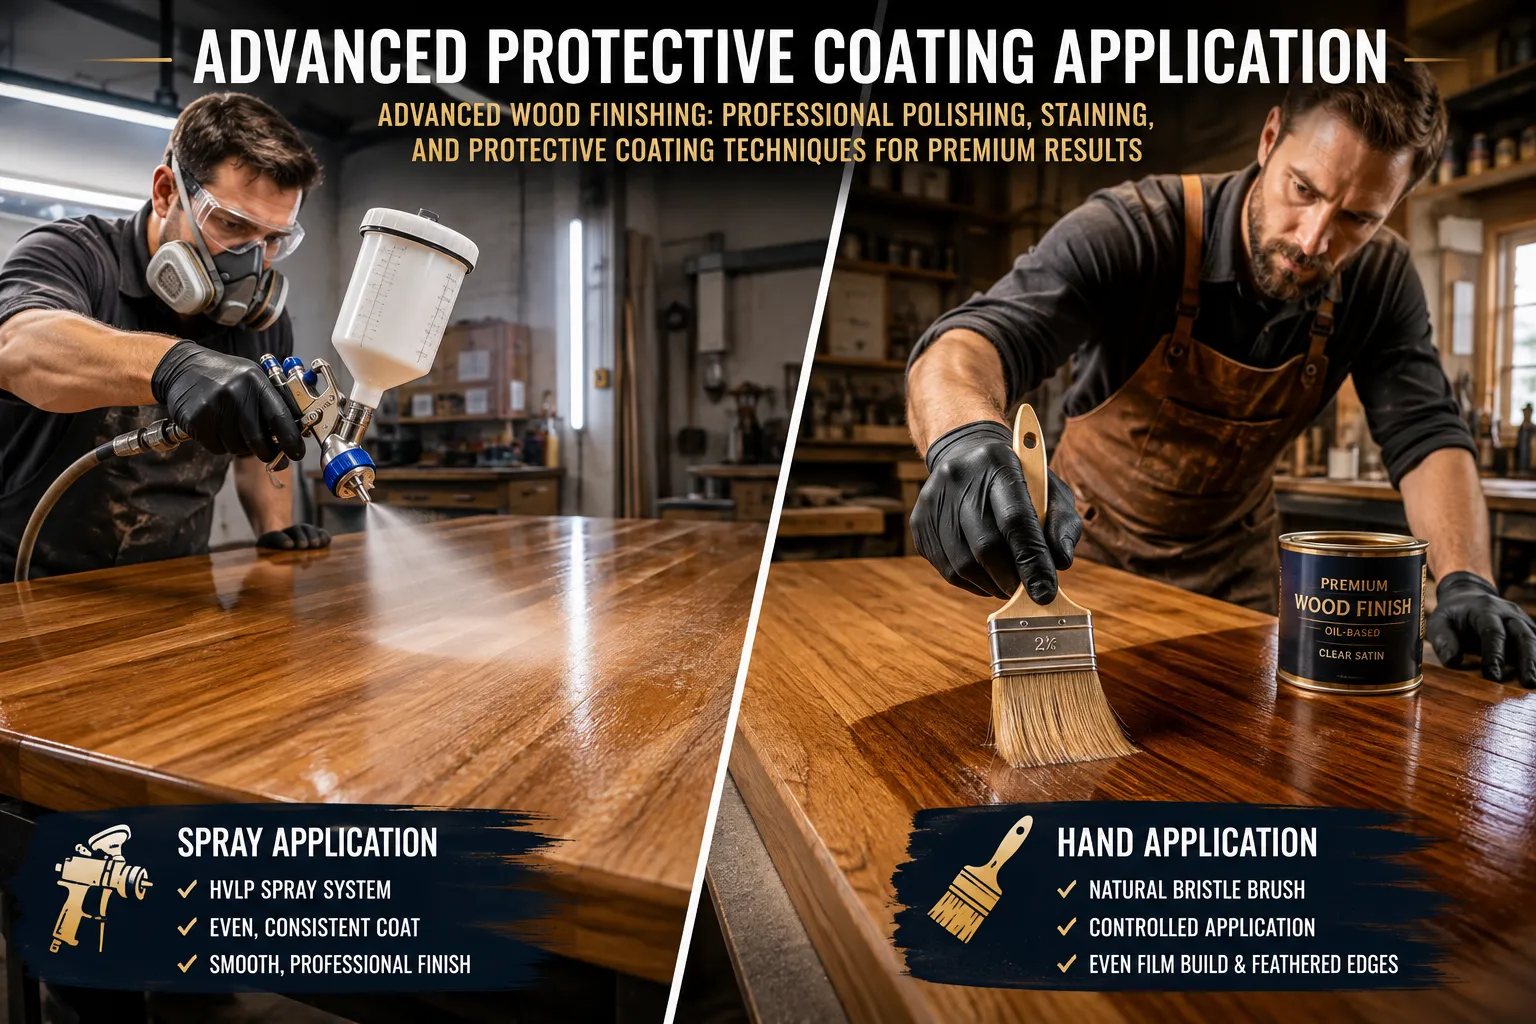
- Spraying (HVLP/Airless): For the smoothest, most even finish, especially on large or intricate surfaces, spraying is often preferred. HVLP systems provide a fine atomization with minimal overspray, ensuring a glass-like finish with multiple thin coats. This technique reduces brush marks and allows for faster build-up of a durable film.
- Brushing: For smaller projects or when spraying isn’t feasible, using a high-quality natural bristle brush for oil-based finishes or a synthetic brush for water-based finishes is essential. Apply thin, even coats, flowing the finish on rather than brushing vigorously. Avoid overworking the finish to prevent bubbles.
- Rubbed Finishes: Some finishes, particularly oils or oil-varnish blends, are applied by hand-rubbing, building up thin coats that penetrate and cure within the wood, yielding a rich, subtle sheen.
Professional Polishing Techniques for a Mirror Finish
Once the final protective coat has fully cured (which can take several weeks for some finishes), professional polishing can achieve a truly mirror-like, deep luster. This is a multi-step abrasive process.
- Leveling the Surface: Even with careful application, dust nibs or slight texture might be present. Start by wet-sanding with very fine sandpaper (e.g., 800-1500 grit) on a flat block. Use water with a drop of dish soap as a lubricant. The goal is to create a uniformly dull, scratch-free surface.
- Compounding: Switch to a fine abrasive compound designed for clear coats. Apply a small amount to a foam polishing pad on a random orbital buffer or by hand. Work in small sections, using moderate pressure, until the surface begins to gain gloss and the sanding marks disappear.
- Polishing: Follow with an even finer polishing compound, using a clean, softer foam pad. This step refines the surface further, removing any swirl marks from the compounding stage and boosting the gloss.
- Glazing/Swirl Remover: For ultimate clarity and to eliminate any remaining micro-scratches, use an ultra-fine glaze or swirl remover with a very soft finishing pad.
- Waxing (Optional): A final application of a high-quality paste wax can add an extra layer of protection and deepen the shine, though modern clear coats often don’t strictly require it for protection.
This meticulous process, often seen in automotive paint finishing, can transform a good wood finish into an extraordinary one. For anyone creating custom wood charging stations and desk organizers, such a finish can significantly elevate the perceived value.
Environmental Considerations and Safety in 2026
In 2026, professional wood finishing also means prioritizing safety and environmental responsibility. Many modern finishes offer low VOC (Volatile Organic Compound) formulations, reducing harmful emissions and improving workshop air quality.
- Ventilation: Always work in a well-ventilated area. Use exhaust fans to remove fumes and ensure fresh air circulation.
- Personal Protective Equipment (PPE): Wear appropriate respirators (organic vapor cartridges for solvent-based finishes, particulate masks for sanding dust), safety glasses, and chemical-resistant gloves.
- Disposal: Properly dispose of rags, solvents, and leftover finishes according to local regulations. Oily rags can spontaneously combust; always store them in a sealed, water-filled metal container.
Conclusion
Mastering Advanced Wood Finishing: Professional Polishing, Staining, and Protective Coating Techniques for Premium Results is a journey that transforms woodworking from a craft into an art form. By dedicating attention to meticulous surface preparation, understanding the nuances of various staining agents and application methods, and selecting the optimal protective coatings, you elevate your projects to a professional standard. The final step of professional polishing, while demanding, unlocks a depth of luster and clarity that distinguishes truly premium pieces. Remember that patience, attention to detail, and a systematic approach are your most valuable tools. Embrace these advanced techniques, and your woodworking projects in 2026 and beyond will not only boast exceptional aesthetics but also stand the test of time, reflecting a commitment to unparalleled craftsmanship.
References
- Flexner, B. (2005). Understanding Wood Finishing: How to Select and Apply the Right Finish. Fox Chapel Publishing.
- Jewitt, M. (2014). The Woodfinishing Handbook. Guild of Master Craftsman Publications Ltd.
- Mehler, M. (2018). The New Wood Finishing Book. Taunton Press.
SEO Meta Title: Advanced Wood Finishing: Polishing, Staining & Protection SEO Meta Description: Elevate woodworking with advanced finishing techniques. Learn professional polishing, nuanced staining, and durable protective coating methods for premium results in 2026.