


The subtle hum of a motor, the rhythmic scrape of steel on spinning timber, and the transformation of a raw block of wood into an elegant, functional object—these are the hallmarks of wood lathe turning. While the craft might appear daunting, its fundamental principles are remarkably accessible. This Beginner’s Guide to Wood Lathe Turning: First Projects, Essential Tools, and Safety Practices will equip you with the knowledge to confidently embark on your woodturning journey in 2026, demystifying the process and revealing the simple satisfaction of shaping wood with precision.
Key Takeaways
- Safety First: Always prioritize personal protective equipment (PPE) and a clean, organized workspace to prevent accidents.
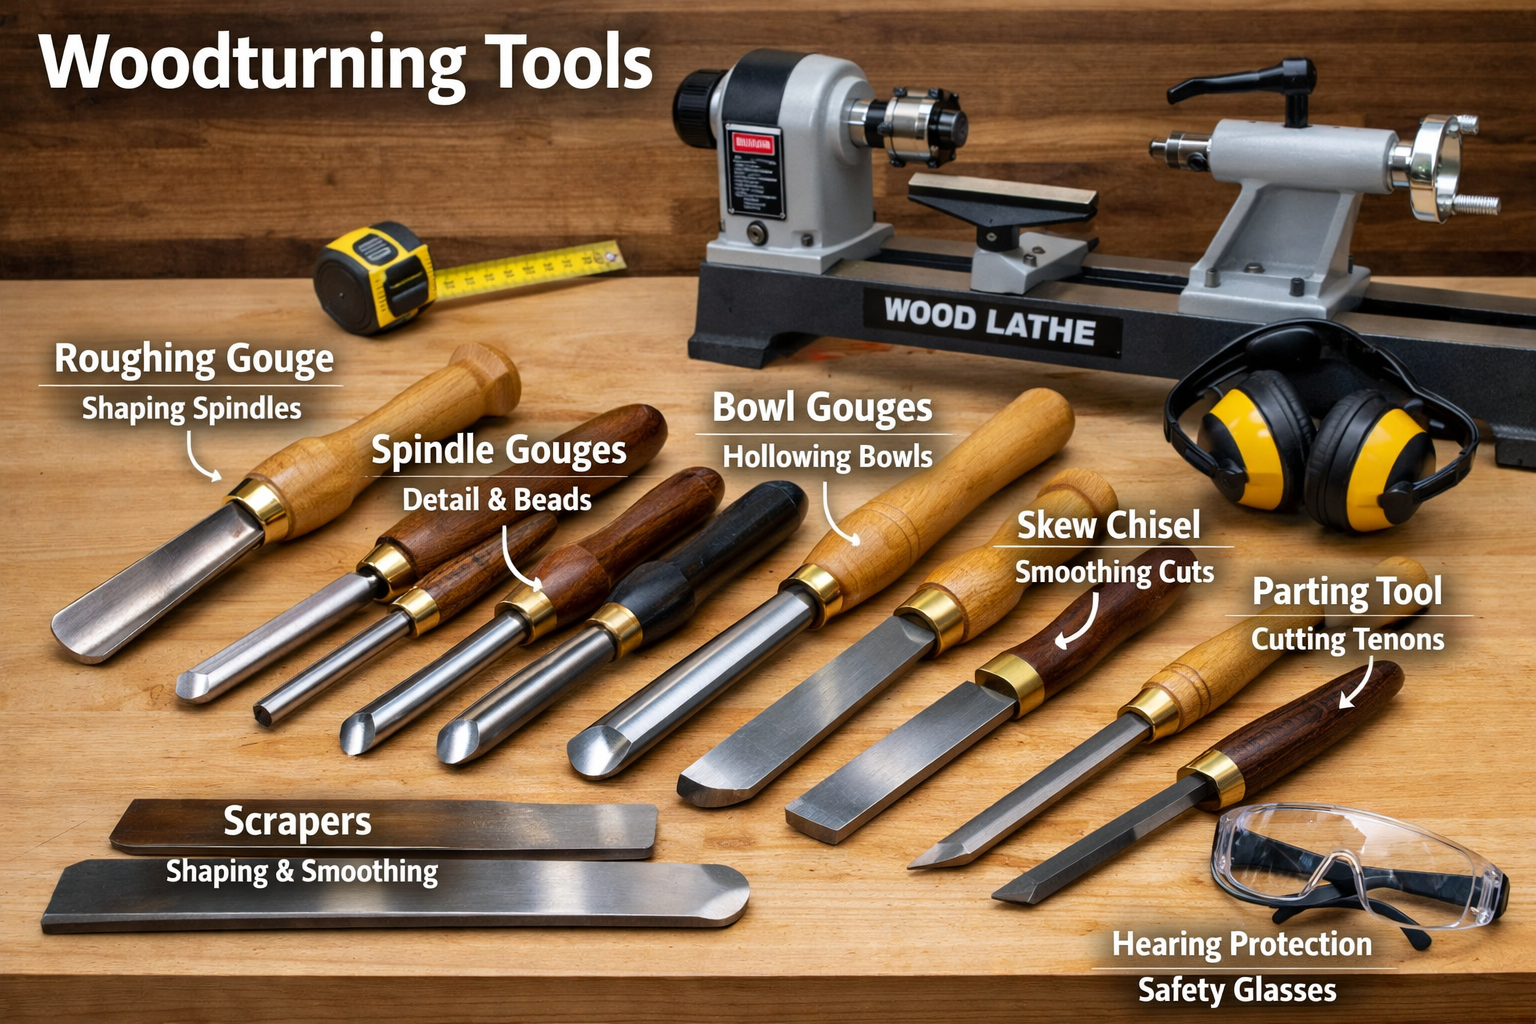
- Essential Tool Selection: Start with a few core turning chisels—roughing gouge, spindle gouge, skew chisel, parting tool, and scrapers—and learn their specific uses.
- Understanding Your Lathe: Familiarize yourself with the main components of a wood lathe and how to properly mount and secure your workpiece.
- Beginner-Friendly Projects: Simple projects like spindles, bowls, and mallets are ideal for developing fundamental techniques and building confidence.
- Consistent Practice: Woodturning is a skill that improves with hands-on experience and a willingness to experiment and learn from mistakes.
Essential Tools and Equipment for the Aspiring Woodturner
Embarking on wood lathe turning requires a foundational set of tools and equipment. Understanding each piece’s function is crucial for both safety and successful turning. This section details the necessary components to get started, ensuring you have everything you need for your first projects.

The Wood Lathe: Your Primary Machine
The heart of any woodturning operation is the lathe itself. For beginners, a mini or midi lathe is often recommended. These offer a good balance of power, capacity, and affordability, making them perfect for learning the ropes and tackling smaller projects.
- Headstock: This stationary end contains the motor, spindle, and drive mechanism. It’s where your workpiece is typically driven.
- Tailstock: This movable end supports the workpiece opposite the headstock, often housing a live center to allow the wood to spin freely.
- Bed: The main structural beam that connects the headstock and tailstock, providing a stable platform.
- Tool Rest: An adjustable support for your turning chisels, allowing you to brace the tool against the spinning wood.
When selecting a lathe, consider its swing (the maximum diameter of wood it can turn) and distance between centers (the maximum length of wood it can turn). For most beginner projects like pens, small bowls, or candle holders, a midi lathe with a 10-12 inch swing and 16-24 inch distance between centers is more than adequate.
Must-Have Turning Chisels
While an array of turning chisels exists, beginners can effectively start with a core set of five to six tools. These are your primary instruments for shaping wood.
| Tool Category | Common Use | Key Features |
|---|---|---|
| Roughing Gouge | Quickly reduces square blanks to cylinders. | Deep flute, broad cutting edge. |
| Spindle Gouge | Shapes coves, beads, and details on spindles. | Shallower flute than roughing gouge, various sizes. |
| Skew Chisel | Creates smooth surfaces, V-cuts, and beads. | Flat, beveled edge, angled. Considered more advanced to master. |
| Parting Tool | Separates workpieces from waste, creates grooves. | Narrow, often pointed edge. |
| Scraper | Smooths surfaces, creates concave/convex shapes. | Flat or rounded edge, used for shearing cuts. |
| Bowl Gouge | Essential for hollowing out bowls and vessels. | Deep flute, often with an angled grind for aggressive cutting. |
It’s vital to keep your turning chisels razor-sharp. A dull tool will tear the wood, create more dust, and be significantly more dangerous. Investing in a good sharpening system, such as a bench grinder with appropriate jigs, is as important as the chisels themselves. For more on maintaining sharp edges, explore our guide on The Ultimate Guide to Sharpening Woodworking Chisels and Planes.
Essential Accessories
Beyond the lathe and chisels, a few accessories are indispensable:
- Chucks and Faceplates: Used for mounting workpieces, especially when turning bowls or other items that can’t be held between centers. A four-jaw self-centering chuck is highly versatile.
- Centers: Live centers for the tailstock allow the wood to spin freely, while spur centers in the headstock grip the workpiece.
- Measuring Tools: Calipers, rulers, and compasses are crucial for accurate dimensions and design.
- Sanding Supplies: Various grits of sandpaper are needed to achieve a smooth finish.
- Wood Finishes: Waxes, oils, and lacquers protect your finished pieces and enhance their beauty.
- Dust Collection System: Woodturning produces a significant amount of fine dust. A shop vacuum or a dedicated dust collector is essential for maintaining air quality and a clean workspace. This aligns with practices for building a DIY Smart Workshop Dust Collection System.
Prioritizing Safety in Wood Lathe Turning
Woodturning is an immensely rewarding hobby, but it involves powerful machinery and sharp tools. Safety must always be your paramount concern. Neglecting safety protocols can lead to serious injury. This section outlines critical safety practices every beginner must adopt before their first cut.
Personal Protective Equipment (PPE)
Never approach a running lathe without the correct PPE.
- Full Face Shield: This is non-negotiable. It protects your entire face from flying debris, wood chips, and potential tool kickbacks. Goggles are not sufficient.
- Hearing Protection: Lathes can be noisy, especially when turning unbalanced wood or at higher speeds. Earmuffs or earplugs are vital to prevent hearing damage.
- Dust Mask/Respirator: Fine wood dust can cause respiratory issues. A good quality dust mask or respirator is essential, especially when sanding or working with certain wood species.
- Appropriate Clothing: Avoid loose-fitting clothing, jewelry, or long hair that could get caught in the spinning workpiece. Roll up sleeves and tie back long hair. Closed-toe shoes are also recommended.
Workspace Setup and Machine Safety
A safe workshop is an organized workshop.
- Clear Workspace: Keep the area around your lathe clear of clutter, tools not in use, and tripping hazards.
- Proper Lighting: Ensure your lathe is well-lit to clearly see your workpiece and tool contact point.
- Secure Lathe: Your lathe must be bolted securely to a sturdy workbench. Any wobble or movement can be extremely dangerous. Consider integrating it into a Building a Custom Wood Workbench for maximum stability.
- Know Your Lathe: Read your lathe’s manual thoroughly. Understand how to operate the on/off switch, speed controls, and emergency stop.
- Inspect Wood: Always inspect your wood blank for cracks, knots, or foreign objects (like nails) before mounting. These can cause the wood to explode or tools to catch.
“A sharp tool is a safe tool. A dull tool requires more force, increasing the risk of slips and kickbacks.”
Safe Turning Practices
These practices are fundamental to preventing accidents while turning.
- Secure Workpiece: Always ensure your workpiece is firmly mounted in the chuck, on a faceplate, or between centers. Wiggle it by hand to confirm it’s tight.
- Start at Low Speed: Begin turning at the lowest speed setting and gradually increase it once the workpiece is balanced and running smoothly. Never start at high speed.
- Tool Rest Position: Position the tool rest as close as possible to the workpiece (about 1/8 to 1/4 inch) without touching it. This provides maximum support and reduces tool leverage.
- Proper Stance: Stand in a balanced stance, slightly to the side of the direct line of fire, especially when roughing out. This minimizes exposure to potential projectile fragments.
- Tool Control: Always keep your turning chisel firmly on the tool rest, using your body to brace and control the tool. Never freehand a cut.
- Cuts Towards the Center: Generally, cut from a larger diameter towards a smaller one, or from the center outwards on a faceplate turning. Avoid unsupported end grain cuts.
- Be Aware of Catches: A “catch” occurs when the tool digs too aggressively into the wood, causing the workpiece to stop suddenly or jerk. This can be dangerous. Learn to recognize the signs and adjust your approach.
- Never Reach Over Spinning Wood: Do not reach over or around a spinning workpiece for any reason.
- Remove Tool Rest Before Sanding: Always remove the tool rest before sanding to prevent sandpaper from getting caught and pulled into the spinning wood.

Your First Wood Lathe Turning Projects
Once you’ve understood the essential tools and embraced critical safety practices, it’s time to create! Starting with simple, achievable projects is key to building confidence and mastering fundamental techniques. Here are some excellent first projects for any beginner.
1. The Practice Spindle: Mastering Basic Cuts
Before attempting anything complex, a simple spindle is your best friend. This project focuses on refining your control over basic cuts, creating uniform diameters, beads, and coves.
Steps:
- Mount the Blank: Secure a square stock of soft wood (like pine or poplar), about 2x2x12 inches, between the headstock’s spur center and the tailstock’s live center.
- Roughing to Round: Using a roughing gouge, slowly and carefully remove the corners until the blank is round. Start at low speed and take shallow cuts.
- Cylinders and Shoulders: Practice turning uniform cylinders along the length of the spindle. Then, create shoulders by cutting straight down with a parting tool to specific depths, followed by a spindle gouge to define the shoulder.
- Beads and Coves: These are classic spindle elements.
- Beads: Use a spindle gouge, starting at the shoulder and rolling the tool around the curve to create a convex shape.
- Coves: Start from the center of the cove, rolling the spindle gouge left and right to create a concave shape.
- Sanding and Finishing: Once satisfied with your shapes, sand the spindle progressively with finer grits of sandpaper while the lathe is spinning. Finish with a simple wax or oil.
This project allows you to focus solely on tool control without the added complexity of hollowing.

2. The Simple Wooden Bowl: Introduction to Faceplate Turning
Turning a bowl introduces you to faceplate or chuck turning, a different method of securing the workpiece. For your first bowl, aim for a simple, shallow design.
Steps:
- Prepare the Blank: Use a round or square blank of wood, approximately 6-8 inches in diameter and 2-3 inches thick. Softer woods like maple or cherry are good choices.
- Mount to Faceplate/Chuck: Attach a waste block to your workpiece, and then attach the waste block to a faceplate, or directly mount the workpiece in a four-jaw chuck. Ensure it’s very secure.
- True the Exterior: Using a bowl gouge, true up the outside of the bowl, shaping its curve. Start from the rim and work towards the base.
- Create a Tenon/Recess (Optional): If you’re using a chuck, you’ll need to create a tenon (a protruding stub) or a recess (a shallow indentation) on the bottom of the bowl so the chuck can grip it.
- Hollow the Interior: Once the exterior is shaped, reverse the bowl on the chuck (if using a tenon/recess) or remount directly. Begin hollowing out the interior with a bowl gouge, working from the rim towards the center. Aim for an even wall thickness.
- Sanding and Finishing: Sand the interior and exterior to a smooth finish. Apply a food-safe finish if the bowl is intended for food use, similar to techniques discussed for Ultimate Guide to Wooden Cutting Boards: End Grain Patterns, Tool Sharpening, and Food-Safe Finishes.
- Parting Off: If a waste block or tenon remains, carefully part off the finished bowl from the waste material.
For ideas on more intricate pieces, even with minimal tools, consider “Crafting Custom Wooden Gifts for the Holiday Season: Profitable” – https://woodcraftwiz.com/crafting-custom-wooden-gifts-for-the-holiday-season-profitable-projects-with-minimal-tools/ for future inspiration.
3. The Mallet or Tool Handle: Practical Application
A simple wooden mallet or a custom tool handle provides excellent practice for both spindle turning and practical application.
Steps:
- Blank Preparation: Select a sturdy hardwood blank (e.g., maple, hickory) for durability.
- Spindle Turning: Mount the blank between centers and turn the handle portion. Practice creating ergonomic curves for a comfortable grip using spindle gouges and scrapers.
- Head Shaping (Mallet): If making a mallet, turn the head section to a desired cylindrical or barrel shape.
- Tenon/Mortise (for Assembly): If the head and handle are separate, turn a tenon on one piece and bore a corresponding mortise in the other for a secure joint. Refer to guides on Mastering Dovetail Joints with Hand Tools for general joinery principles, though lathe turning often uses rounder, simpler tenons.
- Sanding and Finishing: Sand all surfaces smooth and apply a durable finish like Danish oil or polyurethane.
- Assembly (if needed): Assemble components using strong wood glue. Learn more about adhesives in The Ultimate Guide to Wood Glue.
These projects lay a strong foundation for more advanced woodturning endeavors. Remember, consistency and patience are your best allies.

Conclusion
The journey into wood lathe turning is a deeply satisfying exploration of craftsmanship, blending precision with artistic expression. By following this Beginner’s Guide to Wood Lathe Turning: First Projects, Essential Tools, and Safety Practices, you’re now equipped with the foundational knowledge to begin. Remember that safety is paramount—always wear your PPE and maintain a secure, organized workspace. Start with the essential tools, master their use, and tackle straightforward projects like spindles and simple bowls to build your skills.
The beauty of woodturning lies in its iterative nature; each piece you create, regardless of its perfection, teaches you something new. Don’t be afraid to experiment, to make mistakes, and to continuously refine your techniques. In 2026, the world of woodturning awaits your unique touch. Pick up your tools, secure your first blank, and experience the transformative power of the lathe firsthand.
Actionable Next Steps:
- Invest Wisely: Research and purchase a beginner-friendly wood lathe and a core set of turning chisels.
- Prioritize Safety Gear: Acquire a full face shield, hearing protection, and a dust mask before your first cut.
- Set Up Your Workspace: Secure your lathe, ensure good lighting, and maintain a clutter-free environment.
- Practice Sharpening: Learn how to properly sharpen your turning chisels; this skill is crucial.
- Start Simple: Begin with basic spindle turning exercises to get comfortable with tool control and machine operation.
