


The average woodworker spends countless hours searching for misplaced tools, untangling power cords, or fumbling with analog measuring devices. This lost time, often overlooked, significantly impacts project efficiency and overall enjoyment. By proactively designing a mobile tool cart that not only organizes your power tools but also incorporates smart features like integrated power strips, USB charging, and mounts for digital measuring devices, you can transform your workshop’s workflow. The goal is to enhance efficiency, connectivity, and precision, making every woodworking session in 2026 more productive and less frustrating. This article will guide you through the process of Building a DIY Smart Woodworking Tool Cart: Integrating Power, Storage, and Digital Measuring Tools.
Key Takeaways

- Modular Design is Key: Plan your cart with interchangeable modules for various tools and accessories to adapt to future needs.
- Integrated Power is Essential: Incorporate multiple power outlets, USB ports, and even a retractable power reel for seamless tool operation.
- Digital Integration Boosts Precision: Design dedicated mounts for digital calipers, angle gauges, and even a tablet for plans, enhancing accuracy.
- Optimal Storage Maximizes Efficiency: Utilize custom drawers, shelves, and tool holders to ensure every item has its place and is easily accessible.
- Mobility & Durability are Paramount: Heavy-duty casters and robust construction materials ensure the cart can withstand workshop demands and move with ease.
Designing the Foundation: Structural Integrity and Modular Thinking for Your Smart Tool Cart
The journey of Building a DIY Smart Woodworking Tool Cart: Integrating Power, Storage, and Digital Measuring Tools begins with a robust and well-thought-out structural design. This foundation is paramount, as it will bear the weight of numerous tools, withstand constant movement, and house critical electrical components. Starting with a clear vision of your needs will dictate the cart’s dimensions, material choices, and overall layout.
Consider the heaviest tools you plan to store on or in the cart. This will inform the material selection. Plywood, especially Baltic birch or high-quality cabinet-grade plywood, is an excellent choice for its strength, stability, and workability. For the framework, 3/4-inch plywood is typically recommended, with 1/2-inch or 1/4-inch for drawer bottoms and dividers.
Planning for Size and Mobility
Before cutting any wood, sketch out your design. Think about the following:
- Footprint: How much space can the cart occupy without impeding workflow? Ensure it can maneuver through doorways and around existing machinery.
- Height: Should it serve as an auxiliary workbench? A common height is around 34-36 inches (86-91 cm), similar to most workbench heights, allowing for comfortable use.
- Capacity: Estimate the volume and weight of tools you intend to store. This dictates the number and size of drawers, shelves, and hanging spaces.
- Casters: Invest in heavy-duty, locking casters. Polyurethane or rubber wheels are ideal for smooth movement and protecting shop floors. Four swivel casters offer maximum maneuverability, while two fixed and two swivel casters provide better directional control. A common size is 4-inch (10 cm) diameter for a substantial cart.
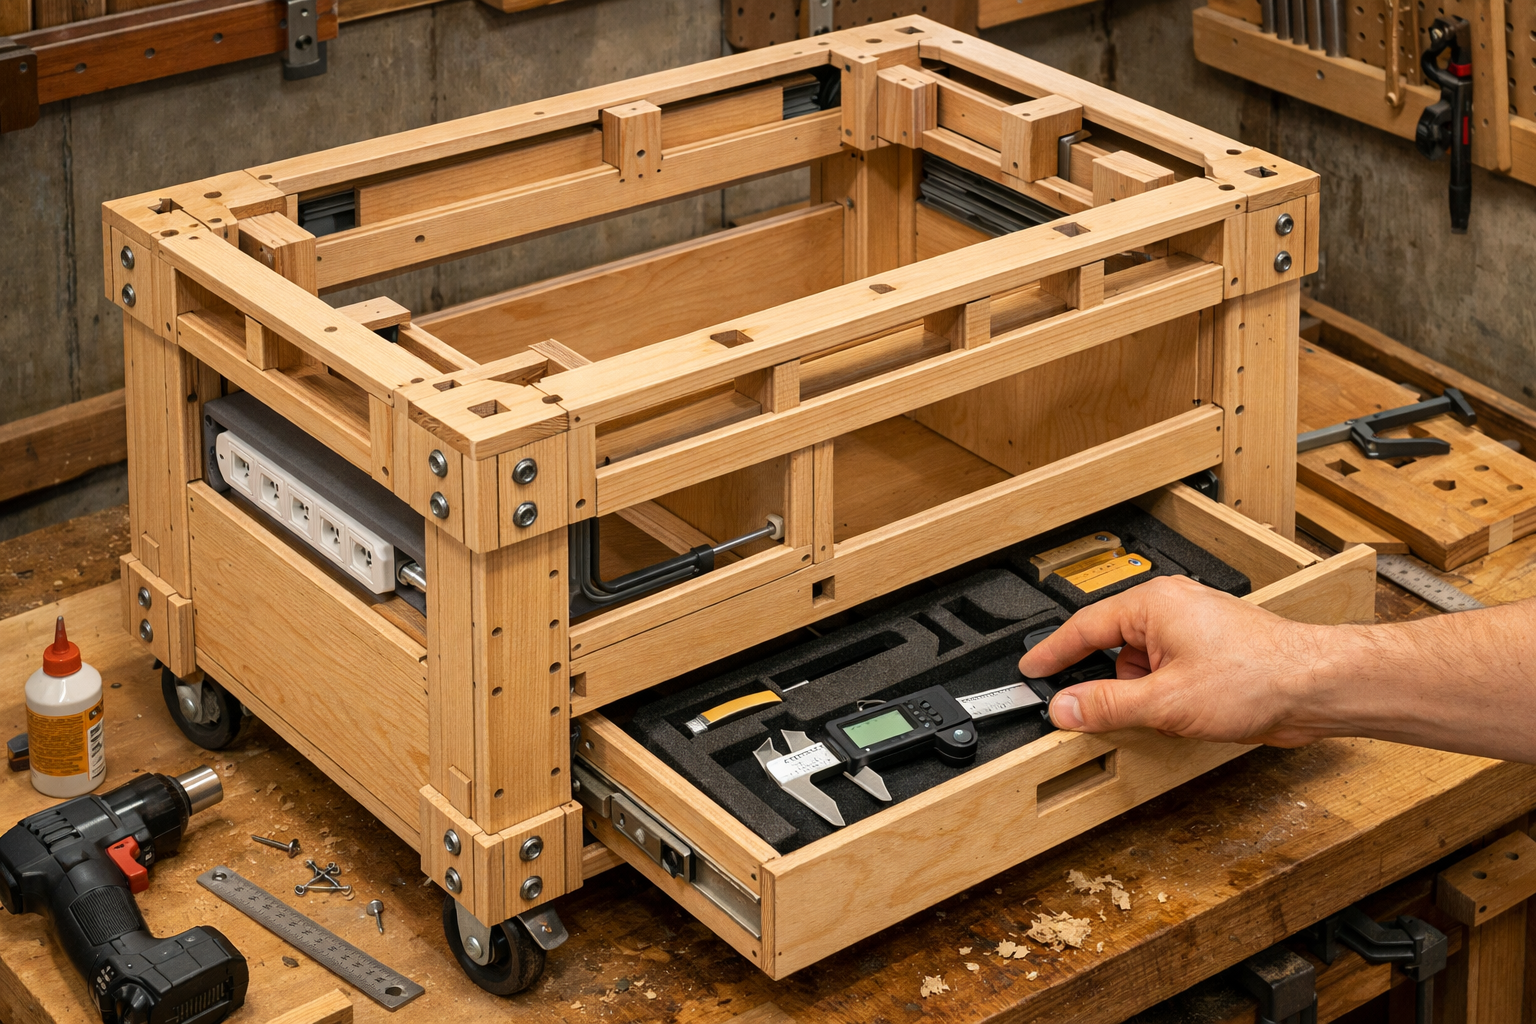
Essential Construction Techniques
Precision is key in woodworking, and building a tool cart is no exception. Accurate cuts and strong joinery will ensure longevity.
Table 1: Recommended Joinery for Tool Cart Construction
| Component | Recommended Joinery | Benefits |
|---|---|---|
| Main Frame/Carcass | Dadoes, Rabbets, Pocket Holes | Strong, stable, relatively quick to assemble |
| Drawer Boxes | Dovetails, Box Joints, Finger Joints | Extremely durable, aesthetically pleasing |
| Drawer Faces | Screws (from inside), Glue | Clean exterior appearance |
| Shelves (adjustable) | Shelf Pins, Cleats | Versatile, allows for future reconfiguration |
For a comprehensive understanding of joinery techniques, explore resources like “Hand Tool Joinery for Visible Wood Joints: Dovetails, Mortis” at Wood Craft Wiz. Using dadoes and rabbets for the main carcass components creates strong mechanical joints that resist racking. Pocket hole joinery can also be effective for rapid assembly, especially when reinforced with wood glue.
Consider building modular units within the cart. For example, a removable bin for sandpaper or a dedicated tray for router bits can significantly improve organization. This modular approach also allows for future upgrades or modifications without rebuilding the entire cart. For more ideas on modular storage, refer to “Building Modular Wood Storage Systems for Small Workshops: Maximizing” and “Smart Workshop Storage Solutions: Maximizing Small Spaces with”.
Integrating Power, Connectivity, and Digital Precision
This is where your tool cart truly becomes “smart.” Beyond just holding tools, it becomes a hub for power delivery and digital assistance. Thoughtful integration of electrical and digital components will streamline your workflow and minimize clutter.
Power Management: Keeping Everything Charged and Connected
A chaotic mess of extension cords is a common sight in many workshops, but your smart tool cart can eliminate this.
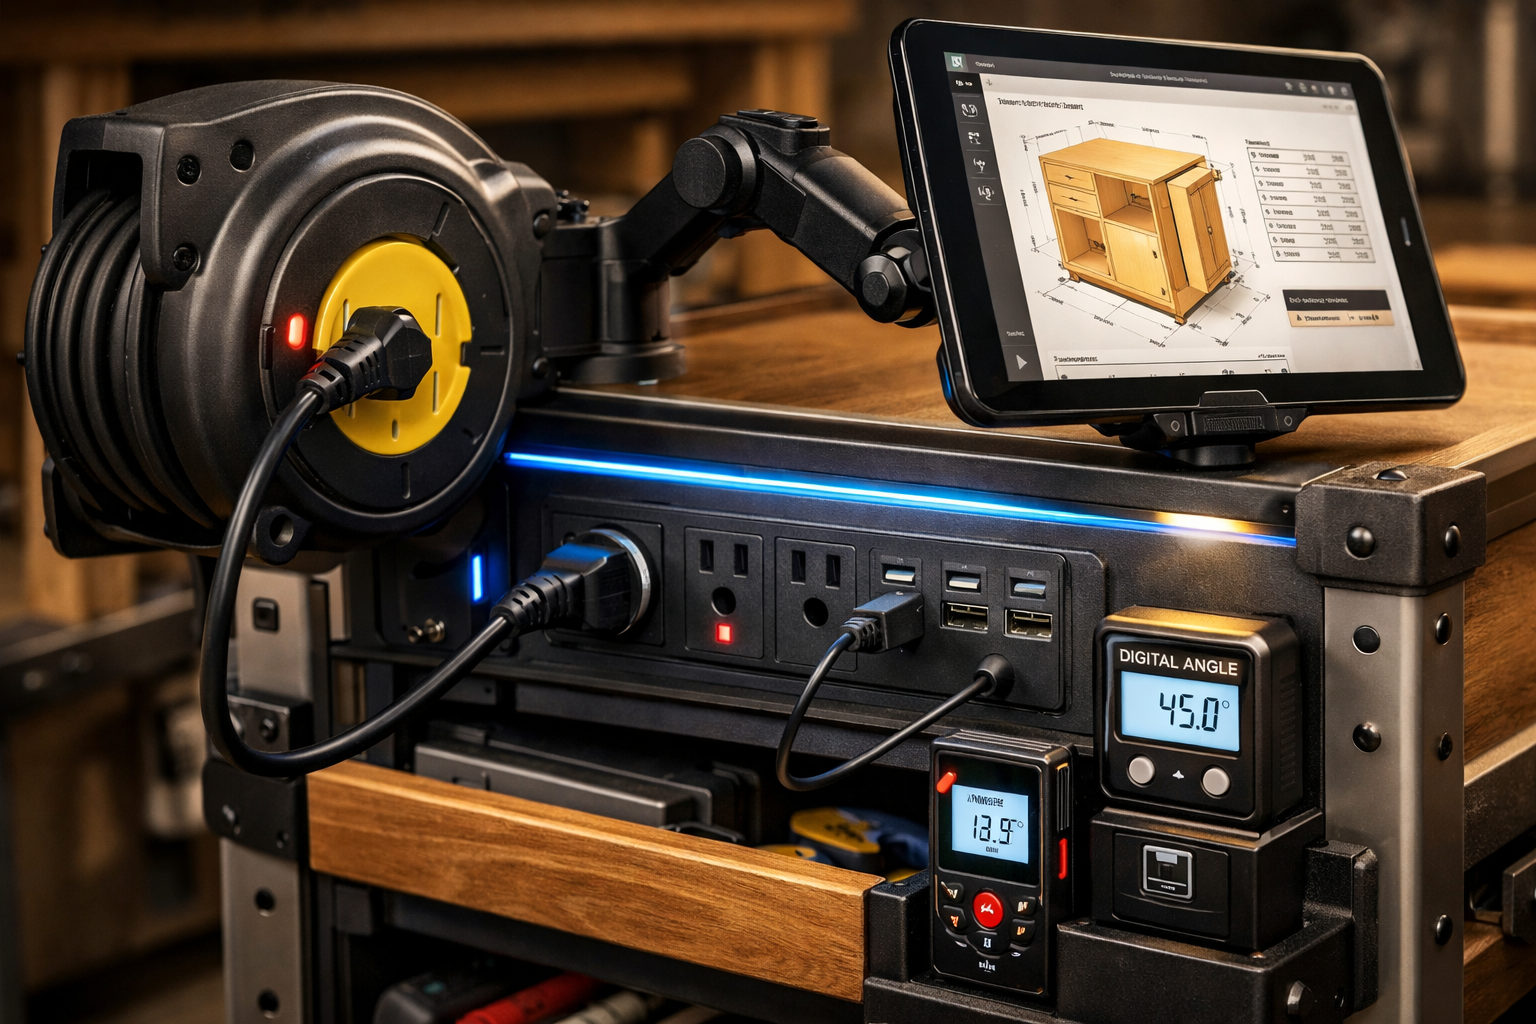
- Integrated Power Strips: Mount industrial-grade power strips directly onto the cart, either on the side, back, or inside a dedicated compartment. Look for strips with surge protection and ample outlets. Some even come with built-in USB charging ports.
- Retractable Power Reel: A high-quality retractable power reel mounted on the cart offers incredible convenience. It allows you to pull out only the length of cord you need, then automatically retracts it when done, keeping floors clear and safe. Ensure the reel has sufficient gauge wire for your most demanding tools.
- USB Charging Ports: Dedicate a section for USB-A and USB-C charging ports. These are invaluable for charging cordless tool batteries, smartphones, or powering LED task lighting.
- Cable Management: Design channels or clips within the cart’s structure to neatly route power cords, preventing snags and damage. Utilize conduit or flexible tubing for protection.
Tip: Before installing any electrical components, consult local electrical codes and ensure you use appropriate wiring and protection. If uncomfortable with electrical work, consider hiring a qualified electrician.
Digital Measuring Tools: Accuracy at Your Fingertips
The integration of digital measuring tools transforms the cart into a mobile command center for precision woodworking.

- Dedicated Mounts: Create custom-fitted slots or magnetic mounts for your digital calipers, digital angle gauges, and laser distance meters. This ensures they are always accessible, protected, and easily returned to their spot.
- Tablet/Smartphone Mount: A flexible, articulating arm mount for a tablet or smartphone can be a game-changer. Use it to display project plans, cut lists, reference guides, or even stream woodworking tutorials while you work. Ensure the mount is sturdy and can withstand workshop vibrations.
- Digital Readouts (DROs) for Tools: While more advanced, consider integrating small DROs for specific hand tools or jigs that reside on the cart. For instance, a small digital scale on a push block can provide precise measurements for repeated cuts.
- Smart Sensor Integration (Optional): For the truly ambitious, integrate small IoT sensors. For example, a vibration sensor on a power tool could activate a dust collection system when the tool is in use, similar to concepts discussed in “Building a DIY Smart Workshop Dust Collection System: Integrating IoT”.
Table 2: Smart Features & Their Benefits
| Feature | Benefit |
|---|---|
| Integrated Power Strips | Clutter-free power, convenient access, surge protection for tools |
| Retractable Power Reel | Eliminates tripping hazards, neat cord storage, quick deployment |
| USB Charging Ports | Keeps mobile devices and cordless tool batteries charged, essential for digital plans/references |
| Digital Tool Mounts | Tools are protected, always accessible, reduces search time, promotes precision |
| Tablet/Phone Mount | Instant access to plans, tutorials, and calculators, hands-free operation |
| Smart Sensor Integration | Automated workshop functions (e.g., dust collection activation), enhanced safety and efficiency |
Optimizing Storage and Accessibility: A Place for Everything
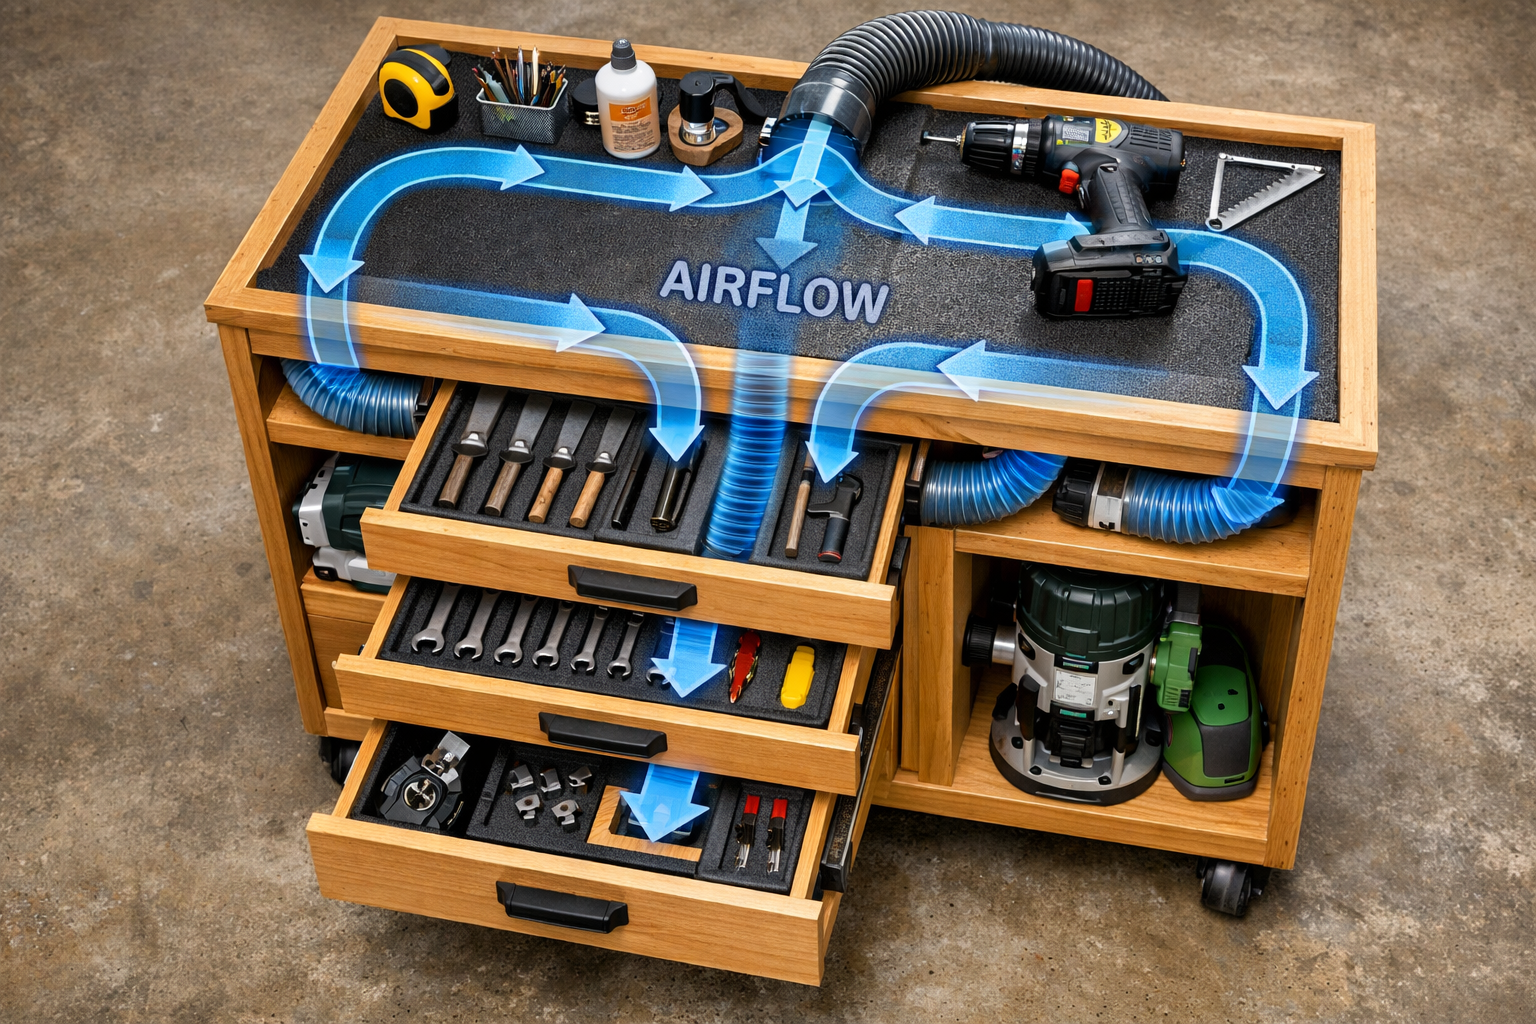
The final, crucial aspect of Building a DIY Smart Woodworking Tool Cart: Integrating Power, Storage, and Digital Measuring Tools is maximizing its storage potential while ensuring every tool is easily accessible. A well-organized cart not only saves time but also protects your valuable tools from damage.
Custom Drawers and Dividers
Drawers are the workhorses of tool storage. Design them for specific types of tools:
- Shallow Drawers: Ideal for hand tools like chisels, planes, measuring tapes, marking gauges, and digital calipers. Use custom foam inserts or wooden dividers to prevent tools from shifting and clattering.
- Medium Drawers: Perfect for smaller power tools such as palm sanders, trim routers, jigsaw blades, drill bits, and various fasteners.
- Deep Drawers/Cabinets: Reserve these for bulkier items like larger routers, orbital sanders, circular saws, or even a smaller planer. Adjustable shelves within these cabinets offer flexibility.
- Specialty Storage:
- Bit Holders: Create custom drill bit and router bit holders that keep them sharp, organized, and easily identifiable. Consider a slanted design for better visibility. You can learn more about router bits at “The Essential Guide to Router Bits: Choosing the Right Profile”.
- Accessory Trays: Use small, compartmentalized trays for screws, nuts, bolts, and other small consumables.
Vertical Storage and External Accessibility
Don’t overlook the exterior surfaces of your cart.
- Side-Mounted Holders: Install pegboard, French cleats, or magnetic strips on the sides of the cart for frequently used hand tools like hammers, screwdrivers, squares, and clamps. This keeps them within arm’s reach.
- Shelves/Cubbyholes: Open shelves or cubbyholes on the sides are great for quick access to items like safety glasses, pencils, and rulers, or even for storing small project pieces.
- Dust Collection Port: If you plan to use a particular power tool extensively on the cart, consider integrating a port for your dust collection hose, making it easy to connect and disconnect. For inspiration on workshop organization and smart solutions, explore “DIY Modular Desk Organizers: Custom Solutions for a Clutter-Free Woodworking Workspace”.
Finishing Touches and Maintenance
Once constructed, a good finish protects your cart and enhances its longevity.
- Finish: Apply several coats of polyurethane, lacquer, or a durable oil-based finish to protect the wood from moisture, dust, and wear. A non-slip mat on the top surface can prevent tools from sliding off.
- Labeling: Clear labeling on drawers and compartments makes finding and returning tools intuitive.
- Regular Cleaning: Keep the cart free of sawdust and debris. Regularly inspect electrical connections and casters for wear.
By dedicating time to design and implement these storage and accessibility features, your DIY smart woodworking tool cart will become an indispensable asset in your workshop, ensuring every tool has a home and is ready for action.
Conclusion
Building a DIY Smart Woodworking Tool Cart: Integrating Power, Storage, and Digital Measuring Tools is more than just a woodworking project; it’s an investment in your productivity, precision, and overall enjoyment of the craft. By meticulously planning the robust structure, strategically integrating power solutions and digital measuring tools, and optimizing every inch for storage and accessibility, you create a mobile hub that centralizes your most critical workshop functions. In 2026, efficiency and smart integration are paramount for any serious woodworker.
The benefits extend beyond mere organization. You’ll experience fewer interruptions searching for tools, faster setup times for various tasks, and enhanced accuracy thanks to readily available digital aids. This project empowers you to tailor a solution perfectly suited to your unique workflow and tool collection, reducing clutter and boosting safety. Take the time to plan, select quality materials, and integrate these smart features, and you’ll find your new tool cart to be an indispensable assistant, truly transforming your woodworking experience.
Actionable Next Steps:
- Assess Your Needs: Catalog your most frequently used tools and estimate their storage requirements (size, weight).
- Sketch Your Design: Create a detailed drawing, considering dimensions, drawer configurations, and locations for power and digital components.
- Gather Materials: Purchase high-quality plywood, casters, drawer slides, power strips, and any specific digital mounts you require.
- Build in Stages: Focus on the structural carcass first, then integrate power, followed by custom storage solutions.
- Refine & Organize: Once built, spend time organizing tools, labeling, and fine-tuning the layout for maximum efficiency.
