


The hum of a bandsaw, a distinct whirring sound, often intimidates new woodworkers, yet it is one of the most versatile and essential tools in any shop. This powerful machine can resaw thick lumber into thinner planks, cut intricate curves impossible with a table saw, and even create unique joinery. For many, the bandsaw remains a mystery, shrouded by perceived complexity and safety concerns. This comprehensive guide, “The Ultimate Guide to Choosing and Maintaining Your First Bandsaw: Essential Cuts and Safety Tips for Beginners,” aims to demystify this indispensable tool, transforming apprehension into confidence and empowering you to unlock its full potential in your woodworking projects in 2026.
Key Takeaways
- Selection is Key: Choosing the right bandsaw involves understanding its components, matching capacity to your needs, and prioritizing reputable brands and features for future upgrades.
- Safety First, Always: Proper personal protective equipment (PPE), understanding blade behavior, and maintaining a safe workspace are non-negotiable for injury prevention.
- Maintenance Extends Life: Regular cleaning, blade tensioning, and guide adjustments are crucial for optimal performance, accuracy, and longevity of your bandsaw.
- Master Essential Cuts: Begin with fundamental techniques like straight cuts, curve cutting, and resawing to build proficiency before tackling more advanced operations.
- Invest in Quality Blades: The blade is the heart of the bandsaw; selecting the correct type and tooth count for your material significantly impacts cut quality and safety.
Choosing Your First Bandsaw: The Ultimate Guide to Features and Capacity
Selecting your first bandsaw can feel overwhelming with the array of options available. This section of “The Ultimate Guide to Choosing and Maintaining Your First Bandsaw: Essential Cuts and Safety Tips for Beginners” breaks down the critical factors, ensuring you make an informed decision that aligns with your woodworking aspirations and budget.

Understanding Bandsaw Anatomy
Before diving into selection, a basic understanding of a bandsaw’s main components is crucial:
- Frame: The backbone of the machine, usually cast iron or welded steel, providing stability.
- Wheels: Two (or sometimes three) wheels over which the blade runs. The lower wheel is driven by the motor.
- Table: The work surface, often tilting for angled cuts.
- Blade Guides: Bearings or blocks that support the blade, preventing it from twisting during cuts.
- Blade Tension Mechanism: Adjusts the tension of the blade for optimal cutting and safety.
- Motor: Powers the lower wheel, dictating the machine’s cutting capacity.
- Dust Port: Connects to a dust collection system to keep your workshop clean and safe.
Key Considerations for Beginners
- Throat Capacity: This refers to the distance from the blade to the frame. A 14-inch bandsaw, a popular beginner choice, offers 13.5 to 14 inches of throat, suitable for most hobbyist projects.
- Resaw Capacity: The maximum height of a board you can cut. Many 14-inch bandsaws offer 6 inches, with some upgradable to 12 inches with a riser block. If you plan to slice thick lumber into veneers, prioritize this.
- Horsepower (HP): For general woodworking, a 1 HP motor is often sufficient. If resawing thick hardwoods is a primary goal, consider 1.5 HP or more.
- Table Size and Tilt: A larger table provides better support for bigger workpieces. A table that tilts up to 45 degrees is standard and useful for angled cuts.
- Blade Guides: Look for precision-machined, adjustable roller guides rather than older block guides, as they provide better blade support and less friction.
- Budget: Bandsaws range widely in price. Benchtop models start around $300-$500, while quality 14-inch floor models can be $700-$1500+.
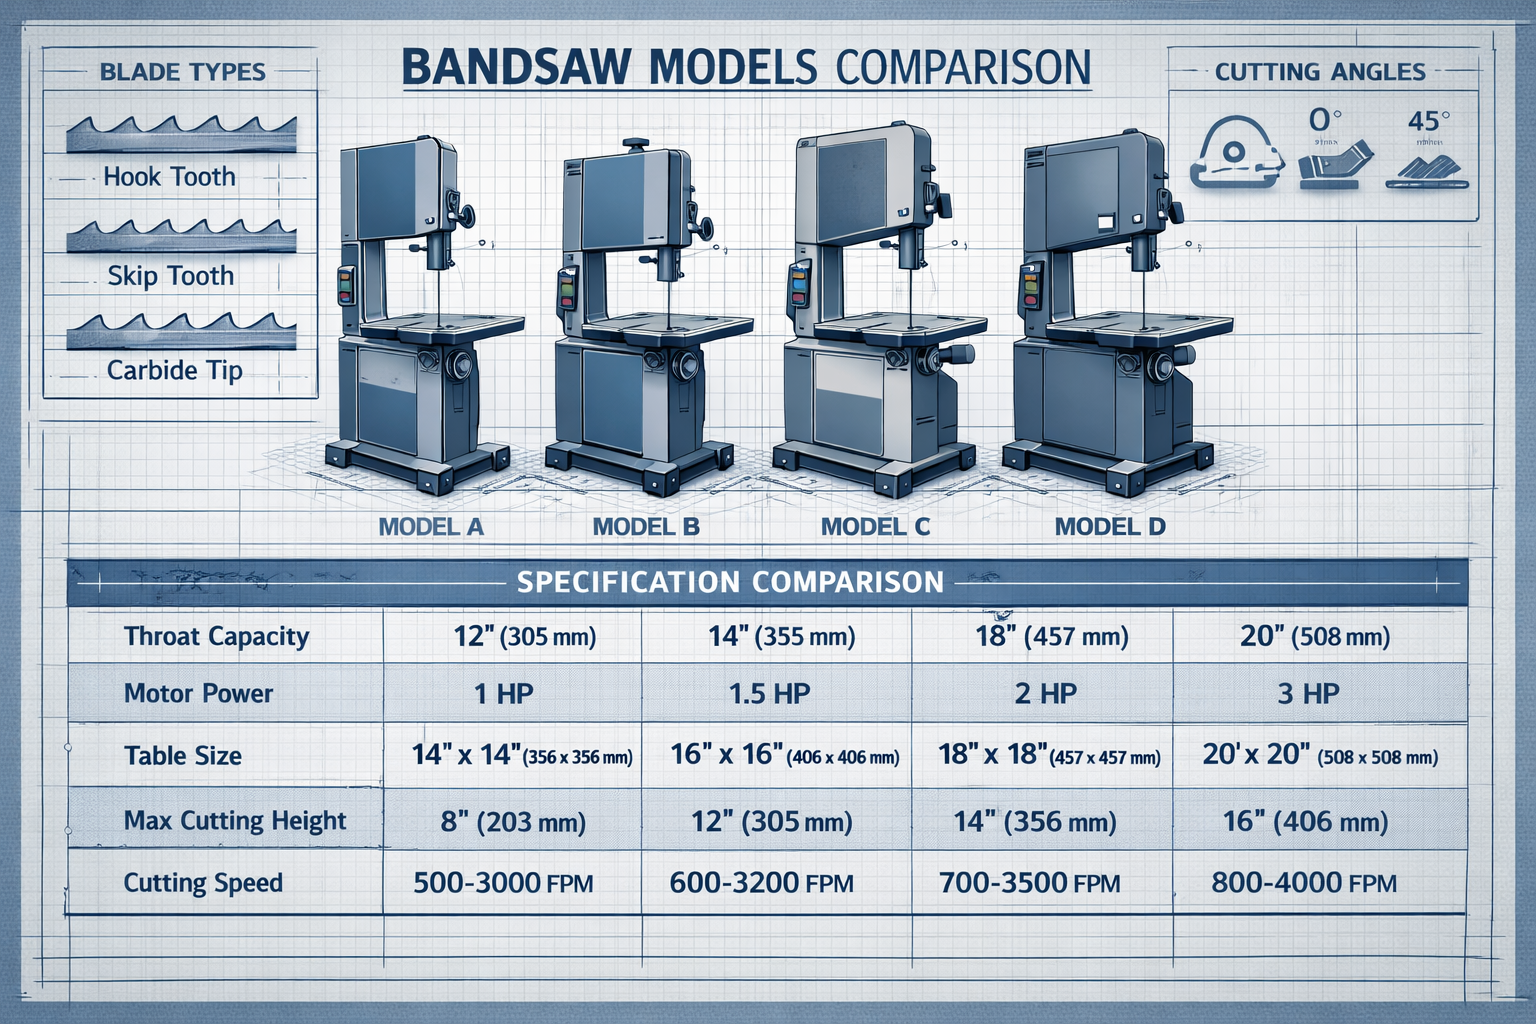
Table: Common Bandsaw Types and Their Applications
| Type | Typical HP | Throat Capacity | Resaw Capacity | Primary Use Cases | Best For |
|---|---|---|---|---|---|
| Benchtop Bandsaw | 0.5 – 1 HP | 9 – 10 inches | 3 – 6 inches | Small curves, delicate cuts, craft projects, hobbyist work. | Limited space, light-duty tasks, occasional use. |
| 14-inch Bandsaw | 1 – 1.5 HP | 13 – 14 inches | 6 – 12 inches | General curve cutting, resawing medium boards, light joinery. | Most home woodworkers, small to medium projects, good upgrade potential. |
| Industrial Bandsaw | 2 HP + | 16 inches + | 12 inches + | Heavy resawing, large stock breakdown, professional production work. | Serious resawing, large furniture, commercial shops. |
Brands to Consider
For beginners, well-regarded brands known for reliability and customer support include Laguna, Grizzly, Rikon, Jet, and Delta. Reading reviews specific to individual models can provide valuable insights into user experience.
- Pro-Tip: Don’t overlook the importance of a good dust collection system when planning your bandsaw purchase. Effective dust removal is vital for safety and machine longevity. Building a Mobile Dust Collection Cart for Any Workshop: Design, Filtration, Portability can offer guidance.
Essential Setup and Maintenance for Optimal Performance
Even the best bandsaw is only as good as its setup and maintenance. Neglecting these aspects can lead to inaccurate cuts, frustration, and even safety hazards. This section of “The Ultimate Guide to Choosing and Maintaining Your First Bandsaw: Essential Cuts and Safety Tips for Beginners” details the crucial steps to keep your machine running smoothly.
Initial Setup and Adjustments
- Assembly and Placement: Follow the manufacturer’s instructions for assembly. Place your bandsaw on a stable, level surface, allowing ample clearance for material infeed and outfeed.
- Blade Installation and Tension:
- Install: Open the wheel covers, slide the blade into position, ensuring teeth point downwards towards the table.
- Tension: This is critical. Proper tension prevents blade wandering and breakage. Use the tensioning knob to apply tension until the blade deflects slightly when pressed. Many bandsaws have a tension scale; aim for the recommended setting for your blade width.
- Blade Tracking: Adjust the upper wheel tilt until the blade runs centered on the wheel’s crown. This ensures the blade stays put during operation.
- Guide Block/Bearing Adjustment:
- Side Guides: Position them just behind the gullet (the space between teeth) and leave a paper-thin gap between the blade and guides.
- Thrust Bearing: Position this behind the blade, allowing a small gap (e.g., 1/64 inch) to prevent the blade from pushing into the bearing during a cut, but still supporting it.
- Table Squareness: Use a reliable square to ensure the table is 90 degrees to the blade (or your desired angle).
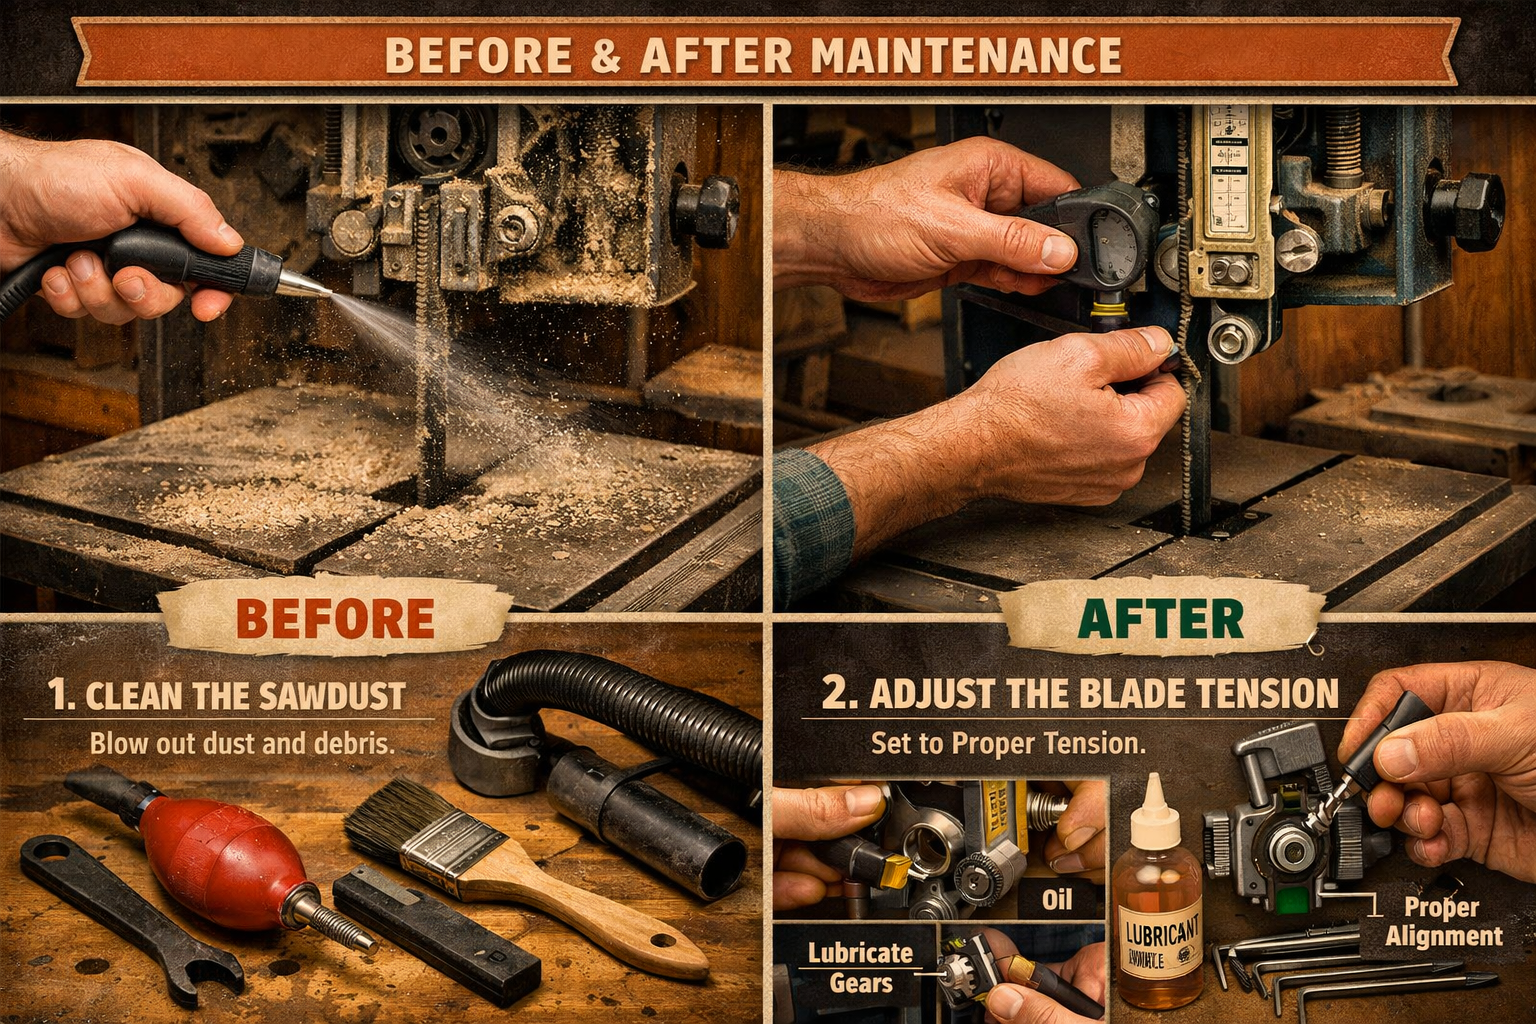
Routine Maintenance Schedule
After Each Use:
- Clean Sawdust: Use a brush or vacuum to remove sawdust from the table, guides, and wheels. Accumulated dust can affect tracking and cause premature wear.
- Blade Inspection: Check the blade for dullness, missing teeth, or cracks.
Monthly (or based on use):
- Blade Tension Check: Verify tension. Blades can stretch over time.
- Guide & Bearing Inspection: Check for wear and tear on guides and thrust bearings. Replace if necessary.
- Lubrication: Lightly lubricate moving parts as per your owner’s manual.
Annually (or based on extensive use):
- Motor Inspection: Check motor brushes (if applicable) and general condition.
- Belt Check: Inspect drive belts for cracks or wear.
- Wheel Cleaning: Occasionally remove the wheels and clean off any pitch or resin buildup.
Did You Know? Blade waxing with a dry lubricant stick can reduce friction and heat buildup, prolonging blade life and improving cut quality.
Mastering Essential Cuts and Crucial Safety Tips for Beginners
The bandsaw excels at diverse cutting tasks, from roughing out shapes to precise joinery. However, its power demands respect and adherence to strict safety protocols. This final section of “The Ultimate Guide to Choosing and Maintaining Your First Bandsaw: Essential Cuts and Safety Tips for Beginners” focuses on basic techniques and, most importantly, how to operate your machine safely.
Essential Cuts for Beginners
- Straight Cuts: While a table saw is preferred for long, straight cuts, the bandsaw can handle shorter ones. Use a fence or a straightedge clamped to the table to guide your material.
- Curve Cutting: This is where the bandsaw shines.
- Preparation: Use a narrow blade (e.g., 1/4 inch) for tighter curves. Slower feed rates are key.
- Technique: Guide the workpiece smoothly into the blade. Make relief cuts (short cuts into the waste area) on sharp curves to prevent the blade from twisting or binding.
- Resawing: Cutting thinner boards from a thicker piece of lumber.
- Blade: Use a wide, coarse-toothed blade (e.g., 1/2 or 3/4 inch, 3-4 TPI).
- Fence: A tall resaw fence is essential to guide the board vertically. Many prefer to offset the fence slightly to compensate for blade drift.
- Feed Rate: A consistent, moderate feed rate is crucial for a clean cut and to prevent burning.
- Resource: For more in-depth resawing techniques, check out Mastering the Band Saw: Essential Techniques for Resawing, Curve Cutting, and Joinery Preparation.
- Cutting Circles:
- Jig: A circle-cutting jig (often shop-made) is invaluable for perfect circles. It typically involves a pivot point attached to the bandsaw table.
- Technique: Slowly rotate the workpiece around the pivot point into the blade.
Crucial Safety Tips
Operating a bandsaw safely is paramount. Never compromise on these fundamental rules:
- Personal Protective Equipment (PPE):
- Eye Protection: Always wear safety glasses or a face shield. Wood dust and small chips can be ejected at high speeds.
- Hearing Protection: Bandsaws are noisy. Wear earmuffs or earplugs, especially during extended use.
- Dust Mask: For fine dust, wear a respirator. Building a DIY Smart Workshop Dust Collection System: Integrating IoT can help manage airborne particles.
- No Loose Clothing or Jewelry: Remove anything that could get caught in the blade. Tie back long hair.
- Gloves (Use with Caution): Some woodworkers prefer gloves, but they can be a hazard if they snag. If wearing them, ensure they are tight-fitting and don’t reduce dexterity.
- Blade Guard Adjustment: The upper blade guide should be set no more than 1/4 to 1/2 inch above the workpiece. This minimizes exposed blade and provides maximum support.
- Workpiece Support: Always support your material. For longer pieces, use outfeed supports or roller stands. Never force the workpiece.
- Keep Hands Clear: Always keep your hands and fingers away from the blade’s path. Use push sticks, push blocks, or featherboards, especially when cutting small pieces or resawing.
- Never Back Out of a Cut: If the blade is binding or you need to re-adjust, turn off the machine and wait for the blade to stop completely before backing out the material. Attempting to back out while the blade is moving can cause the blade to derail or break.
- Avoid Excessive Side Pressure: Let the blade do the work. Forcing a cut or applying too much side pressure can cause the blade to twist, break, or wander.
- Clear Workspace: Maintain a clean, uncluttered workspace around the bandsaw to prevent trips and ensure smooth material handling.
- Understand Blade Behavior: A dull blade requires more force, generates more heat, and can lead to burning and inaccurate cuts. Replace dull blades promptly.
- Emergency Stop: Know the location of your bandsaw’s emergency stop switch.
- Unplug During Maintenance: Always unplug the bandsaw before changing blades, adjusting guides, or performing any maintenance.

Common Bandsaw Problems and Troubleshooting
- Blade Wandering/Drift:
- Cause: Dull blade, improper blade tension, misaligned guides, or incorrect tracking.
- Solution: Replace blade, adjust tension, realign guides, re-track blade.
- Burning Wood:
- Cause: Dull blade, too slow feed rate, too much friction.
- Solution: Replace blade, increase feed rate slightly, apply blade wax.
- Blade Breakage:
- Cause: Too much tension, too little tension, forcing a cut, backing out of a cut while running, fatigue.
- Solution: Adjust tension, use proper technique, replace blade.
Conclusion
The bandsaw is an invaluable asset in any woodworking shop, offering unparalleled versatility for curves, resawing, and intricate work. By thoroughly understanding “The Ultimate Guide to Choosing and Maintaining Your First Bandsaw: Essential Cuts and Safety Tips for Beginners,” you are now equipped with the knowledge to select the right machine, set it up for optimal performance, maintain it diligently, and operate it with confidence and, most importantly, safety.
Remember, patience and practice are key to mastering any new woodworking tool. Start with simple projects, gradually challenging yourself with more complex cuts. Always prioritize safety, and never hesitate to consult your bandsaw’s manual or seek advice from experienced woodworkers. With careful attention to setup, maintenance, and technique, your bandsaw will become a cornerstone of your workshop, opening up a world of creative possibilities for years to come.
References
- Duginske, M. (1989). The Bandsaw Handbook. Taunton Press.
- Fine Woodworking Magazine. (n.d.). Bandsaw Safety. Retrieved from https://www.finewoodworking.com (Accessed 2026).
- Patrick, S. (2014). The Bandsaw Book. Spring House Press.
