

Over 80% of workshops, according to a recent survey of DIY enthusiasts, struggle with inefficient tool storage, leading to wasted time searching for misplaced items and a cramped, unsafe workspace. This common frustration can significantly hinder productivity and enjoyment in any woodworking or crafting endeavor. The solution often lies in rethinking how tools are stored, moving beyond simple pegboards or cluttered drawers. This article provides a comprehensive, detailed plan for Building a DIY Wall-Mounted Tool Cabinet with French Cleats: Maximizing Storage and Organization in your workshop, transforming chaos into an efficient, customizable system that grows with your tool collection in 2026.
Key Takeaways
- A French cleat system offers unparalleled flexibility and modularity for tool storage.
- Careful planning of the cabinet layout and individual tool holders is crucial for maximizing efficiency.
- Selecting appropriate materials and fasteners ensures durability and safety for your wall-mounted storage.
- Precision in measuring and cutting the cleats and cabinet components is essential for a professional finish.
- Ongoing customization allows the system to adapt to your evolving tool collection and workshop needs.
Understanding the French Cleat System: The Foundation for Effective Organization
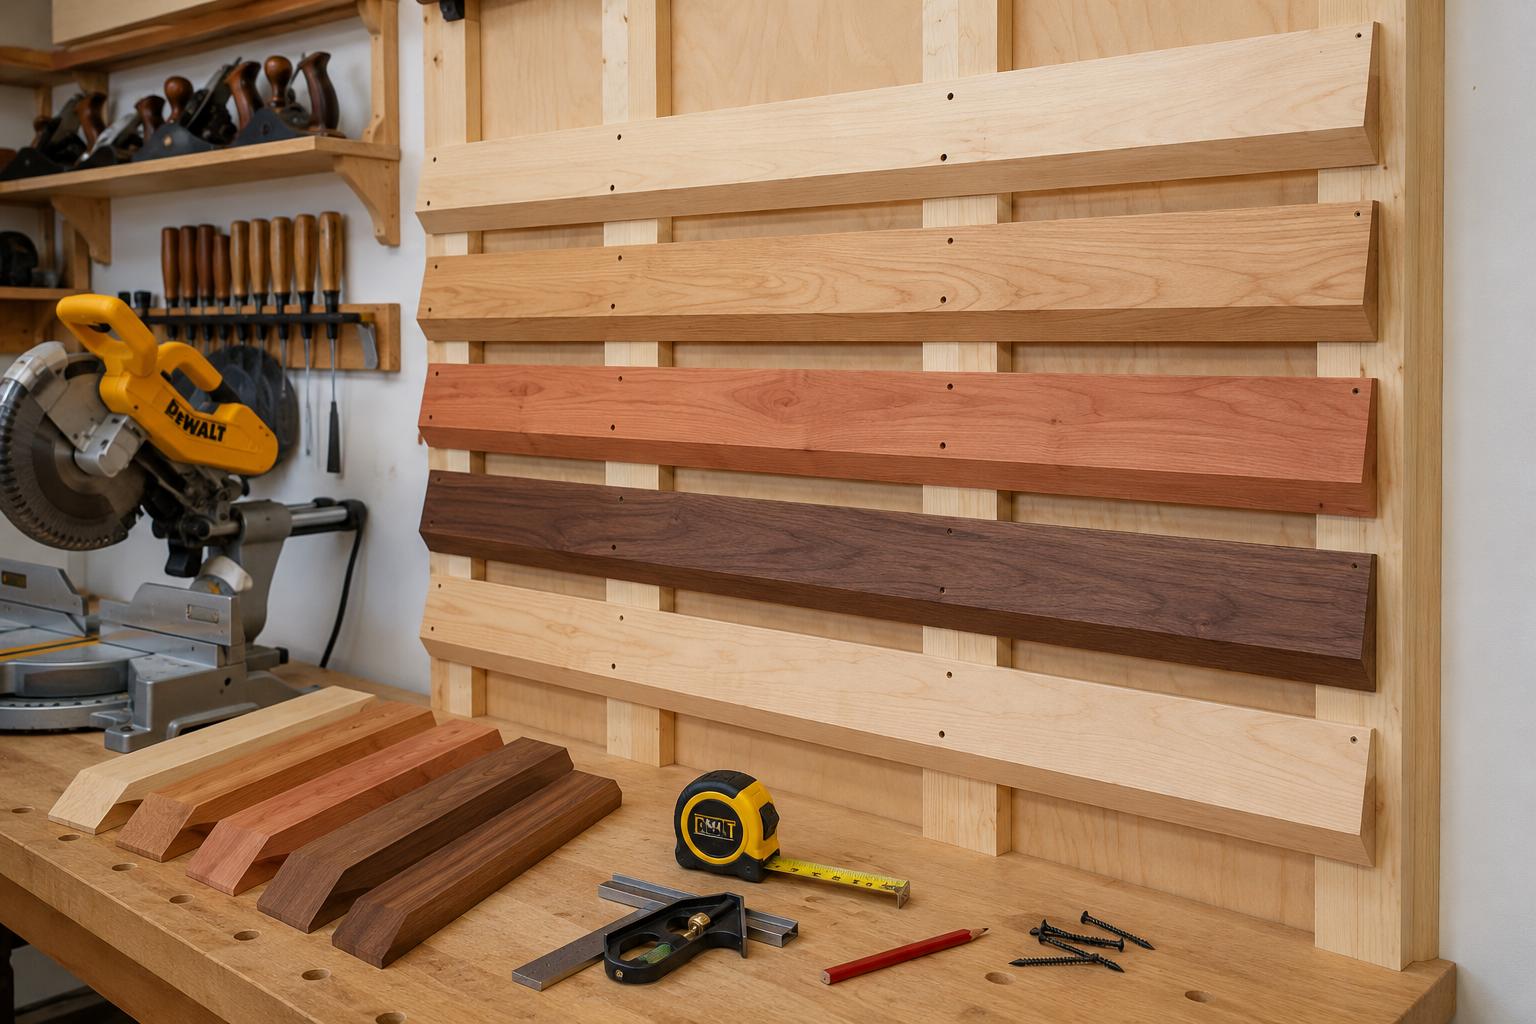
At its core, a French cleat system is a brilliant, straightforward method for hanging objects securely and adjustably on a wall. It involves two interlocking angled pieces of wood. One piece, typically angled at 45 degrees, is securely mounted to the wall (the wall cleat). The other piece, with a complementary 45-degree angle, is attached to the back of a cabinet, shelf, or tool holder (the cabinet cleat). When the cabinet cleat is lowered onto the wall cleat, gravity pulls it tight, creating a remarkably strong and stable connection. This ingenious design allows for easy repositioning and customization without needing to drill new holes in the wall for every change.
The beauty of a French cleat system for Building a DIY Wall-Mounted Tool Cabinet with French Cleats: Maximizing Storage and Organization lies in its inherent modularity. Unlike fixed shelving or pegboards where placement is rigid, French cleats allow you to slide, rearrange, or completely remove individual storage modules as your needs evolve. This adaptability is invaluable in a dynamic workshop where tools are frequently acquired or upgraded.
Why Choose French Cleats for Your Tool Cabinet?
Several compelling reasons make French cleats the superior choice for tool storage:
- Flexibility and Customization: Easily move, add, or remove tool holders and cabinets. This means your storage can adapt as your tool collection grows or as your workflow changes.
- Strength and Security: When properly installed, French cleats can hold substantial weight, securely fastening even heavy power tools to the wall.
- Space Optimization: By utilizing vertical wall space, you free up valuable floor and workbench real estate, making your workshop feel larger and more organized.
- Visibility and Accessibility: Tools are kept visible and within easy reach, reducing time spent searching and increasing efficiency.
- Aesthetic Appeal: A well-built French cleat system with custom holders can look incredibly professional and tidy, enhancing the overall appearance of your workshop.
Essential Materials and Tools for Your Project
Before embarking on Building a DIY Wall-Mounted Tool Cabinet with French Cleats: Maximizing Storage and Organization, gather your materials and tools. High-quality materials ensure a durable and long-lasting cabinet.
Materials:
- Plywood: ¾-inch (19mm) hardwood plywood (e.g., Baltic Birch, cabinet-grade maple) for the main cabinet structure and ¾-inch (19mm) plywood or good quality common pine for the cleats. Marine-grade plywood can offer enhanced durability if your workshop is prone to humidity.
- Hardwood Boards: For drawer faces, door frames, or specific tool holders where aesthetics and rigidity are paramount.
- Wood Glue: High-quality wood glue (e.g., Titebond III for moisture resistance). For choosing the right adhesive, consult “The Ultimate Guide to Wood Glue: Choosing the Right Adhesive for” for more information on selecting the best option for your project.
- Screws: Various sizes of wood screws (e.g., 1 ¼-inch, 2-inch, 2 ½-inch) for assembly and mounting.
- Wall Anchors/Toggle Bolts: If mounting into drywall without hitting studs. It’s always best to hit studs for maximum security.
- Drawer Slides: Full-extension ball-bearing slides for any integrated drawers.
- Hinges: Cabinet hinges for doors.
- Finish: Sandpaper (various grits), wood filler, stain or paint, polyurethane, or clear coat.
Tools:
- Table Saw: Essential for making accurate, repeatable rip cuts and the critical 45-degree bevels for the cleats. Mastering your table saw is key for this project.
- Miter Saw: For precise crosscuts on cabinet components and cleats.
- Drill/Driver: For pilot holes and driving screws.
- Router (Optional but Recommended): For rounding over edges, cutting dadoes, or creating more refined joinery. Explore “Choosing and Using Router Tables: Maximizing Precision and Safety for” to enhance your router skills.
- Measuring Tools: Tape measure, combination square, marking knife, pencil.
- Clamps: Essential for holding pieces together during gluing and assembly.
- Sanding Equipment: Orbital sander or sanding block.
- Safety Gear: Safety glasses, hearing protection, dust mask.
- Level and Stud Finder: For accurate wall mounting.
Designing and Constructing Your Modular Tool Cabinet
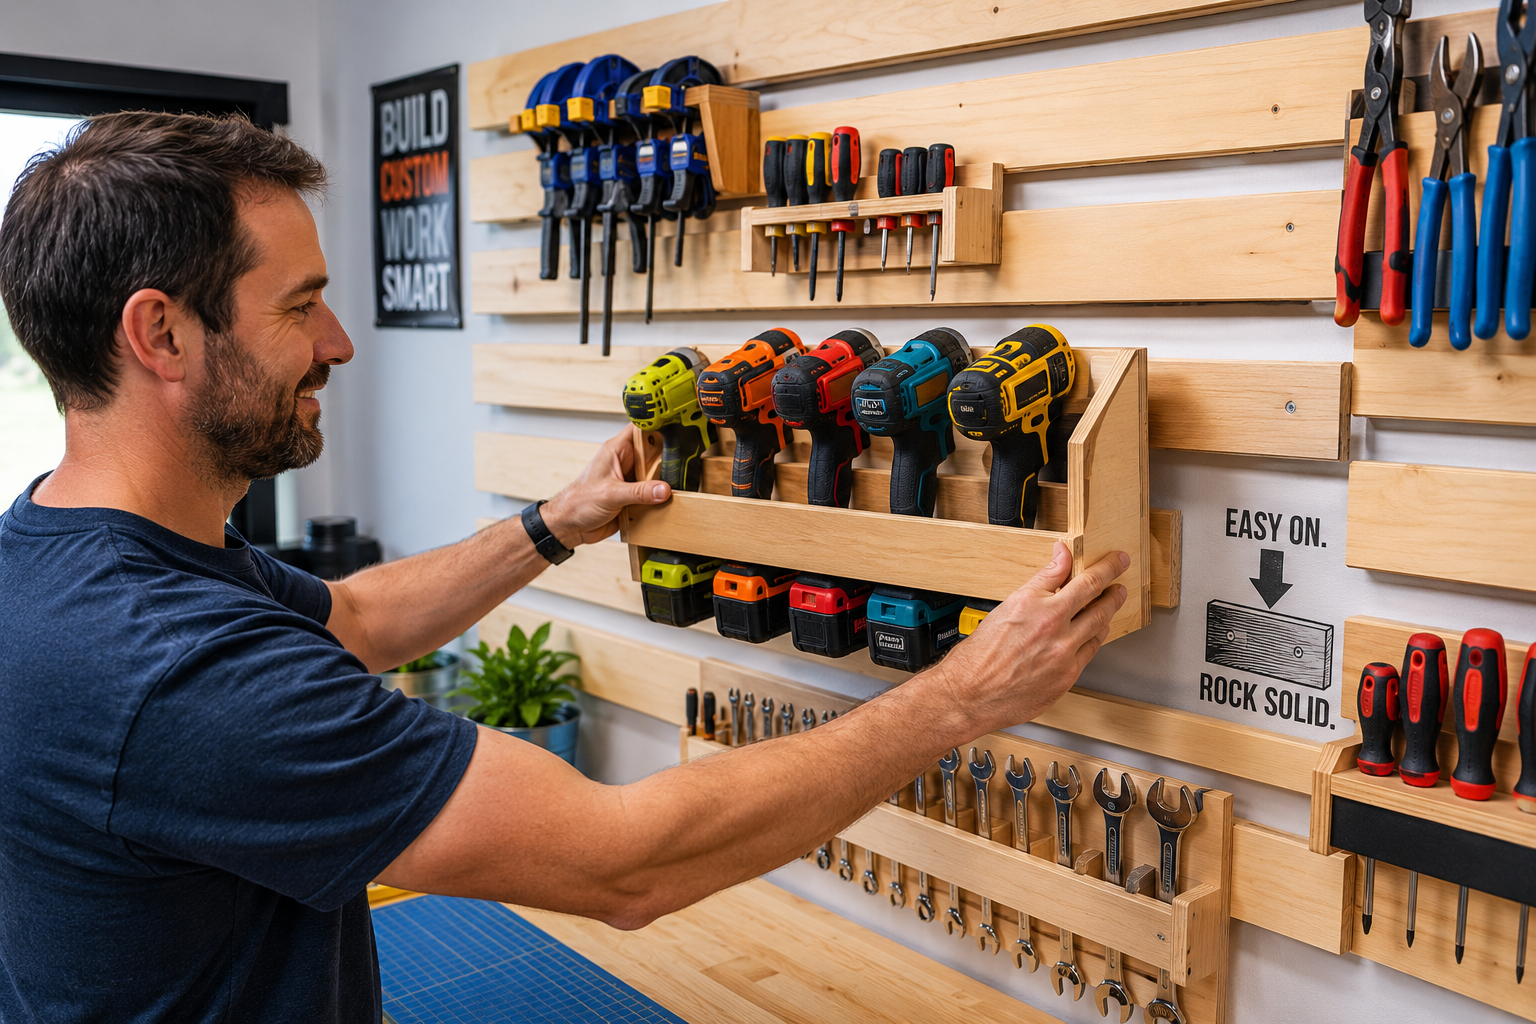
The design phase is where you translate your organizational needs into a tangible plan. Consider the types of tools you own, their sizes, and how frequently you use them. A modular approach allows for dedicated sections for different tool categories (e.g., hand tools, power tools, measuring tools).
Step-by-Step Cabinet Construction
- Plan Your Layout: Sketch a detailed diagram of your desired cabinet, including dimensions for the main frame, shelves, and any drawers. Identify where your French cleats will be mounted on the wall and within the cabinet itself. Think about tool categories and how they can be grouped.
- Cut Plywood Panels: Using your table saw and miter saw, precisely cut all the plywood pieces for the cabinet carcass (sides, top, bottom, back, shelves). Ensure all cuts are square for tight, strong joints.
- Assemble the Carcass: Use wood glue and screws to assemble the main box of your cabinet. Butt joints reinforced with screws are common, but you could opt for more advanced joinery like dadoes or rabbets for added strength and a cleaner look. Mastering Dovetail Joinery for Drawers could inspire techniques for any integrated drawers.
- Create and Install French Cleats:
- Wall Cleats: Rip ¾-inch plywood or hardwood strips to your desired width (e.g., 3-4 inches). Set your table saw blade to 45 degrees and bevel one long edge of each strip. These are your wall cleats.
- Cabinet Cleats: For each cabinet or module, cut a matching cleat. This cleat will be attached to the back of your cabinet, with its 45-degree angle facing downwards and outwards, designed to interlock with the wall cleat.
- Installation: Secure the wall cleats to your workshop wall, ensuring they are perfectly level and screwed directly into wall studs for maximum support. Use a stud finder and mark your stud locations carefully. Then, attach the corresponding cabinet cleats to the back of your assembled cabinet modules using glue and screws.
- Build Custom Tool Holders: This is where the customization truly shines. Consider different types of holders:
- Open Shelves: Simple boxes with a cleat on the back for frequently used items.
- Drill and Driver Holders: Slanted shelves or specific cutouts to hold drills, impact drivers, and battery packs.
- Wrench and Screwdriver Racks: Cutouts or routed slots in a cleated board to organize these tools.
- Chisel Racks: A cleated board with holes or slots to keep chisels sharp and protected.
- Drawer Units: Small drawer boxes can be built and fitted with slides, then a cleat attached to their back to hang on the system.
- Specialized Jigs: Even jigs or guides can be designed to hang on French cleats.
- Always attach a corresponding cleat to the back of each holder you create, ensuring the 45-degree angle faces downwards and outwards for proper engagement with the wall cleat.
Tips for Maximizing Storage and Organization
- Verticality is Key: Think vertically. Use the full height of your wall space.
- Shadow Boards: Consider drawing outlines of your tools directly on the cabinet back or holders. This not only makes it easy to return tools to their spot but also quickly reveals missing items.
- Dedicated Zones: Group similar tools together. All measuring tools in one area, all cutting tools in another. This creates an intuitive workflow.
- Frequent Use vs. Infrequent Use: Place frequently used tools at eye level and within easy reach. Less-used tools can go on higher or lower shelves.
- Labeling: Label drawers, bins, and even specific spots on holders for clarity.
- Portable Elements: Some tool holders can be designed to be easily removed and carried to your workbench, like a small caddy for fasteners or a tray for small hand tools.
- Dust Collection Integration: If you have a dust collection system, consider integrating it into your cabinet design for power tools, ensuring efficient chip and dust removal. Learn more about this in Building a DIY Smart Workshop Dust Collection System.
Finishing and Personalizing Your French Cleat Tool Cabinet
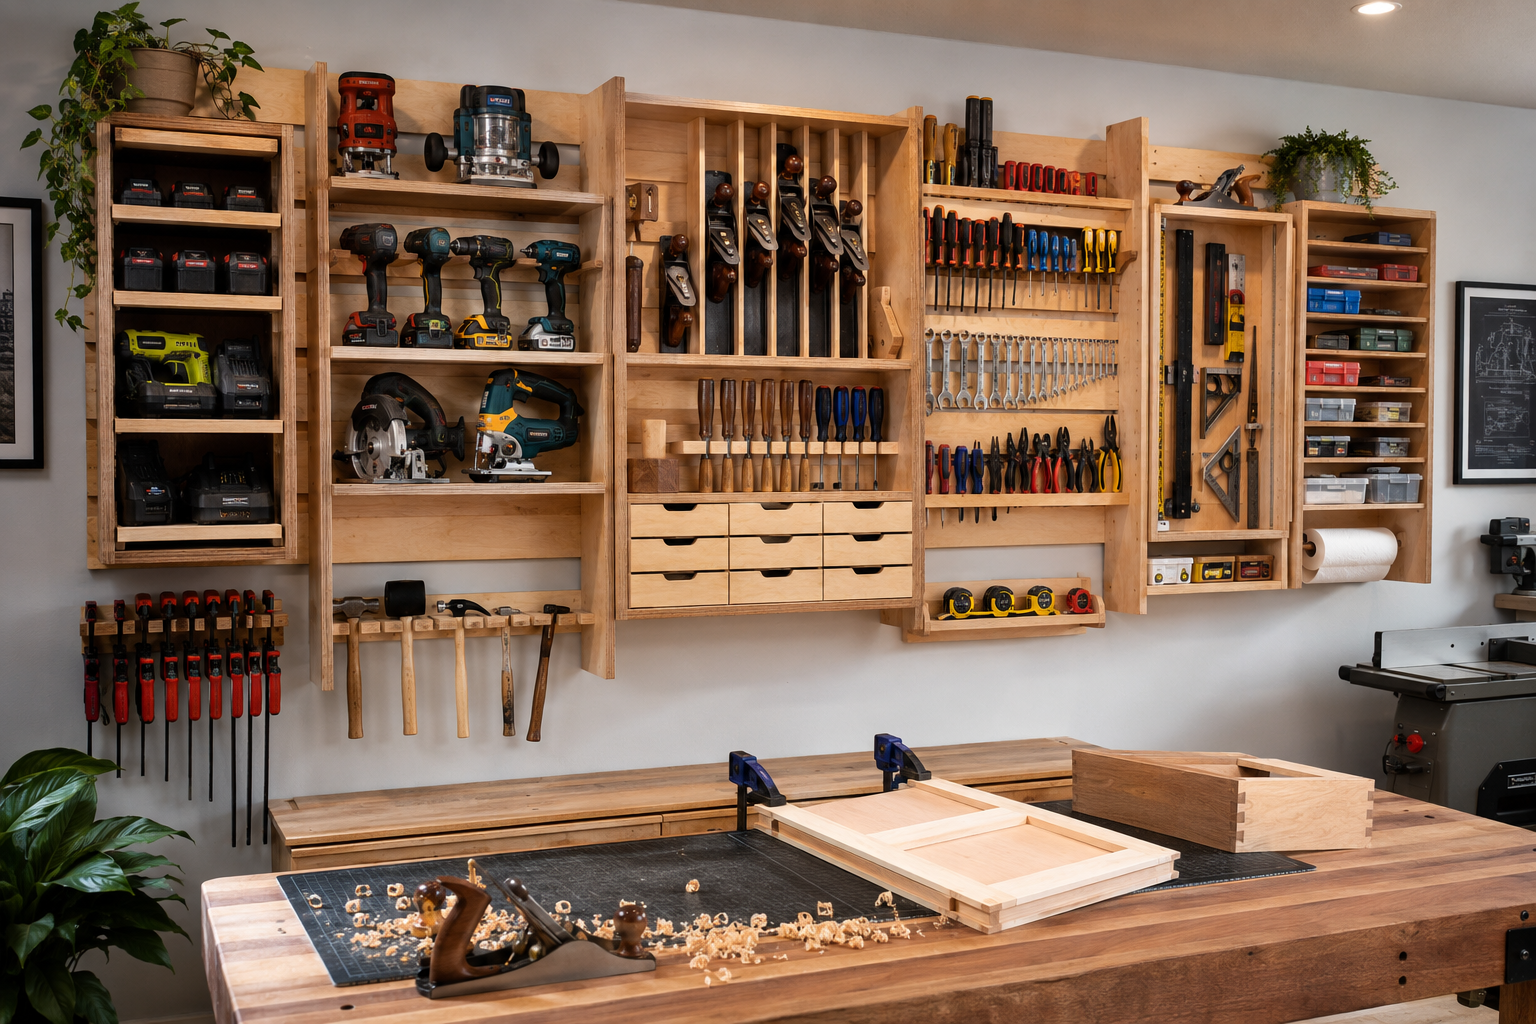
Once your cabinet and tool holders are constructed, the finishing touches elevate its functionality and appearance. A well-finished cabinet not only looks professional but also protects the wood from wear, tear, and workshop dust.
Applying Finishes for Durability and Aesthetics
- Sanding: Begin by sanding all surfaces smooth. Start with a coarser grit (e.g., 80 or 100-grit) to remove any imperfections, then progress to finer grits (e.g., 150, 220-grit) for a silky-smooth finish. Proper sanding is crucial for any successful woodworking project.
- Cleaning: Thoroughly clean all dust particles from the surfaces using a shop vac, tack cloth, or compressed air. Any lingering dust will compromise the finish.
- Stain or Paint (Optional): If you desire a specific color or wish to enhance the wood’s natural grain, apply a wood stain or paint. Follow the manufacturer’s instructions for application and drying times.
- Protective Topcoat: Apply a protective topcoat such as polyurethane, lacquer, or shellac. These finishes protect the wood from moisture, scratches, and chemicals commonly found in a workshop. Apply multiple thin coats, sanding lightly with a fine-grit sandpaper (e.g., 320-grit) between coats, ensuring proper drying time for each layer. A clear satin or semi-gloss polyurethane is a popular choice for workshop furniture due to its durability. For tips on applying polyurethane, consider our guide on applying polyurethane in high humidity.
- Hardware Installation: Install any hinges, drawer slides, and pulls. Ensure all hardware operates smoothly and is securely fastened.
Personalization and Future Expansion
The true power of a French cleat system is its endless potential for personalization and expansion. As your tool collection evolves, so too can your storage solution.
- Modular Additions: Design and build new tool holders or small cabinets as needed. The cleats make it simple to integrate these additions seamlessly.
- Reconfiguration: Don’t be afraid to rearrange your modules. If a certain layout isn’t working, simply lift and move the holders until you find an optimal configuration.
- Themed Sections: Create themed sections for specific tasks, such as a carving station with all necessary tools, or a finishing supplies cabinet.
- Accessory Storage: Don’t forget small accessories like drill bits, screws, and sandpaper. Clear bins or small drawers with dividers can keep these items organized. Consider DIY Modular Desk Organizers for ideas applicable to small items.
- Custom Signage: Add custom labels or signage to your modules for quick identification.
By investing the time to properly design, construct, and finish your DIY wall-mounted tool cabinet with French cleats, you’re not just building storage; you’re creating an adaptable, efficient, and inspiring workspace that will serve you well for years to come. In 2026, a well-organized workshop remains the hallmark of a productive craftsman.
Conclusion
Building a DIY Wall-Mounted Tool Cabinet with French Cleats: Maximizing Storage and Organization is a project that yields immense returns in terms of efficiency, safety, and overall workshop satisfaction. The French cleat system provides an unparalleled level of adaptability, allowing your storage solution to grow and change alongside your tools and projects. By carefully planning your layout, meticulously constructing each component, and adding a professional finish, you create a robust, customizable system that transforms cluttered spaces into hubs of productivity.
This project is more than just woodworking; it’s about engineering a smarter way to work, reducing frustrations, and enhancing the enjoyment of your craft. The modularity of the French cleat system ensures that your investment in time and materials will continue to pay dividends as your woodworking journey evolves. Start small with a few essential tool holders, then expand as your confidence and collection grow. Your future self, navigating a perfectly organized workshop, will thank you.