


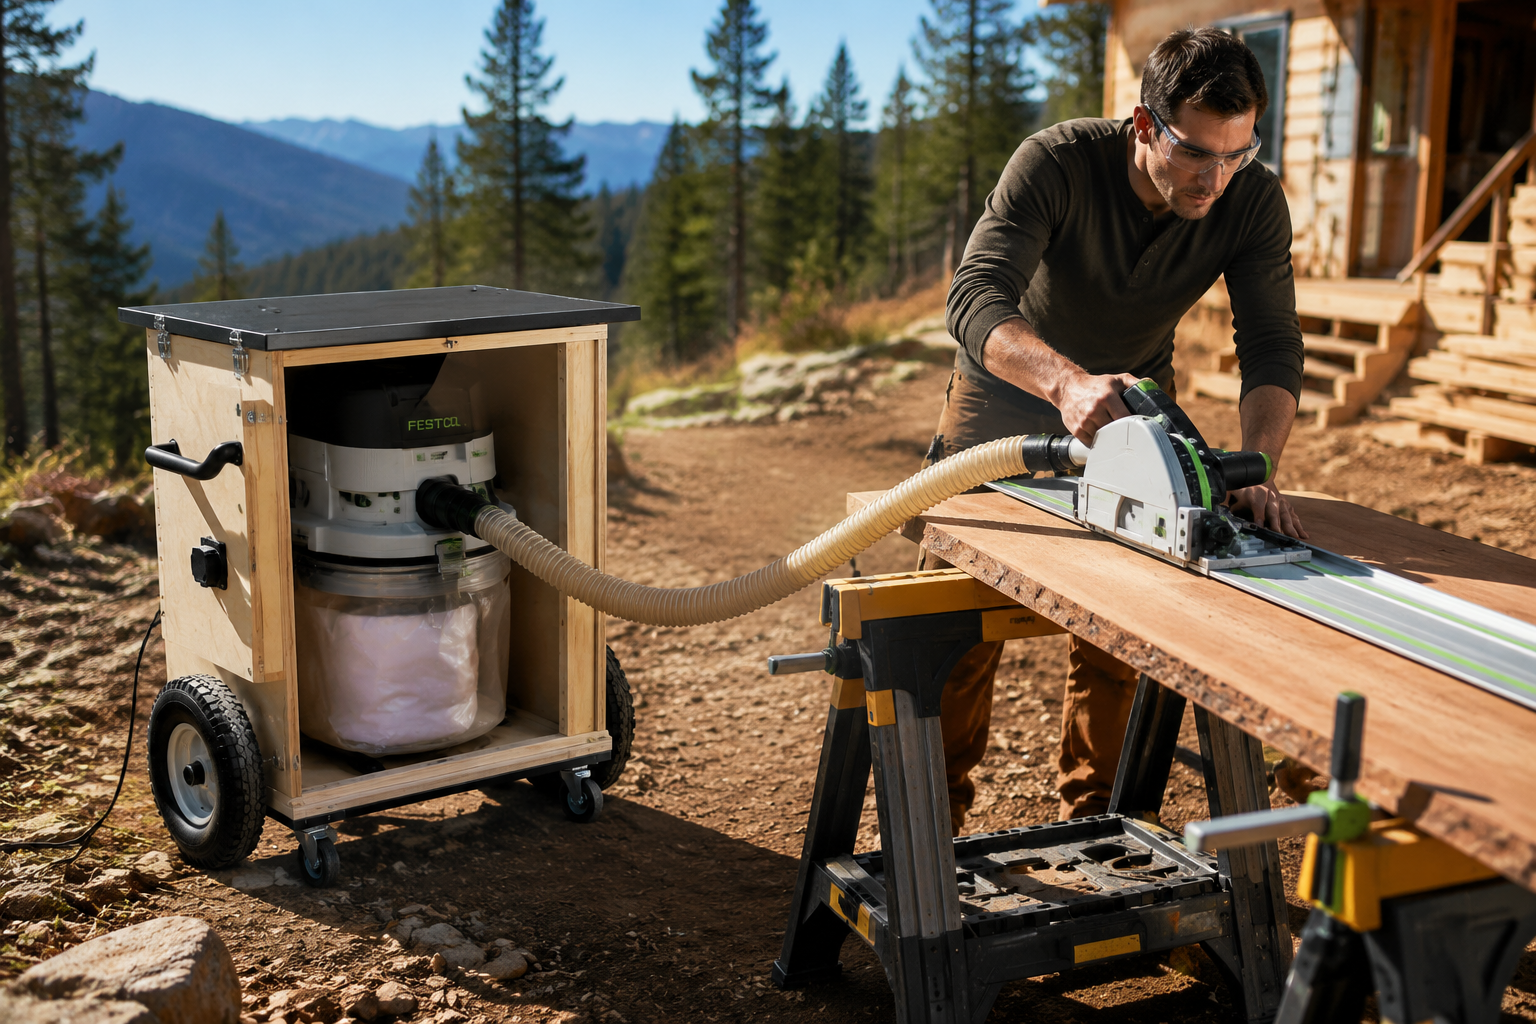
Despite decades of advancements in woodworking tools and techniques, one persistent challenge remains: controlling sawdust outside the dedicated workshop. For professionals and serious hobbyists alike, the traditional “shop-bound” dust collector often proves inadequate when tackling installations, repairs, or custom builds at a client’s location or even a remote corner of the property. This article details the comprehensive process of Building a Portable Dust Extraction Cart for On-Site Projects: Maximizing Cleanliness and Efficiency Beyond the Workshop, transforming a stationary necessity into a mobile powerhouse.
Key Takeaways
- A portable dust extraction cart significantly improves cleanliness and safety on remote job sites.
- Careful planning of the cart’s design, focusing on stability, maneuverability, and component integration, is crucial for success.
- Selecting the right dust collector, filtration, and hose management system forms the core of an effective portable setup.
- Incorporating smart storage, power management, and ergonomic features enhances the cart’s overall utility and longevity.
- Building this cart is a cost-effective DIY solution that boosts professionalism and efficiency for on-site woodworking in 2026.
Designing Your Mobile Dust Control Hub: The Foundation of Portability
The first step in Building a Portable Dust Extraction Cart for On-Site Projects: Maximizing Cleanliness and Efficiency Beyond the Workshop is meticulous design. This isn’t just about throwing components onto a wheeled platform; it’s about creating a robust, ergonomic, and highly functional system that can withstand the rigors of travel and varying job site conditions.

Assessing Your Needs: Power, Volume, and Mobility
Before cutting any lumber, consider the primary tools you’ll be connecting. Are you dealing with a high-volume producer like a planer or jointer, or lower-volume tools like sanders and miter saws? This dictates the required CFM (Cubic Feet per Minute) of your dust collector.
- CFM Requirements:
- Small power tools (random orbit sander, jigsaw): 100-200 CFM
- Miter saw, router table: 300-500 CFM
- Portable planer, small table saw: 500-800 CFM
- Larger tools: 800+ CFM (though these are less common for portable setups).
Next, evaluate the typical environment. Will the cart navigate smooth concrete, rough asphalt, or uneven ground? This influences your choice of casters and overall frame construction.
Essential Design Principles
A successful portable dust cart balances strength, weight, and accessibility.
- Sturdy Foundation: Plywood (minimum 3/4-inch, marine-grade if exposed to weather) or structural aluminum tubing provides a solid base. The frame must withstand the weight and vibration of the dust collector, hoses, and accessories.
- Robust Casters: Industrial-grade, locking casters with rubber or pneumatic tires (6-inch diameter or larger) are critical. Swivel casters at both ends offer maximum maneuverability. Consider a combination of fixed and swivel for stability.
- Compact Footprint: While powerful, the cart must be maneuverable through doorways and tight spaces. Design for verticality rather than horizontal sprawl.
- Enclosure vs. Open Frame:
- Enclosed Cart: Offers better dust containment from the collector itself (though not from the tool!), reduces noise, and protects components from elements. However, it adds weight and can reduce airflow if ventilation is poor.
- Open Frame: Lighter, easier to access components, but offers less protection and potential for more noise.
- Recommendation: A hybrid design, where the dust collector motor is somewhat protected but still allows for good airflow, often strikes the best balance.
- Ergonomics: Include handles for easy pushing/pulling. Position controls (on/off switch) at a convenient height.
Consider incorporating elements from efficient workshop organization. For example, similar principles found in Building Modular Wood Storage Systems for Small Workshops can be applied to organize dust collection accessories on your cart.
Sketching and Planning Your Build
Use graph paper or CAD software to draw out your design. Key dimensions include:
- Dust Collector Dimensions: Crucial for determining the cart’s internal space.
- Hose Routing: Plan for minimal bends and short runs to maintain airflow.
- Access Panels: Ensure easy access for bag changes, filter cleaning, and maintenance.
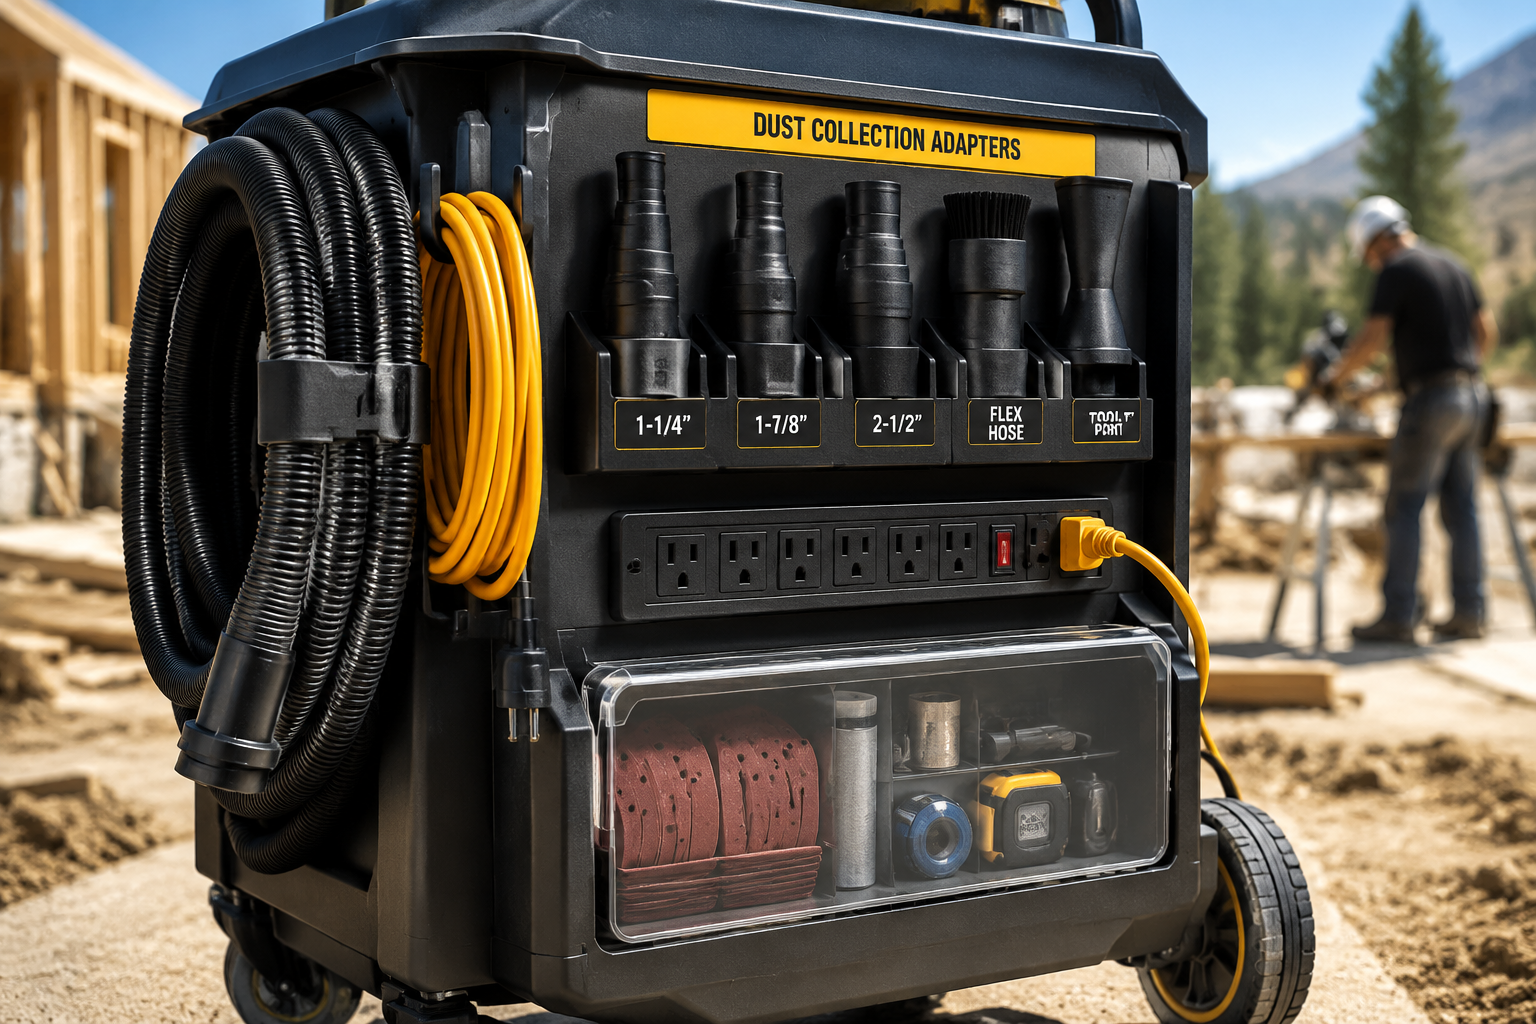
- Accessory Storage: Where will you keep adapters, extra hoses, and power cords?
| Feature | Design Consideration |
|---|---|
| Frame Material | 3/4″ Plywood (cabinet grade), aluminum extrusion, or steel tubing. |
| Casters | 6″+ heavy-duty, locking, rubber or pneumatic wheels (2 swivel, 2 fixed or 4 swivel). |
| Dust Collector | Single-stage (for portability) with minimum 650 CFM, 1 micron filtration. |
| Filtration | High-efficiency pleated cartridge filter (MERV 10+), HEPA optional. |
| Hose Management | Integrated hose hooks, flexible hose arm, or dedicated compartment. |
| Power Management | External power switch, surge protector, cord wrap. |
| Storage | Shelves, bins, hooks for accessories, adapters, safety gear. |
| Noise Reduction | Enclosure design (if applicable), insulation. |
| Stability | Wide wheelbase, low center of gravity. |
| Portability | Balanced handles, appropriate weight distribution. |
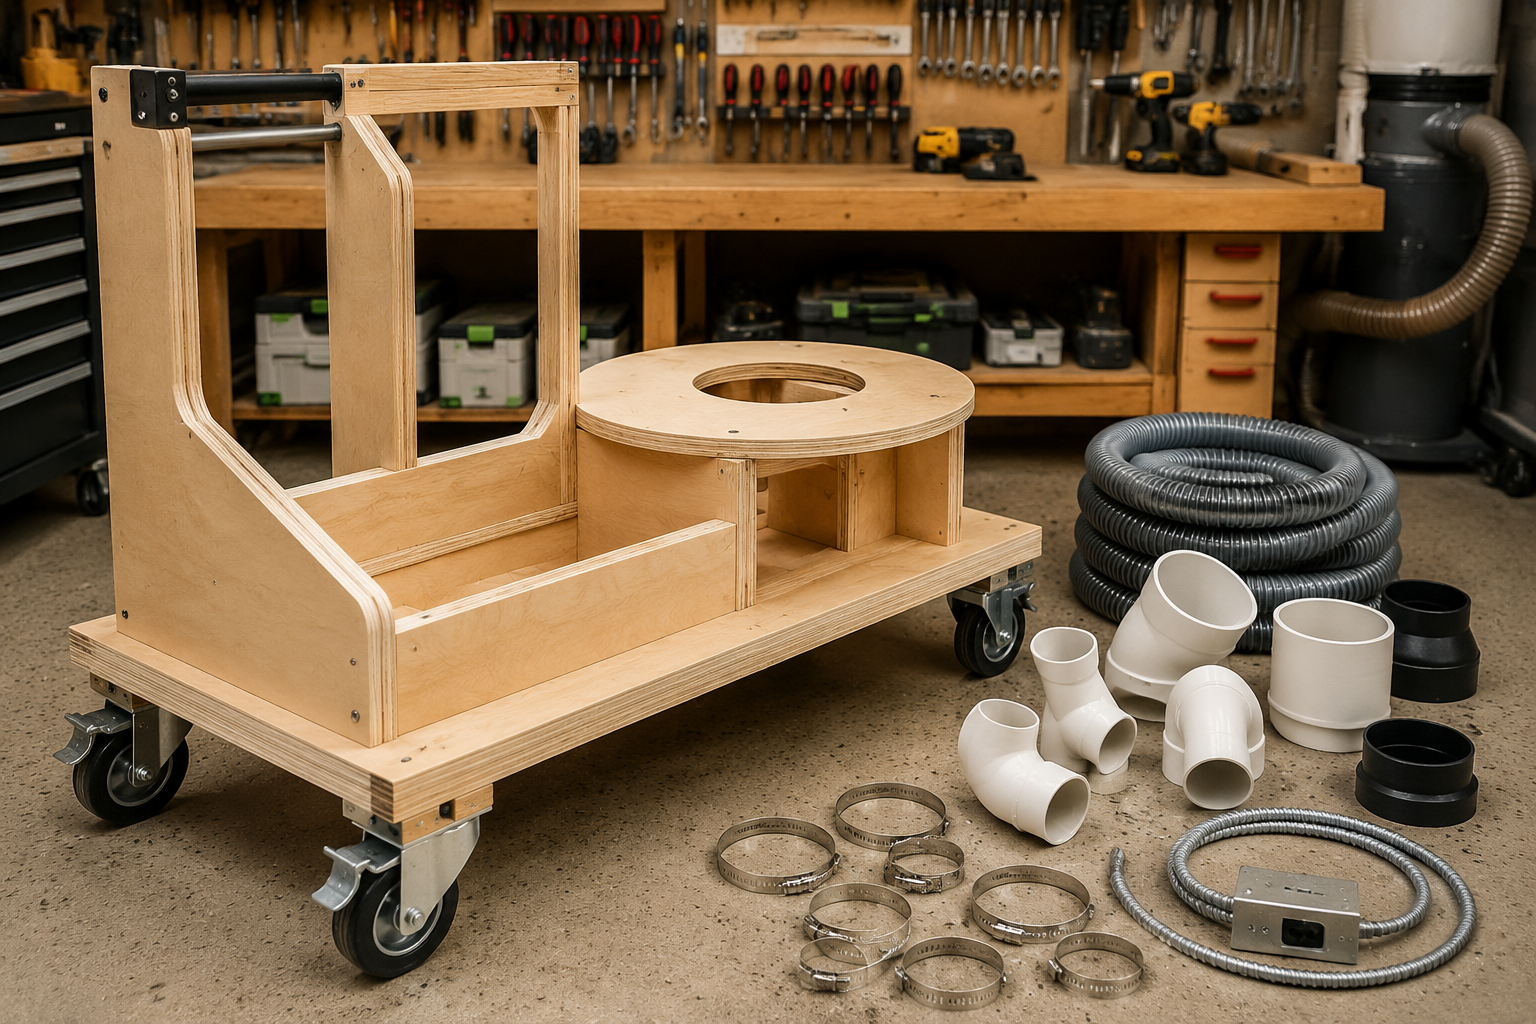
Essential Components and Assembly Guide
With a solid design in hand, the next phase of Building a Portable Dust Extraction Cart for On-Site Projects: Maximizing Cleanliness and Efficiency Beyond the Workshop involves gathering components and beginning construction.
Selecting the Right Dust Collector
The heart of your cart is the dust collector. For portable applications, a compact single-stage unit is usually preferred over large two-stage systems.
- Motor Size: Aim for a 1 HP to 1.5 HP motor for most portable needs.
- CFM Rating: As discussed, match this to your primary tools. Don’t fall for inflated ratings; look for actual CFM at the tool.
- Filtration: A 1-micron filter bag or, even better, a pleated cartridge filter is essential for capturing fine dust particles. Consider a HEPA filter for maximum air quality. Dust Deputy cyclone systems can be integrated to pre-separate larger chips, extending filter life and reducing CFM loss.
- Bag Capacity: A larger collection bag means less frequent emptying, which is a significant advantage on job sites.
- Noise Level: Look for models with lower decibel ratings if noise is a concern in residential areas.
Materials and Tools Needed
| Category | Item |
|---|---|
| Structure | 3/4″ plywood sheets (approx. 2-3 sheets), 2×4 lumber (for internal bracing), wood screws, wood glue |
| Mobility | 4 heavy-duty locking swivel casters (e.g., 6-inch diameter), carriage bolts, washers, nuts |
| Dust Mgmt. | Dust collector (1-1.5HP), pleated cartridge filter (1 micron), collection bags, 4-inch dust hose, hose clamps, various blast gates, reducers, and fittings (PVC or ABS) |
| Electrical | External power switch/box, 12-gauge extension cord, power strip, cord wraps |
| Optional | Cyclone separator (e.g., Dust Deputy), sound-dampening insulation, tool hooks, accessory bins |
| Tools | Table saw or circular saw, drill/driver, router (for dados/rabbets), measuring tape, square, clamps, safety gear (eye/ear protection) |
Remember to ensure your chosen tools are well-maintained for precision cuts. For table saw operation, refer to guides like the Craftsman 113.299 Table Saw: A Comprehensive Guide.
Step-by-Step Assembly
- Cut Plywood Panels: Based on your design, cut all plywood panels for the sides, top, bottom, and internal shelves. Use accurate measurements to ensure a square and sturdy assembly.
- Assemble the Base: Construct the bottom frame using plywood and 2x4s for reinforcement. Attach the heavy-duty casters to the underside, ensuring they are securely bolted through the plywood and into the 2×4 bracing.
- Build the Enclosure/Frame: Assemble the side panels, securing them with wood glue and screws. Consider using dados or rabbets for stronger joints, a technique useful for Building Robust Floating Shelves. This also adds to the professional look.
- Install Dust Collector Platform: Create a sturdy platform or shelf within the cart to hold the dust collector securely. Ensure adequate ventilation openings if using an enclosed design.
- Mount the Dust Collector: Carefully place the dust collector onto its platform and secure it. This might involve straps, bolts, or custom brackets. Install the filter and collection bag.
- Route Ductwork: Connect the main inlet of the dust collector to an external port on the cart using PVC or ABS pipe. Include a blast gate. Plan for additional ports if you intend to connect multiple tools. Minimize bends to maximize airflow.
- Electrical Integration: Mount an external, dust-rated power switch. Wire it to an internal power strip where the dust collector and any other tools can plug in. Include a cord wrap for a long extension cord.
- Add Handles and Doors: Attach sturdy handles to one or both sides for easy maneuvering. If your design includes an enclosure, install hinges and latches for access doors.
Optimizing Your Cart for On-Site Performance and Longevity
The final stage in Building a Portable Dust Extraction Cart for On-Site Projects: Maximizing Cleanliness and Efficiency Beyond the Workshop focuses on refinements that enhance usability, durability, and safety.
Enhancing Dust Collection Efficiency
Even with a powerful collector, system efficiency can be lost through leaks and poor hose management.
- Cyclone Separator: Integrating a pre-separator like a Dust Deputy or similar cyclone before the main dust collector significantly extends the life of your main filter, reduces bag changes, and maintains consistent suction. This is a game-changer for on-site projects.
- Hose Management: Use flexible, anti-static dust hose that is just long enough for your task, minimizing excess slack. Store hoses on integrated hooks or in dedicated compartments when not in use. Consider a retractable hose reel for maximum convenience.
- Sealing: Caulk all pipe joints and ensure any access panels seal tightly to prevent air leaks, which drastically reduce CFM.
- Proper Adapters: Keep a range of universal and tool-specific dust port adapters on hand. For help with tool integration, our guide on Beginner’s Guide to Essential Woodworking Jigs also touches on tool setup.
Storage and Organization
A truly portable cart goes beyond just moving the dust collector; it organizes its accessories.
- Integrated Tool Storage: Create shelves or compartments for frequently used portable tools like sanders, drills, or router bits. This saves trips back and forth. For efficient storage ideas, consider principles from Smart Workshop Storage Solutions: Maximizing Small Spaces.
- Accessory Hooks: Install hooks for hanging extra hoses, power cords, and blast gates.
- Bin/Drawer Storage: Small bins or drawers can hold quick-access items like sandpaper, dust masks, and pencils.
- Power Management: An external, weather-resistant power strip with surge protection is crucial. Include a dedicated area for wrapping and storing a heavy-duty extension cord.
Durability and Maintenance for 2026
On-site conditions can be harsh. Protect your investment.
- Protective Finish: Apply multiple coats of polyurethane or exterior paint to all wooden surfaces to protect against moisture, UV, and wear and tear.
- Regular Cleaning: Empty collection bags/bins regularly. Clean or replace filters as needed. Compressed air can extend the life of pleated filters.
- Caster Maintenance: Lubricate caster wheels and inspect for damage periodically.
- Electrical Check: Regularly inspect all electrical cords and connections for fraying or damage.
By creating a durable and highly organized cart, you not only extend its lifespan but also enhance your professional image on every job. This commitment to efficiency and cleanliness will set your woodworking apart in 2026.

Conclusion
Building a Portable Dust Extraction Cart for On-Site Projects: Maximizing Cleanliness and Efficiency Beyond the Workshop is an investment that pays dividends in improved health, professionalism, and operational efficiency. By carefully designing for portability and power, selecting robust components, and optimizing for on-site conditions, woodworkers can transform dusty, inefficient remote projects into clean, productive endeavors. This DIY solution enhances safety, reduces cleanup time, and projects a highly professional image, ultimately improving the quality of your work and your working environment. Start planning your portable dust control hub today and take your woodworking capabilities far beyond the confines of your workshop.
References
- Jianu, M. (2020). Wood Dust Control Handbook. Woodworker’s Journal Press.
- OSHA. (2018). Safety and Health Topics: Wood Dust. Occupational Safety and Health Administration.
- Schwartz, L. (2022). The Workbench Book: A Craftsman’s Guide to Workbenches for All Woodworkers. Taunton Press.
