


DIY Small-Batch Wood Milling: From Log to Lumber with Chainsaws and Alaskan Mills
Imagine the satisfaction of crafting a heirloom piece of furniture from a tree that once stood on your own property, or salvaging unique urban timber that would otherwise go to waste. This isn’t a fantasy reserved for commercial sawmills; with the right tools and techniques, anyone can achieve DIY Small-Batch Wood Milling: From Log to Lumber with Chainsaws and Alaskan Mills. This guide will demystify the process, empowering you to transform logs into usable lumber, opening up a world of creative and cost-effective woodworking opportunities in 2026.
Key Takeaways
- Cost Savings & Unique Wood: Milling your own lumber significantly reduces material costs and provides access to wood species and grain patterns unavailable at traditional lumberyards.
- Essential Equipment: A powerful chainsaw, a quality Alaskan mill attachment, and proper safety gear are fundamental for successful and safe operation.
- Safety First: Prioritize personal protective equipment (PPE) and a clear, stable milling environment to prevent accidents.
- Proper Drying: Air-drying lumber with careful stacking and stickering is crucial for preventing warping and ensuring stable, usable timber.
- Versatile Applications: Self-milled lumber can be used for a wide range of woodworking projects, from furniture to home accents, adding unique character.
Gearing Up for DIY Small-Batch Wood Milling: Essential Tools and Safety
Embarking on DIY Small-Batch Wood Milling: From Log to Lumber with Chainsaws and Alaskan Mills requires a calculated approach, starting with the right equipment and an unwavering commitment to safety. The core of this operation revolves around a powerful chainsaw and a specialized milling attachment, commonly known as an Alaskan mill.

Selecting Your Chainsaw: Power and Bar Length
Not just any chainsaw will do for milling. You’ll need a robust, professional-grade saw with sufficient power to handle the sustained load of cutting through dense wood. Look for models with engine displacements of 70cc (4.3 cubic inches) or higher. While smaller saws can manage very small logs, they will be slower and prone to overheating.
The chainsaw’s bar length is another critical consideration. It dictates the maximum width of the lumber you can mill. To cut a 12-inch wide board, you’ll need a bar at least 16 inches long, as the mill attachment consumes some of the bar length. Common bar lengths for milling range from 24 inches to 36 inches, allowing for most typical lumber dimensions. Ensure your chainsaw can comfortably power the chosen bar length. For specific projects like crafting Adirondack chairs or sturdy benches, having appropriately sized lumber is key.
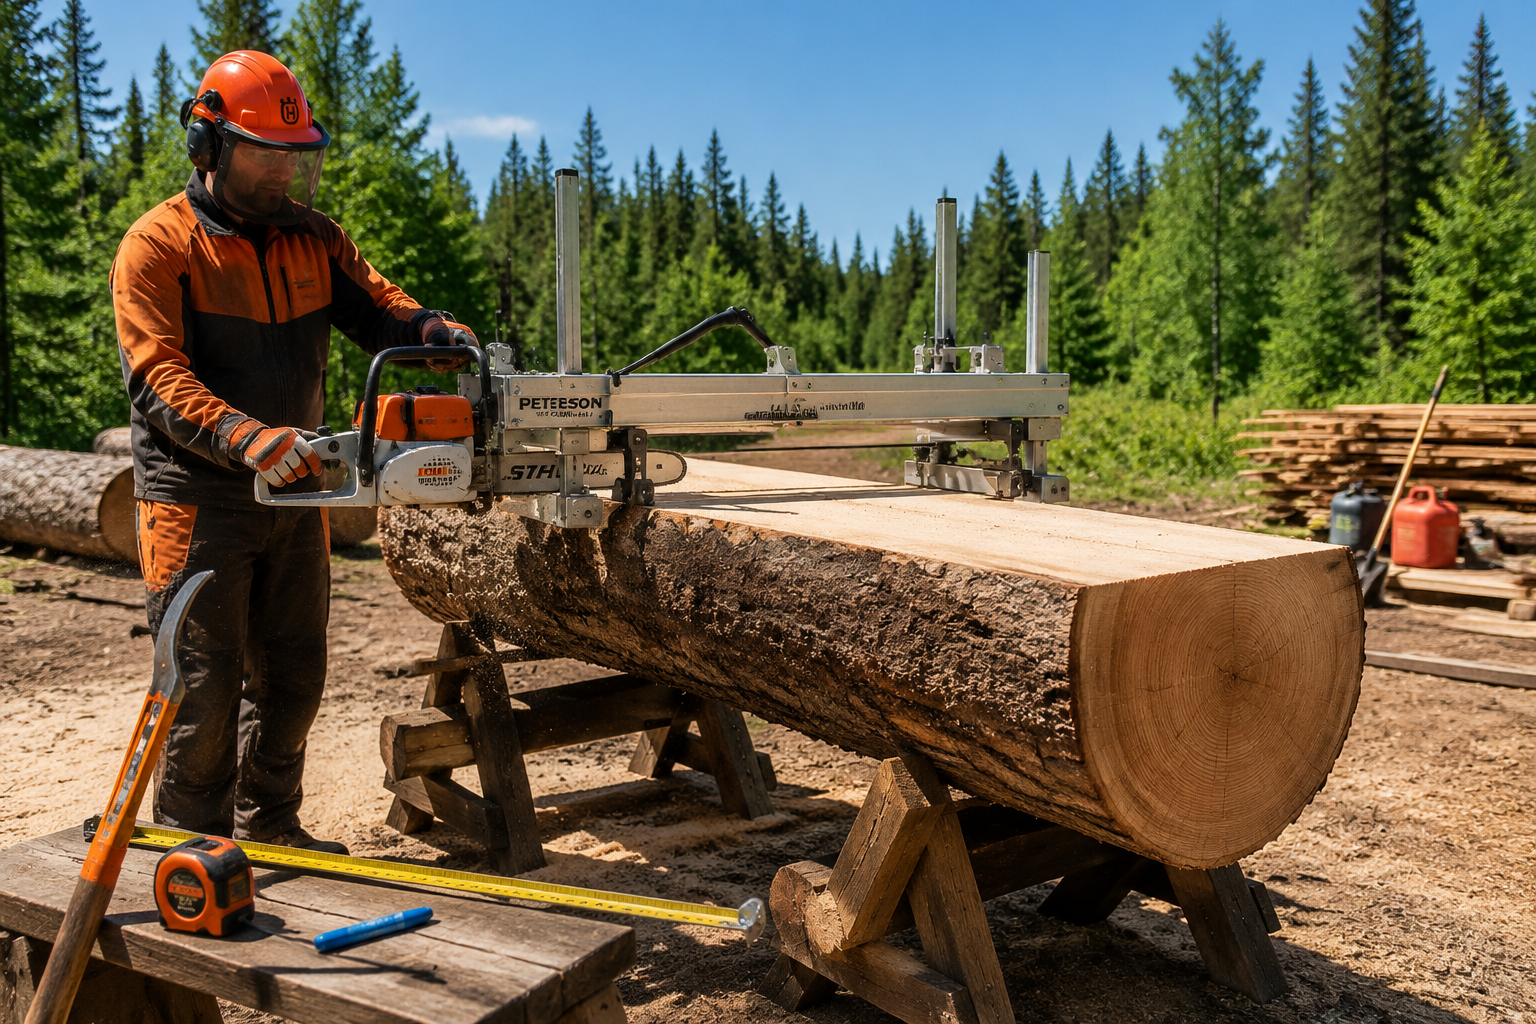
The Alaskan Mill: Your Portable Sawmill
An Alaskan mill, also known as a chainsaw mill, is an attachment that clamps onto your chainsaw bar, guiding it along a rail or guide board to create straight, consistent cuts. These mills typically consist of a sturdy frame with adjustable clamps, allowing you to set the desired thickness of your lumber.
Key features to look for in an Alaskan mill:
- Robust Construction: A heavy-duty aluminum or steel frame will withstand vibrations and ensure accuracy.
- Adjustability: Easy and precise adjustment for varying lumber thicknesses.
- Compatibility: Ensure it fits your chainsaw’s bar width and stud spacing.
- Stability: A wide base or extra handles improve control and reduce fatigue.
There are various brands and designs, but they all serve the same fundamental purpose: to transform your chainsaw into a portable, precision milling tool.
Crucial Safety Gear: No Compromises
Milling lumber with a chainsaw is inherently dangerous. Prioritizing safety is non-negotiable. Always wear the following Personal Protective Equipment (PPE):
- Chainsaw Chaps: These are made of a special material designed to stop a moving chain instantly. They are a lifesaver.
- Helmet with Visor and Hearing Protection: Protect your head from falling debris, your eyes from sawdust and chips, and your ears from the extreme noise of a running chainsaw.
- Heavy-Duty Work Gloves: Protect your hands from splinters, cuts, and vibrations.
- Steel-Toed Boots: Guard against falling logs or lumber and chainsaw kickback.
- Snug-fitting clothing: Avoid loose clothing that could get snagged by the chain.
Beyond personal gear, ensure your milling area is clear of obstructions, stable, and well-ventilated. Have a first-aid kit readily available and ideally, never mill alone.

From Log to Lumber: The Milling Process with Chainsaws and Alaskan Mills

Once you have your equipment and safety gear ready, the practical steps of DIY Small-Batch Wood Milling: From Log to Lumber with Chainsaws and Alaskan Mills can begin. This process involves careful preparation, precise cuts, and methodical handling.
Log Selection and Preparation
The quality of your finished lumber starts with the log. Choose logs that are:
- Straight and Free of Defects: Avoid logs with excessive knots, crooks, or rot, as these will yield poor-quality lumber.
- Freshly Felled: Logs milled shortly after felling are easier to cut and less likely to develop severe checking or splitting during drying.
- Appropriate Size: Ensure the log is manageable for your equipment and physical capabilities.
Before milling, prepare your log:
- Remove Bark (Optional but Recommended): While not strictly necessary, removing bark can reduce debris, minimize insect infestations during drying, and make for cleaner cuts. A drawknife or a debarking tool works well.
- Clean the Log: Remove any dirt, rocks, or metal embedded in the log using a wire brush or scraper. These can dull or damage your chainsaw chain rapidly.
- Level and Secure the Log: Place the log on sturdy sawhorses, blocks, or a log-bunk system, ensuring it’s level and cannot roll during cutting. Stability is paramount for safety and cut accuracy.
Making the First Cut: The Initial Slab
The first cut is critical as it establishes a flat reference surface for all subsequent cuts. This is often the most challenging step.
- Establish a Guide Rail: Attach a straight 2×4 or metal guide rail along the top of your log, parallel to the desired cut line. This rail provides a smooth surface for the Alaskan mill to slide along. Secure it firmly with screws or specialized clamps.
- Set the Mill Thickness: Adjust your Alaskan mill to the desired thickness for your first slab (often 1-2 inches for an initial waste cut, or directly to your lumber thickness if the log is perfectly straight).
- Begin Cutting: Start your chainsaw and slowly guide the mill along the guide rail. Maintain consistent pressure and allow the saw to do the work. Avoid forcing it, which can cause kickback or uneven cuts.
- Remove the Slab: Once the first cut is complete, carefully remove the initial slab. This often contains the most sapwood and defects, making it a good “sacrificial” cut to get to the quality heartwood.
Subsequent Cuts: Creating Dimensional Lumber
With a flat surface established, subsequent cuts become much easier and more accurate.
- Flip the Log (Optional): Some millers prefer to flip the log 90 degrees after the first slab to mill a second flat face, creating a “two-sided cant.”
- Use the Milled Surface as a Guide: For subsequent cuts, the Alaskan mill will ride directly on the previously milled flat surface of the log, eliminating the need for an external guide rail.
- Determine Lumber Dimensions: Plan your cuts to maximize usable lumber. Consider common dimensions like 2x4s, 2x6s, or 4x4s, depending on your project needs. For instance, creating modular wood storage systems for small workshops benefits from standardized sizes.
- Mill Boards: Adjust the mill for your desired thickness and proceed with cutting each board, working your way down the log. Take breaks as needed, sharpen your chain, and refuel your saw.
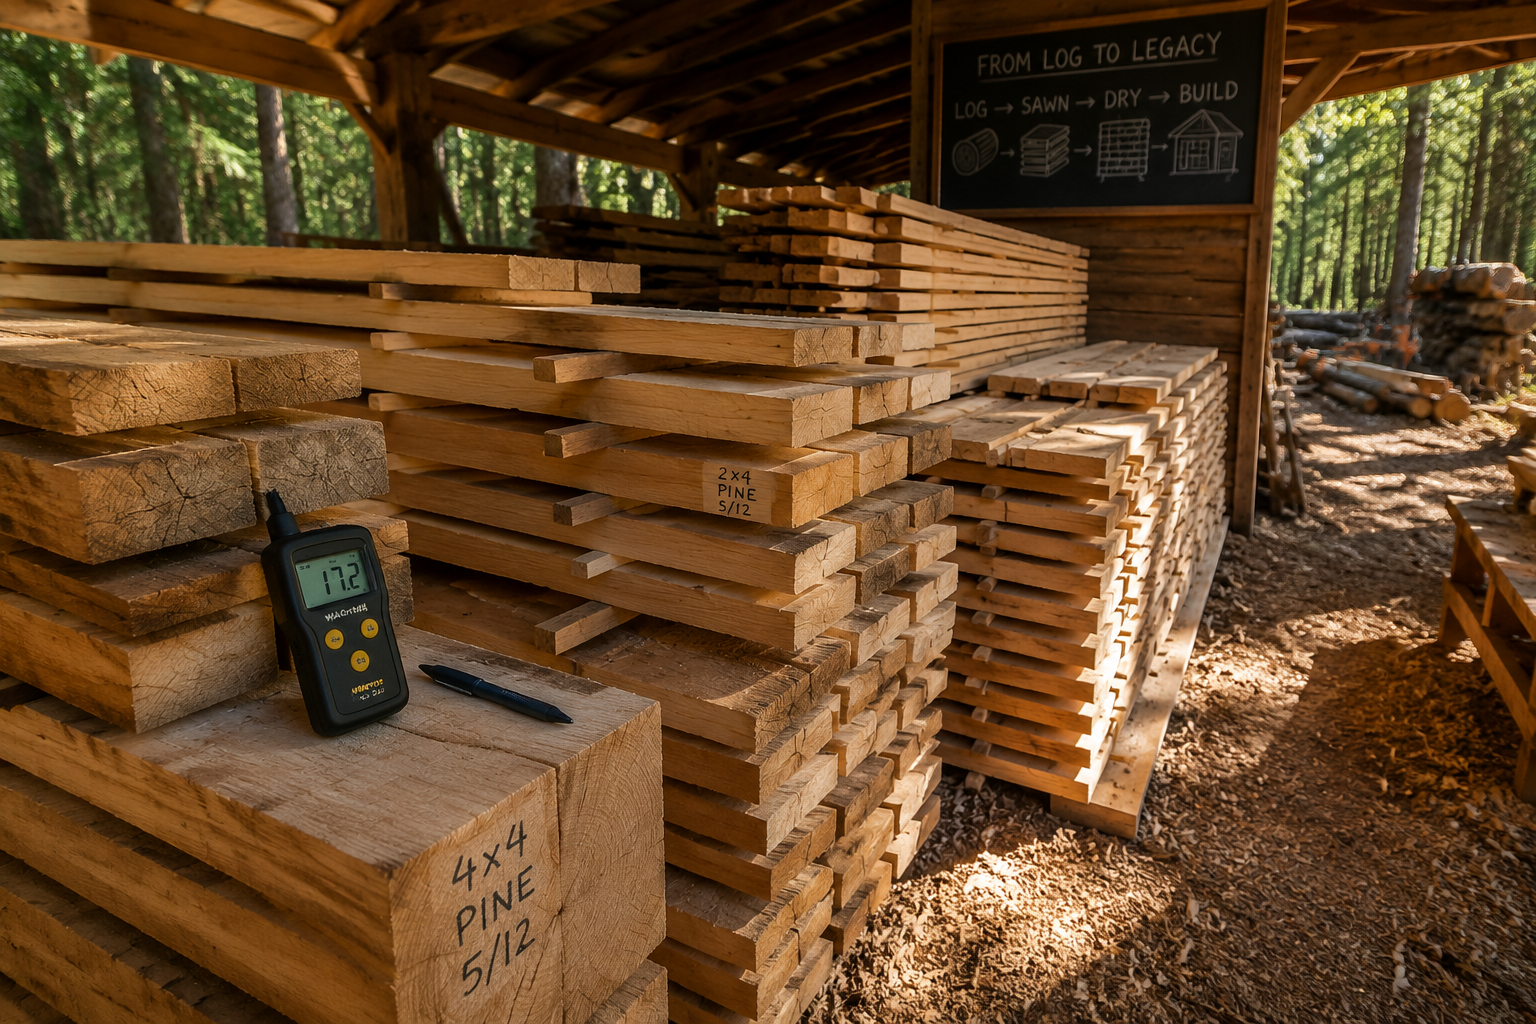
Stacking and Drying Your Milled Lumber
Freshly milled lumber, known as “green” lumber, contains a high moisture content and is unsuitable for most woodworking projects. It must be properly dried to prevent warping, twisting, and cracking. This process, known as “stickering,” is crucial.

- Prepare a Drying Area: Choose a well-ventilated, shaded location that is protected from direct sun and rain. An open-sided shed or a lean-to works perfectly.
- Elevate the Stack: Place your first layer of lumber on sturdy, level supports (e.g., concrete blocks, timbers) at least 6-12 inches off the ground to ensure airflow underneath.
- Sticker the Lumber: Place uniform strips of dry wood (stickers), typically 3/4″ to 1″ thick, between each layer of lumber. Align the stickers directly above each other for stability and even weight distribution. Stickers create air gaps, allowing moisture to escape uniformly.
- Stack Evenly: Keep the stack straight and level to prevent warping. Place heavier boards at the bottom.
- Weight the Top (Optional): Placing heavy weights (e.g., concrete blocks) on top of the stack can help minimize warping and cupping as the wood dries.
- Allow Time: Air-drying can take anywhere from several months to a year or more, depending on the wood species, thickness, and local climate. A general rule of thumb is one year per inch of thickness. Monitor moisture content with a moisture meter to determine when the lumber is ready for use.
- Protection: Cover the top of your stack with a waterproof tarp or roofing material to prevent rain from soaking the lumber while still allowing air to circulate around the sides.
Properly dried lumber is essential for projects ranging from intricate dovetail joints to robust kitchen islands from scratch.

Benefits and Applications of DIY Milled Lumber in 2026
The effort invested in DIY Small-Batch Wood Milling: From Log to Lumber with Chainsaws and Alaskan Mills yields significant rewards, both practical and personal. In 2026, the demand for unique, sustainable, and custom wood projects continues to grow, making self-milled lumber a valuable resource.
Cost Savings and Unique Wood Species
One of the most compelling advantages of milling your own lumber is the dramatic cost savings. While the initial investment in a powerful chainsaw and an Alaskan mill can be substantial, the cost per board foot of raw material is often a fraction of what you’d pay at a lumberyard, especially for larger or specialty dimensions. This makes larger projects, like building live-edge dining tables with reclaimed wood, much more accessible.
Furthermore, DIY milling unlocks access to unique wood species and cuts that are rarely available commercially. Urban trees, fallen storm timber, or lesser-known local hardwoods can all be transformed into beautiful, one-of-a-kind lumber. This allows woodworkers to incorporate distinctive grain patterns, natural edges, and character marks into their projects, creating truly unique pieces. For those interested in sourcing and selecting reclaimed urban lumber, milling offers the ultimate control over the final product.
Versatile Applications in Woodworking Projects
The dimensional lumber you produce from your own logs is incredibly versatile. It can be used for a vast array of woodworking projects, adding a personal touch and story to each piece.
Popular applications include:
- Furniture Building: Craft sturdy tables, benches, shelves, or even bed frames. The unique character of self-milled wood lends itself well to rustic, farmhouse, or modern designs. Imagine a stunning live-edge coffee table or a robust crafting profitable wooden benches.
- Home Renovation and Decor: Create custom mantels, exposed beams, accent walls, or unique trim. The ability to mill specific dimensions is invaluable for bespoke architectural elements. For example, milling your own beams for exposed wood beam installation can be a cost-effective and visually stunning choice.
- Outdoor Structures: Build sheds, pergolas, raised garden beds, or fencing components. The natural durability of many local wood species makes them ideal for outdoor use.
- Small Projects and Crafts: Even smaller offcuts can be utilized for items like cutting boards, serving trays, or wooden candle holders.
The satisfaction of working with lumber you personally milled is immense. Each board tells a story, connecting you more deeply to your craft and the natural world. It’s a sustainable practice that minimizes waste and maximizes the potential of local resources. This hands-on approach embodies the spirit of self-reliance and creative independence that many woodworkers cherish in 2026.

Conclusion
DIY Small-Batch Wood Milling: From Log to Lumber with Chainsaws and Alaskan Mills is more than just a technique; it’s a pathway to self-sufficiency, creativity, and significant cost savings for any woodworker. From selecting the right powerful chainsaw and Alaskan mill attachment to meticulously stacking and air-drying your green lumber, each step contributes to transforming raw logs into valuable, usable timber. The commitment to safety, from donning essential PPE to securing your logs, ensures a productive and incident-free milling experience.
In 2026, the ability to source and process your own lumber offers unparalleled access to unique wood species, custom dimensions, and the immense satisfaction of knowing your project’s foundation came directly from your own efforts. Whether you’re building a grand dining table, crafting bespoke furniture, or simply creating custom decor, the journey from log to lumber with a chainsaw mill empowers you to bring truly unique and sustainable woodworking projects to life. Embrace the challenge, enjoy the process, and unlock a new dimension in your woodworking journey.
Actionable Next Steps:
- Assess Your Needs: Determine the types of lumber and projects you envision to guide your equipment choices.
- Invest in Quality Gear: Purchase a robust chainsaw, a reliable Alaskan mill, and, most importantly, a complete set of safety gear.
- Educate Yourself Further: Watch instructional videos, read detailed guides, and consider taking a basic chainsaw safety course.
- Start Small: Begin with smaller, more manageable logs to hone your skills before tackling larger timber.
- Plan Your Drying Area: Designate a suitable space for stickering and air-drying your milled lumber before you even make your first cut.
SEO Meta Title: DIY Small-Batch Wood Milling: Log to Lumber with Chainsaws SEO Meta Description: Learn DIY small-batch wood milling from log to lumber using chainsaws & Alaskan mills. Save costs, get unique wood for projects in 2026.
