

The average Adirondack chair receives over 500 hours of direct sunlight, rain, and temperature fluctuations annually. To withstand these demanding conditions while providing unparalleled comfort, a precise balance of ergonomic design and efficient production is crucial. This article delves into the intricacies of Building Adirondack Chairs: Ergonomic Design and Efficient Production for Outdoor Comfort, offering a comprehensive guide for woodworkers aiming to craft durable, comfortable, and visually appealing outdoor seating in 2026. We will explore everything from selecting the right materials to mastering joinery and finishing techniques, ensuring your creations offer both lasting enjoyment and market appeal.
Key Takeaways
- Ergonomic design is paramount, focusing on specific angles for seat, back, and armrests to ensure optimal comfort.
- Selecting weather-resistant wood species and high-quality fasteners is essential for durability and longevity.
- Efficient production relies on accurate measurements, precise cuts, and optimized assembly techniques.
- Strong joinery methods, such as mortise and tenon or lap joints, contribute significantly to the chair’s structural integrity.
- Proper finishing, including sanding and weather-resistant coatings, protects the chair and enhances its aesthetic appeal.
Understanding Ergonomic Design for Adirondack Chairs
The hallmark of a great Adirondack chair is its distinctive comfort, which stems directly from thoughtful ergonomic design. Unlike standard chairs, the Adirondack is designed for relaxed lounging, featuring a reclined back, a sloped seat, and wide armrests. Achieving this comfort requires attention to specific angles and dimensions.

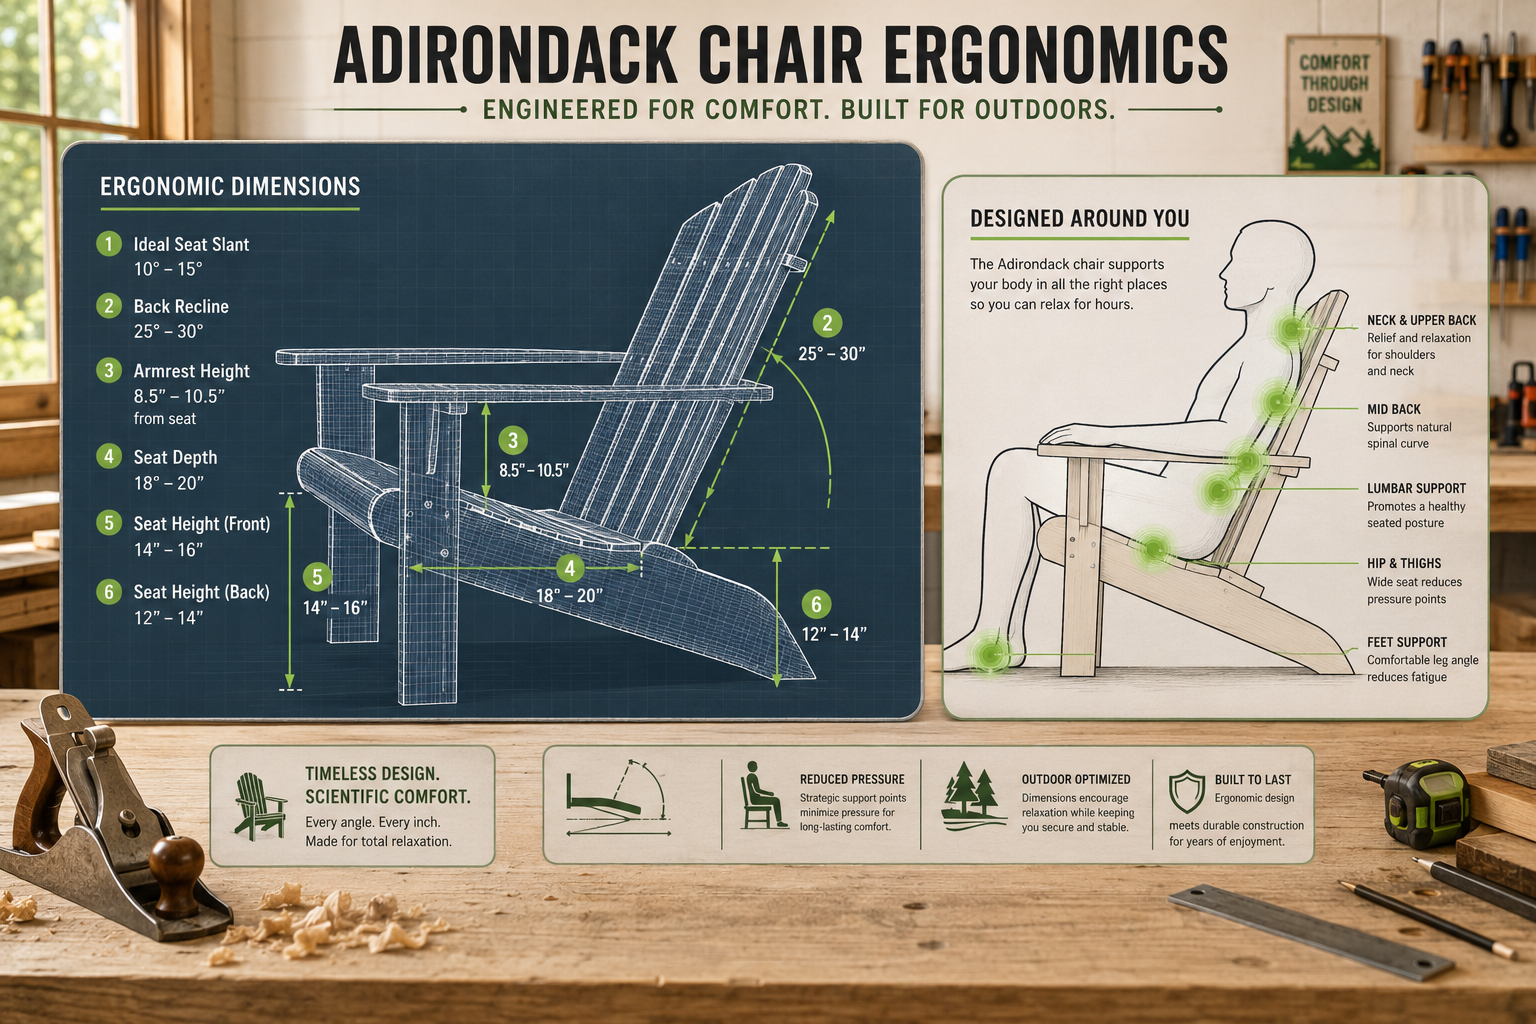
The typical Adirondack chair features a seat that slopes downwards from front to back, usually at an angle between 10 to 15 degrees. This subtle incline helps distribute body weight evenly and keeps the user from sliding forward. The backrest, often curved for lumbar support, reclines significantly, generally between 25 to 30 degrees from vertical. This deep recline allows for a relaxed posture, reducing pressure on the lower back and neck.
Armrests are also crucial for comfort. They should be wide enough to rest a drink or a book, and ideally positioned at a height that allows the user to rest their arms naturally without shrugging their shoulders. Standard armrest height is typically around 7-9 inches above the seat, although this can be adjusted for specific user demographics.
Critical Dimensions and Angles for Comfort
To illustrate these points, consider the following table of ideal ergonomic specifications:
| Component | Recommended Angle/Dimension | Ergonomic Benefit |
|---|---|---|
| Seat Slope | 10-15 degrees from horizontal | Prevents sliding, distributes weight |
| Back Recline | 25-30 degrees from vertical | Promotes relaxed posture, reduces back strain |
| Armrest Height | 7-9 inches above seat | Natural arm resting, supports forearms |
| Seat Width | 20-24 inches | Accommodates various body types comfortably |
| Seat Depth | 18-20 inches | Supports thighs without cutting off circulation |
| Backrest Slats | Evenly spaced, slightly curved | Lumbar support, airflow |
These measurements are not arbitrary; they are the result of centuries of design refinement, evolving from early 20th-century prototypes to the comfortable outdoor staple we know today. When building a portable workbench or any other woodworking project, applying similar ergonomic considerations to user interaction is always beneficial.
A common mistake is to create a chair with too steep a seat angle, which makes it difficult to get out of, or too upright a back, which compromises the characteristic lounging comfort. Precision in cutting and assembly, guided by these ergonomic principles, is key to achieving the desired user experience. Even simple projects like building custom wooden key holders benefit from careful planning and precise execution to meet functional design goals.
Material Selection and Efficient Production Techniques
The longevity and aesthetic appeal of your Adirondack chair depend heavily on the materials you choose and the efficiency of your production process. When Building Adirondack Chairs: Ergonomic Design and Efficient Production for Outdoor Comfort, material selection is your first critical decision.
Wood Selection for Outdoor Durability
For outdoor furniture, weather resistance is non-negotiable. Here are some top wood choices:
- Cedar: Naturally rot-resistant, lightweight, and fragrant. It weathers to a beautiful silver-grey if left unfinished, or can be stained to maintain its original hue.
- Redwood: Similar to cedar in its natural resistance to decay and insects. It is slightly softer than some hardwoods but is very stable.
- Teak: The gold standard for outdoor furniture. Teak is incredibly durable, highly resistant to rot, insects, and moisture, and develops a beautiful silvery patina over time. It is, however, more expensive.
- Cypress: A good alternative to cedar and redwood, offering natural durability and resistance to decay.
- Pressure-Treated Pine: A more economical option, treated with chemicals to resist rot and insects. While durable, it may not have the same aesthetic appeal as natural hardwoods and requires careful finishing.
Beyond the wood itself, fasteners are equally important. Stainless steel screws and bolts are highly recommended as they resist rust and corrosion, preventing unsightly stains on the wood and maintaining structural integrity over time.
Streamlining the Production Process
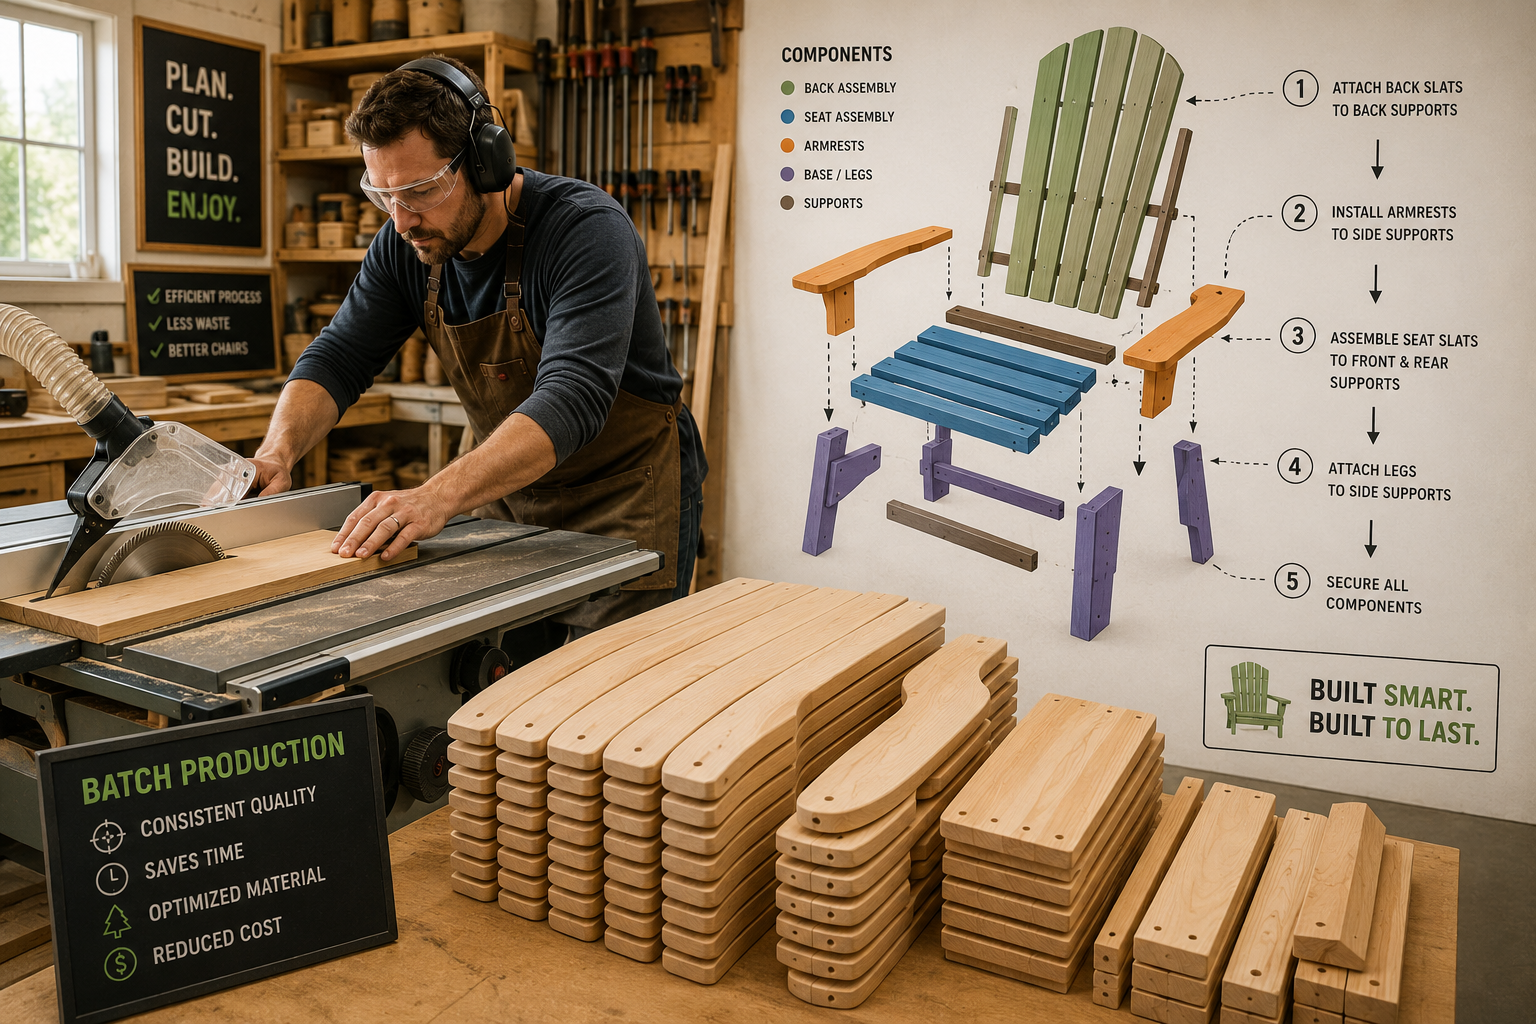
Efficiency in production not only saves time and reduces waste but also ensures consistency across multiple chairs if you’re planning a batch.
- Template Creation: Develop precise templates for each unique part of the Adirondack chair. This allows for quick and accurate marking of lumber. For complex curves, consider creating a full-scale drawing first.
- Batch Cutting: Once templates are ready, cut all identical pieces in batches. For example, cut all leg pieces, then all backrest slats, and so on. This minimizes tool setup changes and speeds up the process significantly. Power tools like a table saw, miter saw, and band saw are invaluable here. Mastering the band saw can greatly improve the accuracy and speed of cutting curved components.
- Pre-Drilling and Countersinking: Always pre-drill pilot holes to prevent wood splitting, especially with denser hardwoods. Countersink screw holes for a flush, professional finish, which also helps prevent water pooling around fasteners.
- Assembly Jigs: For repeated assemblies, simple jigs can ensure that parts are aligned correctly every time, reducing errors and speeding up the joining process. This is particularly useful for attaching the seat to the legs or the backrest to the frame. When tackling other projects, such as building a modular home office desk system, similar jig concepts can streamline complex assemblies.
- Finishing in Stages: Applying finishes to individual components before full assembly can be easier, especially in tight corners. However, a final coat after assembly ensures complete coverage.
By adopting these efficient techniques, woodworkers can significantly reduce the labor required per chair while maintaining a high standard of quality. This approach is similar to strategies used in customization strategies for mass-producing small woodcraft, where repeatable processes lead to scalable output.
Joinery and Finishing for Enhanced Durability and Aesthetics
The structural integrity and long-term appearance of an Adirondack chair are largely determined by the quality of its joinery and the effectiveness of its finish. When Building Adirondack Chairs: Ergonomic Design and Efficient Production for Outdoor Comfort, these final stages are as crucial as the initial design.
Robust Joinery Methods
For outdoor furniture that endures years of use and exposure, strong, weather-resistant joinery is essential. While screws are commonly used, incorporating traditional woodworking joints significantly enhances durability and minimizes reliance on fasteners alone.
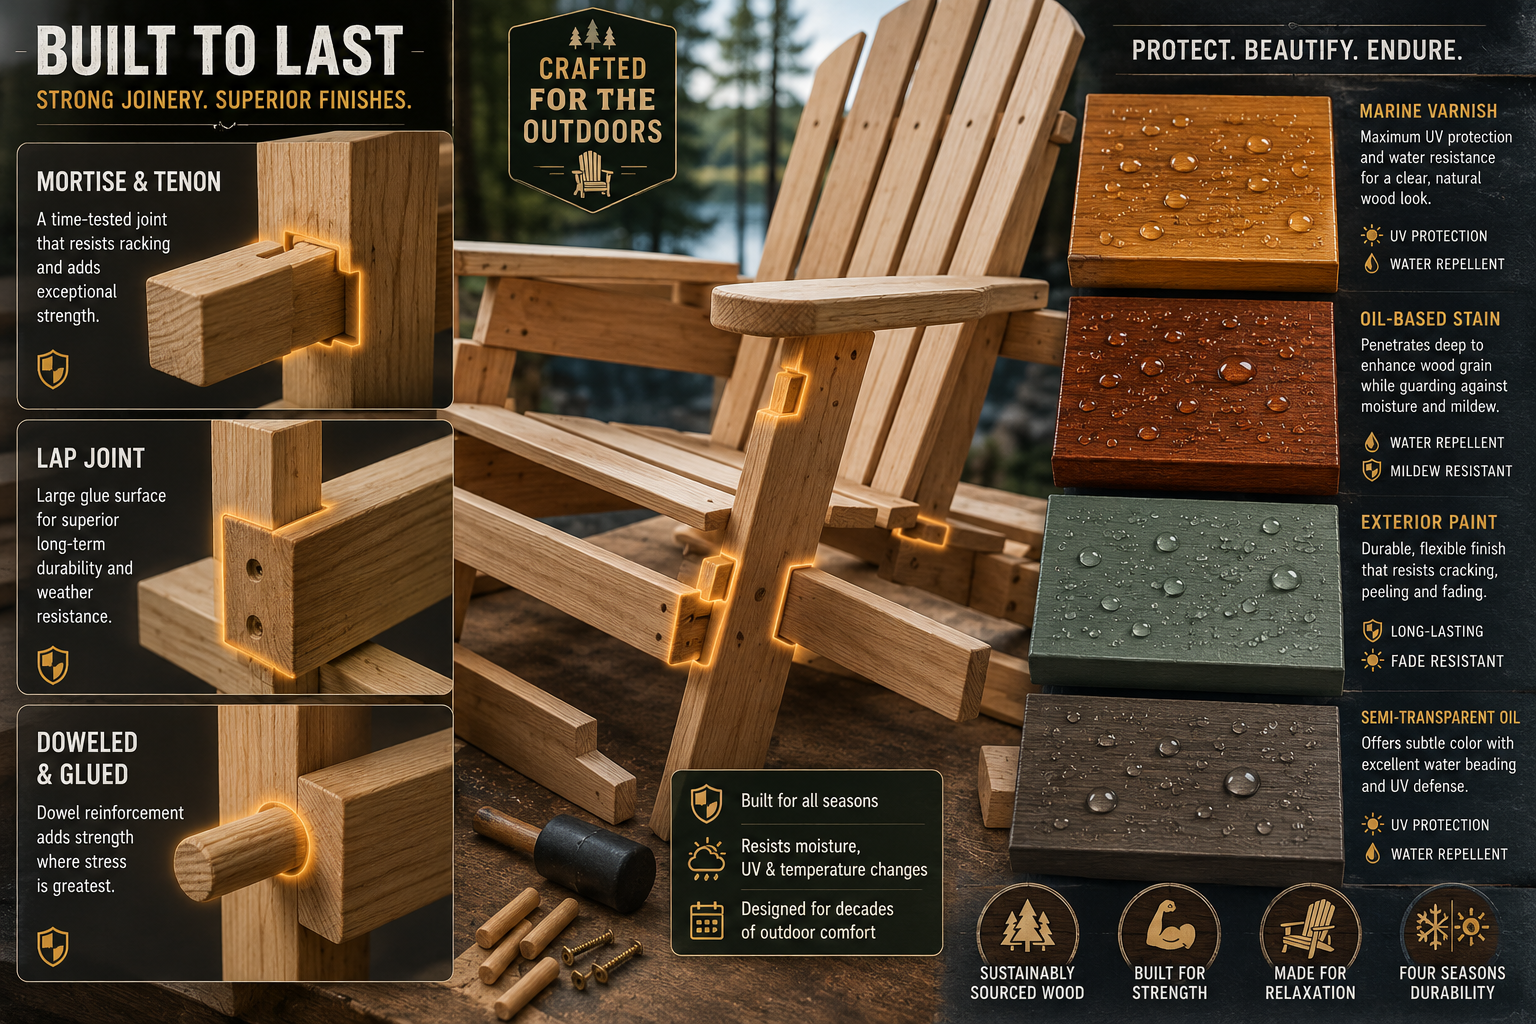
- Mortise and Tenon Joints: These are exceptionally strong and are ideal for connecting legs to rails or armrests to supports. The interlocking wood fibers create a robust bond that resists racking and provides superior stability.
- Lap Joints: Often used for connecting slats or creating strong, flat unions. A half-lap joint, for instance, offers a larger gluing surface than a simple butt joint and is less prone to breaking under stress.
- Pocket Hole Joinery: While less traditional, pocket holes offer a strong, hidden mechanical connection that can be quickly assembled. They are particularly useful for attaching seat slats or other non-load-bearing elements. Ensure to use weather-resistant pocket hole screws.
- Galvanized or Stainless Steel Fasteners: Regardless of the joint type, all screws, bolts, and hardware should be specifically designed for outdoor use to prevent rust and staining.
Proper application of waterproof wood glue designed for exterior use is critical for all glued joints. Clamping techniques also play a vital role, ensuring tight, strong bonds as the glue cures. For more on precision woodworking, exploring topics like mastering the router table can provide insights into creating accurate joints.

Long-Lasting Finishing Techniques
A well-applied finish protects the wood from UV radiation, moisture, and biological degradation (mold, mildew, insects), while also enhancing its natural beauty.
- Sanding: Begin with thorough sanding. Start with a coarser grit (80-100) to remove milling marks and gradually move to finer grits (150-220) for a smooth surface. This creates a uniform base for the finish to adhere to.
- Cleaning: After sanding, remove all dust and debris. A tack cloth or compressed air works well. Any residual dust will compromise the finish’s adhesion and appearance.
- Pre-Treatment (Optional but Recommended): For woods like cedar or redwood, a wood conditioner or preservative can offer an extra layer of protection, especially against rot and insect infestation.
- Application of Outdoor Finish:
- Oil-Based Stains/Finishes: Penetrate the wood, providing a natural look and protection. They need reapplication every 1-2 years. Tung oil or linseed oil blends with UV inhibitors are excellent choices.
- Exterior Paints: Offer the most robust protection and allow for color customization. Use high-quality exterior-grade primers and paints. Multiple thin coats are better than one thick coat.
- Marine Varnishes/Polyurethanes: Create a durable film on the surface, offering excellent water and UV resistance. These typically last longer than oils but can crack or peel if not maintained.
Apply finishes in a well-ventilated area, following manufacturer instructions for application and drying times. Multiple thin coats are always superior to one thick coat, providing better durability and a smoother finish. For further insights into wood finishing, explore various unique wood finishing techniques to find the perfect look for your chairs.
Regular maintenance, such as cleaning and reapplication of finish as needed, will significantly extend the lifespan of your Adirondack chairs, ensuring they remain comfortable and beautiful for many years to come. This careful attention to detail elevates a simple piece of outdoor furniture into a lasting investment in comfort and style.
Conclusion
Building Adirondack Chairs: Ergonomic Design and Efficient Production for Outdoor Comfort is a rewarding endeavor that combines craftsmanship with a deep understanding of user experience. By meticulously adhering to ergonomic principles for seat, back, and armrest angles, selecting appropriate weather-resistant materials, and employing efficient production techniques, woodworkers can create chairs that are not only visually appealing but also offer unparalleled comfort and durability for years of outdoor enjoyment. Robust joinery and high-quality exterior finishes are the final, crucial steps in ensuring these iconic chairs withstand the elements while maintaining their charm. Investing time in careful planning and execution will result in beautifully crafted Adirondack chairs that truly embody the essence of outdoor relaxation.
Actionable Next Steps
- Draft a Design Plan: Start by drawing a full-scale plan or using existing blueprints, customizing dimensions for your target users and desired aesthetic.
- Source Quality Materials: Select a weather-resistant wood species and ensure you have all necessary stainless steel fasteners and exterior-grade glues.
- Create Templates: Develop precise templates for all chair components to streamline cutting and ensure consistency.
- Practice Joinery: If new to mortise and tenon or lap joints, practice on scrap wood before cutting your final pieces.
- Plan Your Finishing Process: Research and choose an appropriate outdoor finish, considering the wood type and desired maintenance level, then prepare your workspace for application.
Meta Title: Building Adirondack Chairs: Ergonomics, Production & Outdoor Comfort Meta Description: Master building Adirondack chairs with ergonomic design principles, efficient production techniques, and durable finishes for lasting outdoor comfort in 2026.
