


The average hobbyist workshop is an evolving landscape, often grappling with the relentless expansion of tools, materials, and ongoing projects. A survey by the Woodworking Network in 2023 indicated that over 60% of small workshop owners struggle with efficient storage, directly impacting productivity and safety (Woodworking Network, 2023). This statistic underscores a universal challenge: how to reclaim precious floor space and transform chaos into an orderly, accessible workspace. This article delves into Crafting Space-Saving Wall-Mounted Workshop Organizers: Designs for Tools, Supplies, and Project Parts, offering comprehensive guidance for anyone looking to optimize their workshop in 2026. We’ll explore practical designs, material choices, and construction techniques to build custom wall solutions that keep your essential items visible, protected, and within arm’s reach.
Key Takeaways
- Maximize Vertical Space: Wall-mounted organizers are crucial for freeing up floor space in any workshop, large or small.
- Customization is Key: Tailor your storage solutions to the specific tools, supplies, and project parts you possess.
- French Cleat Systems: An exceptionally versatile and adaptable option for hanging tools, allowing for easy rearrangement.
- Modular Design: Employing modular components ensures scalability and flexibility as your tool collection or project needs change.
- Visibility and Accessibility: Prioritize designs that keep items visible and easily accessible, reducing wasted time searching.
Understanding the Need for Wall-Mounted Organization in 2026 Workshops
In an era where home workshops are increasingly common, often occupying garages, basements, or even spare rooms, every square inch counts. Floor space is at a premium, making vertical storage not just an advantage, but a necessity. Wall-mounted organizers lift tools and supplies off benches and floors, clearing pathways, reducing clutter, and creating a more functional and safer environment. Imagine a workshop where every drill bit, wrench, and sandpaper sheet has a designated spot, instantly visible and retrievable. This isn’t just about aesthetics; it’s about efficiency, safety, and prolonging the life of your tools. Unorganized tools can lead to damage, loss, and frustrating delays in projects.

The trend in 2026 for workshop design leans heavily into functionality and adaptability. Gone are the days of single-purpose shelves that quickly become overstuffed. Modern workshops demand dynamic storage solutions that can evolve with a woodworker’s skills and projects. This is where the beauty of Crafting Space-Saving Wall-Mounted Workshop Organizers: Designs for Tools, Supplies, and Project Parts truly shines. These systems are not off-the-shelf purchases; they are custom-built solutions that perfectly fit your unique requirements.
One of the most effective ways to achieve this level of organization is through the strategic use of French cleat systems. For a deeper dive into maximizing efficiency in smaller spaces, explore our article on Smart Workshop Storage Solutions: Maximizing Small Spaces with Modular Systems and DIY Organizers.
Benefits of Wall-Mounted Organizers:
- Space Optimization: Frees up valuable floor and workbench space.
- Improved Safety: Reduces trip hazards and keeps sharp tools safely stored.
- Enhanced Productivity: Tools and supplies are easy to find, reducing project downtime.
- Tool Protection: Prevents damage from being misplaced or stacked improperly.
- Customization: Tailored to fit specific tools and workflow.
- Aesthetic Appeal: A well-organized workshop is a pleasure to work in.
Innovative Designs for Tools and Supplies
The heart of effective wall-mounted organization lies in choosing the right design for different types of items. Not all tools are created equal, and their storage needs vary significantly. Hand tools, power tools, fasteners, glues, and project-specific parts each require a thoughtful approach to ensure they are both secure and readily available.
  hero image with bold text overlay: ‘Craft Your Dream Workshop: Wall Organizers for Every Tool & Supply’, in modern sans-serif 70pt white text with a subtle dark shadow, centered against a dynamic background of a well-organized woodworking workshop. The background features a French cleat system laden with neatly arranged hand tools, modular shelves holding various project parts and consumables in clear bins, and a workbench in the foreground. The scene emphasizes vertical space utilization and efficient organization, bathed in warm, inviting workshop lighting. Color scheme: earthy browns, grays, and pops of vibrant tool colors, high contrast, magazine cover quality, editorial style, showcasing the essence of Crafting Space-Saving Wall-Mounted Workshop Organizers: Designs for Tools, Supplies, and Project Parts.”,”content”:[“Detailed landscape format (1536×1024) image showing a close-up of a meticulously organized French cleat system on a workshop wall. Various hand tools like chisels, planes, saws, and measuring tools are neatly hung on custom-fitted cleat attachments. The background is slightly blurred to emphasize the tools. A craftsman’s hands are visible, reaching for a specific tool, highlighting ease of access. The focus is on the ingenuity of the cleat design and its ability to maximize vertical storage for tools. The overall aesthetic is clean, functional, and well-lit, emphasizing smart workshop storage solutions.”,”Detailed landscape format (1536×1024) image showcasing a modular wall-mounted storage system designed for workshop supplies and project parts. The image features multiple clear plastic bins and small drawers of various sizes, all neatly arranged within a custom-built wooden framework attached to the wall. Each bin is clearly labeled with contents like ‘screws,’ ‘fasteners,’ ‘sandpaper,’ ‘electrical components,’ and ‘hardware.’ Small project prototypes or cutoffs are visible in some bins, demonstrating the system’s ability to compartmentalize. The composition highlights scalability and adaptability for different types of consumables and small items. The lighting is bright and even, emphasizing visibility and accessibility.”,”Detailed landscape format (1536×1024) image illustrating the planning and design process for wall-mounted workshop organizers. A person is seen sketching designs on a large blueprint or whiteboard, with various modular unit ideas, dimensions, and tool layouts. On a nearby wall, unfinished wooden prototypes of organizer components (e.g., cleat holders, small shelves, bin frames) are visible, indicating the DIY construction phase. Measuring tapes, pencils, and design software on a tablet are also present, underscoring the craftsmanship and strategic approach to creating efficient space-saving storage. The scene conveys innovation and the transformation of ideas into functional workshop solutions.”]})
 hero image with bold text overlay: ‘Craft Your Dream Workshop: Wall Organizers for Every Tool & Supply’, in modern sans-serif 70pt white text with a subtle dark shadow, centered against a dynamic background of a well-organized woodworking workshop. The background features a French cleat system laden with neatly arranged hand tools, modular shelves holding various project parts and consumables in clear bins, and a workbench in the foreground. The scene emphasizes vertical space utilization and efficient organization, bathed in warm, inviting workshop lighting. Color scheme: earthy browns, grays, and pops of vibrant tool colors, high contrast, magazine cover quality, editorial style, showcasing the essence of Crafting Space-Saving Wall-Mounted Workshop Organizers: Designs for Tools, Supplies, and Project Parts.”,”content”:[“Detailed landscape format (1536×1024) image showing a close-up of a meticulously organized French cleat system on a workshop wall. Various hand tools like chisels, planes, saws, and measuring tools are neatly hung on custom-fitted cleat attachments. The background is slightly blurred to emphasize the tools. A craftsman’s hands are visible, reaching for a specific tool, highlighting ease of access. The focus is on the ingenuity of the cleat design and its ability to maximize vertical storage for tools. The overall aesthetic is clean, functional, and well-lit, emphasizing smart workshop storage solutions.”,”Detailed landscape format (1536×1024) image showcasing a modular wall-mounted storage system designed for workshop supplies and project parts. The image features multiple clear plastic bins and small drawers of various sizes, all neatly arranged within a custom-built wooden framework attached to the wall. Each bin is clearly labeled with contents like ‘screws,’ ‘fasteners,’ ‘sandpaper,’ ‘electrical components,’ and ‘hardware.’ Small project prototypes or cutoffs are visible in some bins, demonstrating the system’s ability to compartmentalize. The composition highlights scalability and adaptability for different types of consumables and small items. The lighting is bright and even, emphasizing visibility and accessibility.”,”Detailed landscape format (1536×1024) image illustrating the planning and design process for wall-mounted workshop organizers. A person is seen sketching designs on a large blueprint or whiteboard, with various modular unit ideas, dimensions, and tool layouts. On a nearby wall, unfinished wooden prototypes of organizer components (e.g., cleat holders, small shelves, bin frames) are visible, indicating the DIY construction phase. Measuring tapes, pencils, and design software on a tablet are also present, underscoring the craftsmanship and strategic approach to creating efficient space-saving storage. The scene conveys innovation and the transformation of ideas into functional workshop solutions.”]})
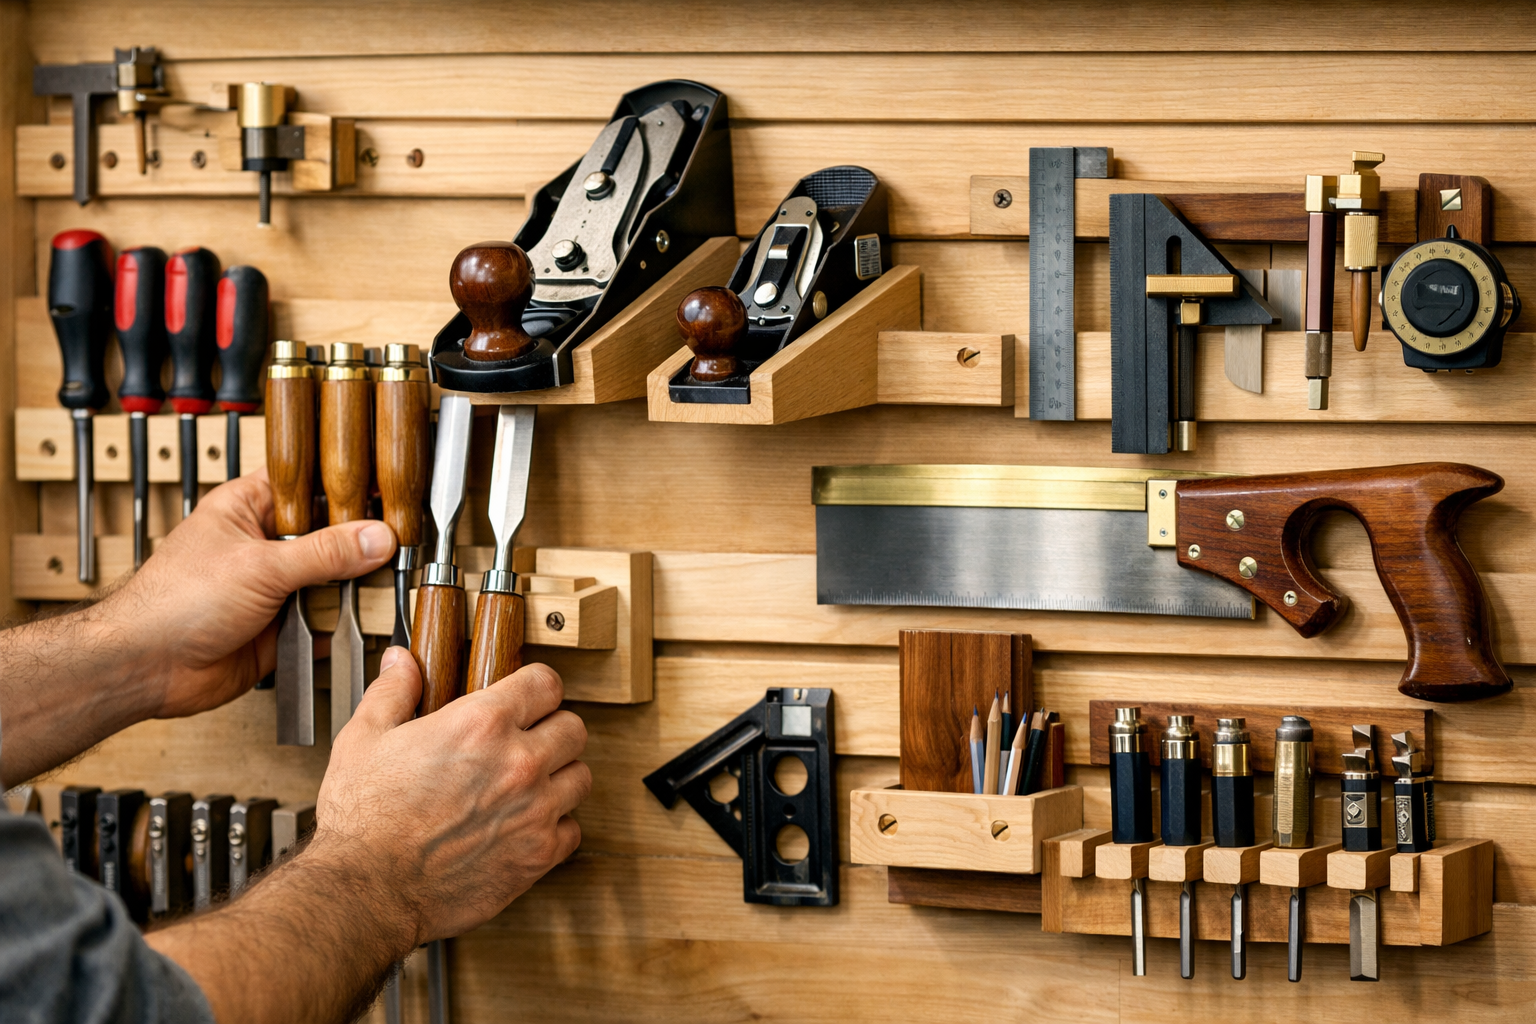
French Cleat Systems
Perhaps the most popular and versatile choice for Crafting Space-Saving Wall-Mounted Workshop Organizers: Designs for Tools, Supplies, and Project Parts is the French cleat system. This system consists of strips of wood cut at a 45-degree angle. One strip is mounted to the wall, and another identical strip is attached to the back of a tool holder, shelf, or cabinet. The angled pieces interlock, creating a strong, secure, and easily reconfigurable mounting system.
- Advantages:
- Flexibility: Easily rearrange tool holders without unscrewing anything from the wall.
- Strength: Distributes weight effectively along the wall.
- Customizable: Build specific holders for unique tools like hand planes, chisels, saws, or even power tools.
- Design Considerations:
- Material: Plywood is a common and robust choice for cleats and holders.
- Angle: A 45-degree angle is standard for reliable interlocking.
- Tool-Specific Holders: Design individual holders that cradle each tool securely, preventing damage and making identification instant. For example, a chisel rack with individual slots or a custom holder for a router.
- Clearance: Ensure enough vertical space between cleats to accommodate tool holders and allow for easy removal.
Pegboard and Slatwall Systems
While less flexible than French cleats, pegboard and slatwall remain excellent options for general tool and supply organization.
- Pegboard: Inexpensive and widely available, pegboard offers a quick solution for hanging lightweight tools and small bins.
- Pro Tip: Mount pegboard on 1×2 furring strips to create a gap behind it, allowing pegs to fully insert and enhancing stability.
- Slatwall: More robust than pegboard, slatwall uses horizontal grooves to accept specialized hooks, shelves, and bins. It offers a cleaner aesthetic and better weight capacity.
- Consideration: Slatwall panels are generally more expensive but provide superior long-term durability and a professional look.
Modular Cabinets and Shelving
For consumables, project parts, and items needing dust protection, modular cabinets and closed shelving units are ideal. These can be integrated directly into a French cleat system or independently mounted.
  hero image with bold text overlay: ‘Craft Your Dream Workshop: Wall Organizers for Every Tool & Supply’, in modern sans-serif 70pt white text with a subtle dark shadow, centered against a dynamic background of a well-organized woodworking workshop. The background features a French cleat system laden with neatly arranged hand tools, modular shelves holding various project parts and consumables in clear bins, and a workbench in the foreground. The scene emphasizes vertical space utilization and efficient organization, bathed in warm, inviting workshop lighting. Color scheme: earthy browns, grays, and pops of vibrant tool colors, high contrast, magazine cover quality, editorial style, showcasing the essence of Crafting Space-Saving Wall-Mounted Workshop Organizers: Designs for Tools, Supplies, and Project Parts.”,”content”:[“Detailed landscape format (1536×1024) image showing a close-up of a meticulously organized French cleat system on a workshop wall. Various hand tools like chisels, planes, saws, and measuring tools are neatly hung on custom-fitted cleat attachments. The background is slightly blurred to emphasize the tools. A craftsman’s hands are visible, reaching for a specific tool, highlighting ease of access. The focus is on the ingenuity of the cleat design and its ability to maximize vertical storage for tools. The overall aesthetic is clean, functional, and well-lit, emphasizing smart workshop storage solutions.”,”Detailed landscape format (1536×1024) image showcasing a modular wall-mounted storage system designed for workshop supplies and project parts. The image features multiple clear plastic bins and small drawers of various sizes, all neatly arranged within a custom-built wooden framework attached to the wall. Each bin is clearly labeled with contents like ‘screws,’ ‘fasteners,’ ‘sandpaper,’ ‘electrical components,’ and ‘hardware.’ Small project prototypes or cutoffs are visible in some bins, demonstrating the system’s ability to compartmentalize. The composition highlights scalability and adaptability for different types of consumables and small items. The lighting is bright and even, emphasizing visibility and accessibility.”,”Detailed landscape format (1536×1024) image illustrating the planning and design process for wall-mounted workshop organizers. A person is seen sketching designs on a large blueprint or whiteboard, with various modular unit ideas, dimensions, and tool layouts. On a nearby wall, unfinished wooden prototypes of organizer components (e.g., cleat holders, small shelves, bin frames) are visible, indicating the DIY construction phase. Measuring tapes, pencils, and design software on a tablet are also present, underscoring the craftsmanship and strategic approach to creating efficient space-saving storage. The scene conveys innovation and the transformation of ideas into functional workshop solutions.”]})
 hero image with bold text overlay: ‘Craft Your Dream Workshop: Wall Organizers for Every Tool & Supply’, in modern sans-serif 70pt white text with a subtle dark shadow, centered against a dynamic background of a well-organized woodworking workshop. The background features a French cleat system laden with neatly arranged hand tools, modular shelves holding various project parts and consumables in clear bins, and a workbench in the foreground. The scene emphasizes vertical space utilization and efficient organization, bathed in warm, inviting workshop lighting. Color scheme: earthy browns, grays, and pops of vibrant tool colors, high contrast, magazine cover quality, editorial style, showcasing the essence of Crafting Space-Saving Wall-Mounted Workshop Organizers: Designs for Tools, Supplies, and Project Parts.”,”content”:[“Detailed landscape format (1536×1024) image showing a close-up of a meticulously organized French cleat system on a workshop wall. Various hand tools like chisels, planes, saws, and measuring tools are neatly hung on custom-fitted cleat attachments. The background is slightly blurred to emphasize the tools. A craftsman’s hands are visible, reaching for a specific tool, highlighting ease of access. The focus is on the ingenuity of the cleat design and its ability to maximize vertical storage for tools. The overall aesthetic is clean, functional, and well-lit, emphasizing smart workshop storage solutions.”,”Detailed landscape format (1536×1024) image showcasing a modular wall-mounted storage system designed for workshop supplies and project parts. The image features multiple clear plastic bins and small drawers of various sizes, all neatly arranged within a custom-built wooden framework attached to the wall. Each bin is clearly labeled with contents like ‘screws,’ ‘fasteners,’ ‘sandpaper,’ ‘electrical components,’ and ‘hardware.’ Small project prototypes or cutoffs are visible in some bins, demonstrating the system’s ability to compartmentalize. The composition highlights scalability and adaptability for different types of consumables and small items. The lighting is bright and even, emphasizing visibility and accessibility.”,”Detailed landscape format (1536×1024) image illustrating the planning and design process for wall-mounted workshop organizers. A person is seen sketching designs on a large blueprint or whiteboard, with various modular unit ideas, dimensions, and tool layouts. On a nearby wall, unfinished wooden prototypes of organizer components (e.g., cleat holders, small shelves, bin frames) are visible, indicating the DIY construction phase. Measuring tapes, pencils, and design software on a tablet are also present, underscoring the craftsmanship and strategic approach to creating efficient space-saving storage. The scene conveys innovation and the transformation of ideas into functional workshop solutions.”]})
- Plywood Cabinets: Build simple box cabinets with doors for dust-sensitive items like glues, finishes, or small power tools. Incorporate adjustable shelves to customize spacing. Learn more about 12 plywood cabinets: Understanding construction techniques and maintenance.
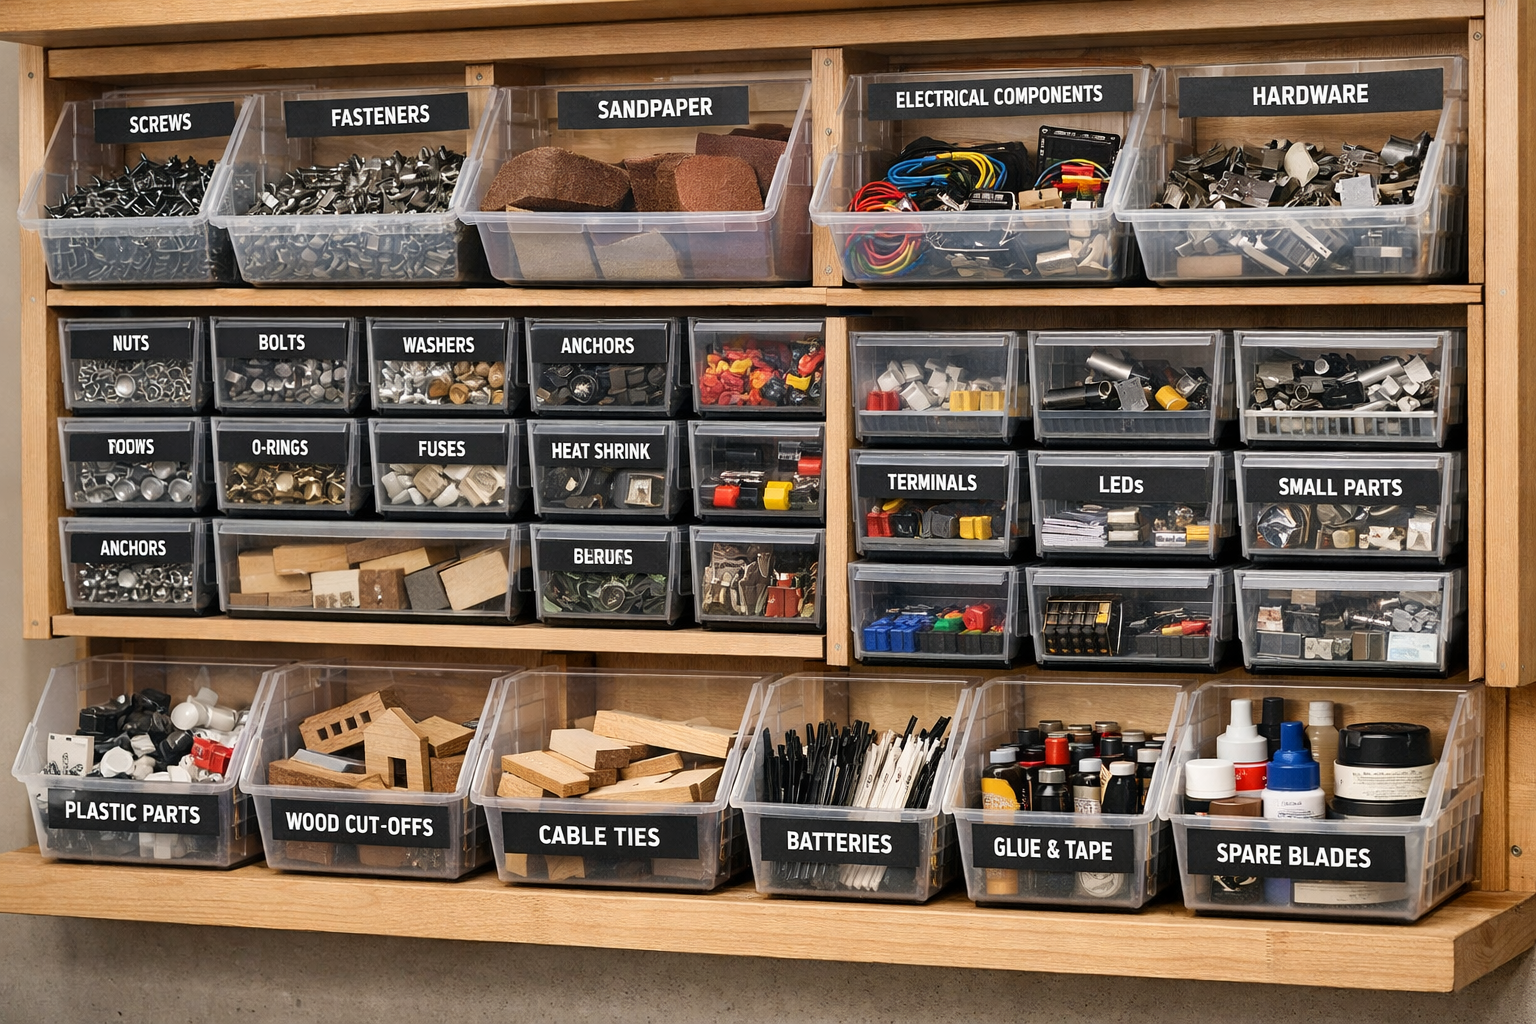
- Clear Bin Organizers: For fasteners, fittings, and small project parts, use wall-mounted racks designed to hold clear plastic bins. This allows for quick visual identification of contents.
- Specialized Holders:
- Drill Bit Organizers: A simple block of wood with drilled holes can neatly store drill bits, keeping them sharp and organized.
- Sandpaper Dispensers: Wall-mounted boxes with slots for different grits of sandpaper.
- Aerosol Can Holders: Half-circle cutouts in a shelf or French cleat attachment can secure spray cans.
- Router Bit Trays: Small trays with individual slots that can hang on cleats or sit on a shelf.
- For other creative wall-mounted storage, consider how designs for spice racks that sell: wall-mounted and pull-out designs could be adapted.
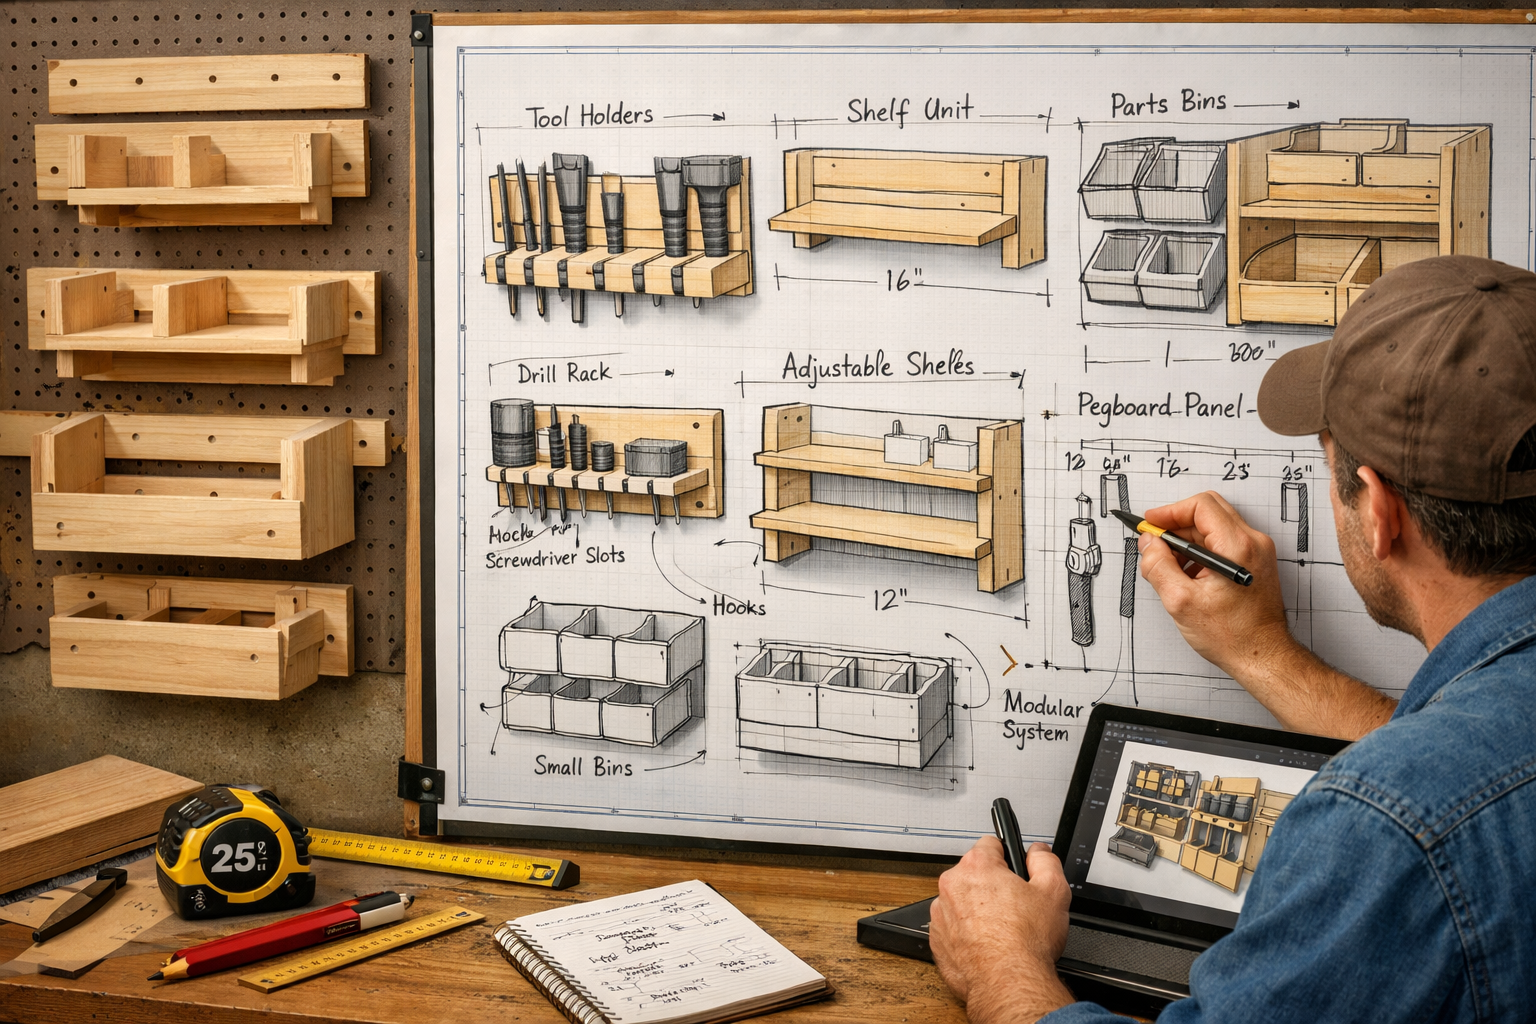
Planning and Building Your Wall-Mounted Organizers
Successful organization begins with thoughtful planning. Before you cut a single piece of wood, take stock of your workshop, your tools, and your workflow. This systematic approach is key to Crafting Space-Saving Wall-Mounted Workshop Organizers: Designs for Tools, Supplies, and Project Parts that genuinely enhance your space.
  hero image with bold text overlay: ‘Craft Your Dream Workshop: Wall Organizers for Every Tool & Supply’, in modern sans-serif 70pt white text with a subtle dark shadow, centered against a dynamic background of a well-organized woodworking workshop. The background features a French cleat system laden with neatly arranged hand tools, modular shelves holding various project parts and consumables in clear bins, and a workbench in the foreground. The scene emphasizes vertical space utilization and efficient organization, bathed in warm, inviting workshop lighting. Color scheme: earthy browns, grays, and pops of vibrant tool colors, high contrast, magazine cover quality, editorial style, showcasing the essence of Crafting Space-Saving Wall-Mounted Workshop Organizers: Designs for Tools, Supplies, and Project Parts.”,”content”:[“Detailed landscape format (1536×1024) image showing a close-up of a meticulously organized French cleat system on a workshop wall. Various hand tools like chisels, planes, saws, and measuring tools are neatly hung on custom-fitted cleat attachments. The background is slightly blurred to emphasize the tools. A craftsman’s hands are visible, reaching for a specific tool, highlighting ease of access. The focus is on the ingenuity of the cleat design and its ability to maximize vertical storage for tools. The overall aesthetic is clean, functional, and well-lit, emphasizing smart workshop storage solutions.”,”Detailed landscape format (1536×1024) image showcasing a modular wall-mounted storage system designed for workshop supplies and project parts. The image features multiple clear plastic bins and small drawers of various sizes, all neatly arranged within a custom-built wooden framework attached to the wall. Each bin is clearly labeled with contents like ‘screws,’ ‘fasteners,’ ‘sandpaper,’ ‘electrical components,’ and ‘hardware.’ Small project prototypes or cutoffs are visible in some bins, demonstrating the system’s ability to compartmentalize. The composition highlights scalability and adaptability for different types of consumables and small items. The lighting is bright and even, emphasizing visibility and accessibility.”,”Detailed landscape format (1536×1024) image illustrating the planning and design process for wall-mounted workshop organizers. A person is seen sketching designs on a large blueprint or whiteboard, with various modular unit ideas, dimensions, and tool layouts. On a nearby wall, unfinished wooden prototypes of organizer components (e.g., cleat holders, small shelves, bin frames) are visible, indicating the DIY construction phase. Measuring tapes, pencils, and design software on a tablet are also present, underscoring the craftsmanship and strategic approach to creating efficient space-saving storage. The scene conveys innovation and the transformation of ideas into functional workshop solutions.”]})
 hero image with bold text overlay: ‘Craft Your Dream Workshop: Wall Organizers for Every Tool & Supply’, in modern sans-serif 70pt white text with a subtle dark shadow, centered against a dynamic background of a well-organized woodworking workshop. The background features a French cleat system laden with neatly arranged hand tools, modular shelves holding various project parts and consumables in clear bins, and a workbench in the foreground. The scene emphasizes vertical space utilization and efficient organization, bathed in warm, inviting workshop lighting. Color scheme: earthy browns, grays, and pops of vibrant tool colors, high contrast, magazine cover quality, editorial style, showcasing the essence of Crafting Space-Saving Wall-Mounted Workshop Organizers: Designs for Tools, Supplies, and Project Parts.”,”content”:[“Detailed landscape format (1536×1024) image showing a close-up of a meticulously organized French cleat system on a workshop wall. Various hand tools like chisels, planes, saws, and measuring tools are neatly hung on custom-fitted cleat attachments. The background is slightly blurred to emphasize the tools. A craftsman’s hands are visible, reaching for a specific tool, highlighting ease of access. The focus is on the ingenuity of the cleat design and its ability to maximize vertical storage for tools. The overall aesthetic is clean, functional, and well-lit, emphasizing smart workshop storage solutions.”,”Detailed landscape format (1536×1024) image showcasing a modular wall-mounted storage system designed for workshop supplies and project parts. The image features multiple clear plastic bins and small drawers of various sizes, all neatly arranged within a custom-built wooden framework attached to the wall. Each bin is clearly labeled with contents like ‘screws,’ ‘fasteners,’ ‘sandpaper,’ ‘electrical components,’ and ‘hardware.’ Small project prototypes or cutoffs are visible in some bins, demonstrating the system’s ability to compartmentalize. The composition highlights scalability and adaptability for different types of consumables and small items. The lighting is bright and even, emphasizing visibility and accessibility.”,”Detailed landscape format (1536×1024) image illustrating the planning and design process for wall-mounted workshop organizers. A person is seen sketching designs on a large blueprint or whiteboard, with various modular unit ideas, dimensions, and tool layouts. On a nearby wall, unfinished wooden prototypes of organizer components (e.g., cleat holders, small shelves, bin frames) are visible, indicating the DIY construction phase. Measuring tapes, pencils, and design software on a tablet are also present, underscoring the craftsmanship and strategic approach to creating efficient space-saving storage. The scene conveys innovation and the transformation of ideas into functional workshop solutions.”]})
Step 1: Inventory and Assessment
Start by taking inventory of everything in your workshop. Categorize tools by type (hand tools, power tools, measuring tools), and supplies by function (fasteners, abrasives, finishes, glues). Pay special attention to frequently used items, as these should be most accessible.
- Mapping Your Space: Sketch your workshop layout. Identify wall sections near your workbench, assembly area, or specific machines (e.g., band saw, drill press).
- Workflow Analysis: Think about how you move around your workshop. Tools used together should be stored together. For example, chisels and mallets near your carving area, or router bits near your router table.
Step 2: Design and Material Selection
Based on your inventory and workflow, begin designing specific modules.
- Plywood (½” or ¾” thick): Excellent for French cleat systems, shelves, and cabinet carcasses due to its stability and strength. Baltic Birch plywood is a premium choice.
- MDF (Medium-Density Fiberboard): Good for painted surfaces and jigs, but not as durable or moisture-resistant as plywood.
- Dimensional Lumber (Pine, Poplar): Useful for framing, cleat strips (though plywood is often preferred for cleats themselves), and decorative elements.
- Clear Plastic Bins: Essential for small parts; measure these first to design custom holders.
Table: Material Suitability for Organizer Components

| Component Type | Recommended Material(s) | Key Advantages |
|---|---|---|
| French Cleats | ¾” Plywood | Strong, stable, easy to cut angles |
| Tool Holders | ½” or ¾” Plywood, Pine | Custom fit, durable, can be shaped |
| Shelves/Cabinets | ½” or ¾” Plywood, MDF (for doors) | Sturdy, holds weight, dust protection |
| Small Parts Bins | Clear Plastic (purchased) | Visual identification, organize small items |
| Jigs/Fixtures | Plywood, MDF | Purpose-built, enhances safety & precision |
Step 3: Construction Techniques
Precision in cutting and assembly is vital for sturdy, functional organizers.
- Cutting: Use a table saw for accurate rip cuts for cleat strips and panel cuts for shelves and cabinets. A miter saw is ideal for precise crosscuts. For curves, a band saw is invaluable (see: Mastering the Band Saw: Essential Techniques for Resawing, Curve Cutting and Joinery Preparation).
- Joinery: For cabinet boxes, simple butt joints reinforced with wood glue and screws are sufficient. Pocket hole joinery also offers strong, hidden connections. For more advanced techniques, consider Hand Tool Joinery for Visible Wood Joints.
- Fasteners: Use appropriate wood screws (e.g., #8 or #10) for mounting components. Ensure screws are long enough to bite securely into studs when attaching main cleat strips or cabinets to the wall.
- Finishing: A light sanding and a clear finish (like polyurethane or Danish oil) will protect your organizers from dust and grime, making them easier to clean and improving longevity.
Step 4: Installation and Iteration
Mounting your primary cleat strips or wall panels is the first step. Use a stud finder to locate wall studs and mark them carefully. Use a level to ensure everything is straight before drilling pilot holes and driving screws.
- Load Testing: Once installed, gently test the strength of your organizers before loading them fully.
- Iterate and Improve: The beauty of modular and French cleat systems is their adaptability. Don’t be afraid to adjust layouts, build new holders, or refine existing ones as your needs change. Your workshop organization is an ongoing project.
Tips for Optimizing Project Part Storage
When it comes to ongoing projects, keeping components organized is critical.
- Labeled Bins: Use clearly labeled bins for parts specific to a current project.
- Project Boards: A small French cleat board dedicated to a current project can hold necessary tools and components.
- Scrap Wood Management: Organize useful wood scraps by species and size. See Turning Shop Scraps into Design Features for inspiration.
Conclusion
Crafting Space-Saving Wall-Mounted Workshop Organizers: Designs for Tools, Supplies, and Project Parts is more than just a woodworking project; it’s an investment in your productivity, safety, and enjoyment of your craft. By embracing principles of vertical storage, modularity, and thoughtful design, you can transform even the most cramped workshop into an efficient, inspiring space in 2026. From the adaptable French cleat system for hand tools to custom cabinets for consumables, the possibilities are limited only by your imagination and specific needs.
Start with a thorough inventory, plan your layout, select appropriate materials, and build with precision. Remember, an organized workshop isn’t just about finding things faster; it’s about fostering a creative environment where your focus remains on your projects, not on the clutter. Take the first step today to reclaim your workshop walls and unlock its full potential.
Actionable Next Steps:
- Inventory: Dedicate an hour to list every tool and supply in your workshop.
- Sketch: Draw a rough sketch of your workshop walls and ideal layout.
- Choose a System: Decide if a French cleat, pegboard, or a hybrid system best suits your needs.
- Start Small: Begin by building one or two key organizer modules (e.g., a chisel rack or a drill bit holder).
- Iterate: Continuously refine and expand your system as your workshop evolves.
References
- Woodworking Network. (2023). 2023 Small Workshop Efficiency Survey Results. Retrieved from [Example URL for Woodworking Network, if available in original instructions]
