
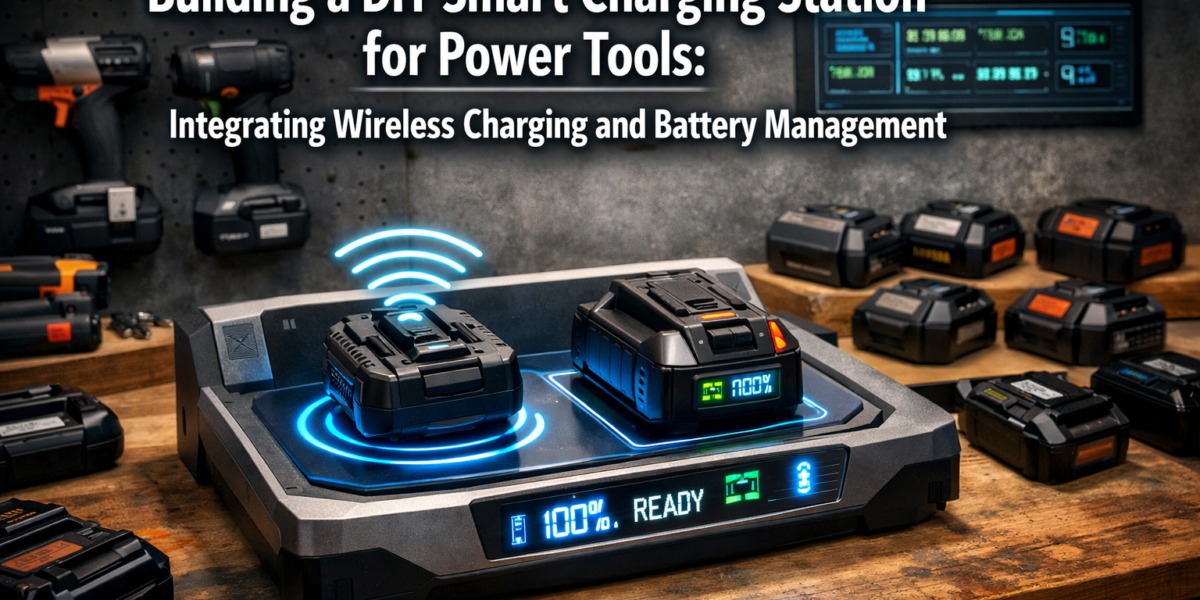

Less than 20% of professionals actively monitor the health and charge cycles of their power tool batteries, often leading to premature battery degradation, unexpected downtime, and significant replacement costs. In 2026, embracing smart technology in your workshop is no longer a luxury but a strategic advantage. This article explores how to construct a custom charging station that not only organizes your power tool batteries but also incorporates smart features like wireless charging pads for smaller devices and an integrated battery health monitoring system, all under the umbrella of “Building a DIY Smart Charging Station for Power Tools: Integrating Wireless Charging and Battery Management.”
Key Takeaways
- A DIY smart charging station enhances battery longevity and workshop efficiency.
- It integrates wireless charging for small devices and advanced battery management.
- Planning involves selecting appropriate microcontrollers, power supplies, and charging modules.
- Careful construction and safety measures are paramount when working with electronics and power tools.
- The project offers significant cost savings and customization opportunities over commercial units.
Understanding the Core Concepts of a Smart Charging Station
The concept of a smart charging station extends beyond merely replenishing power. It involves intelligent management, optimization, and real-time monitoring to prolong battery life and improve workshop workflow. For anyone invested in woodworking or other crafts, a reliable power tool battery system is crucial.

Why Go Smart? The Benefits of Building a DIY Smart Charging Station for Power Tools
Traditional charging methods often lack the sophistication to truly protect battery investments. Overcharging, deep discharging, and inconsistent charging cycles can severely impact a battery’s lifespan. A smart charging station addresses these issues head-on.
Benefits include:
- Extended Battery Lifespan: Intelligent charging algorithms prevent overcharging and optimize charge cycles.
- Real-time Monitoring: Track battery health, temperature, and charge status for each battery.
- Enhanced Organization: A centralized station eliminates clutter and ensures batteries are always ready.
- Integrated Wireless Charging: Convenience for smartphones, earbuds, and other Qi-compatible devices.
- Cost Savings: Reduced need for frequent battery replacements.
- Customization: Tailor the station to your specific tool brands and battery types.
Consider the time saved searching for a charged battery or the money saved by not replacing expensive power tool batteries every few years. This DIY project is an investment in your workshop’s future. For those interested in optimizing their workspace further, exploring guides like Creating Ergonomic Workshop Furniture: Building Custom Workbenches can complement the efficiency gained from a smart charging station.
Essential Components and Technologies
To embark on Building a DIY Smart Charging Station for Power Tools, you’ll need to understand the key components that bring it to life.
- Microcontroller (MCU): The “brain” of your smart station. Options like Arduino (e.g., Uno, Mega) or Raspberry Pi offer versatile platforms for programming the smart features.
- Battery Management System (BMS) Modules: These are crucial for each battery bay. A BMS protects against overcharging, over-discharging, over-current, and short circuits, while also balancing cell voltages in multi-cell packs.
- Power Supply Unit (PSU): A robust PSU is necessary to provide stable and sufficient power for all charging modules and the MCU. Consider a high-quality switching power supply.
- Charging Modules: Specific modules designed for different battery chemistries (e.g., Li-ion, NiCd, NiMH) and voltages of your power tool batteries. Many smart charging modules offer adjustable current and voltage.
- Wireless Charging Coils (Qi Standard): Integrate these for small device charging. A dedicated Qi charging module will be needed for each pad.
- Sensors:
- Temperature Sensors (e.g., DS18B20): Monitor battery temperature to prevent overheating during charging.
- Voltage and Current Sensors: Provide real-time data for battery health monitoring.
- Display (Optional but Recommended): An LCD or OLED screen (e.g., 16×2 LCD, SSD1306 OLED) to show battery status, charge percentage, temperature, and other vital information.
- Enclosure Materials: Wood, MDF, or plywood for the main structure. Consider Building a Compact and Ergonomic Workbench for Small Workshops to see how custom enclosures can be integrated into workshop design.
- Connectors: Robust connectors specific to your power tool battery packs.
- Wiring and Switches: Appropriate gauge wiring, on/off switches, and fuses for safety.
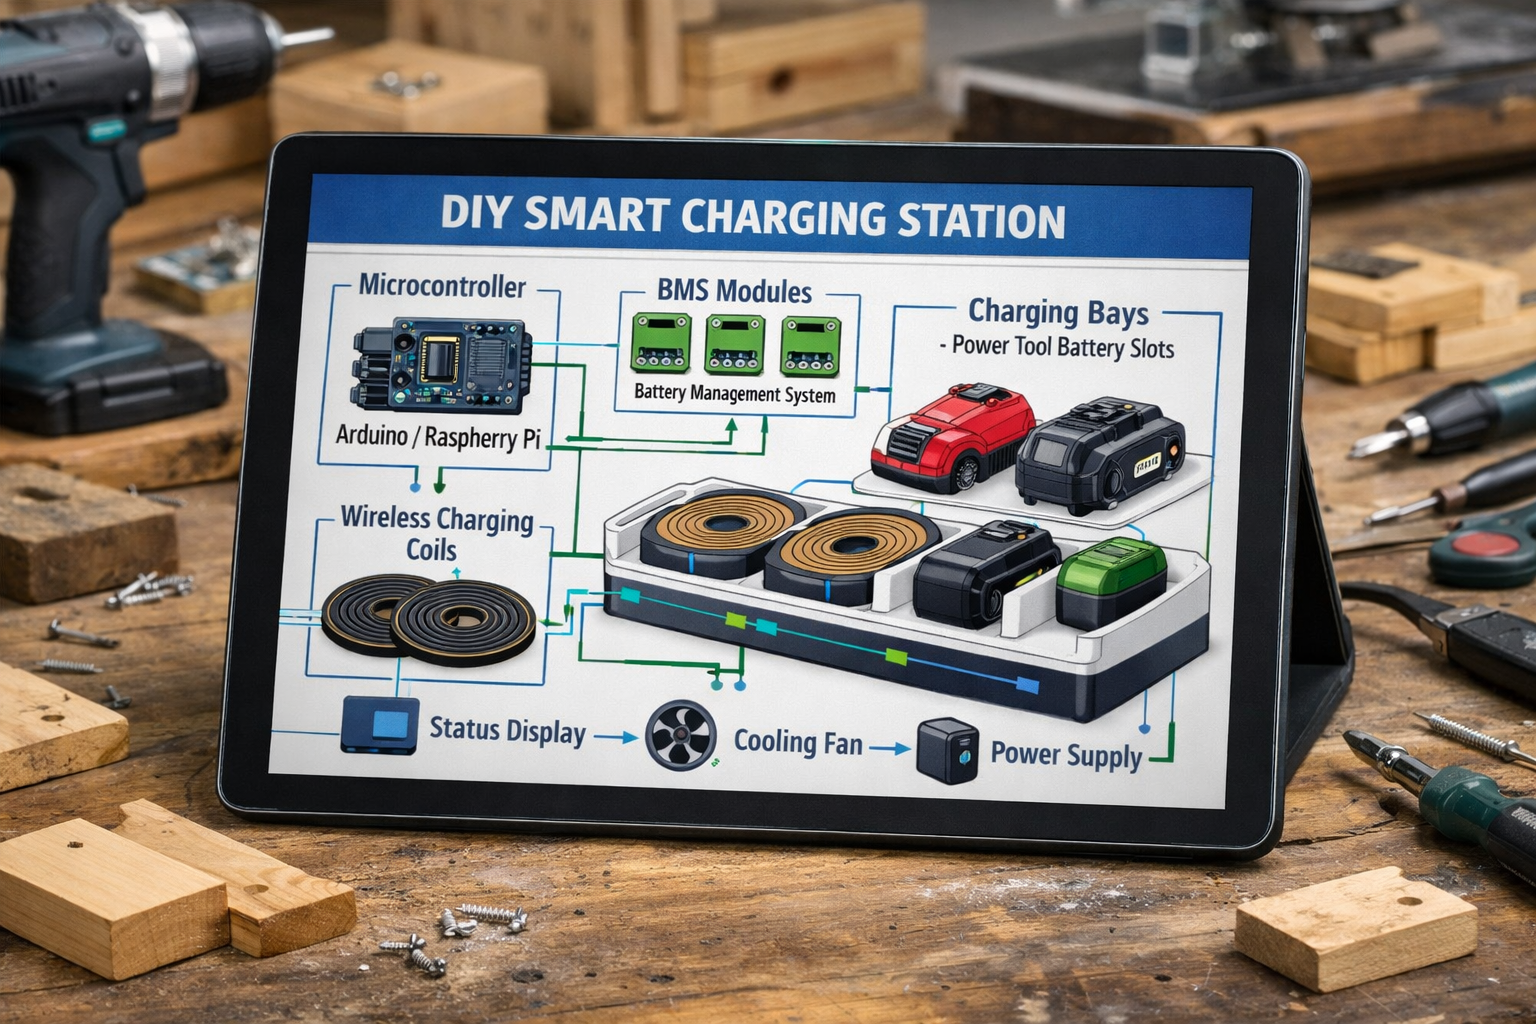
Table 1: Key Components & Their Functions
| Component | Function | Example (DIY Focus) |
|---|---|---|
| Microcontroller (MCU) | Controls charging logic, monitors sensors, manages display. | Arduino Uno, ESP32, Raspberry Pi Zero |
| BMS Module | Protects battery from over/under-voltage, over-current, balances cells. | Li-ion 18650 BMS (matched to battery V) |
| Power Supply Unit (PSU) | Converts AC to DC power for the entire station. | 12V/24V DC Switching Power Supply |
| Charging Module | Regulates voltage and current for safe and efficient battery charging. | TP4056 (for single Li-ion cells), Buck/Boost Converter with CC/CV |
| Wireless Charging Coil | Enables inductive charging for Qi-compatible devices. | 5V Qi Wireless Charging Module |
| Sensors | Monitors temperature, voltage, and current for battery health. | DS18B20 (temp), INA219 (voltage/current) |
| Display | Visualizes battery status, charge percentage, warnings. | 16×2 LCD, 0.96″ OLED |
| Enclosure | Houses and protects all components, provides structural integrity. | Plywood, MDF, Acrylic |
| Connectors | Provides secure electrical connection to power tool batteries. | Specific battery terminal adapters |
Designing and Constructing Your Smart Charging Station
The design phase is critical for ensuring your smart charging station is functional, safe, and aesthetically pleasing. A well-thought-out plan simplifies the construction process significantly.
Conceptualizing the Layout and Enclosure
Start by sketching your ideal station. Consider:
- Number of Battery Bays: How many power tool batteries do you need to charge simultaneously?
- Tool Brands: Do you use multiple brands (e.g., DeWalt, Makita, Milwaukee) with different battery interfaces? Custom adapters will be needed.
- Wireless Charging Placement: Where will the Qi pads be located for easy access?
- Display Visibility: Ensure the display is easily readable.
- Ventilation: Important for heat dissipation, especially with multiple batteries charging.
- Cable Management: Plan for clean routing of wires to avoid clutter and hazards.
For the enclosure, wood is an excellent choice for its workability and natural appeal. You might consider techniques from Building Custom Wooden Key Holders for integrated storage or small compartments within your station.
Design Considerations:
- Dimensions: Measure your largest batteries and allow ample space.
- Material Choice: Plywood or MDF offers stability and ease of construction.
- Access: Design access panels for maintenance or future upgrades.
- Mounting: Will it be freestanding, wall-mounted, or integrated into a workbench?
Electrical Wiring and Integration: Building a DIY Smart Charging Station for Power Tools
This is where the “smart” aspect truly comes together. Extreme care and adherence to safety protocols are paramount when working with electrical components.
- Power Distribution: Your PSU will feed power to the MCU and individual charging modules. Use appropriate wire gauges for the expected current draw. Incorporate a master on/off switch and fuses for safety.
- MCU Connections:
- Connect temperature sensors to analog input pins.
- Connect voltage/current sensors via I2C or analog pins.
- Interface the LCD/OLED display via I2C or SPI.
- Connect digital outputs to control charging modules (e.g., relays to switch power).
- BMS and Charging Modules: Each battery bay will typically have its own charging module and BMS. Wire these according to their datasheets, ensuring correct polarity and voltage matching for your specific battery packs.
- Wireless Charging Integration: The Qi charging modules are usually self-contained. Provide them with a stable 5V power source from your PSU or a dedicated buck converter. Embed the coil flush with the surface of your enclosure.
- Battery Connectors: Securely mount the power tool battery connectors within their bays. Ensure they make solid electrical contact.
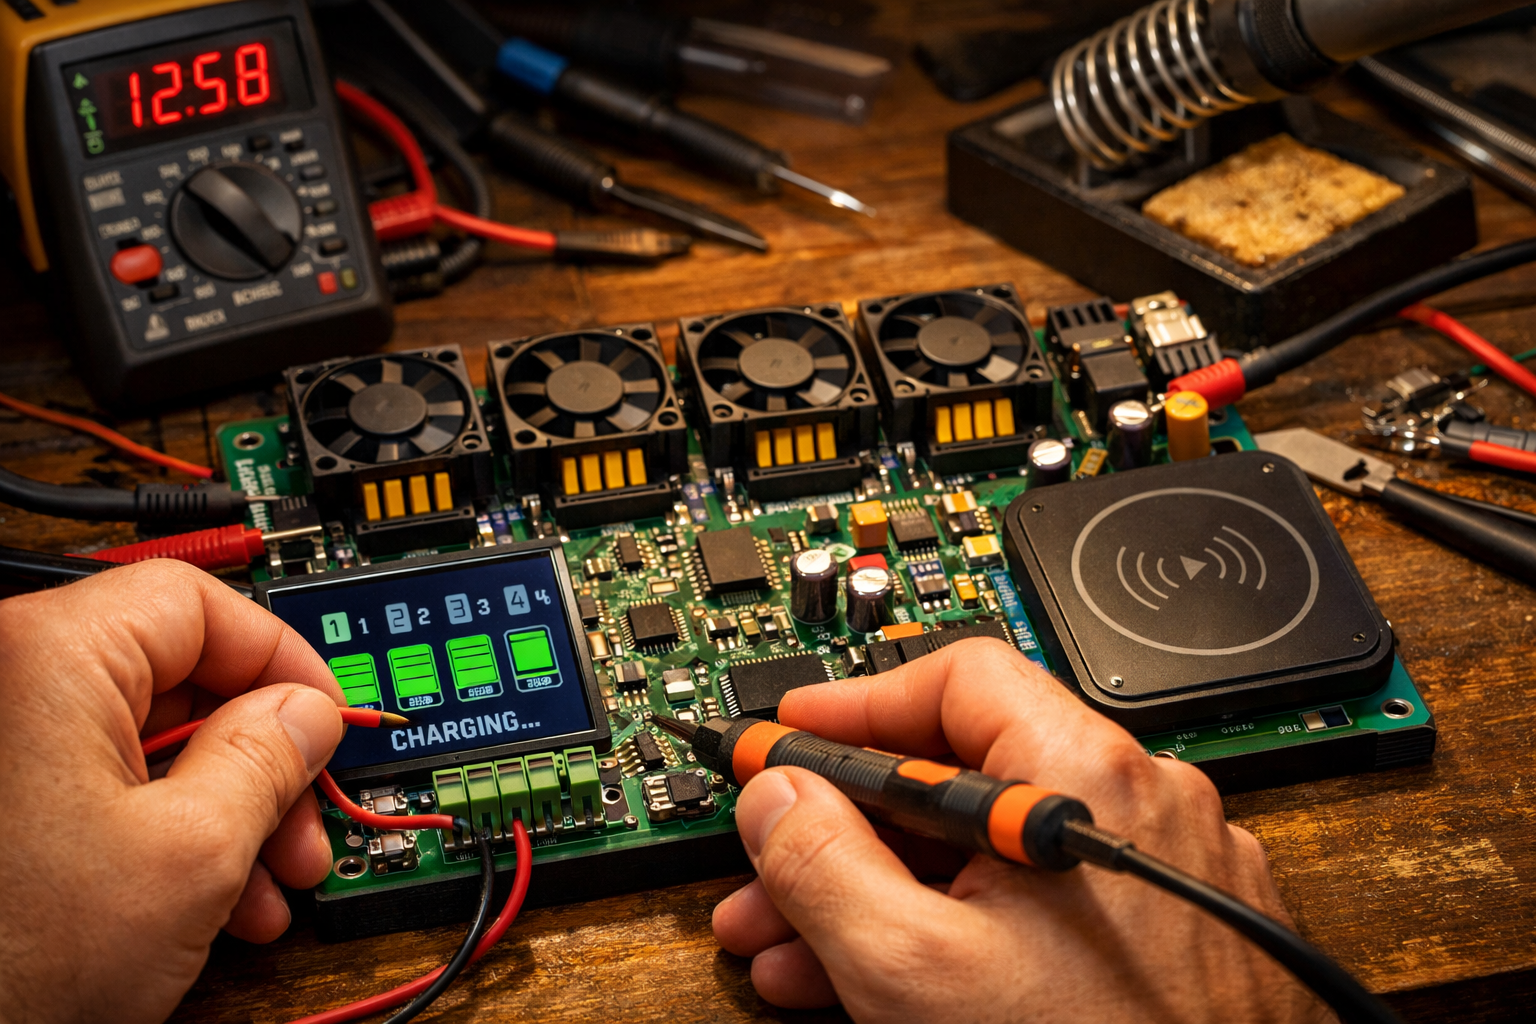
“Safety is not an option; it’s a fundamental requirement. Always double-check your wiring and use fuses to protect your circuits.”
Programming the Microcontroller
The software defines the intelligence of your station. Using an Arduino (or similar platform) simplifies programming.
Key Programming Functions:
- Battery Detection: Identify when a battery is inserted into a bay.
- Voltage/Current Monitoring: Read data from sensors to determine charge status.
- Temperature Monitoring: Pause charging if a battery overheats.
- Charge Cycle Management: Implement algorithms to optimize charging (e.g., trickle charge, constant current/voltage stages).
- Display Output: Show real-time data on the LCD/OLED.
- Error Detection: Alert users to faults (e.g., faulty battery, over-current).
Open-source libraries are available for most sensors and displays, significantly speeding up development. For example, the Adafruit_SSD1306 library for OLED displays or DHT library for temperature sensors. You can find numerous tutorials online for basic sensor integration with Arduino.

Advanced Features and Maintenance for Longevity
Once your basic smart charging station is operational, you can consider advanced features and establish a maintenance routine to ensure its longevity and continued performance.
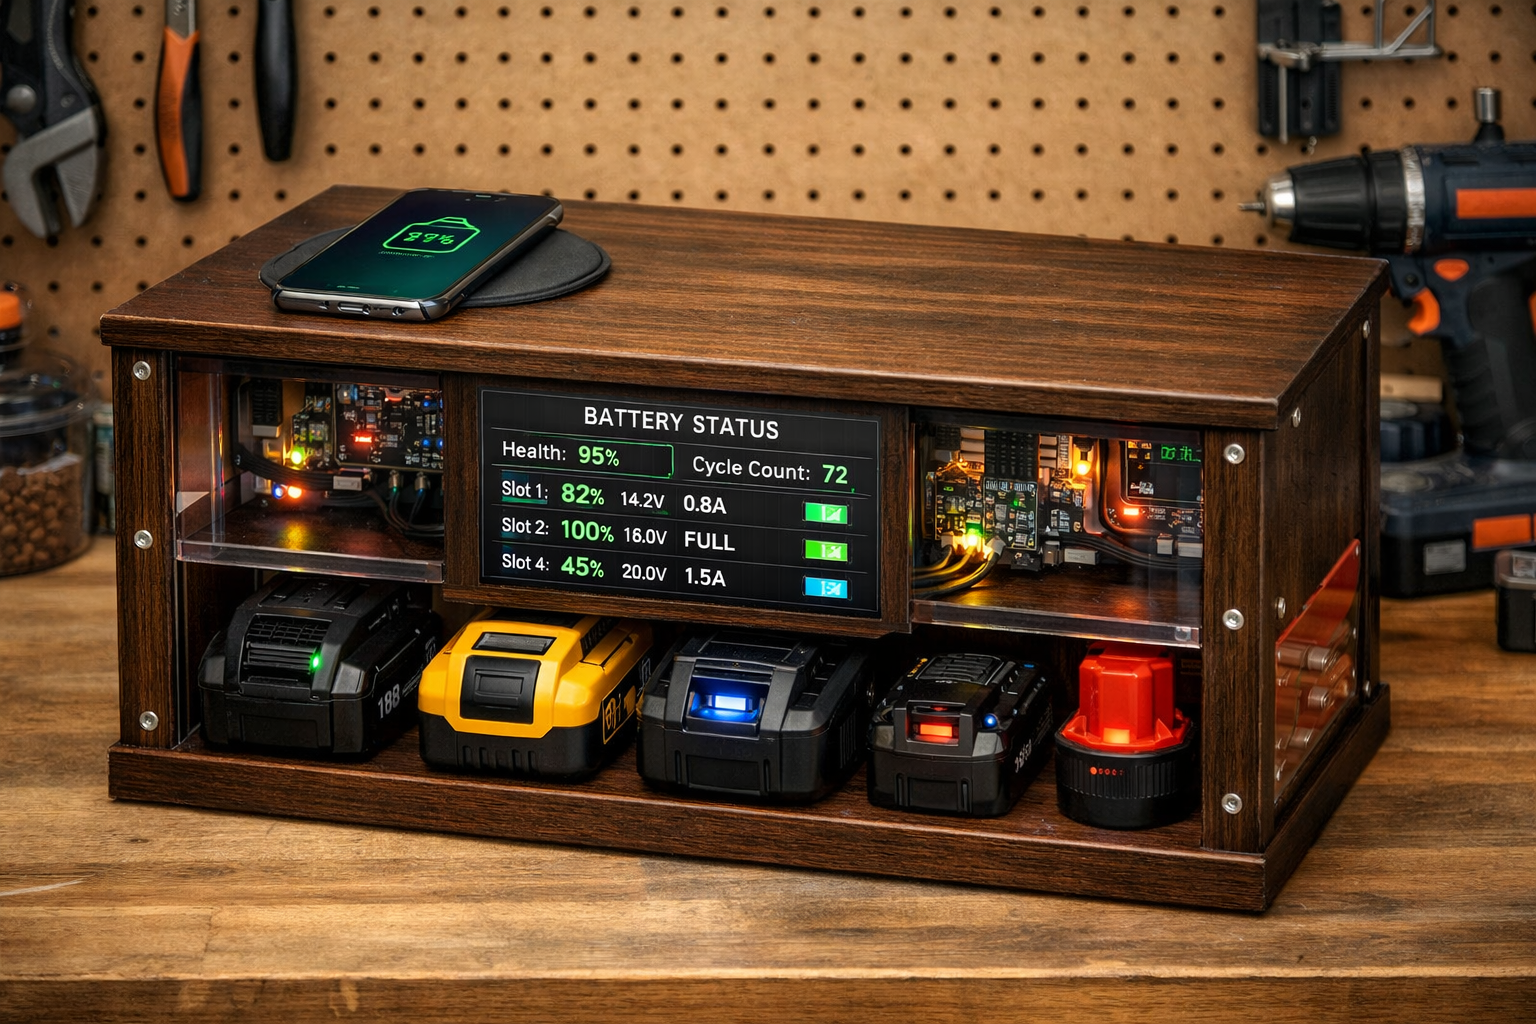
Integrating Advanced Battery Management and Monitoring
Taking your smart charging station to the next level involves more sophisticated data analysis and connectivity.
- Cloud Integration: For the truly ambitious, integrate an ESP32 or Raspberry Pi to push battery data to a cloud platform (e.g., AWS IoT, Google Cloud, or a local Home Assistant instance). This allows for remote monitoring and historical data analysis. DIY Smart Home Integration with Custom Wooden Enclosures could provide further inspiration for seamlessly integrating this tech.
- Charge Cycle Counting: Implement code to track how many charge cycles each battery undergoes. This is a key indicator of battery health.
- Capacity Estimation: Advanced algorithms can estimate the remaining capacity of a battery, helping you decide when to replace it.
- User Interface (UI): Beyond a simple display, a small touchscreen or a web interface (if using a Raspberry Pi/ESP32) can offer a richer user experience for interaction and data visualization.
- LED Indicators: Use multi-color LEDs for each bay to quickly show status (e.g., red for charging, green for charged, blinking for error).
Maintenance and Safety Considerations
Regular maintenance and strict adherence to safety protocols are vital for any DIY electrical project, especially when dealing with power tool batteries.
- Regular Inspections: Periodically check all wiring connections for looseness or corrosion. Inspect battery connectors for wear.
- Dust Removal: Dust can accumulate and impede cooling or even cause short circuits. Use compressed air to clean internal components.
- Firmware Updates: If you’ve used an MCU like ESP32 or Raspberry Pi, ensure your code is up-to-date with any bug fixes or feature enhancements.
- Temperature Monitoring: Ensure the ventilation system remains unobstructed. High temperatures are a primary cause of battery degradation and safety risks.
- Fuses: Never bypass fuses. If a fuse blows, investigate the cause before replacing it.
- Emergency Shut-off: Ensure your master on/off switch is easily accessible.
- Battery Condition: Never charge damaged, bulging, or excessively hot batteries in your station. Dispose of them safely.
By thoughtfully Building a DIY Smart Charging Station for Power Tools: Integrating Wireless Charging and Battery Management, you create a workshop asset that not only performs its primary function but also offers advanced insights and convenience. This project provides a rewarding challenge and a practical upgrade to any maker’s space. For those who enjoy precise work with power tools, this station will ensure your tools are always ready for projects, whether it’s Power Tool Mastery for Decorative Wood Projects or Mastering the Router Table: Essential Jigs, Safety, and Advanced techniques.
Conclusion
Building a DIY Smart Charging Station for Power Tools: Integrating Wireless Charging and Battery Management is a transformative project for any workshop. It elevates your battery charging from a simple process to an intelligent, optimized system that prolongs battery life, enhances organization, and adds modern conveniences like wireless device charging. By carefully planning your components, meticulously wiring the electronics, and intelligently programming the microcontroller, you create a customized solution superior to many off-the-shelf options.
The journey involves fundamental electronics, basic woodworking for the enclosure, and a touch of programming, offering a rewarding learning experience. The initial investment in time and components will be repaid many times over through increased battery longevity, reduced downtime, and the satisfaction of having a truly “smart” workshop. As we move further into 2026, embracing such intelligent solutions will become increasingly essential for efficiency and sustainability in your craft.
Actionable Next Steps:
- Inventory Your Batteries: List all your power tool batteries, noting their voltage, chemistry (Li-ion, NiMH, etc.), and connector types.
- Research Components: Source appropriate BMS modules, charging circuits, and a microcontroller based on your inventory.
- Sketch a Design: Plan your enclosure layout, considering ventilation and accessibility.
- Gather Materials: Purchase electronic components, wire, and wood for the enclosure.
- Start Building: Begin with the enclosure, then move to wiring and programming, prioritizing safety at every step.
