

An estimated 70% of households in 2026 report daily frustration with tangled charging cables and scattered electronic devices. This pervasive digital clutter not only detracts from the aesthetics of our living and workspaces but can also reduce productivity and increase stress. The solution doesn’t lie in more plastic organizers, but in embracing the timeless elegance and inherent functionality of wood to create custom DIY Charging Stations and Device Organizers: Elegant Wooden Solutions for Clutter-Free Tech Spaces. This article will guide you through crafting beautiful, practical wooden organizers that seamlessly integrate technology into your home or office, making chaos a thing of the past.
Key Takeaways
- Customization is Key: Tailor your wooden charging station and device organizer to your specific tech, space, and aesthetic preferences.
- Integrated Cable Management: Design solutions that hide cables, prevent tangles, and centralize power, creating a truly clutter-free environment.
- Material Selection Matters: Choosing the right wood and finish enhances durability, appearance, and overall project success.
- Essential Tools & Techniques: Even beginners can create elegant wooden organizers with basic woodworking tools and fundamental skills.
- Beyond Charging: Expand your organizer’s functionality to include storage for pens, notebooks, and other small essentials.
The Case for Elegant Wooden Solutions for Clutter-Free Tech Spaces
In an era dominated by digital devices, the physical space around us often struggles to keep up. Phones, tablets, smartwatches, and wireless earbuds each come with their own charging cables and often vie for limited outlet space. The result is a common sight: a jumble of cords, devices sprawled across surfaces, and a general sense of disorder. While many off-the-shelf plastic organizers exist, they frequently fall short in terms of aesthetics, durability, and true customization. This is where DIY Charging Stations and Device Organizers: Elegant Wooden Solutions for Clutter-Free Tech Spaces offer a superior alternative.

Wooden organizers bring a natural warmth and sophistication that plastic cannot replicate. They are sturdy, long-lasting, and can be designed to perfectly match your existing decor, whether it’s modern minimalist, rustic farmhouse, or classic traditional. Beyond mere aesthetics, custom wooden solutions allow for meticulous planning of integrated cable management, ensuring that unsightly wires are hidden from view and devices are neatly docked while charging. This bespoke approach transforms a functional necessity into a design feature.
Why Wood is the Ideal Material
Wood offers a unique combination of advantages for crafting device organizers:
- Aesthetics: The natural grain and warmth of wood add an organic, refined touch to any space. Different wood types, from light maple to dark walnut, offer diverse visual appeals.
- Durability: Properly constructed and finished wooden organizers are exceptionally robust and can withstand daily use for years.
- Customizability: Wood is highly workable, allowing for precise cuts, custom compartments, and unique designs to fit specific devices and power strips.
- Sustainability: Sourcing wood responsibly, perhaps from local sawmills or reclaimed sources, can make your project environmentally friendly. Consider exploring “Sustainable Wood Sourcing for the Modern Woodworker” for more insights into eco-conscious choices.
- Thermal Properties: Wood is a relatively poor conductor of heat compared to metal, which can be a minor advantage in managing the minimal heat generated by charging devices.
Choosing the right wood for your project is crucial. Hardwoods like oak, walnut, cherry, and maple are excellent choices for their durability and beautiful grain. Softer woods like pine can be easier to work with for beginners but may be less resistant to dents and scratches.
Designing Your DIY Charging Stations and Device Organizers: Key Considerations
Before you even pick up a saw, thoughtful design is paramount. A successful DIY Charging Stations and Device Organizers: Elegant Wooden Solutions for Clutter-Free Tech Spaces project begins with understanding your needs and sketching out a plan.
Assessing Your Tech Ecosystem
Start by listing all the devices you intend to charge and organize. This might include:
- Smartphones (1-3 or more)
- Tablets
- Smartwatches
- Wireless earbuds
- E-readers
- Portable power banks
For each device, consider its dimensions, charging port location, and whether it requires a specific dock or simply a stable resting place. Also, account for the size of your power strip and charging adapters.
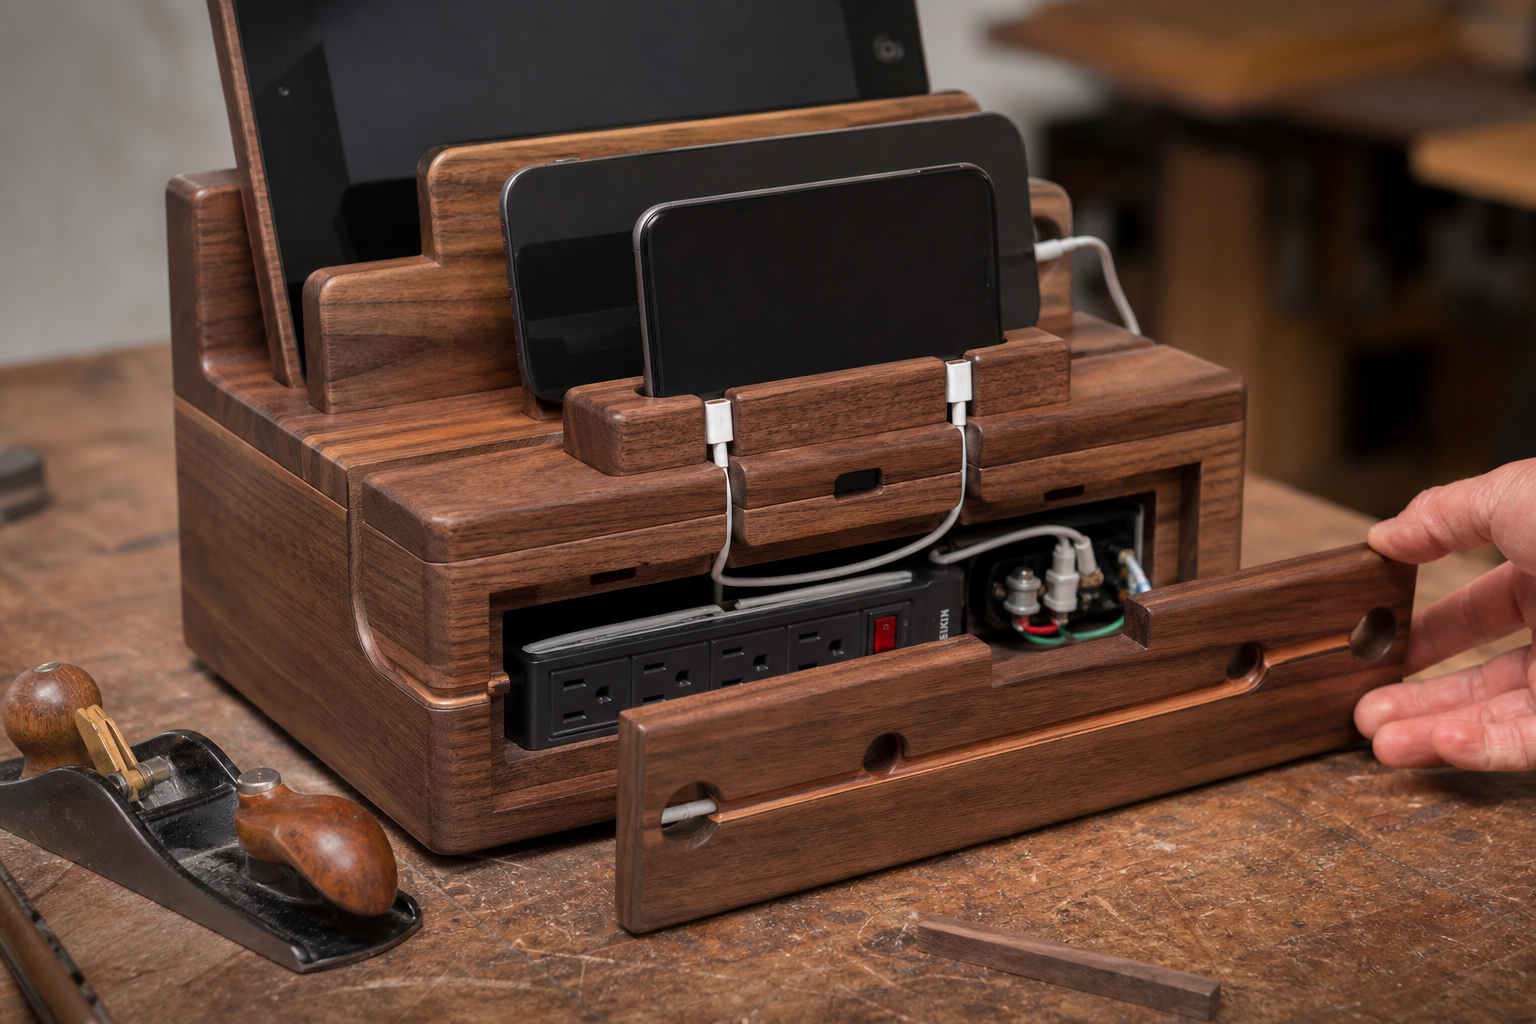
Integrated Cable Management: The Heart of Clutter-Free Design
The primary goal of any charging station is to tame cables. Your design should incorporate discreet channels, hidden compartments, and strategic openings for wires.
- Hidden Power Strip Compartment: Design a box or cavity within your organizer to house a power strip. This keeps the bulk of the cables out of sight and allows a single cord to exit the organizer and plug into the wall.
- Cable Channels and Grooves: Route individual charging cables through dados, grooves, or drilled holes that guide them from the power strip to each device. This prevents tangling and keeps the top surface clean.
- Weight or Anchor Points: For devices that charge upright, ensure the design provides enough stability so they don’t tip over. Consider using small wooden dowels or precisely cut slots.
- Ventilation: While charging devices typically generate minimal heat, ensure adequate airflow, especially if enclosing a power strip. Small vents or gaps can suffice.
Consider drawing inspiration from concepts like “DIY Smart Home Integration with Custom Wooden Enclosures” to see how technology can be seamlessly concealed within elegant wooden structures.
Functional Aesthetics and Ergonomics
An elegant organizer should also be easy to use.
- Accessibility: Devices should be easy to place and remove.
- Visual Balance: The design should complement your existing furniture. Think about clean lines, minimalist forms, and appropriate finishes. For inspiration on integrating modern design with natural materials, explore “Warm Minimalism in Woodworking.”
- Multi-Purpose Storage: Beyond charging, can your organizer hold other items like pens, sticky notes, keys, or even a small notebook? Integrating additional storage can further declutter your space. For example, a small drawer or a pen holder can be incorporated. If you are building for a desk, consider adding features from “DIY Modular Desk Organizers” to create a truly comprehensive workspace solution.
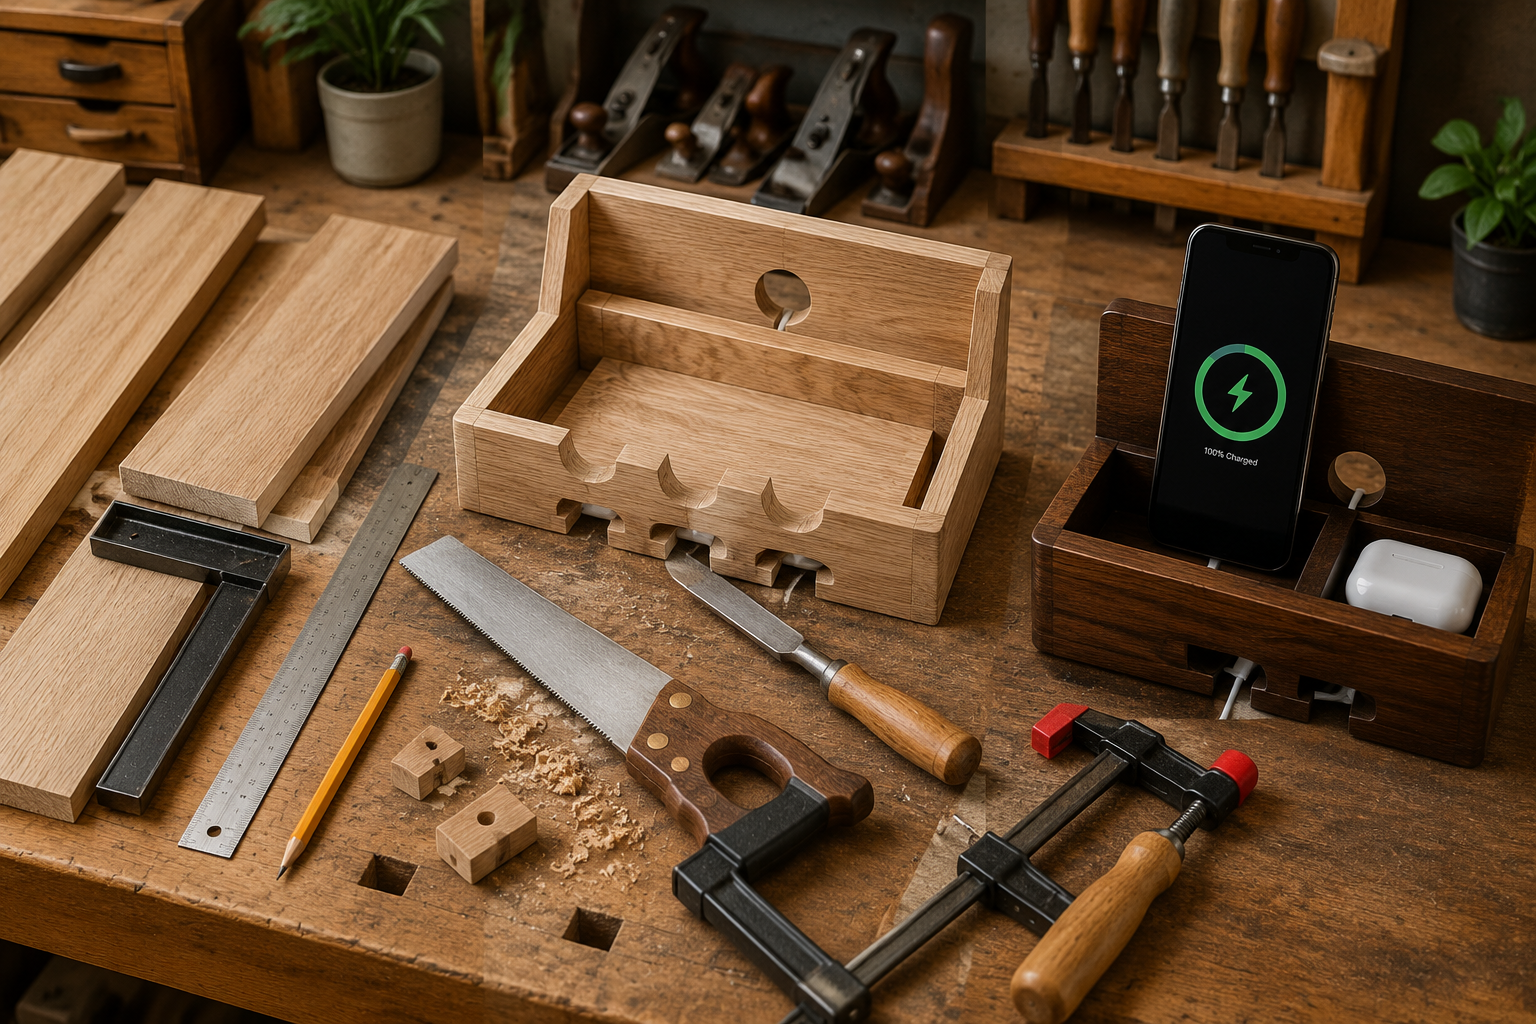
Essential Tools, Materials, and Building Techniques
Embarking on DIY Charging Stations and Device Organizers: Elegant Wooden Solutions for Clutter-Free Tech Spaces doesn’t require a fully equipped professional workshop. Many projects can be completed with basic hand tools and a few power tools.
Recommended Tools
For most wooden charging stations and organizers, you’ll likely need:
- Measuring and Marking Tools: Tape measure, ruler, square, pencil.
- Cutting Tools: Hand saw (such as a Japanese pull saw for precision, see “Beginner’s Guide to Japanese Hand Saws”), miter saw or circular saw for straight cuts, jigsaw for curves.
- Drilling Tools: Cordless drill with various drill bits (for cable holes and pilot holes).
- Shaping Tools: Chisels for fine adjustments (refer to “The Ultimate Guide to Sharpening Woodworking Chisels and Planes”), sandpaper in various grits, possibly a router for dados and chamfers (learn more about “The Essential Guide to Router Bits”).
- Clamping: Wood clamps are essential for holding pieces together during gluing and assembly.
- Safety Gear: Safety glasses, hearing protection, dust mask.
Material Choices and Finishes
- Wood: As discussed, hardwoods like oak, walnut, cherry, or maple are excellent. For beginners or budget-friendly options, clear pine or poplar can work well. Plywood can be a good choice for hidden compartments or bases.
- Adhesives: High-quality wood glue is crucial for strong joints. Consult “The Ultimate Guide to Wood Glue” for selecting the best adhesive for your project.
- Fasteners: Small brad nails or screws might be used in conjunction with glue for added strength, especially for beginners.
- Finishes:
- Oils: Danish oil, tung oil, or linseed oil penetrate the wood, enhancing its natural beauty and providing a durable, natural-looking finish.
- Polyurethane: Offers excellent protection against scratches and moisture, available in various sheens (matte to glossy). Learn about “Aerosol Polyurethane Benefits, Application, and Types.”
- Stains: Can be used to change the wood color to match existing furniture.
- Wax: Provides a soft, natural luster and some protection.
Step-by-Step Construction Overview (General Principles)
While specific plans will vary, the general process for building DIY Charging Stations and Device Organizers: Elegant Wooden Solutions for Clutter-Free Tech Spaces often follows these steps:
- Design and Planning: Create detailed drawings, including dimensions for each component, cable routing, and device slots.
- Material Preparation: Cut your chosen wood to the required dimensions. Ensure all edges are square and smooth.
- Create Compartments and Channels: Cut dados for internal dividers, drill holes for cables, and route grooves for wire management. This is often done before assembly for easier access.
- Assembly: Use wood glue and clamps to join the pieces. For beginners, consider using simpler joinery like butt joints with screws or dowels. Advanced woodworkers might use more complex joints. Refer to “Beginner’s Guide to Essential Woodworking Joints” for a comprehensive overview.
- Sanding: Once the glue is dry, sand all surfaces thoroughly, starting with a coarser grit (e.g., 120-grit) and progressing to finer grits (e.g., 220-grit) for a smooth finish.
- Finishing: Apply your chosen stain (if any), followed by an oil, polyurethane, or wax finish according to the product instructions. Allow adequate drying time between coats.
- Hardware Installation (Optional): Attach any rubber feet, internal clips for cables, or other hardware.
Popular Designs and Customization Ideas for DIY Charging Stations and Device Organizers
The beauty of DIY is the ability to create something truly unique and perfectly suited to your needs. Here are a few popular design types and customization ideas for your DIY Charging Stations and Device Organizers: Elegant Wooden Solutions for Clutter-Free Tech Spaces.

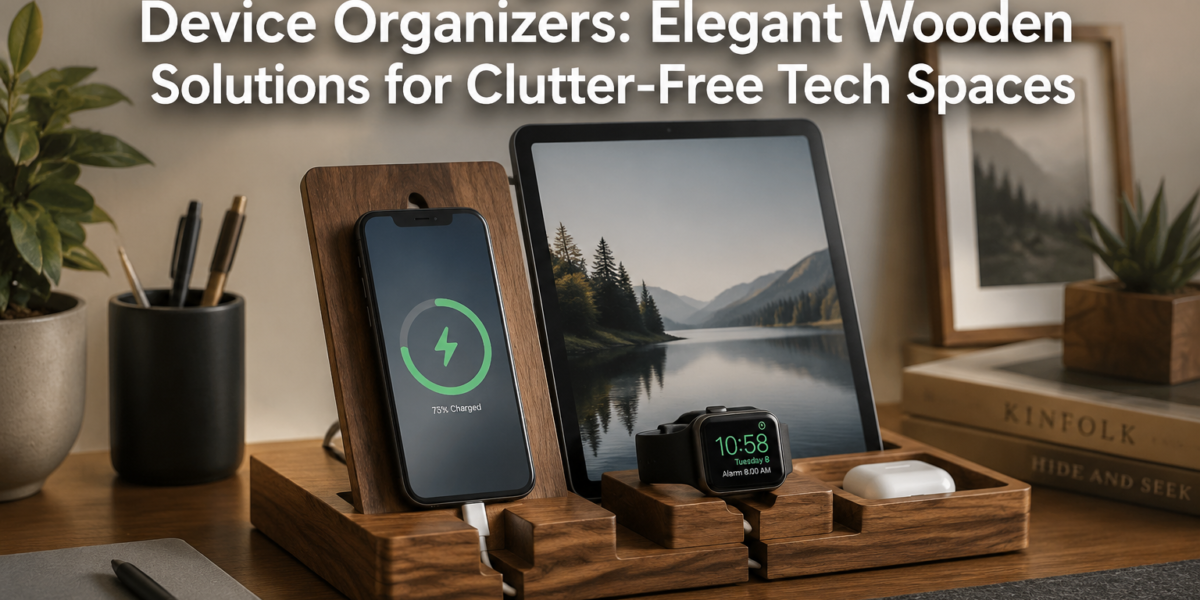
Slotted Box Organizer
This is a common and versatile design. It typically involves a rectangular box with a hinged or removable lid. Inside, a power strip is housed, and individual slots or dividers are created for phones, tablets, and smartwatches. Cables are routed from the power strip through small holes in the dividers to each device.
- Customization: Vary the number and size of slots. Add a front lip to prevent devices from sliding out. Incorporate a small drawer beneath for earbuds or charging bricks.
Tiered Charging Shelf
For those with multiple devices or a need to save desk space, a tiered design can be effective. This involves several shelves or platforms, with devices resting on each tier. Cable management can be integrated into the back panel or through cutouts in each shelf.
- Customization: Experiment with different heights and depths for each tier. Add a dedicated section for a wireless charging pad. Consider a small, integrated storage cubby on one tier for accessories.
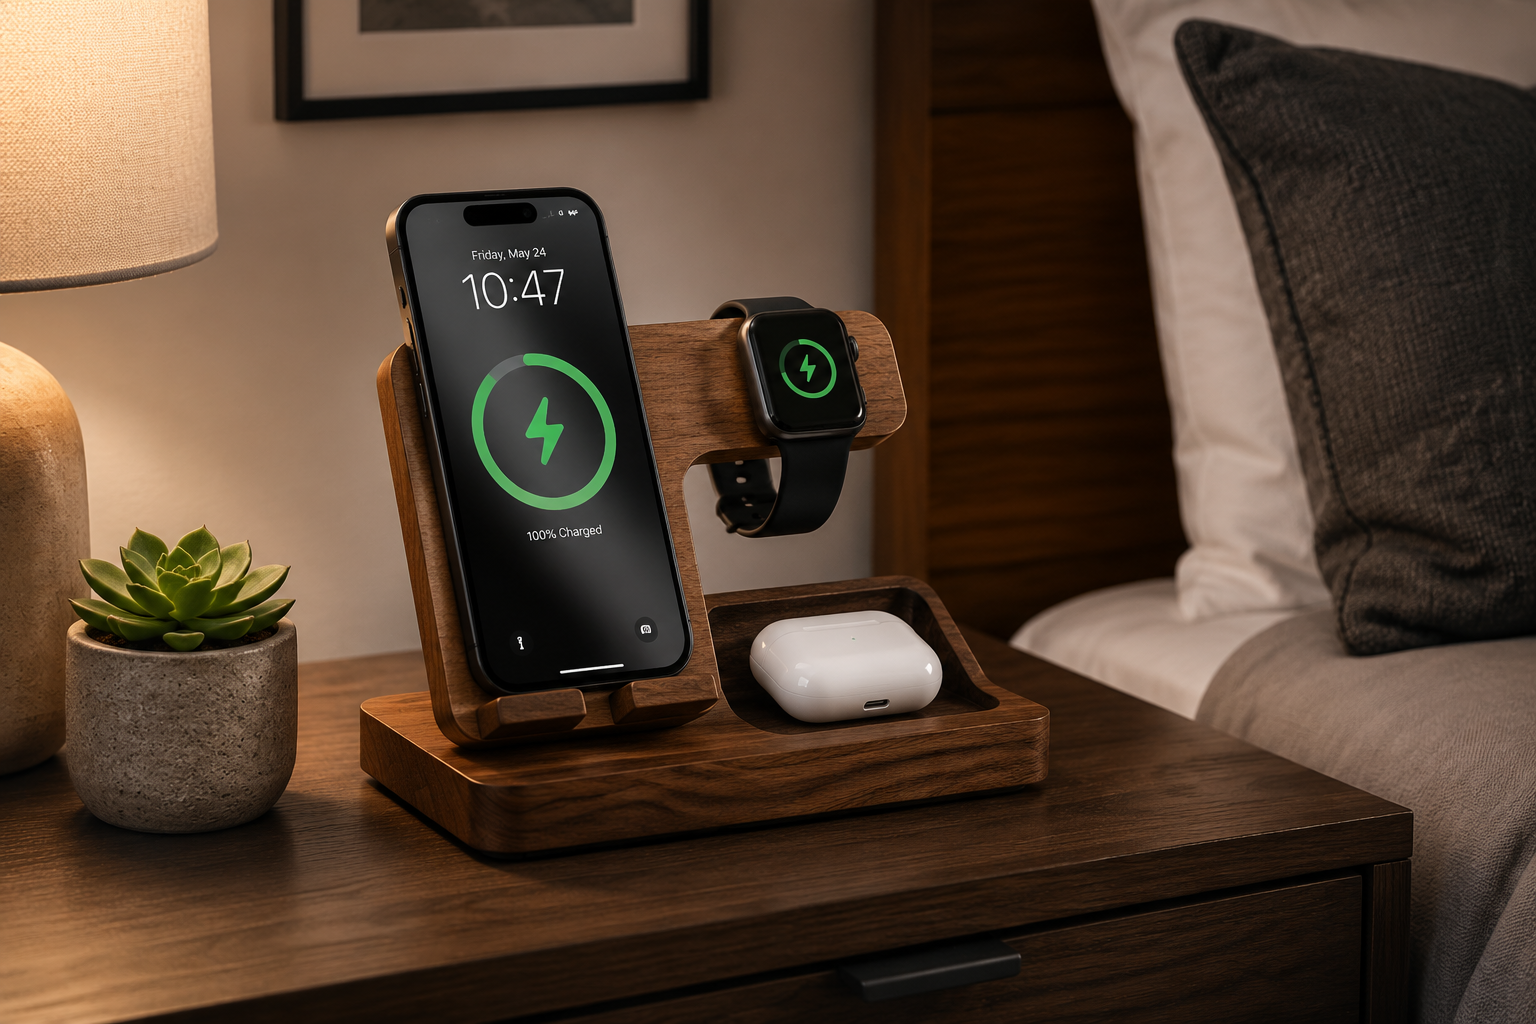
Desk Valet with Charging Capabilities
A classic desk valet can be upgraded with integrated charging features. These often include a flat area for keys or coins, a tray for a watch, and now, strategically placed slots for phones and tablets with cable access.
- Customization: Incorporate specific cutouts for smartwatches. Add a small dish or divot for jewelry. Engrave a monogram or design for a personalized touch (as explored in “Crafting Engraved Wooden Coasters”).
Wall-Mounted Charging Shelf
For ultimate space-saving, a wall-mounted unit can be an excellent choice. This can be a simple floating shelf design with hidden cable channels or a more complex cabinet that conceals the entire charging setup.
- Customization: Add hooks for headphones or keys. Integrate a small display shelf for decorative items. For wall-mounted solutions, you might also find inspiration in “DIY Compact Entryway Organizers.”
Incorporating Smart Features
For the more adventurous woodworker, integrate smart home components. This could involve embedding a smart power strip that can be controlled remotely, or even creating custom enclosures for smart speakers or hubs directly into your organizer. This builds on concepts discussed in “DIY Smart Home Integration with Custom Wooden Enclosures”.
Finishing Touches and Embellishments
- Felt Liners: Add soft felt to the bottom of device slots to protect screens and prevent scratches.
- Rubber Feet: Attach small rubber feet to the base to prevent slipping and protect your furniture.
- Decorative Accents: Small metal accents, contrasting wood inlays, or unique joinery (like dovetails or finger joints) can elevate the aesthetic.
- Personalization: A simple wood-burning tool or a carved initial can make your organizer truly yours.
The potential for creativity in designing DIY Charging Stations and Device Organizers: Elegant Wooden Solutions for Clutter-Free Tech Spaces is boundless. Each project offers an opportunity to combine practicality with personal style, resulting in a piece that is both highly functional and a joy to behold.
Conclusion
The pursuit of a clutter-free tech space doesn’t have to mean sacrificing aesthetics or individuality. By embracing the principles of woodworking and thoughtful design, anyone can create beautiful and highly functional DIY Charging Stations and Device Organizers: Elegant Wooden Solutions for Clutter-Free Tech Spaces. These projects offer more than just a place to charge your devices; they provide a sense of order, enhance your home or office decor, and offer the deep satisfaction that comes from creating something with your own hands.
From selecting the perfect wood to meticulously crafting hidden cable channels, each step in the process contributes to a sophisticated solution that integrates seamlessly into modern living. As you consider your next woodworking project in 2026, remember the transformative power of a custom wooden organizer. It’s an investment in both practicality and peace of mind, proving that elegance and utility can indeed coexist beautifully.
Actionable Next Steps
- Inventory Your Devices: List all electronic devices and charging accessories you want to organize.
- Sketch Your Design: Draw out a few design ideas, incorporating cable management and storage for other items.
- Gather Materials: Select your wood type and necessary hardware.
- Acquire Tools: Ensure you have the basic woodworking tools required for your chosen design.
- Start Building: Follow your plan, taking your time and enjoying the creative process.
SEO Meta Title: DIY Wooden Charging Stations: Elegant Tech Organizers SEO Meta Description: Build elegant DIY wooden charging stations and device organizers for clutter-free tech spaces in 2026. Learn design tips, tools, and techniques for custom solutions.
DIY charging station, wooden device organizer, clutter-free tech, cable management, woodworking projects, elegant tech solutions, custom organizers, home organization, desktop organizer, DIY electronics storage
