


The average cost of custom framing can easily exceed $300 for a modest piece, and often much more for larger mirrors or intricate artwork. Yet, with a relatively small investment in tools and materials, anyone can learn to build bespoke wooden frames, from simple mitered designs to more intricate profiles, enhancing the aesthetic appeal of mirrors and artwork throughout your home. This guide explores the rewarding process of Crafting Custom Wooden Frames for Mirrors and Artwork: Elevating Home Decor with DIY Touches, transforming ordinary reflections and masterpieces into personalized statements.
Key Takeaways:

- Custom wooden frames offer significant cost savings and unparalleled personalization compared to store-bought options.
- Understanding different wood types, joinery techniques, and finishing methods is crucial for successful frame crafting.
- Essential tools, both hand and power, are necessary for precise cuts and professional finishes.
- Careful measurement, material selection, and attention to detail are paramount for a high-quality finished product.
- DIY framing allows for unique artistic expression, enhancing home decor with bespoke wooden touches.
The Allure of Custom Wooden Frames: Why DIY?
In an era of mass-produced goods, the appeal of handcrafted items remains strong. For home decor, nothing quite matches the warmth, character, and individuality that custom wooden frames bring to mirrors and artwork. Rather than settling for generic frames that may not perfectly match your aesthetic or artwork dimensions, crafting your own allows for complete creative control. You can select specific wood species, customize profiles, and apply finishes that seamlessly integrate with your existing interior design in 2026.
Beyond aesthetics, the practical benefits are substantial. Custom dimensions ensure a perfect fit for unusual artwork sizes, eliminating the frustrating search for ready-made frames. Furthermore, the cost savings can be considerable. While initial tool investments are required, the long-term value of being able to frame multiple pieces, or even create gifts, makes it a worthwhile endeavor. Imagine the satisfaction of showcasing a cherished painting or an elegant mirror in a frame you meticulously built yourself, a true testament to Crafting Custom Wooden Frames for Mirrors and Artwork: Elevating Home Decor with DIY Touches.
Cost-Benefit Analysis of DIY Framing
To illustrate the financial advantage, consider this comparison:
| Item | Average Store-Bought Cost | DIY Materials Cost (Estimate) | Notes |
|---|---|---|---|
| Standard 16×20 Artwork | $80 – $200 | $20 – $50 | Assumes purchasing raw lumber, joinery supplies, and finish. |
| Large 24×36 Mirror | $200 – $500+ | $50 – $150 | Material cost for quality wood and hardware. |
| Custom Size/Profile | Often quoted per project | Varies, but typically 30-50% less | Significant savings for unique dimensions or intricate designs. |
| Tool Investment | N/A | $150 – $800+ | One-time cost for basic hand tools to power tools (miter saw, router). |
While the initial tool investment might seem daunting, it’s a one-time expense that pays dividends over time, especially for enthusiasts looking to undertake multiple projects. This also opens doors to other woodworking projects, like building custom wooden key holders or DIY wooden plant stands, further maximizing the value of your tools.
Essential Tools and Materials for Frame Construction
The journey of Crafting Custom Wooden Frames for Mirrors and Artwork: Elevating Home Decor with DIY Touches begins with selecting the right tools and materials. Depending on the complexity and scale of your project, your toolkit may range from basic hand tools to more advanced power machinery.
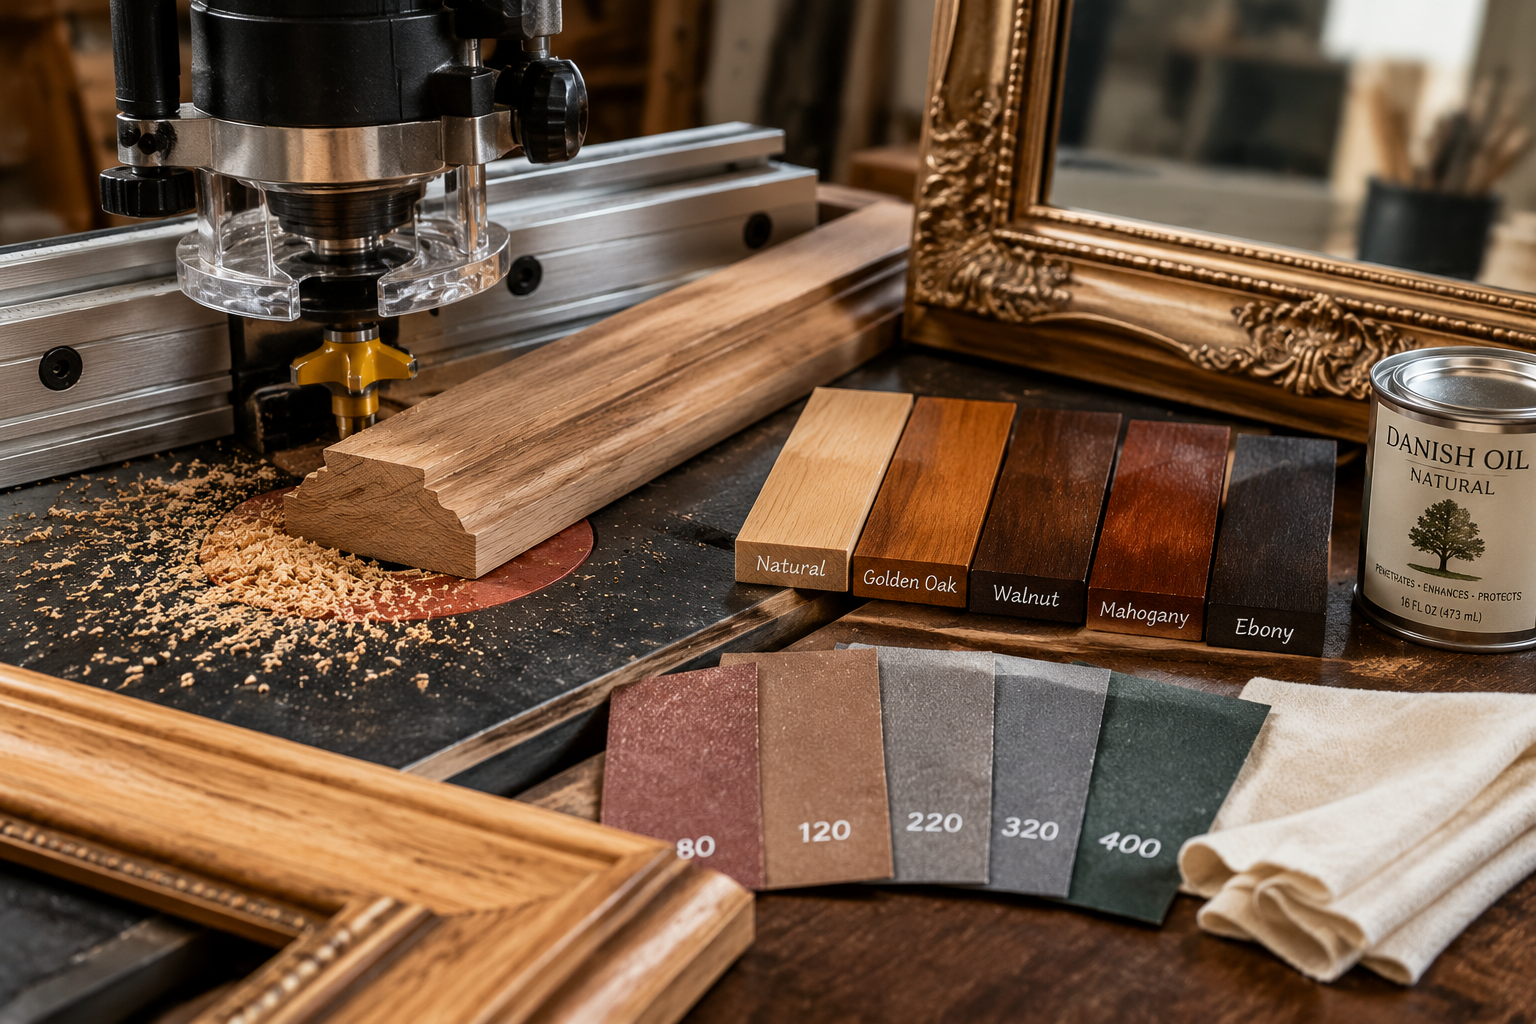
Wood Selection for Frames
The type of wood you choose dramatically influences the frame’s appearance, durability, and workability.
Hardwoods:
- Oak: Durable, strong, prominent grain. Excellent for traditional or rustic frames. Stains well.
- Walnut: Rich, dark brown with a beautiful grain. Adds a touch of elegance and sophistication. Often used with a clear finish to highlight its natural beauty.
- Maple: Light-colored, fine grain, very strong. Takes paint and stain evenly. Ideal for modern or minimalist designs.
- Cherry: Reddish-brown, darkens with age. Smooth texture, elegant appearance.
- Poplar: Cost-effective hardwood, light in color, easily painted. Good for beginners or painted frames.
Softwoods:
- Pine: Readily available, affordable, light in color. Can be stained, but prone to knots and dents. Good for rustic or painted frames.
- Fir: Similar to pine, slightly harder, good for structural integrity.
Consider sourcing reclaimed or salvaged wood for unique character and sustainability. Our guide on Sourcing Reclaimed and Salvaged Wood offers valuable insights into selecting and preparing these materials.
Tools for Precision and Finish
A successful frame relies on precise cuts and secure joinery.

Basic Hand Tools:
- Measuring Tape and Ruler: Essential for accurate dimensions.
- Pencils and Marking Gauges: For clear layout lines.
- Hand Saw and Miter Box: For making accurate 45-degree angle cuts for frame corners.
- Clamps: Corner clamps or strap clamps are critical for holding frame pieces together during gluing and drying.
- Wood Glue: High-quality wood glue for strong, lasting joints.
- Sandpaper: Various grits (120, 180, 220) for smooth finishes.
- Chisels: For cleaning up joints and minor adjustments.
- Rubber Mallet: For tapping joints together without marring the wood.
Power Tools (Optional, but highly recommended for efficiency and precision):
- Miter Saw: Indispensable for cutting accurate and repeatable angles. Essential for perfect frame corners.
- Router and Router Table: For creating decorative profiles (rabbets for glass/artwork, ogees, beads, etc.) along the frame edges. Mastering the router table can significantly elevate your frame designs.
- Orbital Sander: Speeds up the sanding process and ensures a smooth surface.
- Brad Nailer or Pin Nailer: For reinforcing glued joints, especially useful for smaller frames.
- Table Saw: While not strictly necessary for simple frames, a table saw offers versatility for ripping custom frame stock and making rabbet cuts. Our article on Mastering the Router Table: Beyond Basic Edges for Precision Joinery provides excellent guidance for advanced profile creation.
Finishing Supplies:
- Wood Stain: To color the wood while allowing the grain to show through.
- Wood Oil (e.g., Danish oil, Linseed oil): Penetrates the wood, enhancing its natural beauty and providing protection. Our guide on Danish Oil vs. Linseed: The Ultimate Wood Finishing Guide offers a detailed comparison.
- Polyurethane or Varnish: For a durable, protective topcoat. Available in various sheens (matte, satin, gloss).
- Paint: For a solid color finish.
- Brushes or Rags: For application.
The Step-by-Step Process of Crafting Custom Wooden Frames
Crafting Custom Wooden Frames for Mirrors and Artwork: Elevating Home Decor with DIY Touches is a methodical process that rewards patience and precision. Follow these steps to achieve professional results.
1. Planning and Design
- Measure Accurately: Measure your mirror or artwork twice. For artwork, measure the height and width of the piece itself, and consider if you’ll be adding a mat board.
- Determine Frame Dimensions: Decide on the width of your frame rails. Wider rails offer more presence, while narrower ones provide a delicate touch.
- Choose a Profile: Sketch out or select a profile for your frame. This could be a simple flat profile, a rounded edge, or a more elaborate routed design.
- Calculate Wood Stock: Account for the length of each side, plus extra for waste cuts. Remember, a miter joint requires cutting the outside edge longer than the inside edge. The formula is typically: Outside length = Artwork/mirror dimension + (2 x frame rail width). For a rabbet (the groove that holds the glass/artwork), ensure your wood stock is thick enough.
- Safety First: Always wear appropriate safety gear, including eye protection and hearing protection, especially when using power tools.
2. Cutting the Frame Pieces
- Rip Stock to Width (if necessary): If you’re starting with wider lumber, use a table saw to rip it down to your desired frame rail width.
- Cut Rabbets: Before cutting the miters, cut a rabbet along one edge of your frame stock. This L-shaped groove will hold the mirror/artwork, backing, and any glass. A router with a rabbeting bit or a table saw with a dado blade can achieve this. Ensure the rabbet is deep enough to accommodate all components.
- Miter Cuts: Using a miter saw or miter box, cut the four frame pieces to length with precise 45-degree angles. Ensure opposing sides are exactly the same length. Test fit the four pieces to ensure they form a perfect 90-degree corner before gluing. Imperfect miters will lead to visible gaps.
3. Assembling the Frame
- Dry Fit: Lay out your four cut pieces and dry fit them together to ensure all angles meet perfectly. Make any necessary micro-adjustments now.
- Apply Glue: Apply a thin, even coat of wood glue to each mitered surface. Avoid excessive glue that will squeeze out excessively.
- Clamp Securely: Use specialized corner clamps, strap clamps, or a combination of bar clamps with corner blocks to hold the frame together firmly. Apply even pressure until glue dries. Wipe away any glue squeeze-out with a damp cloth immediately, as dried glue can prevent stain absorption.
- Reinforce Joints (Optional but Recommended): For added strength, especially on larger frames, consider reinforcing the miter joints.
- Splines: Cut a small kerf (groove) across the miter joint after assembly and insert a thin piece of wood (a spline) with glue.
- Biscuits or Dominos: Use a biscuit joiner or domino joiner for invisible, strong reinforcement.
- Brad Nails/Pin Nails: Drive small brad or pin nails through the joint from the outside edge for quick reinforcement. Fill the small holes later.
- Allow to Dry: Let the glue cure completely according to the manufacturer’s instructions, typically 24 hours, before unclamping.
4. Sanding and Finishing
- Initial Sanding: Begin sanding with a medium-grit sandpaper (120-150 grit) to remove any glue residue, minor imperfections, and sharp edges.
- Fine Sanding: Progress to finer grits (180-220 grit) for a super smooth finish. Ensure all surfaces are uniformly sanded. Always sand in the direction of the wood grain.
- Cleanliness: Thoroughly wipe down the frame with a tack cloth or a damp cloth to remove all sanding dust.
- Apply Finish:
- Stain: Apply wood stain evenly, following the grain. Wipe off excess after the recommended dwell time. Allow to dry completely.
- Oil Finish: Apply several coats of penetrating oil, buffing between coats, to bring out the wood’s natural luster and provide protection.
- Topcoat (Polyurethane/Varnish): For added durability, especially for frames that might experience wear, apply a protective topcoat. Apply thin, even coats, sanding lightly with a very fine grit (e.g., 320-400) between coats to ensure good adhesion and a smooth finish.
For specific guidance on different finishes, explore our articles on Maple Wood Finishing Techniques or Reclaimed Wood Finishing Techniques.

5. Installing Mirror/Artwork and Hardware
- Clean Components: Ensure your mirror or artwork and the inside of the rabbet are free of dust and debris.
- Insert Components: Carefully place the mirror or artwork into the rabbet. If using glass, place it first, then the artwork, followed by a mat board (if desired).
- Backing Board: Place a foam core board or hardboard backing over the artwork/mirror to protect it and hold it in place.
- Secure with Fasteners: Use framer’s points, glazier’s points, or offset clips to secure the backing board. These push into the frame’s rabbet edge.
- Hanging Hardware: Attach appropriate hanging hardware to the back of the frame. D-rings with picture wire are common for larger frames, while sawtooth hangers or a single wire loop work for smaller pieces. Ensure the hardware is securely screwed into the frame, not just the backing.
- Protective Bumpers: Apply small felt bumpers to the bottom corners of the frame to protect your wall and keep the frame level.
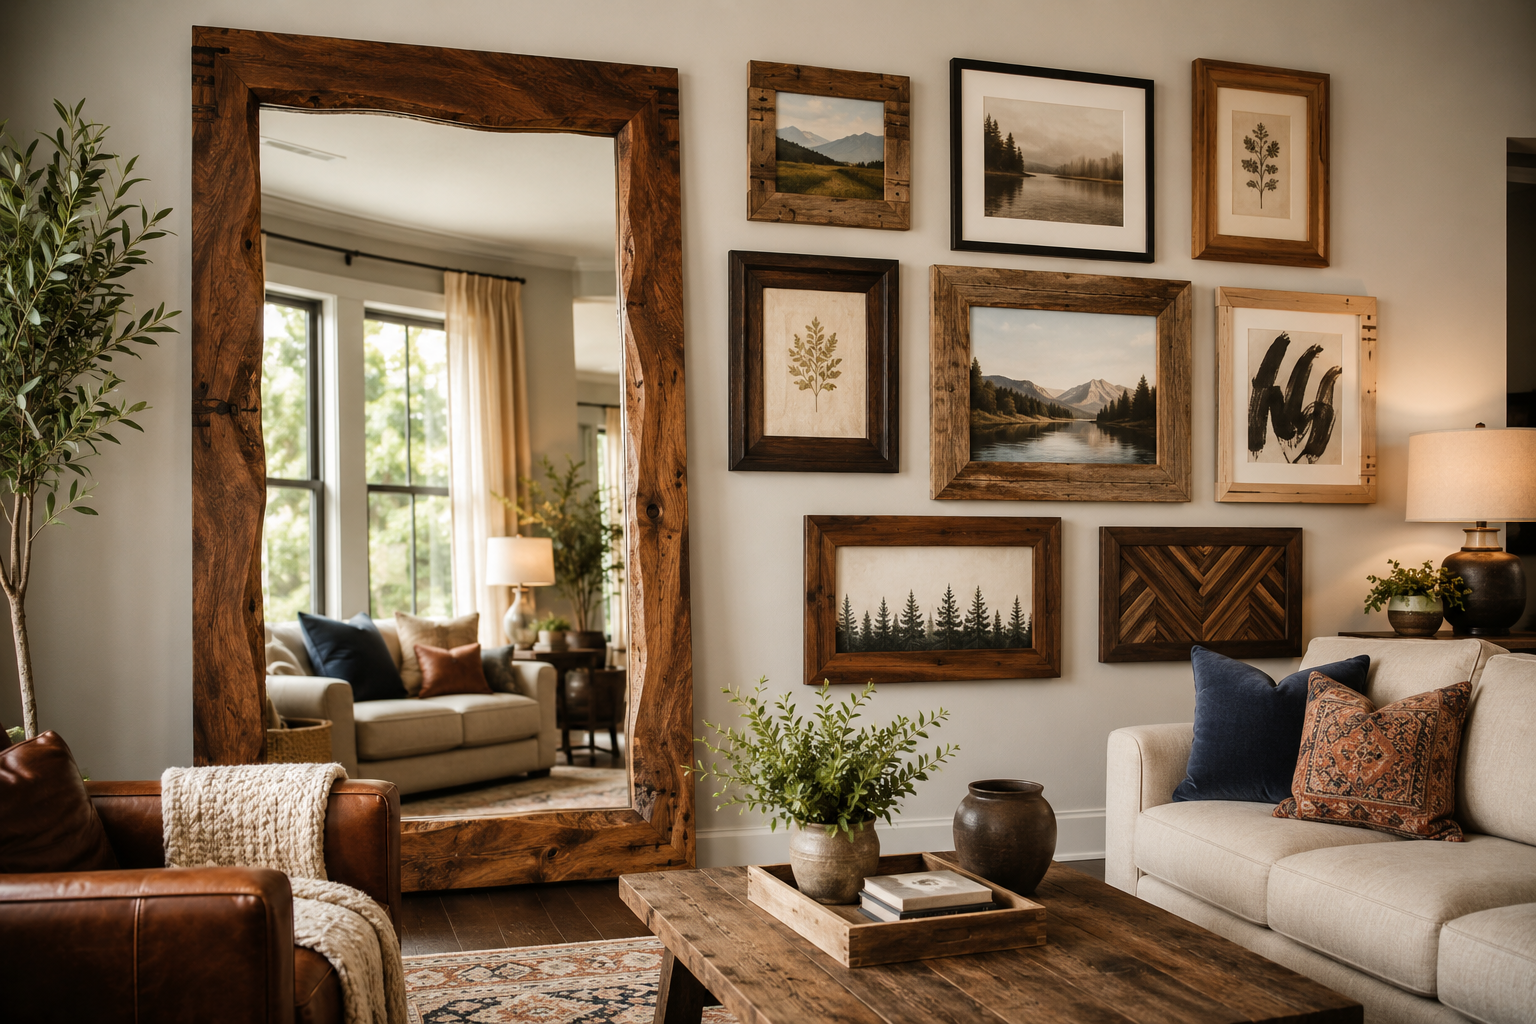
Elevating Home Decor with DIY Touches
The beauty of Crafting Custom Wooden Frames for Mirrors and Artwork: Elevating Home Decor with DIY Touches lies in its potential for personalization. Each frame becomes a unique accent, reflecting your style and enhancing the objects it encases.
Design Ideas and Inspirations
- Rustic Charm: Use reclaimed barn wood or distressed pine, applying a natural oil finish or a light white wash. This style pairs beautifully with farmhouse decor or vintage prints.
- Modern Minimalism: Opt for sleek maple or walnut with a clear, satin finish. Simple, clean profiles complement contemporary artwork and minimalist interiors.
- Elegant & Traditional: Cherry or oak with a rich stain and a classic routed profile (like an ogee or cove) creates a timeless look perfect for oil paintings or antique mirrors.
- Eclectic Gallery Wall: Mix different wood species, finishes, and frame profiles to create a dynamic and visually interesting gallery wall. This approach allows each piece of art to have its own distinct personality while contributing to a cohesive whole.
- Statement Mirrors: Design an oversized, chunky frame for a large mirror, turning it into a focal point in an entryway or living room. You can even incorporate carved elements or unique joinery for added flair. For attaching mirrors securely, consult our guide on Adhesive for Mirrors on Wood: Types, Tips, and Step-by-Step Guide.
- Themed Frames: Create frames that complement the subject of the artwork. For example, a driftwood-inspired frame for a beach scene or a dark, heavy frame for a dramatic portrait.
The creative possibilities are endless, making DIY framing a rewarding hobby that continually breathes new life into your living spaces in 2026. This personalized approach to decor truly sets your home apart, demonstrating a commitment to thoughtful design and skilled craftsmanship.
Conclusion
Crafting Custom Wooden Frames for Mirrors and Artwork: Elevating Home Decor with DIY Touches is more than just a woodworking project; it’s an opportunity to infuse your home with personal style, save money, and develop a satisfying new skill. From selecting the perfect wood to applying the final coat of finish, each step offers a chance for creativity and precision. The result is a bespoke piece that not only beautifully showcases your cherished items but also adds a unique narrative to your living environment.
By following the detailed steps outlined in this guide and embracing the learning process, you can confidently create stunning frames that transform your mirrors and artwork into true design statements. Start with a simpler design, gradually build your skills and tool collection, and watch as your home decor elevates to new levels of personalized elegance.
Actionable Next Steps:
- Assess Your Needs: Identify a mirror or piece of artwork you’d like to frame and measure its dimensions.
- Gather Materials: Select a wood species that complements your decor and purchase the necessary lumber.
- Acquire Tools: Start with essential hand tools, then consider investing in a miter saw for increased precision.
- Practice Cuts: Before cutting your final frame pieces, practice making accurate 45-degree cuts on scrap wood.
- Begin Your First Frame: Follow the step-by-step guide to plan, cut, assemble, and finish your first custom wooden frame.
SEO Meta Title: Crafting Custom Wooden Frames: DIY Decor Elevation SEO Meta Description: Learn crafting custom wooden frames for mirrors and artwork. Elevate your home decor with DIY touches, step-by-step guides, and expert tips in 2026.
