

Over 80% of woodworking accidents involving routers could be minimized or prevented with the proper application of jigs and fixtures. DIY woodworking jigs for the router are not merely accessories; they are fundamental tools that elevate both the precision and safety of complex cuts, transforming challenging operations into repeatable, confident tasks for woodworkers of all skill levels. This article provides detailed plans and instructions for building a variety of essential router jigs, such as circle cutting jigs, dado and rabbet jigs, mortising jigs, and edge-forming guides, ensuring accurate and repeatable results while significantly improving safety in your workshop during 2026.
Key Takeaways
- Enhanced Precision and Repeatability: Router jigs eliminate freehand errors, enabling consistently accurate cuts for joinery, dados, and curves.
- Improved Safety: By securely holding the workpiece and guiding the router, jigs minimize the risk of kickback, slips, and accidental contact with bits.
- Versatility: A few fundamental jig designs can be adapted for numerous applications, expanding the router’s capabilities beyond its handheld limitations.
- Cost-Effective Solution: Building jigs yourself often utilizes scrap materials, making precision woodworking accessible without expensive commercial fixtures.
- Empowerment: Understanding and constructing jigs deepens a woodworker’s understanding of tool mechanics and encourages innovative problem-solving.
The Foundation of Router Precision: Understanding Jigs and Their Benefits
Routers are incredibly versatile woodworking tools, capable of shaping edges, cutting dados, creating joinery, and much more. However, their true potential is often unlocked when they are used in conjunction with jigs. A woodworking jig is a custom-made device designed to guide a tool or workpiece, ensuring precise and repeatable cuts. For routers, these jigs provide a stable, controlled path for the bit, which is crucial for achieving professional-grade results and maintaining a high level of safety.

The primary benefit of using DIY woodworking jigs for the router is the significant boost in precision. Freehand routing, even for experienced users, can lead to inconsistencies, wobbles, and deviations. Jigs remove this human error factor, allowing for cuts that are perfectly straight, consistently curved, or precisely spaced. This repeatability is invaluable, especially when creating multiple identical parts for projects like high-demand woodworking projects for 2026: coffee tables, wine racks, and clocks or complex cabinetry.
Beyond precision, safety is paramount. Routers, with their high RPM and sharp bits, can be dangerous if not handled correctly. Jigs enhance safety by:
- Securing the Workpiece: Many jigs clamp the wood firmly, preventing movement or kickback.
- Guiding the Tool: They keep the router on a controlled path, preventing accidental deviations into fingers or other parts of the body.
- Reducing Fatigue: Less effort is required to control the router, leading to better focus and reduced chance of error.
Constructing these jigs yourself is a rewarding aspect of woodworking. It allows for customization to specific project needs and utilizes often-overlooked scraps of plywood, MDF, or hardwood. The investment is minimal, but the return in terms of accuracy and safety is substantial.
Essential Materials for Jig Construction
Before diving into specific jig plans, gather some basic materials and tools:
- Plywood or MDF (1/2″ or 3/4″ thick): Excellent for jig bases, fences, and guides due to stability.
- Hardwood Scraps: Useful for sturdy clamping blocks, runners, or wear surfaces.
- T-track and T-bolts: Optional, but highly recommended for adjustable fences and clamping mechanisms.
- Toggle Clamps: Quick and secure workpiece fastening.
- Fasteners: Wood screws, carriage bolts, wing nuts for easy adjustments.
- Wood Glue: For permanent jig assemblies (refer to The Ultimate Guide to Wood Glue).
- Measuring Tools: Tape measure, ruler, combination square, marking knife.
- Basic Woodworking Tools: Table saw, miter saw, drill, sandpaper, safety gear.
Detailed Plans for Foundational DIY Woodworking Jigs for the Router
Building a repertoire of essential router jigs is a cornerstone of advanced woodworking. These jigs, when properly constructed, provide repeatable accuracy and vastly improve safety, allowing you to tackle complex cuts with confidence.
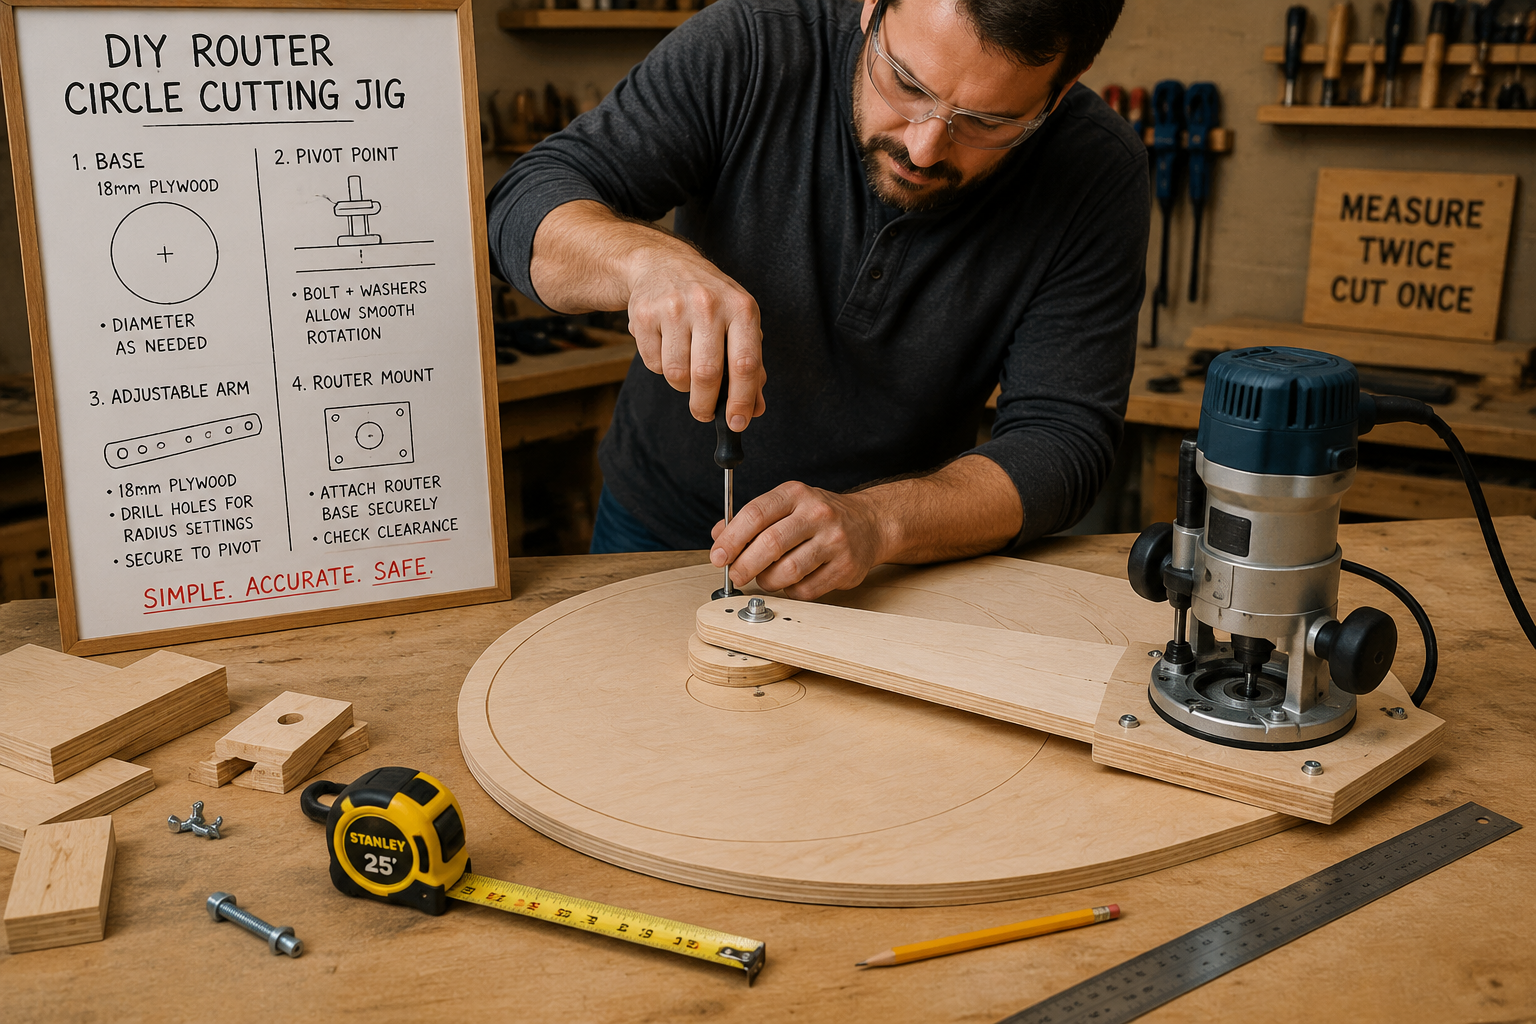
1. Circle Cutting Jig
Cutting perfect circles with a router is challenging freehand but simple with a dedicated jig. This jig is indispensable for items like round tabletops, speaker cutouts, or decorative inlays.
Materials:
- 1/2″ or 3/4″ plywood or MDF, approximately 12″ x 24″
- Small piece of 1/4″ plywood or acrylic for the router sub-base
- Small carriage bolt (1/4″ or 5/16″), washer, wing nut for pivot
- Wood screws
Construction:
- Create Router Base Extension: Remove your router’s base plate. Trace its outline onto the 1/4″ plywood/acrylic. Mark the mounting screw holes and the center hole for the router bit. Drill these holes.
- Attach to Main Jig Plate: Take the 12″x24″ main jig plate. Position the new router base extension on one end, aligning the router bit hole with the center of the main plate. Secure it with wood screws from underneath, ensuring they don’t protrude into the router bit path.
- Establish Pivot Track: Draw a straight line down the center of the main jig plate, extending from the router bit hole. Along this line, drill a series of small holes (same diameter as your carriage bolt) at precise 1-inch increments, starting from the center of the router bit opening. These holes will serve as your pivot points for different circle radii.
- Install Pivot Bolt: Insert the carriage bolt through one of the pivot holes, securing it with a washer and wing nut from the underside. This bolt will act as the pivot point in your workpiece.
Usage:
- Determine your desired circle radius.
- Select the corresponding pivot hole on the jig plate.
- Drill a small hole (matching your carriage bolt diameter) into the center of your workpiece.
- Insert the jig’s pivot bolt into the workpiece’s pivot hole.
- Install your desired router bit and set its depth.
- Route slowly and in multiple shallow passes until the circle is cut through.
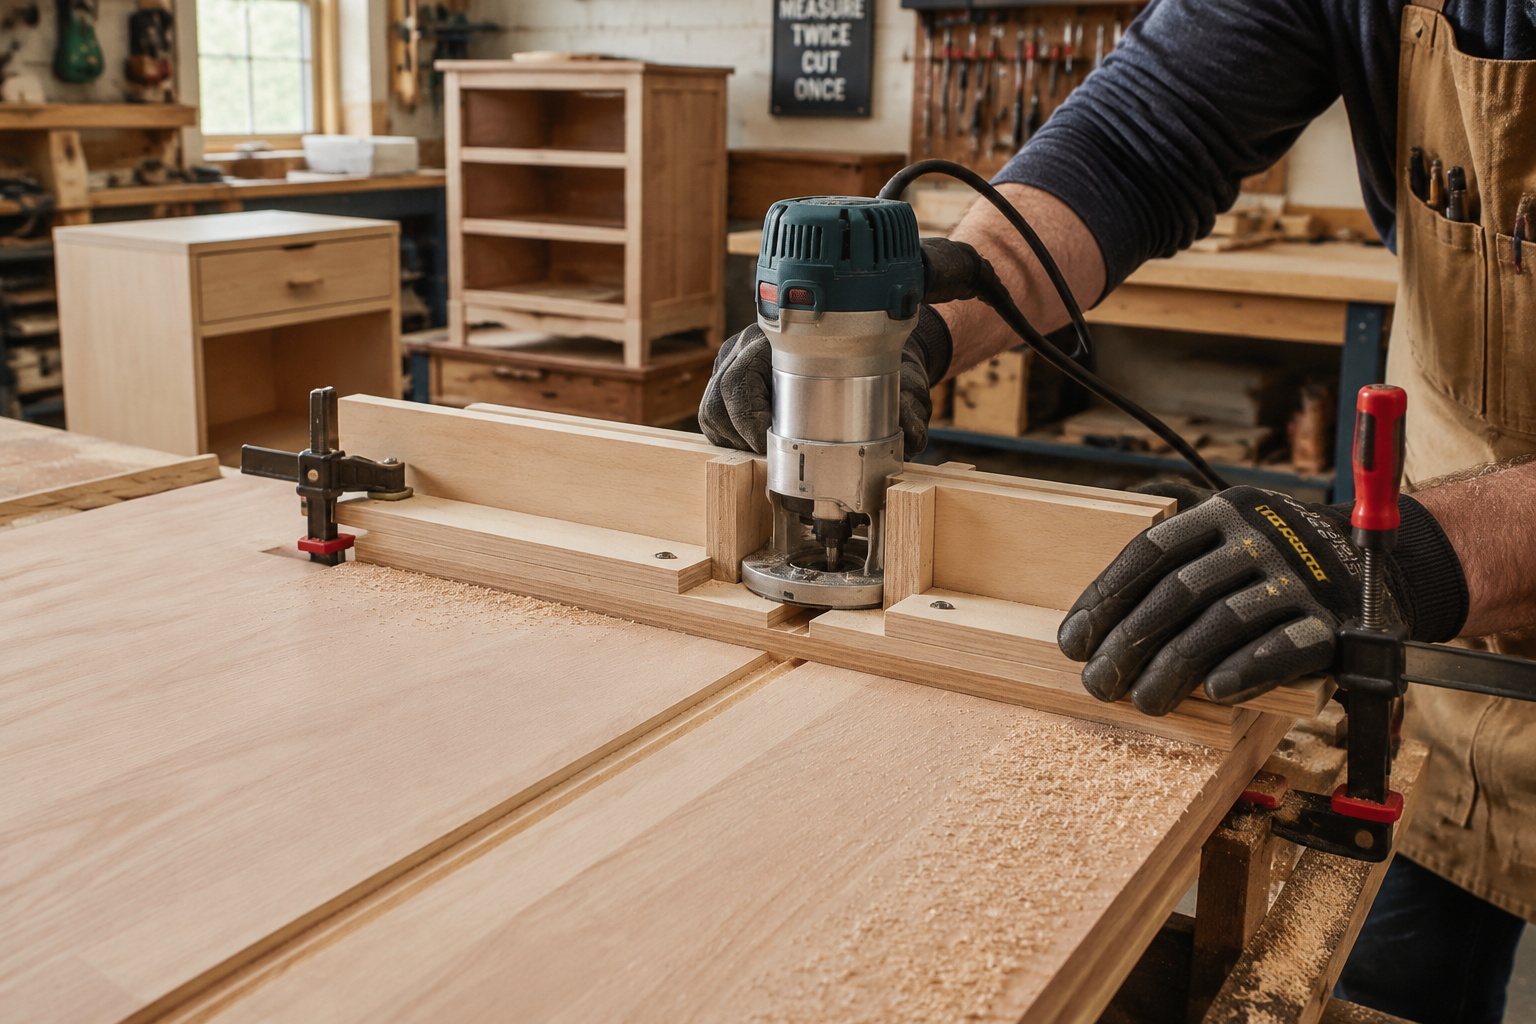
2. Dado and Rabbet Jig
Accurate dados (grooves across the grain) and rabbets (grooves along an edge) are fundamental for strong joinery in shelves, cabinets, and boxes. This jig ensures perfectly straight and parallel cuts.
Materials:
- 3/4″ plywood or MDF, two pieces (e.g., 6″ x 36″ for the base, 3″ x 36″ for the fence)
- Two strips of 1/2″ or 3/4″ hardwood, 1.5″ x 36″ for router guides
- Toggle clamps (optional, but highly recommended)
- Wood screws, wood glue
Construction:
- Create Router Guide Rails: Take your router and the specific bit you intend to use for dados. Attach the two hardwood strips to the 6″x36″ plywood base, parallel to each other. The critical dimension is the exact width of your router’s base plate (or a router sub-base you use) plus the diameter of your router bit. This forms a channel for your router to ride in. Ensure the strips are perfectly parallel. Glue and screw these strips from the underside.
- Attach the Fence: Take the 3″x36″ plywood piece and attach it perpendicular to the guide rail assembly. This fence will register against the edge of your workpiece. It should be positioned such that your router bit, when guided by the rails, cuts exactly parallel to the fence. Double-check alignment with a square.
- Add Clamping Options (Optional): Install toggle clamps on the base to securely hold the jig to your workpiece.
Usage:

- Mark the location of your dado or rabbet on the workpiece.
- Align the jig’s fence with your mark.
- Clamp the jig securely to the workpiece.
- Place the router between the guide rails.
- Set the bit depth. Make a test cut on scrap material first.
- Route the dado or rabbet in controlled passes.
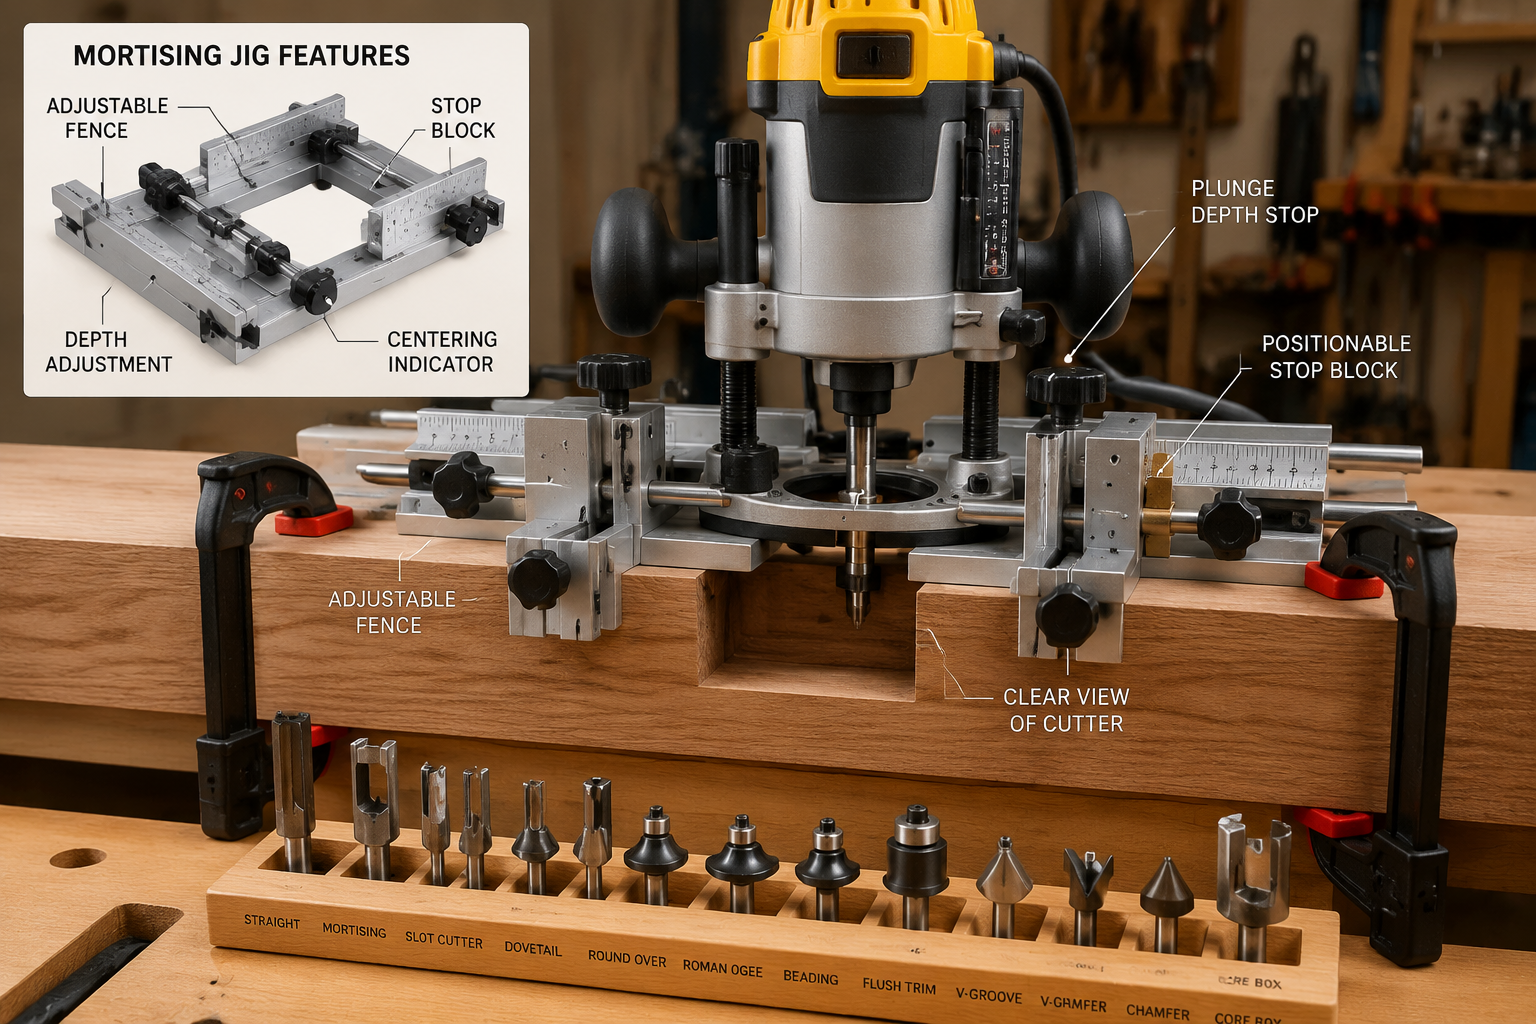
3. Mortising Jig
Mortise and tenon joints are exceptionally strong, and this jig simplifies cutting accurate mortises with a router. This is particularly useful for furniture making or DIY wooden birdhouses with advanced designs.
Materials:
- 3/4″ plywood or MDF, two pieces (e.g., 8″ x 12″ for the base, 4″ x 12″ for the fence)
- Two pieces of 1/2″ or 3/4″ hardwood, 1.5″ x 12″ for guide rails
- Toggle clamps
- Carriage bolts, wing nuts, washers
- Wood screws, wood glue
Construction:
- Base and Guide Rails: Attach the two hardwood guide rails to the 8″x12″ plywood base, parallel to each other, creating a channel slightly wider than your router’s base or sub-base. The router will plunge between these rails.
- Adjustable Fence: The 4″x12″ plywood piece serves as an adjustable fence. Drill two elongated slots in the base plate and two corresponding holes in the fence. Use carriage bolts, washers, and wing nuts to allow the fence to slide back and forth for mortise centering.
- Stop Blocks: Create two small, movable stop blocks that can be clamped or screwed to the guide rails. These limit the router’s travel, defining the length of the mortise.
- Clamp Integration: Install toggle clamps on the jig base to hold the workpiece securely.
Usage:
- Mark the center and length of your mortise on the workpiece.
- Clamp the workpiece into the jig.
- Adjust the fence to center the mortise precisely on your workpiece.
- Adjust the stop blocks to define the mortise length.
- Install a straight or spiral upcut bit in your router.
- Plunge the router repeatedly within the confined area, clearing chips, until the desired depth is reached.
4. Edge-Forming Guide
This simple jig helps create perfectly even chamfers, rounds, or decorative edges on workpieces where the router’s bearing may not register correctly (e.g., small pieces, irregular shapes).
Materials:
- 1/2″ or 3/4″ plywood or MDF, approximately 6″ x 12″
- Two small blocks of hardwood or plywood, 1″ x 1″ x 6″
- Wood screws, wood glue
Construction:
- Base Plate: Take the 6″x12″ plywood.
- Fence Strips: Glue and screw the two small hardwood blocks to one edge of the base, creating a fence. The key is to ensure this fence is perfectly straight.
- Router Overhang: The router bit will extend past this fence by the amount of your desired profile. Make sure the fence is tall enough to register against your workpiece.
Usage:
- Place the workpiece against the fence.
- Clamp the jig and workpiece securely to your workbench.
- Set your router bit depth.
- Run the router along the fence, carefully forming the edge.
These foundational jigs will significantly enhance your router’s capabilities, allowing you to create precise joinery and finishes that are difficult to achieve freehand.
Maximizing Safety and Repeatability with DIY Woodworking Jigs for the Router
While jigs significantly improve safety, they are not a substitute for proper technique and personal protective equipment. Always wear safety glasses and hearing protection when operating a router. Furthermore, always ensure your router bits are sharp and clean; dull bits can lead to burning, tear-out, and increased risk of kickback.
To maximize repeatability, meticulous setup is crucial. When building any of these DIY woodworking jigs for the router, take the time to measure precisely. Even a small error in jig construction can lead to cumulative inaccuracies in your project. A square, ruler, and marking knife are your best friends here. For repetitive tasks, consider marking settings on your jigs for quick recall. For instance, drill holes for common dado widths or clearly label pivot points on your circle jig.
Advanced Jig Concepts and Customizations
Once you’ve mastered these basic jigs, you can begin to explore more advanced concepts and customize jigs for specific project needs.

- Router Table Integration: Many handheld router jigs can inspire or be adapted for use on a router table. A solid fence and sleds are essentially large jigs themselves.
- Dovetail and Box Joint Jigs: While more complex, these jigs allow for intricate joinery that greatly enhances the strength and aesthetic of your pieces. There are many designs available, often involving templates and guide bushings.
- Template Guides: Investing in a set of router template guide bushings expands the utility of any jig or template you create, allowing the router bit to follow specific patterns.
- Vacuum Clamping: For ultimate stability, especially with larger jigs or workpieces, integrating a vacuum clamping system can be a game-changer.
- T-Track Systems: Incorporating T-track into your jigs or workbench allows for highly adjustable and secure clamping and fence mechanisms, making jig setup faster and more versatile. For enhancing workshop efficiency, consider other DIY smart workshop upgrades.
The beauty of DIY woodworking jigs for the router lies in their adaptability. Don’t be afraid to experiment with materials, clamping methods, and guide mechanisms to solve unique routing challenges in your projects for 2026. Keep a scrap bin handy; it’s a treasure trove for jig components.
Conclusion
The journey of mastering woodworking with a router is profoundly enriched by the embrace of DIY woodworking jigs. These ingenious fixtures are not merely aids; they are fundamental components that dramatically enhance precision, ensure repeatable results, and critically, elevate safety in the workshop. By investing time in constructing essential jigs like those for circle cutting, dados, rabbets, and mortises, woodworkers gain unparalleled control over their router operations, transforming complex cuts into routine, accurate tasks.
The satisfaction derived from building your own tools, tailored to your specific needs and projects in 2026, is immense. It fosters a deeper understanding of woodworking mechanics and encourages innovative problem-solving. Remember to prioritize safety by always wearing appropriate personal protective equipment, maintaining sharp bits, and double-checking all measurements and setups. With these DIY router jigs as your allies, you are well-equipped to tackle ambitious projects with confidence, precision, and an uncompromised commitment to safety.
Actionable Next Steps:
- Start Simple: Choose one of the foundational jigs (e.g., the circle cutting jig or dado jig) and gather the necessary scrap materials.
- Build and Test: Construct the jig, taking meticulous care with measurements and assembly. Test it on scrap wood before using it on a project piece.
- Refine and Customize: Don’t hesitate to modify or enhance your jigs based on your specific router, preferences, and project requirements.
- Explore Further: Once comfortable, research and attempt more advanced jigs like those for dovetails or box joints to expand your joinery capabilities.
- Prioritize Safety: Always review router safety guidelines before each use, and ensure your jigs are securely clamped and stable.
Meta Title: DIY Router Jigs: Boost Precision & Safety for Complex Wood Cuts Meta Description: Build DIY woodworking jigs for your router to enhance precision and safety for complex cuts. Plans for circle, dado, mortising, and edge-forming jigs.
