
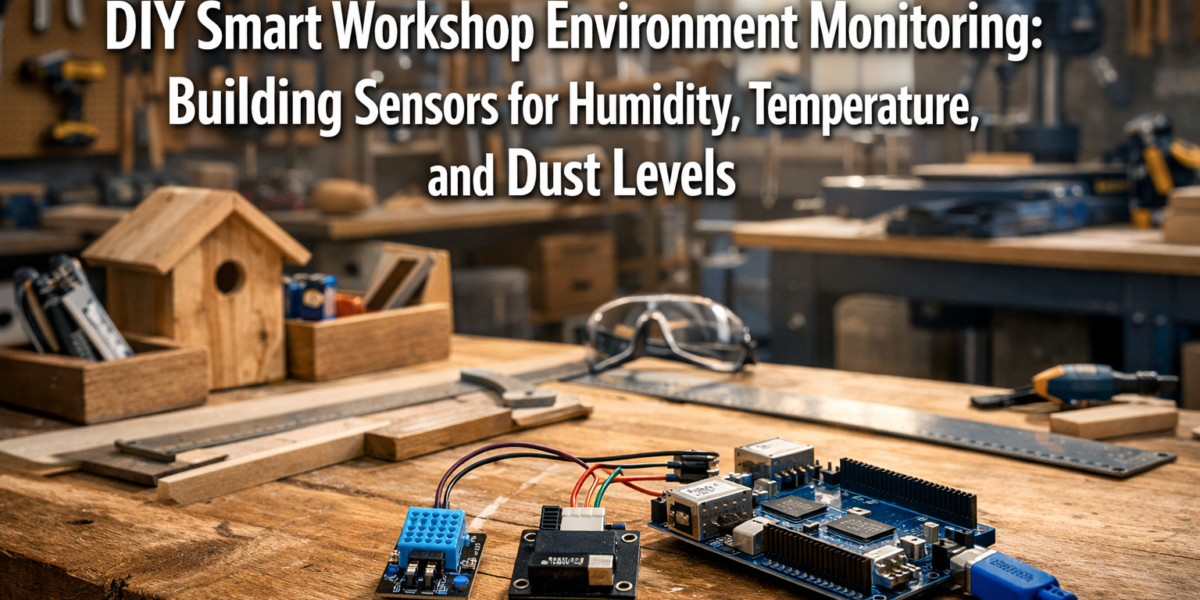

The air in your workshop isn’t just air; it’s a critical, often overlooked, factor determining the longevity of your materials, the precision of your work, and even your personal health. Unseen fluctuations in humidity, temperature, and airborne dust can warp wood, corrode tools, and irritate respiratory systems. While commercial monitoring systems exist, a more empowering and cost-effective approach for the modern maker is a truly integrated solution. This article delves into the transformative world of DIY Smart Workshop Environment Monitoring: Building Sensors for Humidity, Temperature, and Dust Levels, providing woodworkers and craftspeople with the knowledge to construct their own intelligent environmental control.
By leveraging readily available microcontrollers and sensors, you can create a custom system that not only alerts you to adverse conditions but also logs data, helping you understand your workshop’s unique climate patterns. This proactive management ensures your valuable materials remain pristine, your tools stay sharp, and your workspace remains a safe haven for creativity.

Key Takeaways
- Building DIY environmental sensors offers a cost-effective and customizable solution for workshop monitoring.
- Humidity and temperature control are crucial for preventing wood warping, cracking, and tool corrosion.
- Monitoring dust levels protects respiratory health and improves air quality in the workspace.
- Arduino or ESP-based microcontrollers are ideal for integrating various sensors and enabling smart connectivity.
- Data logging and real-time alerts enhance workshop safety, material preservation, and overall operational efficiency.
The Importance of Monitoring Your Workshop Environment in 2026
In 2026, as craftsmanship continues to merge with technology, understanding and controlling your workshop’s environment is more vital than ever. Wood, a hygroscopic material, constantly exchanges moisture with the surrounding air. This process, known as wood movement, can lead to undesirable effects such as warping, cracking, and joint failure if humidity levels fluctuate too dramatically. Beyond wood, high humidity can lead to rust on precision tools, while extreme temperatures can affect the performance of glues, finishes, and electronic equipment.
Dust, a pervasive byproduct of nearly all workshop activities, presents a significant health hazard. Fine particulate matter (PM2.5 and PM10) can penetrate deep into the lungs, leading to respiratory issues and exacerbating conditions like asthma. Moreover, dust accumulation can damage sensitive electronics and even pose a fire risk. A robust DIY Smart Workshop Environment Monitoring: Building Sensors for Humidity, Temperature, and Dust Levels system empowers you to mitigate these risks effectively.
Humidity: The Silent Destroyer of Wood
Ideal humidity for most woodworking workshops ranges between 40-60%. Outside this range, wood can experience significant stress. Too dry, and it shrinks and cracks; too humid, and it swells and warps. Monitoring this factor helps you maintain stable conditions, preserving the integrity of your projects and raw materials. For further reading on how wood behaves, consider our article on Understanding Wood Movement: How to Design and Build Furniture That.
Temperature: Affecting Adhesives and Comfort
While less critical for wood movement than humidity, extreme temperatures can still be detrimental. Cold temperatures can slow the curing time of glues and finishes, while excessively hot conditions can lead to premature drying or even off-gassing of certain chemicals. A comfortable working temperature also enhances productivity and safety.
Dust Levels: Protecting Your Lungs and Equipment
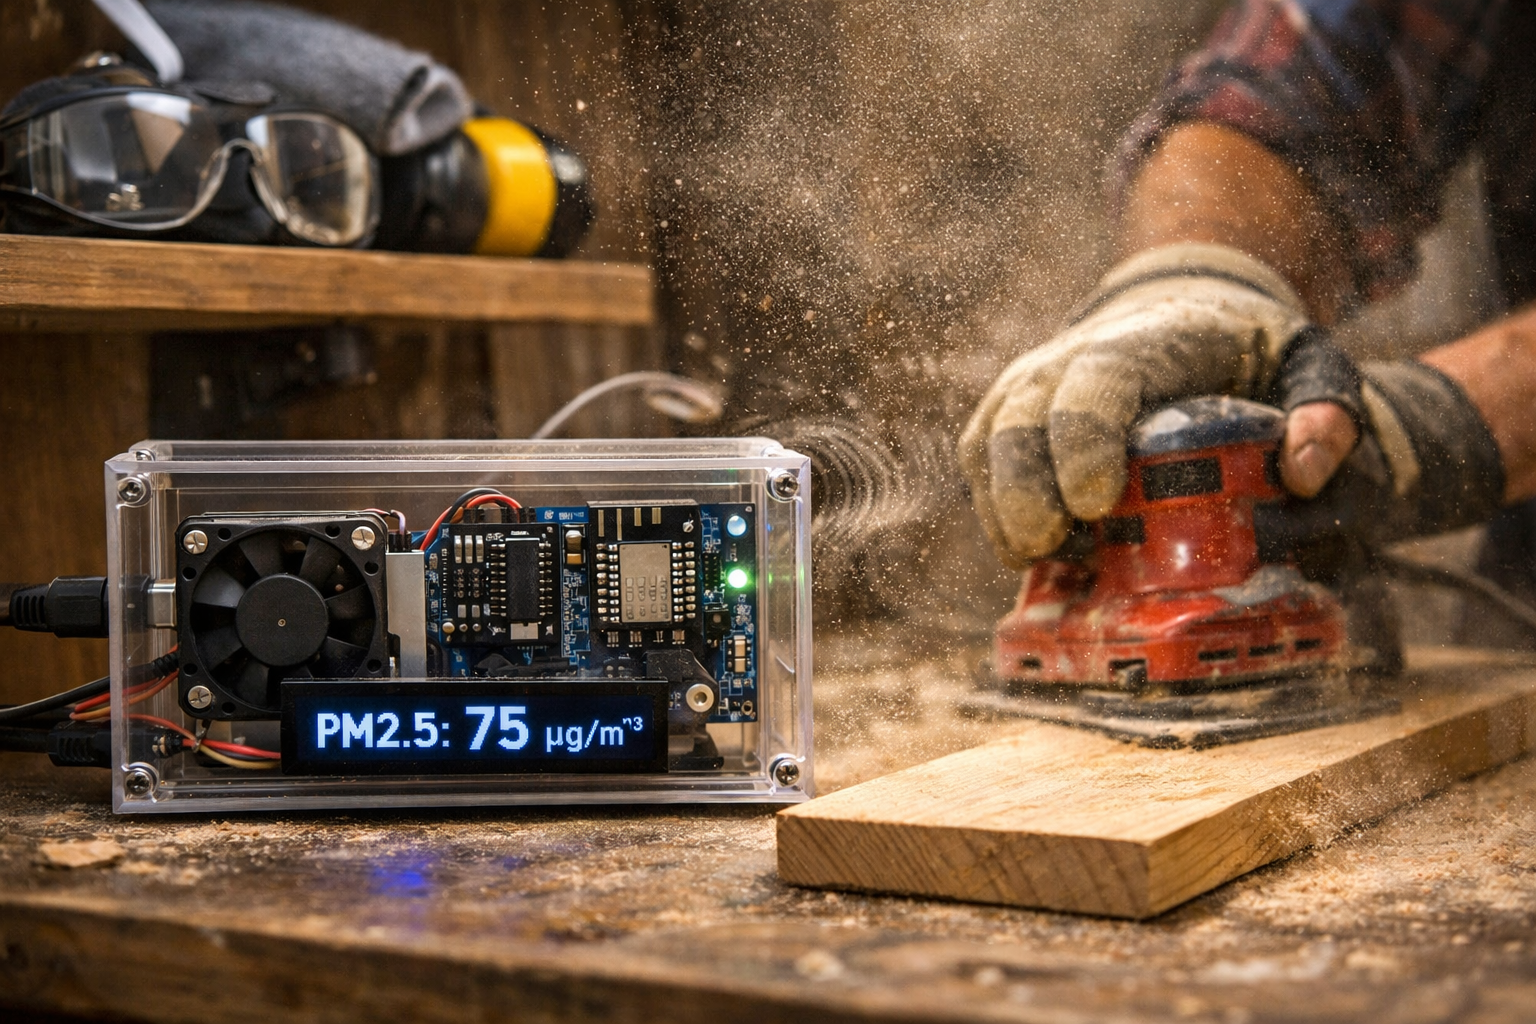
Dust is perhaps the most insidious threat in a workshop. Effective dust collection is paramount, but monitoring particle levels provides an extra layer of protection, indicating when your system might be failing or when it’s time to take a break or don additional PPE. This is particularly important for activities like sanding and routing, which generate vast amounts of fine dust.
Building Your DIY Smart Workshop Environment Monitoring System: Core Components and Assembly
Embarking on a DIY Smart Workshop Environment Monitoring: Building Sensors for Humidity, Temperature, and Dust Levels project requires a few key components and a basic understanding of electronics. The beauty of a DIY approach is its scalability and flexibility; you can start simple and add features as your skills grow.
Essential Components
- Microcontroller:
- Arduino Uno/Nano: Great for beginners, robust ecosystem.
- ESP32/ESP8266: Highly recommended for smart workshop applications due to built-in Wi-Fi, allowing data to be sent to the cloud, a local server, or even a smartphone app. These are crucial for creating a truly “smart” system.
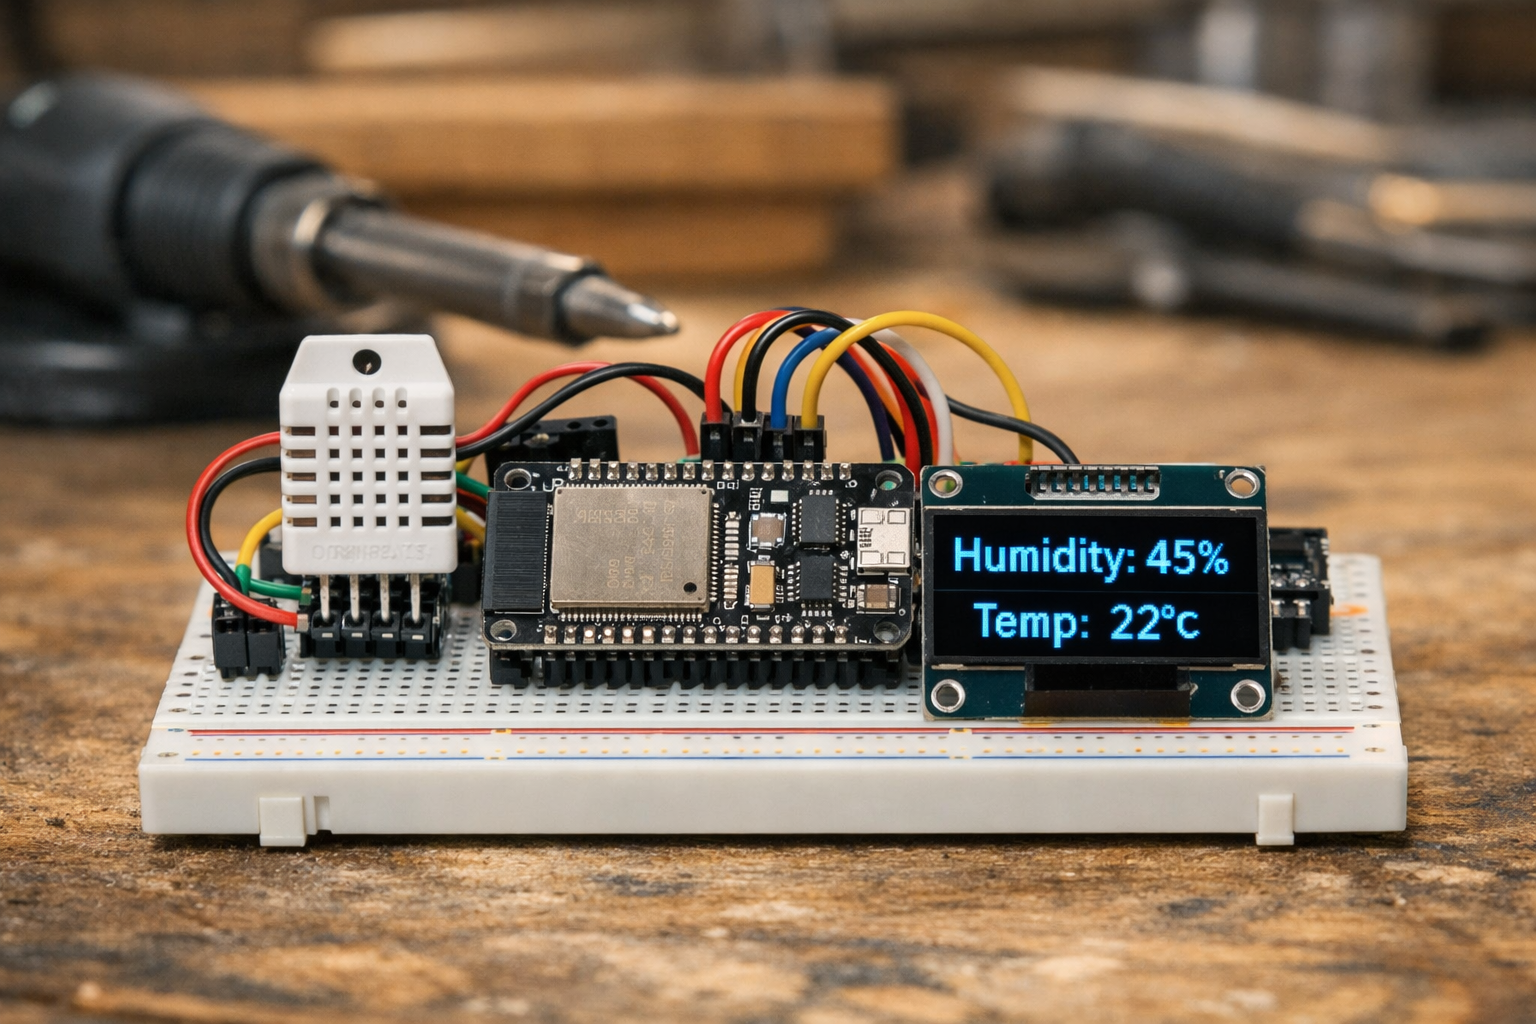
- Humidity and Temperature Sensor:
- DHT11/DHT22: Affordable and widely available. DHT22 offers better accuracy and range.
- BME280: More advanced, measuring humidity, temperature, and barometric pressure.
- Dust Sensor (Particulate Matter Sensor):
- PMS5003/PMSA003I: Reliable sensors for measuring PM1.0, PM2.5, and PM10 levels. These use laser scattering to detect particle counts and sizes.
- GP2Y1010AU0F (Sharp Dust Sensor): A simpler, less expensive analog option, though less precise than laser-based sensors.
- Display (Optional but Recommended):
- OLED Display (e.g., SSD1306): Small, low-power, and clear for displaying real-time data directly on the device.
- Connectivity (for Smart Features):
- Built-in Wi-Fi on ESP32/ESP8266.
- Ethernet shield for Arduino (if Wi-Fi is not preferred).
- Power Supply:
- USB power adapter (e.g., 5V, 1A).
- Battery pack for portability (if desired).
- Miscellaneous:
- Breadboard, jumper wires, resistors, soldering iron, project enclosure.
Assembly Steps (Simplified)
- Gather Your Components: Ensure you have all the necessary sensors, microcontroller, and supporting electronics.
- Wire the Sensors: Connect the sensors to your microcontroller according to their datasheets. This typically involves power (VCC), ground (GND), and a data pin. For example, a DHT22 connects to a digital pin, while a PMSA003I might use a serial (UART) connection.
- Tip: Start with one sensor at a time to simplify troubleshooting.
- Write the Code (Sketch):
- Use the Arduino IDE (or a similar environment for ESP boards).
- Install necessary libraries for each sensor (e.g., DHT sensor library, Adafruit SSD1306 library for OLED).
- Write code to:
- Initialize the sensors.
- Read data from each sensor at regular intervals.
- Print data to the serial monitor (for debugging) or display it on the OLED.
- For smart features:
- Connect to Wi-Fi.
- Send data to a cloud platform (e.g., Adafruit IO, ThingSpeak, Home Assistant) or a local server.
- Implement conditional alerts (e.g., if humidity > 60%, send notification).
- Test and Calibrate: Power up your system and verify that all sensors are providing logical readings. Some sensors might require minor software calibration.
- Enclose Your Project: Protect your electronics from dust and physical damage by placing them in a suitable enclosure. This could be a 3D-printed box, a small plastic project box, or even a custom wooden enclosure.
For more hands-on building projects, you might also find inspiration in guides like Building a Compact and Ergonomic Workbench for Small Workshops or Building Modular Wood Storage Systems for Small Workshops to integrate your monitoring system seamlessly.
Integrating Your Sensors for a Truly Smart Workshop Environment
A truly smart workshop leverages connectivity to provide actionable insights and automated responses. This goes beyond just displaying numbers; it involves data logging, visualization, and intelligent alerts that can protect your projects and health. Your DIY Smart Workshop Environment Monitoring: Building Sensors for Humidity, Temperature, and Dust Levels setup can become the nerve center of your workspace.
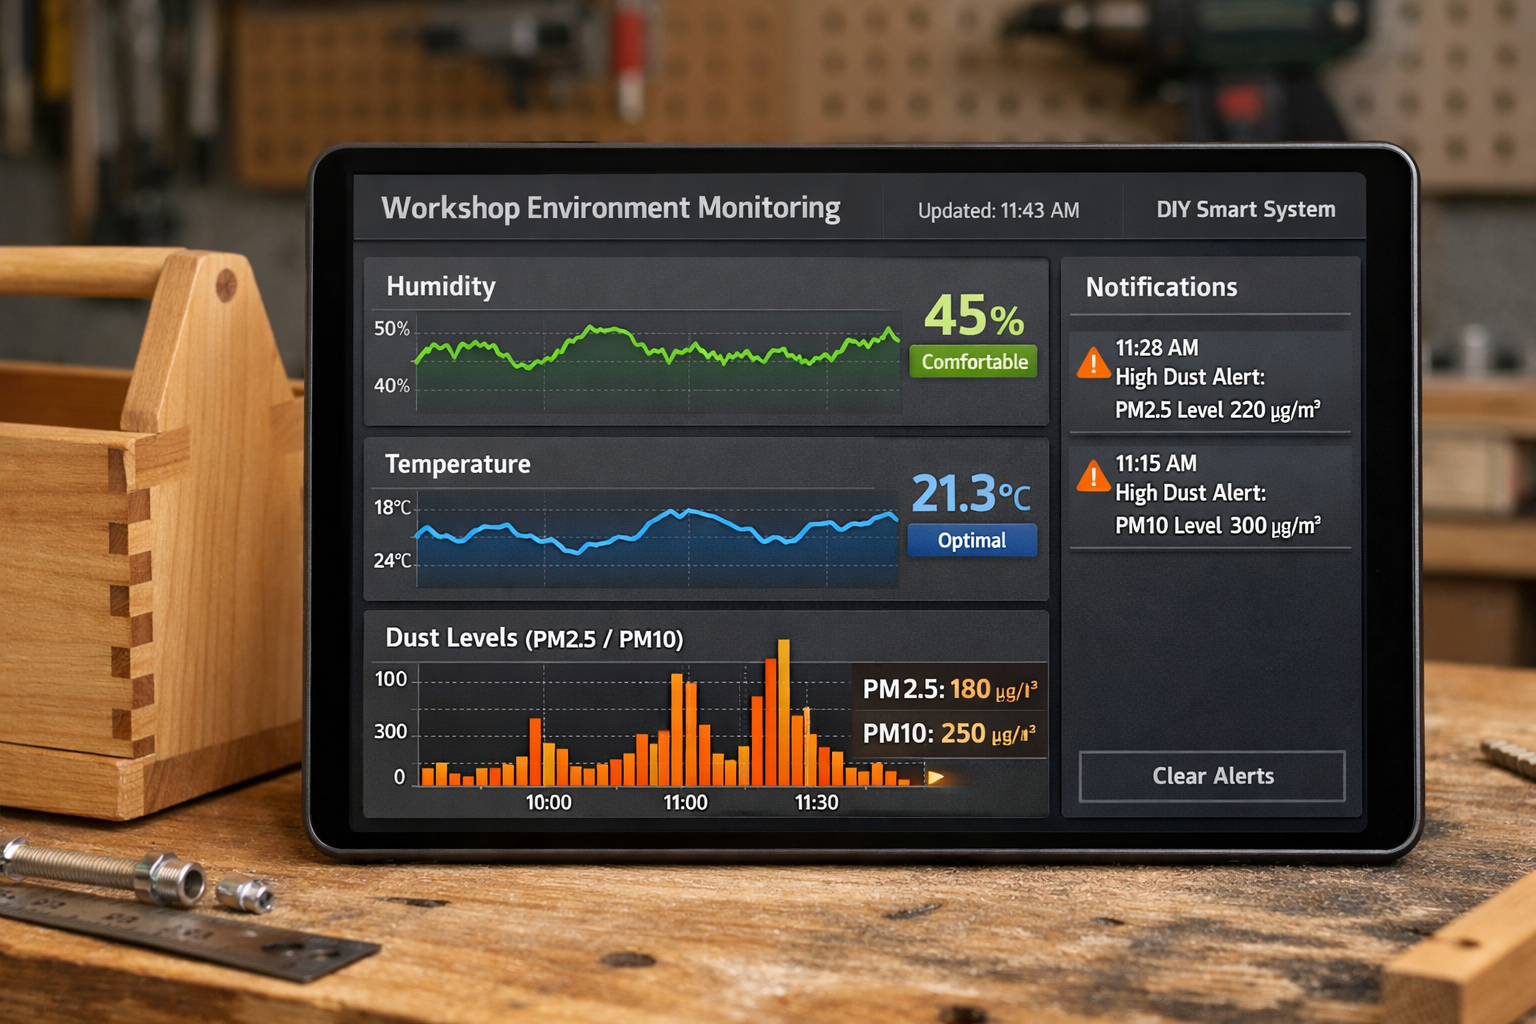
Data Logging and Visualization
Once your sensors are operational, the next step is to log the data over time. This provides historical context and helps identify trends.
- Cloud Platforms: Services like Adafruit IO, ThingSpeak, or even Google Sheets (via IFTTT) allow you to send sensor data from your ESP-based microcontroller to the cloud. These platforms often provide easy-to-use dashboards for visualizing your data with graphs and charts.
- Local Server (Home Assistant): For those with a more advanced home automation setup, integrating your sensors into Home Assistant (a free, open-source home automation platform) offers unparalleled control and privacy. You can create custom dashboards, integrate with other smart devices, and manage all your data locally.
- SD Card Module: For simpler, offline data logging, an SD card module connected to your microcontroller can save sensor readings to a file for later analysis.
Real-time Alerts and Notifications
The “smart” aspect truly shines with automated alerts. Imagine getting a notification on your phone if your workshop humidity drops below optimal levels or if dust levels spike while you’re away.
- Email/SMS: Many cloud platforms and Home Assistant can trigger email or SMS notifications based on predefined thresholds.
- Push Notifications: Dedicated smartphone apps for platforms like Home Assistant or custom apps built with tools like Blynk can send push notifications directly to your device.
- Visual/Audible Alarms: Your microcontroller can activate an LED or a buzzer in the workshop itself if conditions become critical, providing immediate feedback.
Automation and Control
The ultimate goal of a smart monitoring system is to enable automation. While more advanced, this can involve linking your sensor data to control other devices.
- Dehumidifier/Humidifier Control: If humidity drops too low, your system could activate a smart plug connected to a humidifier. Conversely, a high humidity reading could trigger a dehumidifier.
- Air Purifier/Dust Collector Control: Elevated dust levels could automatically turn on your shop’s air purifier or dust collector, ensuring rapid air quality improvement.
- Ventilation: Smart vents or exhaust fans could be triggered to improve air circulation when temperatures are too high or air quality deteriorates.
Practical Considerations
- Sensor Placement: Place humidity and temperature sensors away from direct sunlight, heat sources, or drafts for accurate readings. Dust sensors should be positioned in areas where dust is likely to accumulate or generated, but also away from direct airflow from dust collectors to avoid skewed readings.
- Power Reliability: Ensure a stable power supply for continuous monitoring.
- Wi-Fi Coverage: For connected systems, reliable Wi-Fi coverage in your workshop is essential.
By implementing these smart integrations, your DIY monitoring system transforms from a simple sensor array into a powerful tool that actively contributes to a healthier, more productive, and safer woodworking environment. It allows you to protect your investment in materials and tools, while safeguarding your health in the process.
Conclusion
The journey of creating a DIY Smart Workshop Environment Monitoring: Building Sensors for Humidity, Temperature, and Dust Levels system is an empowering one, merging the practicalities of woodworking with the innovations of smart technology. In 2026, maintaining optimal environmental conditions in your workshop is no longer a luxury but a fundamental requirement for preserving materials, protecting tools, and safeguarding your health.

By building your own sensors, you gain an intimate understanding of your workspace, empowering you to make informed decisions about ventilation, dust collection, and material storage. The satisfaction of crafting a functional, intelligent system that actively contributes to a better woodworking experience is immense. Start with basic temperature and humidity, then expand to dust monitoring and advanced automations. Your hands-on effort will not only result in a superior workshop but also deepen your appreciation for both traditional craft and modern innovation.
Actionable Next Steps:
- Start Small: Purchase a basic microcontroller (like an ESP32) and a DHT22 sensor to get acquainted with the wiring and coding.
- Expand Gradually: Once comfortable, add a dust sensor (e.g., PMSA003I) and integrate an OLED display for local readings.
- Embrace Connectivity: Experiment with sending data to a cloud dashboard or a local home automation platform to unlock smart features and remote monitoring.
- Build an Enclosure: Design and build a custom enclosure for your sensor system, perhaps using some of the woodworking skills you’re protecting!
- Refine and Automate: As you gain experience, explore automating devices like humidifiers or air purifiers based on your sensor data.
SEO Meta Title: DIY Smart Workshop Environment Monitoring in 2026 SEO Meta Description: Build DIY smart sensors for humidity, temperature, and dust levels in your workshop. Protect wood, tools, and health with custom monitoring systems in 2026.
