
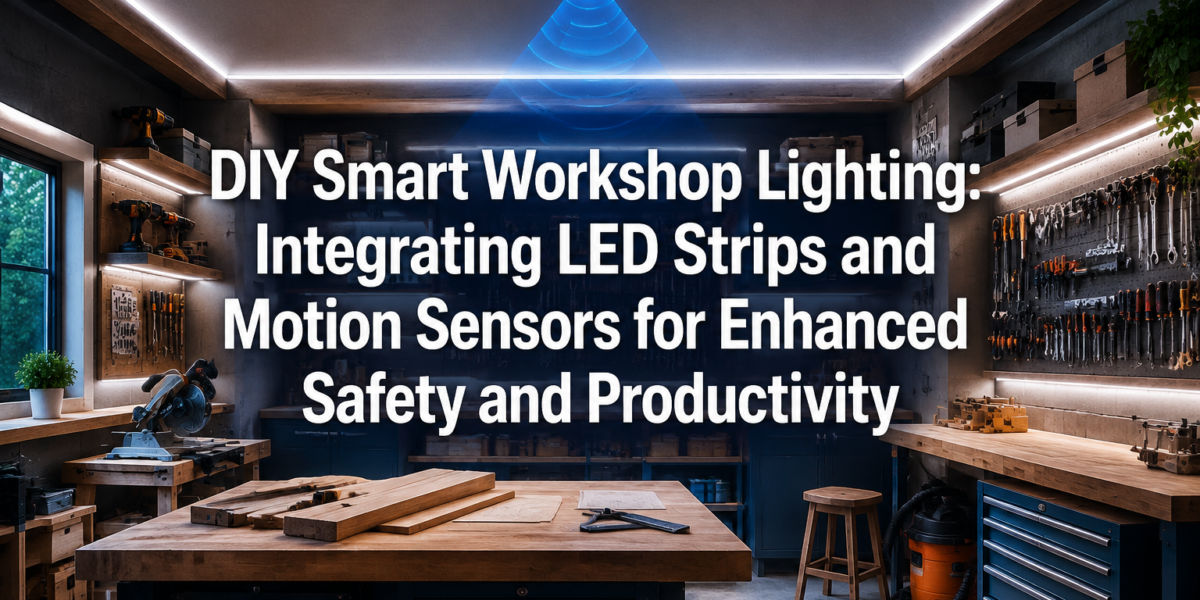

A staggering 30% of workshop accidents are attributed to poor lighting conditions, leading to miscuts, trips, and eye strain. This often-overlooked aspect of workshop design directly impacts both safety and efficiency, yet many DIY enthusiasts continue to operate in suboptimal environments. Fortunately, creating a superior lighting setup is more accessible than ever, thanks to advancements in LED technology and smart home integration. This article delves into the transformative potential of DIY Smart Workshop Lighting: Integrating LED Strips and Motion Sensors for Enhanced Safety and Productivity in your creative space in 2026.
Modern LED strips, combined with intelligent motion sensors and even voice control, offer a cost-effective and highly customizable solution to illuminate every corner of your workshop, ensuring optimal visibility precisely when and where it’s needed. Beyond mere brightness, smart lighting enhances safety by reducing shadows, conserves energy by automating usage, and boosts productivity by providing an adaptive, comfortable working environment.

Key Takeaways
- Enhanced Safety: Motion-activated, bright LED lighting drastically reduces shadows and improves visibility, minimizing accident risks from power tools and sharp objects.
- Optimized Productivity: Consistent, customizable illumination allows for greater precision in detailed tasks and reduces eye fatigue during long working sessions.
- Significant Energy Savings: Motion sensors ensure lights are only active when the workshop is occupied, leading to substantial reductions in electricity consumption.
- Smart Integration: Voice control and app-based management offer unparalleled convenience, allowing for hands-free adjustments and scheduling.
- Cost-Effective DIY Project: Implementing smart LED strip lighting is an achievable and affordable upgrade that delivers high returns on investment in safety and efficiency.
The Foundation of Smart Workshop Lighting: LEDs and Motion Sensors

At the heart of any effective DIY Smart Workshop Lighting: Integrating LED Strips and Motion Sensors for Enhanced Safety and Productivity system are two core components: LED strips and motion sensors. Understanding their benefits and how they work together is crucial for successful implementation.
LED (Light Emitting Diode) strips have revolutionized workshop lighting due to their incredible efficiency, longevity, and versatility. Unlike traditional fluorescent tubes or incandescent bulbs, LEDs consume significantly less power, produce minimal heat, and offer a much longer lifespan, often tens of thousands of hours. They come in various color temperatures (measured in Kelvin), allowing you to choose between cool white light (5000K-6500K) ideal for task lighting, or warmer tones for ambient illumination. Their flexible, adhesive backing makes them easy to install in tight spaces, under shelves, or along workbench edges, providing uniform, shadow-free light exactly where you need it most.
Motion sensors, typically Passive Infrared (PIR) sensors, detect changes in infrared radiation, which is emitted by moving objects like a person. When a sensor detects movement, it triggers the connected lights to turn on. After a pre-set period of no activity, the lights automatically turn off. This simple automation is a game-changer for workshops, preventing lights from being left on unnecessarily and saving considerable energy. Furthermore, automatic lighting provides an immediate safety boost, illuminating paths and workspaces the moment you enter, without fumbling for a switch.
Why Choose LED Strips for Your Workshop?
| Feature | Benefit for Workshop |
|---|---|
| Energy Efficiency | Low power consumption, reduced electricity bills 💡 |
| Long Lifespan | Fewer replacements, less maintenance effort |
| Customizable Brightness | Dimmable options for various tasks |
| Flexible Installation | Mounts easily under cabinets, above benches |
| Low Heat Emission | Safer around flammable materials and comfortable |
| Instant On | No warm-up time, immediate light for safety |
| Variety of Color Temps | Choose ideal light for specific tasks (e.g., 5000K for detail work) |
Integrating these two elements creates a dynamic and responsive lighting system. Imagine stepping into your workshop with a heavy sheet of plywood, and the lights automatically flood the area with bright, crisp illumination, without you having to set anything down. This is the power of DIY Smart Workshop Lighting: Integrating LED Strips and Motion Sensors for Enhanced Safety and Productivity.
Planning Your Smart Lighting Layout and Components
Effective planning is paramount for a successful DIY Smart Workshop Lighting: Integrating LED Strips and Motion Sensors for Enhanced Safety and Productivity project. Before purchasing any components, take the time to map out your workshop, identify key work zones, and consider the specific lighting needs of each area.
Step 1: Assess Your Workshop Zones
Every workshop has distinct areas with varying lighting requirements. Consider:
- General Illumination: Overhead lighting to brighten the entire space.
- Workbench Task Lighting: Bright, shadow-free light directly over your main work surfaces.
- Machine Stations: Dedicated lighting for stationary tools like table saws, bandsaws, and drill presses.
- Storage Areas: Sufficient light to easily locate tools and materials.
- Passageways: Safe illumination for movement within the workshop.
For areas like your main workbench, consider a high-CRI (Color Rendering Index) LED strip to ensure colors are accurately represented, which is crucial for finishing work or when selecting specific wood tones. You might also want to explore options for building a compact and ergonomic workbench for small workshops that can easily integrate lighting during its construction.
Step 2: Component Selection
Once your layout is planned, you’ll need to select the right components.
LED Strips:
- Brightness (Lumens per foot/meter): Choose strips with sufficient brightness for your tasks. For general lighting, 500-800 lumens/meter is good; for task lighting, aim for 1000+ lumens/meter.
- Color Temperature: 5000K-6500K (daylight white) is often preferred for workshops as it mimics natural light and enhances clarity.
- Voltage: Most LED strips are 12V or 24V DC. Ensure your power supply matches.
- IP Rating: If your workshop is prone to dust or moisture, look for an IP65 or higher rating to protect against ingress.
Power Supplies (Drivers):
- You’ll need a power supply (transformer) that converts your AC mains power to the DC voltage required by your LED strips.
- Calculate the total wattage of your LED strips (watts per meter × total length) and select a power supply with at least 20% more capacity than your total wattage. This overhead prevents overheating and prolongs the life of the driver.
Motion Sensors:
- Type: PIR sensors are common and effective.
- Detection Angle and Range: Choose sensors that cover the desired area. Wide-angle sensors are good for general room detection.
- Adjustable Settings: Look for sensors with adjustable sensitivity, lux (ambient light) settings, and time-on duration.
- Connectivity: For smart integration, select Wi-Fi enabled sensors or those compatible with a smart home hub.
Smart Controllers (Optional but Recommended):
- These allow for app control, voice control (via Alexa, Google Assistant), and advanced automation. Options range from simple Wi-Fi dimmer switches to dedicated smart home hubs (e.g., SmartThings, Home Assistant).
- Some LED strip kits come with smart controllers built-in. Consider how this could also be integrated into a larger DIY Smart Home Integration with Custom Woodwork: Hiding Tech with Style project.
Wiring and Connectors:
- Use appropriate gauge wire for your voltage and current.
- Solderless connectors are convenient for connecting LED strips, but soldering offers a more robust connection.
- Aluminum channels with diffusers are excellent for mounting LED strips, providing a clean look, protecting the strips, and diffusing the light for a more even spread.
Remember, safety is paramount. When dealing with electrical components, always ensure the power is off at the breaker. If you’re unsure about wiring, consult a qualified electrician.

Installation and Smart Integration for Enhanced Productivity
With your components ready and your plan in place, it’s time to bring your DIY Smart Workshop Lighting: Integrating LED Strips and Motion Sensors for Enhanced Safety and Productivity to life. This section covers the practical steps of installation and how to integrate smart features for maximum benefit.
Step 1: Mounting LED Strips
- Clean Surfaces: Ensure all mounting surfaces are clean, dry, and free of dust or grease. This is crucial for the adhesive backing of the LED strips.
- Measure and Cut: Measure the lengths needed for each section. Most LED strips can be cut at designated points, usually marked with a scissor icon, without damaging the circuit.
- Install Aluminum Channels (Recommended): For a professional finish and better light diffusion, install aluminum channels first. Secure them with screws or strong adhesive.
- Attach Strips: Peel the adhesive backing and carefully press the LED strips into place within the channels or directly onto your chosen surfaces.
- Connect Strips: Use solderless connectors or solder wires to bridge gaps between strips, especially around corners or between sections of channels.
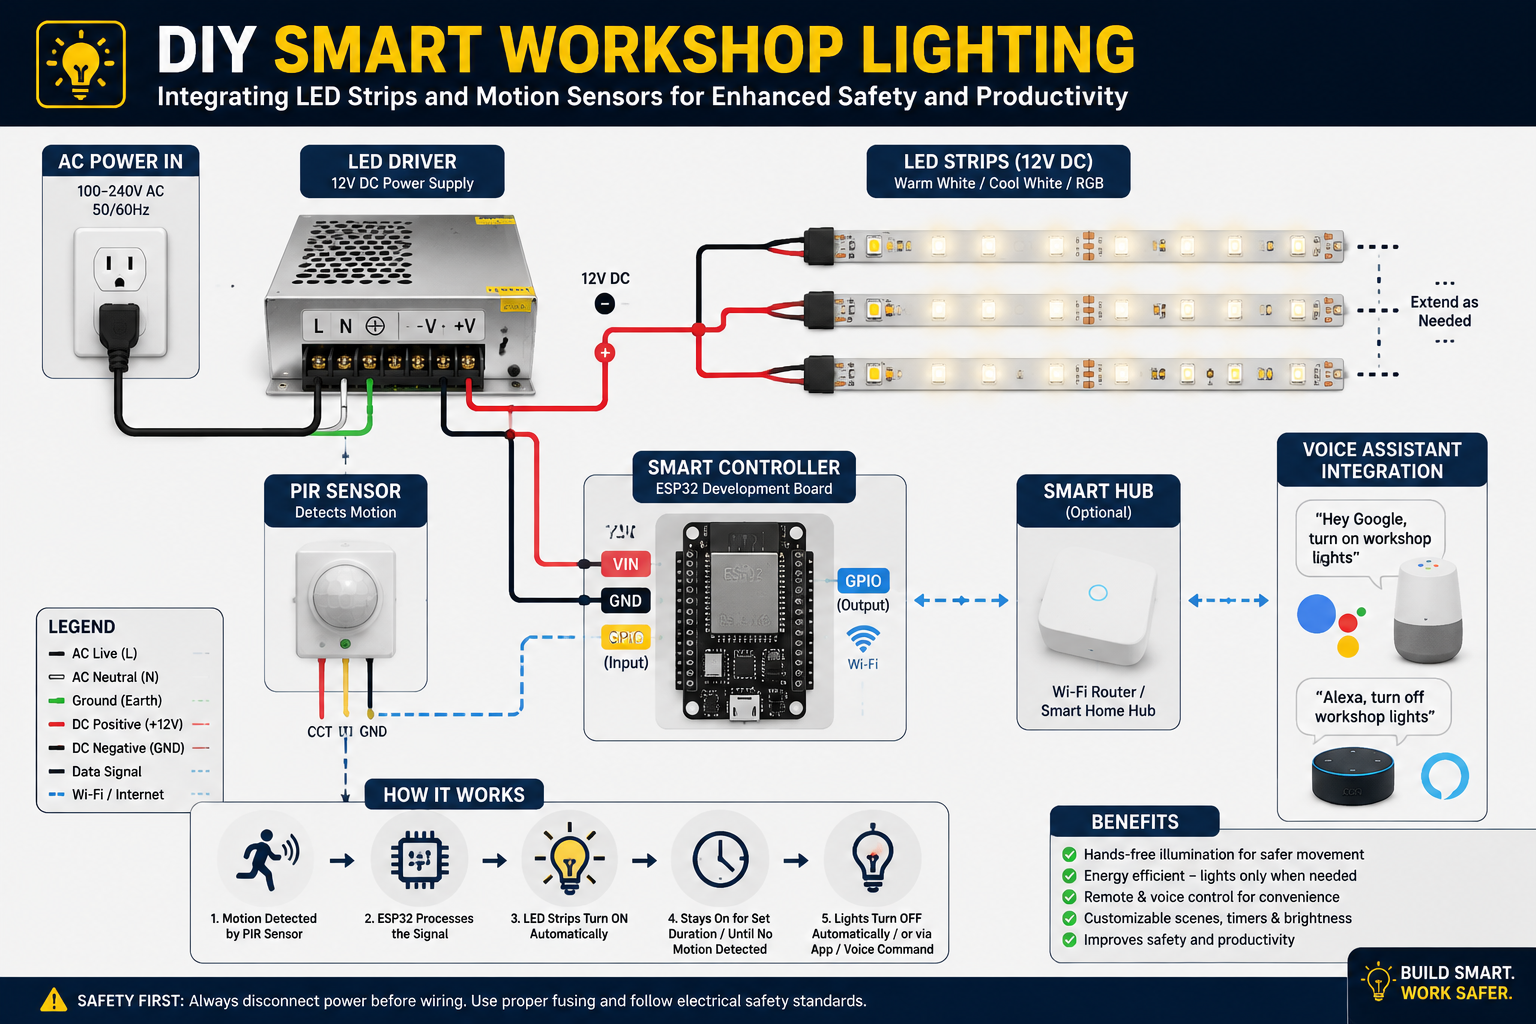
Step 2: Wiring the System
This is where the electrical work comes in. If you’re uncomfortable with wiring, hire a professional.
- Main Power Disconnect: ALWAYS turn off the power at the circuit breaker before beginning any wiring. Use a voltage tester to confirm the power is off.
- Power Supply Placement: Mount your LED power supplies in accessible, well-ventilated locations, away from excessive dust or moisture.
- Connect LED Strips to Power Supply: Connect the positive (+) and negative (-) leads from your LED strips to the corresponding terminals on the DC output of your power supply.
- Connect Motion Sensor:
- Integrated Sensors: If your LED strip controller has a built-in sensor input, follow its specific wiring instructions.
- Standalone Sensors: For standalone motion sensors, they typically act as a switch. Wire the sensor between your power supply and the LED strips (on the DC side for 12V/24V systems). The sensor will then control the power flow to the strips. Ensure the sensor itself is powered correctly (often requiring its own small power source or drawing from the main LED power supply).
- Connect Smart Controller (if applicable): If using a separate smart controller, it will typically sit between the power supply and the LED strips, or it might be an AC-side switch controlling the entire power supply. Follow the manufacturer’s instructions for wiring.
Step 3: Integrating Smart Features
This is where your workshop truly becomes “smart.”
- Sensor Configuration:
- Placement: Position motion sensors to cover key entry points and work zones. Avoid placing them directly above heat sources or in direct sunlight, which can cause false triggers.
- Adjust Settings: Fine-tune the sensor’s sensitivity, time-on duration, and ambient light (lux) settings. For example, you might want lights to stay on for 15-30 minutes after motion stops, and only activate if the ambient light is below a certain level.
- Smart Hub/App Setup:
- Connect Devices: Follow the instructions for your smart controller or hub (e.g., SmartThings, Home Assistant, Philips Hue, Govee). Connect your Wi-Fi enabled motion sensors and LED controllers to your home network.
- Create Routines/Automations: Set up rules like “When motion detected in workshop, turn on workshop lights. When no motion for 15 minutes, turn off workshop lights.” You can also schedule lights to dim or change color temperature at certain times.
- Voice Control:
- Integrate your smart lighting system with voice assistants like Amazon Alexa or Google Assistant. This allows for hands-free control, crucial when your hands are full or dirty. “Alexa, turn on workbench lights,” or “Hey Google, dim workshop lights to 50%.”
For a truly optimized workspace, consider pairing your smart lighting with other organizational improvements like building a mobile dust collection cart for any workshop to keep the air clean and surfaces clear, further enhancing productivity.


Benefits and Best Practices for Maximizing Safety and Productivity
The implementation of DIY Smart Workshop Lighting: Integrating LED Strips and Motion Sensors for Enhanced Safety and Productivity delivers a multitude of advantages beyond just turning lights on and off. When thoughtfully designed and properly maintained, it transforms your workshop into a safer, more efficient, and enjoyable space.
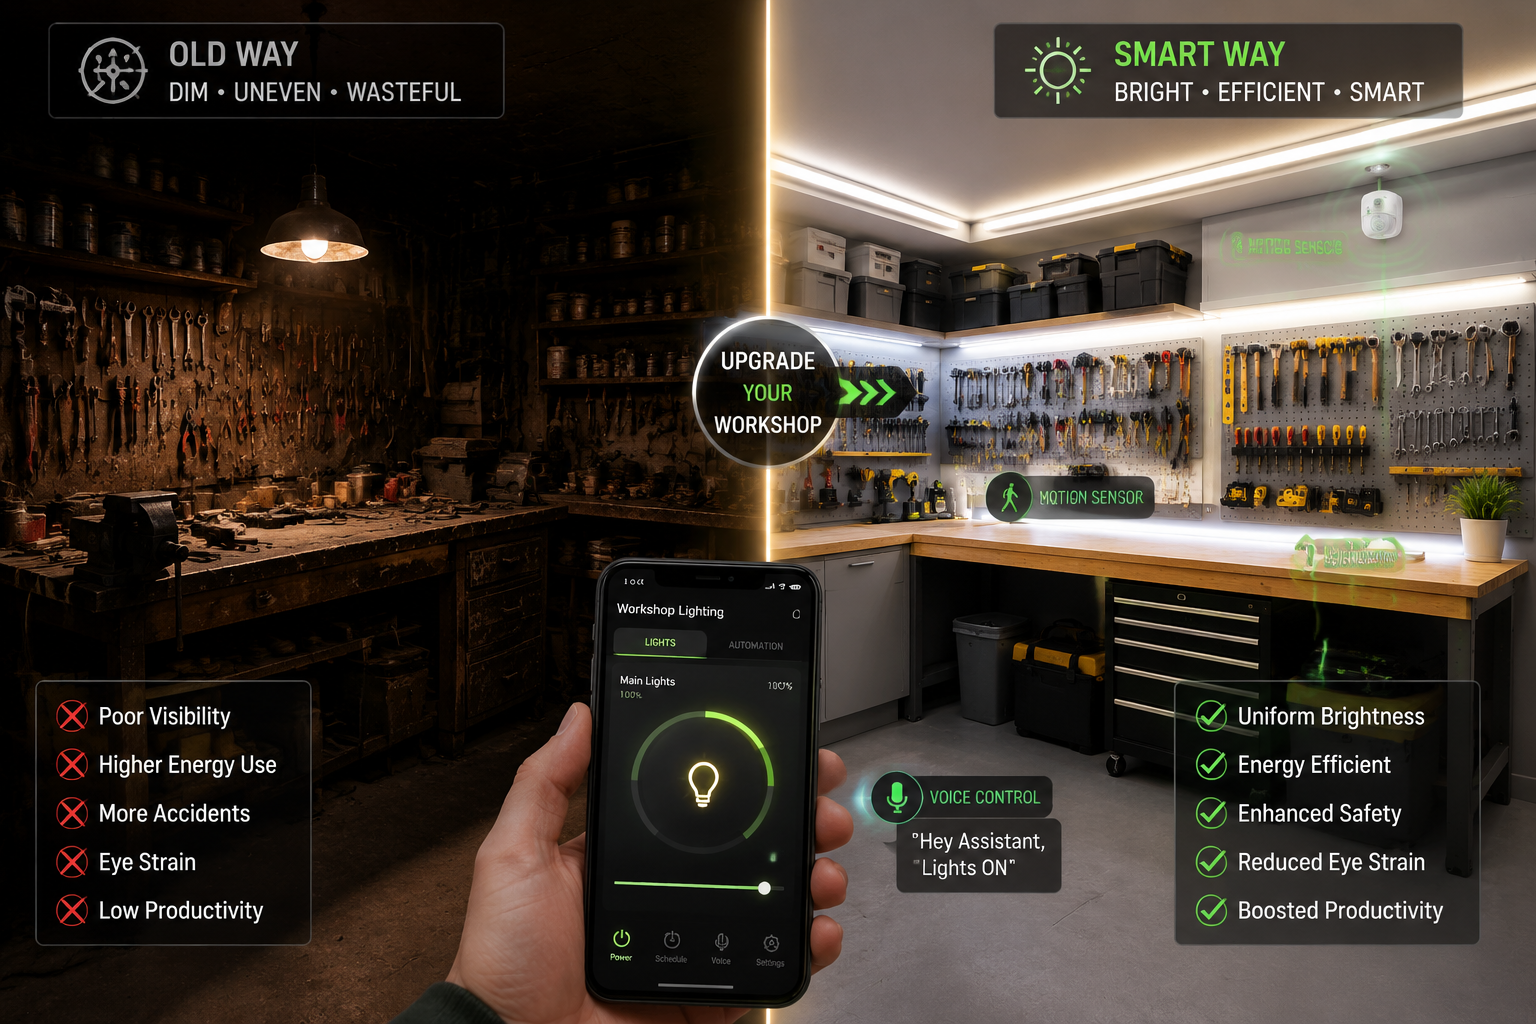
Enhanced Safety
The primary benefit is a significant improvement in workshop safety. Poor lighting is a major contributor to accidents, causing:
- Shadows: Obscuring cuts, drill points, or small components, leading to misalignments and injuries.
- Glare: Causing eye strain and temporary blindness, especially when moving between different light levels.
- Reduced Visibility: Difficulty seeing tool hazards, obstacles on the floor, or the fine details of a project.
Smart LED lighting, especially with motion sensors, addresses these issues directly. Bright, uniform light eliminates shadows. Instant-on capability means no more fumbling in the dark. Furthermore, the ability to control color temperature can reduce eye fatigue, allowing for longer, more focused work sessions. Think about tasks requiring precision, like detailed carving (see Advanced Wood Carving Techniques for Decorative Furniture Accents) or fine joinery with hand tool mastery – optimal lighting is indispensable.
Boosted Productivity
Beyond safety, a well-lit workshop is a productive workshop.
- Reduced Eye Strain: Proper illumination minimizes the effort your eyes need to make, reducing fatigue and allowing for longer work periods without discomfort.
- Improved Accuracy: Clear visibility directly translates to more precise cuts, measurements, and assemblies.
- Faster Workflow: No time is wasted searching for tools in dimly lit corners or struggling to see project details. Motion sensors ensure the space is always lit when you’re present, keeping workflow seamless.
- Motivation: A bright, inviting workspace can significantly boost morale and encourage more time spent on projects.
Energy Efficiency and Cost Savings
Motion sensors are the champions of energy conservation in a workshop setting. Unlike a typical home, a workshop is often used intermittently. Leaving lights on for hours when no one is present is a common oversight.
- Automatic Shut-off: Sensors ensure lights are only on when motion is detected, preventing wasted electricity.
- LED Efficiency: LED strips are inherently energy-efficient, using a fraction of the power of traditional bulbs.
- Lower Bills: The combination of LED technology and motion-activated control leads to noticeable savings on your electricity bill over time. This makes the initial investment even more worthwhile.
Best Practices for Optimal Performance
To get the most out of your smart lighting system, consider these best practices:
- Layered Lighting: Don’t rely solely on overhead lighting. Combine general ambient light with task-specific lighting at each workbench and machine. Under-cabinet LED strips are excellent for reducing shadows on your work surface.
- Strategic Sensor Placement: Place motion sensors where they have an unobstructed view of entry points and main work areas. Test their range and sensitivity to prevent false triggers or missed activations.
- Appropriate Color Temperature: Stick to 5000K-6500K for most workshop tasks. This “daylight” color temperature provides excellent clarity.
- Diffusion: Use aluminum channels with frosted diffusers for your LED strips. This softens the light, reduces harsh glare, and creates a more aesthetically pleasing, professional look.
- Regular Cleaning: Dust and debris can accumulate on LED strips and diffusers, reducing light output. Periodically wipe them clean.
- Redundancy: Consider having a small, always-on light in case your smart system temporarily fails, or a manual override switch for certain lights.
- Security Integration: Some smart lighting systems can be integrated with security cameras or alarms, flashing lights if unauthorized entry is detected after hours.
By carefully planning, installing, and optimizing your DIY Smart Workshop Lighting: Integrating LED Strips and Motion Sensors for Enhanced Safety and Productivity, you’re not just adding lights; you’re investing in a more productive, safer, and energy-efficient future for your woodworking endeavors.

Conclusion
The evolution of technology has made sophisticated lighting solutions accessible to every DIY enthusiast, transforming even the most humble workshop into a state-of-the-art workspace. Implementing DIY Smart Workshop Lighting: Integrating LED Strips and Motion Sensors for Enhanced Safety and Productivity is more than just an upgrade; it’s a strategic investment in your safety, efficiency, and overall enjoyment of your craft.
By harnessing the power of energy-efficient LED strips and intelligent motion sensors, you can create a dynamic lighting environment that adapts to your presence, illuminates every critical detail, and significantly reduces the risks associated with woodworking. The added convenience of smart home integration, allowing for voice control and customized routines, elevates the experience, making your workshop a truly modern and responsive extension of your creative passion.
Don’t let poor lighting be the bottleneck to your woodworking ambitions. Take the step in 2026 to overhaul your workshop’s illumination. Start by assessing your needs, carefully selecting components, and then confidently install your new system. The enhanced clarity, reduced eye strain, significant energy savings, and the sheer satisfaction of a well-lit, intelligent workspace will undoubtedly make this one of the most rewarding DIY projects you undertake. Your tools, your projects, and most importantly, your safety, will thank you for it.
SEO Meta Title: DIY Smart Workshop Lighting: LED Strips & Motion Sensors SEO Meta Description: Transform your workshop in 2026 with DIY smart LED lighting and motion sensors. Enhance safety, boost productivity, and save energy with this essential upgrade.
