


Imagine a bustling construction site, a serene backyard, or a cramped garage. What’s the common challenge for many hands-on projects? The lack of a stable, dedicated workspace that can adapt to your environment. This article will guide you through Building a Collapsible Outdoor Workbench: Maximizing Portability and Functionality for On-Site Projects and Limited Spaces, transforming the way you approach DIY and professional tasks. A well-designed portable workbench can be the cornerstone of efficiency, allowing you to bring your workshop wherever the work takes you, without sacrificing stability or storage.
Key Takeaways
- Customizable Portability: Design your workbench with quick-release mechanisms and modular components for easy transport and storage.
- Integrated Storage Solutions: Incorporate clever features like tool cubbies, pegboards, and magnetic strips to keep essential tools organized and accessible.
- Robust Functionality: Ensure the design includes stable clamping surfaces, dog holes, and a durable worktop capable of handling various tasks.
- Material Selection Matters: Choose weather-resistant, lightweight yet strong materials to withstand outdoor conditions and facilitate easy movement.
- Optimized for Limited Space: A collapsible design is ideal for small workshops, apartment balconies, or for those who need to reclaim space quickly.
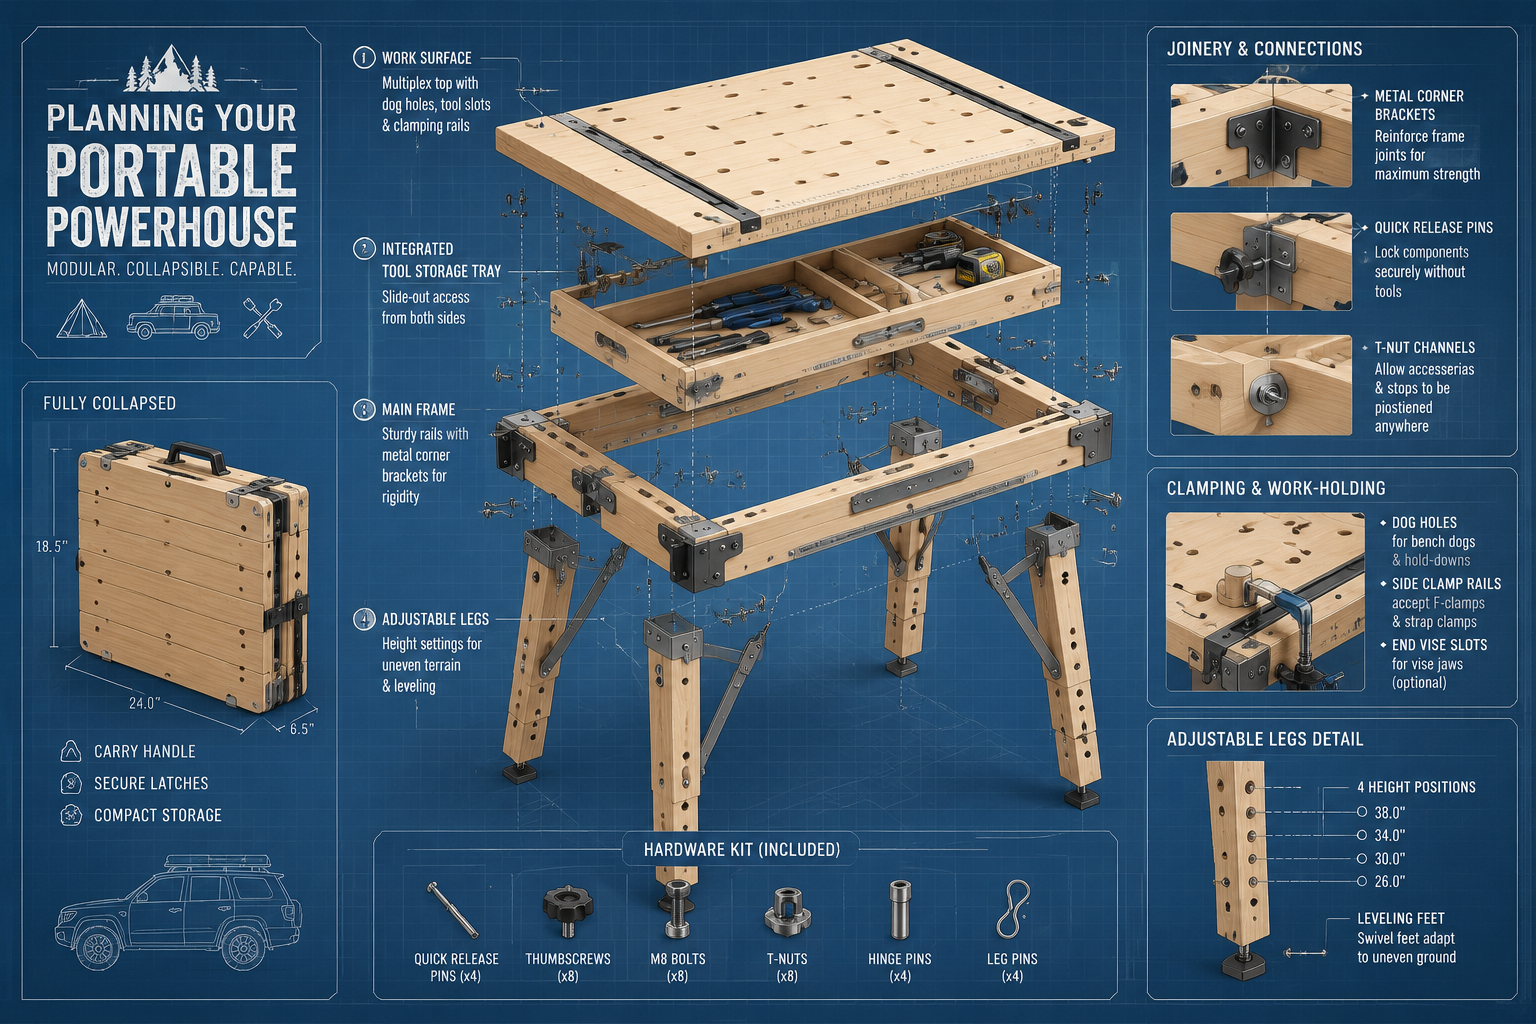
Planning Your Portable Powerhouse: Designing for Collapse and Carry
The first step in building a truly functional collapsible outdoor workbench is meticulous planning. This isn’t just about creating a work surface; it’s about crafting a mobile command center for your projects. The goal is a design that is robust when in use, yet compact and manageable when packed away.

Considerations for your design should include:
- Overall Dimensions: What size work surface do you need for most of your projects? A common size might be 24″x48″ or 30″x60″, but this will depend on your specific needs and available storage space.
- Weight vs. Durability: Lighter materials are easier to transport, but heavier ones often offer more stability. Finding the right balance is crucial.
- Collapse Mechanism: This is the heart of its portability. Options range from simple folding legs to more complex interlocking systems.
- Integrated Storage: How will you keep your tools organized and prevent them from rolling off? Built-in trays, shelves, or a pegboard section can be invaluable.
- Clamping Solutions: A workbench is only as good as its ability to hold your work. Incorporate bench dog holes, T-tracks, or designated areas for clamps.
When thinking about the collapse mechanism, several tried-and-true designs exist:
- Folding Legs (Sawhorse Style): This is perhaps the simplest. The legs fold inward, allowing the tabletop to lay flat. It’s quick to set up but might lack the rigidity of more complex designs.
- Modular Disassembly: The workbench breaks down into several distinct, flat components (e.g., tabletop, leg assemblies, stretcher bars). This offers excellent portability and allows for compact storage, though assembly takes a bit longer.
- Telescoping Legs: Less common for DIY builds due to complexity, but offers adjustable height, which is a significant advantage for various tasks or users.
For maximizing functionality, think beyond just a flat top. A lip around the edge can prevent small parts from rolling off. A dedicated area for a vise or a series of bench dog holes will significantly enhance its utility. Our guide on T-track vs. Dog Holes: Workbench Essentials can provide insights into incorporating versatile clamping options.

Essential Design Features for Portability and Stability
A truly effective collapsible outdoor workbench seamlessly blends ease of transport with rock-solid stability. Here are key design features to consider:
- Quick-Release Hardware: Use wing nuts, cam locks, or toggle clamps where possible to speed up assembly and disassembly without needing extra tools.
- Interlocking Joints: For modular designs, consider half-lap joints, mortise and tenon variations, or even sophisticated sliding dovetails that lock securely when assembled. For more on robust joinery, refer to our Beginner’s Guide to Essential Woodworking Joints.
- Handle Cutouts: Integrate handles into the tabletop or side panels for easier carrying when disassembled.
- Leveling Feet: Adjustable feet can compensate for uneven outdoor surfaces, crucial for maintaining a stable work platform.
- Sacrificial Top: A replaceable plywood top protects the main workbench surface from saw cuts, glue, and paint, extending its lifespan.
Selecting Materials and Constructing Your Workbench
The choice of materials is paramount for Building a Collapsible Outdoor Workbench: Maximizing Portability and Functionality for On-Site Projects and Limited Spaces. It impacts weight, durability, weather resistance, and ultimately, the workbench’s longevity.
Wood Selection for Outdoor Use
For outdoor projects, weather resistance is key.
- Exterior-grade Plywood (Marine Plywood or Treated Plywood): Excellent for the workbench top and larger panels. It resists moisture, warping, and rot better than interior-grade plywood.
- Hardwoods (Oak, Maple, Teak, Ipe): While heavier, hardwoods offer exceptional durability and wear resistance. Teak and Ipe are naturally rot-resistant but can be expensive.
- Softwoods (Pine, Fir): More affordable and lighter, but require thorough sealing and regular maintenance to withstand outdoor elements. Pressure-treated lumber is an option for structural components if properly sealed.
Hardware and Fasteners
Choose corrosion-resistant hardware.
- Stainless Steel or Galvanized Fasteners: Screws, bolts, and nuts should be resistant to rust.
- Heavy-Duty Hinges: For folding legs, select sturdy hinges that can withstand repeated use.
- Quick-Release Clamps/Knobs: Essential for rapid assembly and disassembly.
- Casters (Optional, Lockable): If you need to move it around a small outdoor space or garage, lockable casters can add mobility without sacrificing stability during use.
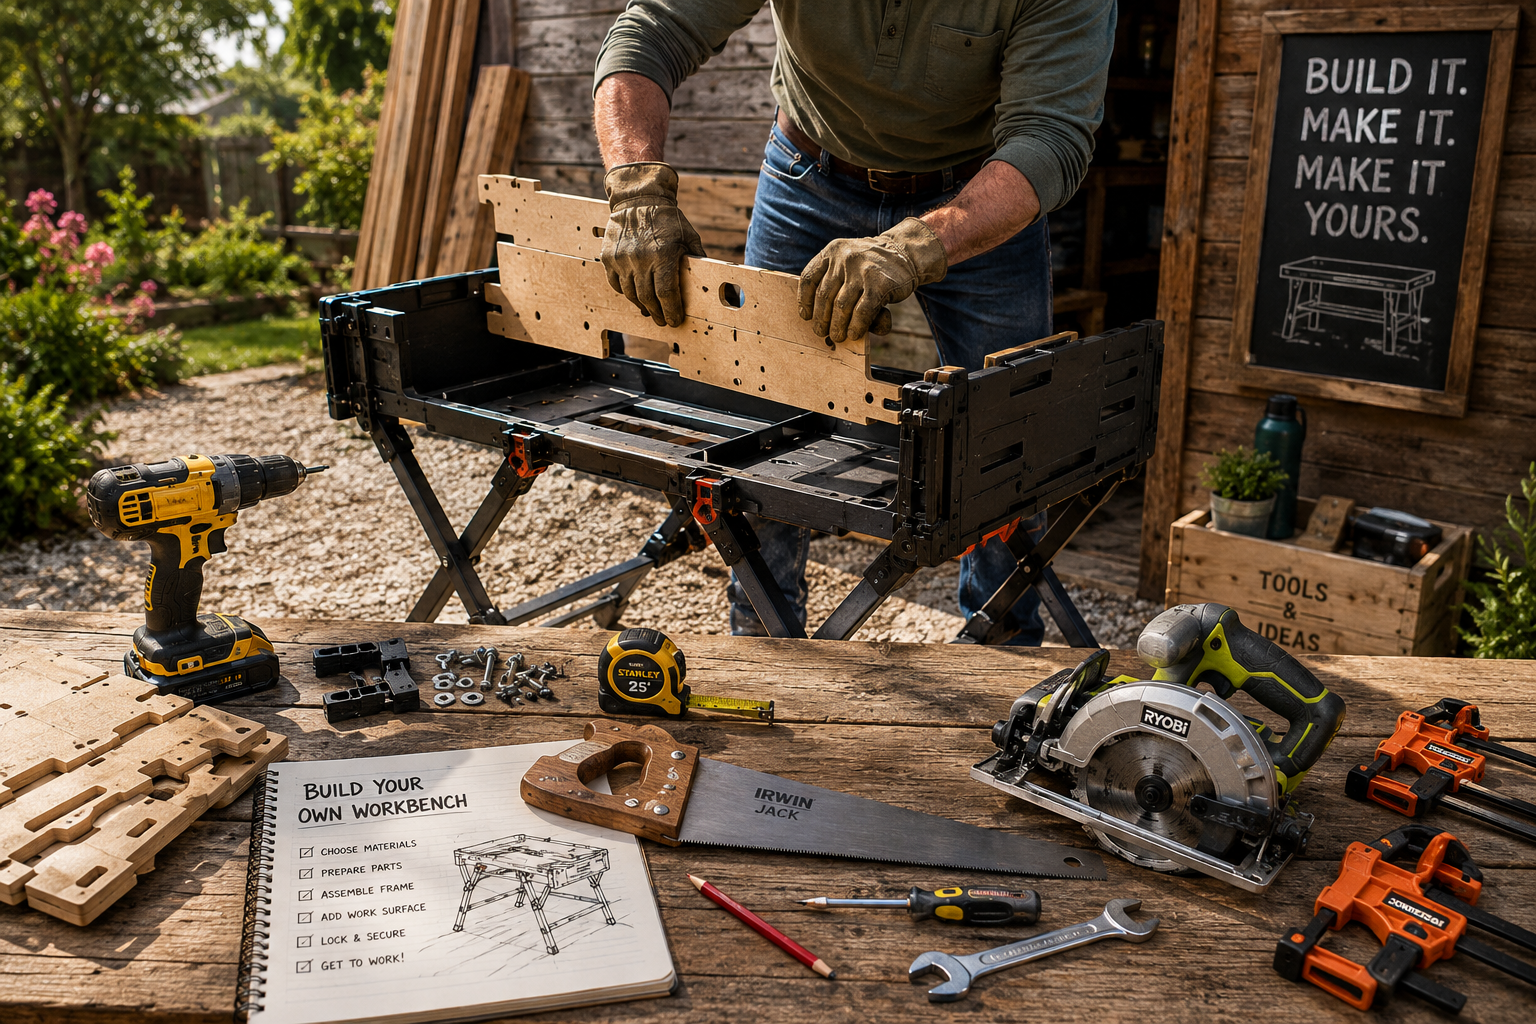
Construction Steps: A General Overview
While specific plans will vary, a typical construction process for a modular collapsible workbench involves these steps:
- Cut Components: Accurately cut all wood pieces according to your design plans. This includes the tabletop, leg assemblies, stretcher bars, and any storage components.
- Assemble Leg Frames: Build two sturdy leg frames that will support the tabletop. These often incorporate cross-bracing for stability.
- Attach Folding/Disassembly Mechanism: Implement your chosen mechanism. For folding legs, attach hinges. For modular systems, pre-drill holes for bolts and quick-release hardware.
- Construct Workbench Top: Assemble the main work surface. If using a sacrificial top, secure it to the primary top.
- Integrate Storage and Clamping: Cut and install shelves, cubbies, or drill bench dog holes. For more advanced storage, consider ideas from our article on DIY Smart Workshop Storage Solutions.
- Apply Finish: Critically important for outdoor use. Apply multiple coats of a marine-grade varnish, exterior paint, or a penetrating oil finish to protect the wood from UV rays, moisture, and pests. Our guide on Sustainable Finishes for Reclaimed Wood offers excellent options.

Tools Required
- Measuring Tools: Tape measure, square, marking knife.
- Cutting Tools: Circular saw, miter saw, jigsaw (for curves).
- Drilling Tools: Cordless drill, drill bits, countersink bit.
- Fastening Tools: Screwdrivers, wrenches.
- Clamps: Essential for holding pieces during assembly.
- Safety Gear: Safety glasses, hearing protection, dust mask.
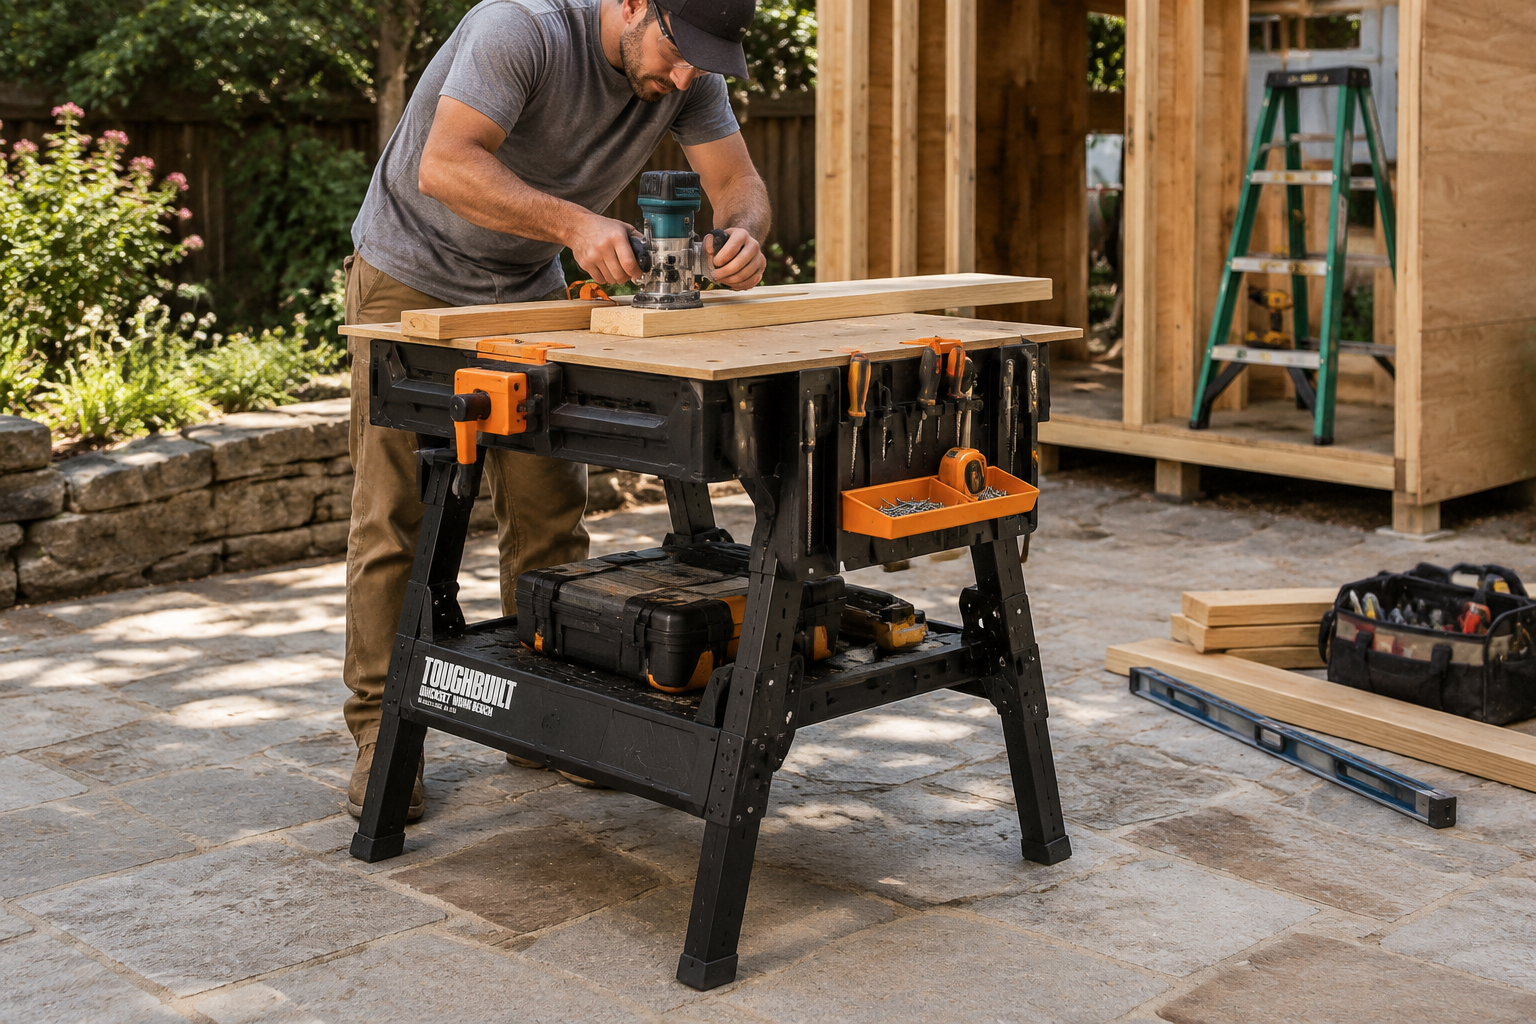
Enhancing Functionality and On-Site Usability
The true value of Building a Collapsible Outdoor Workbench: Maximizing Portability and Functionality for On-Site Projects and Limited Spaces comes alive when it’s loaded with features that streamline your workflow. Beyond the basic structure, adding thoughtful enhancements can transform it from a simple table into an indispensable assistant.
Integrated Tool Storage
Clutter is the enemy of efficiency, especially on a portable workbench.
- Under-Table Shelf: A simple shelf beneath the main work surface can hold larger tools or material offcuts.
- Magnetic Strips: Ideal for small metal tools like screwdrivers, chisels, or drill bits, keeping them visible and within reach.
- Tool Holders/Cubbyholes: Custom-sized slots or small boxes can securely hold specific tools, preventing them from shifting during transport.
- Pegboard Section: Attach a small section of pegboard to one end or side for hanging frequently used hand tools.
Advanced Clamping and Workholding
A stable workpiece is a safe workpiece.

- Bench Dogs: Strategically placed holes allow you to use bench dogs and hold-downs for securing oddly shaped pieces or large panels.
- Integrated Vise: While heavier, a small, quick-release woodworking vise can be incredibly useful. Some designs incorporate a removable vise that can be attached when needed.
- T-Tracks: Recessed T-tracks along the edges or surface allow for flexible clamping using various T-track accessories. This is a highly versatile option, as explored in Choosing and Using Router Tables.
Lighting and Power
For late-day projects or working in shaded areas:
- Integrated LED Strip Lighting: A battery-powered LED strip attached to the underside of the work surface or to an upright can provide crucial illumination.
- Power Strip with Cord Management: Mount an outdoor-rated power strip with surge protection to your workbench, making it easy to plug in power tools. Include cable cleats or hooks to manage cords safely.
Mobility and Storage Considerations
Even when collapsed, a large workbench needs a place.
- Wall Mounts: Design your collapsed workbench to hang flat against a garage or shed wall, freeing up floor space.
- Carrying Straps/Bags: For modular designs, custom straps or a sturdy canvas bag can make transporting components much easier.
- Wheels/Casters: While adding weight, heavy-duty, locking casters on one end can allow you to tilt and roll a collapsed workbench into position.

Maintenance for Longevity
Regular maintenance will ensure your collapsible outdoor workbench serves you well for years.
- Clean After Each Use: Remove sawdust, glue, and debris.
- Inspect Hardware: Periodically check all fasteners and hinges for tightness and signs of wear or corrosion. Tighten or replace as needed.
- Reapply Finish: Depending on exposure, reapply your protective finish annually or bi-annually to maintain weather resistance.
- Store Properly: When not in use, store the workbench in a dry, sheltered location, even if it’s designed for outdoor use. This will significantly extend its lifespan.
By incorporating these enhancements, your collapsible outdoor workbench becomes more than just a temporary surface; it becomes a mobile workshop, ready to support any project, anywhere.
Conclusion
Building a Collapsible Outdoor Workbench: Maximizing Portability and Functionality for On-Site Projects and Limited Spaces is a rewarding project that pays dividends in convenience and efficiency. By carefully planning your design, selecting appropriate weather-resistant materials, and incorporating smart storage and workholding solutions, you can create a versatile tool that extends your workshop’s capabilities far beyond its traditional boundaries. Whether you’re a seasoned woodworker tackling outdoor installations or a DIY enthusiast maximizing a small living space, a custom-built collapsible workbench is an investment in productivity and creative freedom. Start planning your portable powerhouse today, and unlock a new level of flexibility in your woodworking journey.
Actionable Next Steps:
- Sketch Your Design: Begin with a simple drawing, incorporating your desired dimensions, collapse mechanism, and essential features.
- Research Materials: Look into weather-resistant plywoods, hardwoods, and exterior finishes available in your area.
- Gather Tools: Ensure you have the necessary cutting, drilling, and fastening tools, along with crucial safety gear.
- Source Hardware: Seek out stainless steel fasteners, quick-release clamps, and robust hinges for durability.
- Start Building: Take it step-by-step, focusing on accurate cuts and strong joinery to create a stable and reliable workbench.
